
User Manual
Page 5
Channel Audio Function Introduction 69 4-2 Troubleshooting 75 - 5 - Chapter 3 Drivers Installation 47 3-1 Install Chipset Drivers 47 3-2 SoftwareApplication 48 3-3 Software Information 48 3-4 Hardware Information 49 3-5 Contact Us ...49 Chapter 4 Appendix 51 4-1 Unique Software Utilities 51 4-1-1 EasyTune 5 Introduction 51 4-1-2 Xpress Recovery2 Introduction 52 4-1-3 Flash BIOS Method Introduction 54 4-1-4 Serial ATA BIOS Setting Utility Introduction 63 4-1-5 2- / 4- / 6- / 8-
Channel Audio Function Introduction 69 4-2 Troubleshooting 75 - 5 - Chapter 3 Drivers Installation 47 3-1 Install Chipset Drivers 47 3-2 SoftwareApplication 48 3-3 Software Information 48 3-4 Hardware Information 49 3-5 Contact Us ...49 Chapter 4 Appendix 51 4-1 Unique Software Utilities 51 4-1-1 EasyTune 5 Introduction 51 4-1-2 Xpress Recovery2 Introduction 52 4-1-3 Flash BIOS Method Introduction 54 4-1-4 Serial ATA BIOS Setting Utility Introduction 63 4-1-5 2- / 4- / 6- / 8-
User Manual
Page 10
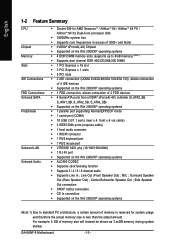
...serial port (COMA) Š 10 USB 2.0/1.1 ports (rear x 4, front x 6 via cable) Š 3 IEEE1394b ports (requires cable) Š 1 front audio connector Š 1 IR/CIR connector Š 1 PS/2 keyboard port Š 1 PS/2 mouse port Š VITESSE 8201 phy (10/100/1000 Mbit) Š...2000/XP operating systems Š ALC850 CODEC Š Supports Jack Sensing function Š Supports 2 / 4 / 6 / 8 channel audio Š Supports Line In ; GA-K8NF-9 Motherboard - 10 - Surround Speaker Out (Rear Speaker Out) ; English 1-2 Feature Summary CPU Chipset Memory Slots IDE Connections FDD Connections ...
...serial port (COMA) Š 10 USB 2.0/1.1 ports (rear x 4, front x 6 via cable) Š 3 IEEE1394b ports (requires cable) Š 1 front audio connector Š 1 IR/CIR connector Š 1 PS/2 keyboard port Š 1 PS/2 mouse port Š VITESSE 8201 phy (10/100/1000 Mbit) Š...2000/XP operating systems Š ALC850 CODEC Š Supports Jack Sensing function Š Supports 2 / 4 / 6 / 8 channel audio Š Supports Line In ; GA-K8NF-9 Motherboard - 10 - Surround Speaker Out (Rear Speaker Out) ; English 1-2 Feature Summary CPU Chipset Memory Slots IDE Connections FDD Connections ...

User Manual
Page 17
... more information please contact your device(s) such as USB keyboard, mouse, scanner, zip, speaker...etc. Parallel Port The parallel port allows connection of providing digital audio to external speakers or compressed AC3 data to this connector. - 17 - Rear Speaker Out Connect the rear surround speakers to an external Dolby Digital Decoder.
... more information please contact your device(s) such as USB keyboard, mouse, scanner, zip, speaker...etc. Parallel Port The parallel port allows connection of providing digital audio to external speakers or compressed AC3 data to this connector. - 17 - Rear Speaker Out Connect the rear surround speakers to an external Dolby Digital Decoder.

User Manual
Page 18
English Side Speaker Out Connect the side surround speakers to configure 2-/4-/6-/8-channel audio functioning. 1-7 Connectors Introduction 13 6 2 10 11 14 1) ATX_12V 2) ATX (Power Connector) 3) CPU_FAN 4) SYS_FAN 5) FDD 6) IDE1 / IDE2 7) S_ATA0/1/2/3_SB 8) PWR_LED 5 16 15 7 9 8 4 13 12 9) F_PANEL 10) F_AUDIO 11) CD_IN 12) F_USB1 / F_USB2 / F_USB3 13) F1_1394 / F2_1394 14) IR_CIR 15) CLR_CMOS 16) BATTERY GA-K8NF-9 Motherboard - 18 - You can use audio software to this connector.
English Side Speaker Out Connect the side surround speakers to configure 2-/4-/6-/8-channel audio functioning. 1-7 Connectors Introduction 13 6 2 10 11 14 1) ATX_12V 2) ATX (Power Connector) 3) CPU_FAN 4) SYS_FAN 5) FDD 6) IDE1 / IDE2 7) S_ATA0/1/2/3_SB 8) PWR_LED 5 16 15 7 9 8 4 13 12 9) F_PANEL 10) F_AUDIO 11) CD_IN 12) F_USB1 / F_USB2 / F_USB3 13) F1_1394 / F2_1394 14) IR_CIR 15) CLR_CMOS 16) BATTERY GA-K8NF-9 Motherboard - 18 - You can use audio software to this connector.
User Manual
Page 24
..., you can have front audio connector. Pin No. Definition 1 1 CD-L 2 GND 3 GND 4 CD-R GA-K8NF-9 Motherboard - 24 - In order to the connector. Also please make sure the pin assignments for the cable are buying support front audio connector, please contact your chassis must remove 5-6, 9-10 Jumper. English 10) F_AUDIO (Front Audio Panel Connector) If you...
..., you can have front audio connector. Pin No. Definition 1 1 CD-L 2 GND 3 GND 4 CD-R GA-K8NF-9 Motherboard - 24 - In order to the connector. Also please make sure the pin assignments for the cable are buying support front audio connector, please contact your chassis must remove 5-6, 9-10 Jumper. English 10) F_AUDIO (Front Audio Panel Connector) If you...
User Manual
Page 35
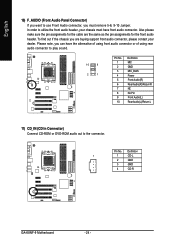
... Values F10: Save ESC: Exit F7: Optimized Defaults F1: General Help CMOS Setup Utility-Copyright (C) 1984-2004 Award Software Integrated Peripherals USB Memory Type AC97 Audio Onboard 1394 Onboard Serial Port 1 Onboard IrDA Port Onboard Parallel Port Parallel Port Mode x ECP Mode Use DMA CIR Port Address x CIR Port IRQ On...
... Values F10: Save ESC: Exit F7: Optimized Defaults F1: General Help CMOS Setup Utility-Copyright (C) 1984-2004 Award Software Integrated Peripherals USB Memory Type AC97 Audio Onboard 1394 Onboard Serial Port 1 Onboard IrDA Port Onboard Parallel Port Parallel Port Mode x ECP Mode Use DMA CIR Port Address x CIR Port IRQ On...

User Manual
Page 37
... Enable onboard AC'97 audio function. (Default value) Disabled Disable this function. (Default value) NV SATA 2 Secondary RAID Enabled Enable 2nd SATA secondary RAID function. If your SATA hard drive ...
... Enable onboard AC'97 audio function. (Default value) Disabled Disable this function. (Default value) NV SATA 2 Secondary RAID Enabled Enable 2nd SATA secondary RAID function. If your SATA hard drive ...

User Manual
Page 69
... Line In. Please follow the steps to acquire the best sound effect if the stereo output is very simple. Line Out STEP 2: Following installation of audio software is applied. English 4-1-5 2- / 4- / 6- / 8- The front channels or earphone can be connected to Center/ Line In Line Out... channels to Line Out (Front Speaker Out). STEP 1: Connect the stereo speakers or earphone to Mic In. Channel Audio Function Introduction This motherboard provides 6 audio connectors. Appendix You are able to use the speaker with amplifier to install the function. (Following pictures are in ...
... Line In. Please follow the steps to acquire the best sound effect if the stereo output is very simple. Line Out STEP 2: Following installation of audio software is applied. English 4-1-5 2- / 4- / 6- / 8- The front channels or earphone can be connected to Center/ Line In Line Out... channels to Line Out (Front Speaker Out). STEP 1: Connect the stereo speakers or earphone to Mic In. Channel Audio Function Introduction This motherboard provides 6 audio connectors. Appendix You are able to use the speaker with amplifier to install the function. (Following pictures are in ...

User Manual
Page 70
... Speaker" to complete 4 channel audio configuration. STEP 3: Click "Speaker Configuration" then click on the lower right hand taskbar. Front Speaker Out Rear Speaker Out Click the icon to "Rear Speaker Out". STEP 2: Following installation of the audio driver, you'll find a ...Sound Effect icon on the left selection bar and select "2CH Speaker" to complete 2 channel audio configuration. 4 Channel Audio Setup STEP 1: Connect the front channels to "Front Speaker Out", the rear channels to select the function. GA-K8NF-9 Motherboard - 70...
... Speaker" to complete 4 channel audio configuration. STEP 3: Click "Speaker Configuration" then click on the lower right hand taskbar. Front Speaker Out Rear Speaker Out Click the icon to "Rear Speaker Out". STEP 2: Following installation of the audio driver, you'll find a ...Sound Effect icon on the left selection bar and select "2CH Speaker" to complete 2 channel audio configuration. 4 Channel Audio Setup STEP 1: Connect the front channels to "Front Speaker Out", the rear channels to select the function. GA-K8NF-9 Motherboard - 70...

User Manual
Page 71
Click the icon to "Center/Subwoofer Speaker Out". STEP 3: Click "Speaker Configuration" then click on the lower right hand taskbar. STEP 2: Following installation of the audio driver, you'll find a Sound Effect icon on the left selection bar and select "6CH Speaker" to complete 6 channel audio configuration. Front Speaker Out Center/Subwoofer Speaker Out Rear Speaker Out - 71 - English 6 Channel Audio Setup STEP 1 : Connect the front channels to "Front Speaker Out", the rear channels to "Rear Speaker Out", and the Center/Subwoofer channels to select the function. Appendix
Click the icon to "Center/Subwoofer Speaker Out". STEP 3: Click "Speaker Configuration" then click on the lower right hand taskbar. STEP 2: Following installation of the audio driver, you'll find a Sound Effect icon on the left selection bar and select "6CH Speaker" to complete 6 channel audio configuration. Front Speaker Out Center/Subwoofer Speaker Out Rear Speaker Out - 71 - English 6 Channel Audio Setup STEP 1 : Connect the front channels to "Front Speaker Out", the rear channels to "Rear Speaker Out", and the Center/Subwoofer channels to select the function. Appendix

User Manual
Page 72
English 8 Channel Audio Setup STEP 1 : Connect the front channels to "Front Speaker Out", the rear channels to "Rear Speaker Out", the Center/ Subwoofer channels to "Center/Subwoofer Speaker ... the sound effect menu, users can adjust sound option settings as desired. Front Speaker Out Center/Subwoofer Speaker Out Rear Speaker Out Side Speaker Out GA-K8NF-9 Motherboard - 72 - STEP 3: Click "Speaker Configuration" then click on the lower right hand taskbar. Click the icon to "Side Speaker Out". STEP 2 : Following installation of...
English 8 Channel Audio Setup STEP 1 : Connect the front channels to "Front Speaker Out", the rear channels to "Rear Speaker Out", the Center/ Subwoofer channels to "Center/Subwoofer Speaker ... the sound effect menu, users can adjust sound option settings as desired. Front Speaker Out Center/Subwoofer Speaker Out Rear Speaker Out Side Speaker Out GA-K8NF-9 Motherboard - 72 - STEP 3: Click "Speaker Configuration" then click on the lower right hand taskbar. Click the icon to "Side Speaker Out". STEP 2 : Following installation of...

User Manual
Page 73
...Sensing function. - 73 - English Jack-Sensing Introduction Jack-Sensing provides audio connectors error-detection function. (Note) Install Microsoft DirectX8.1 or later version before to MIC In jack. Appendix Please note that 3D audio function will appear as above. Following pictures are in Windows XP: ...Introduction of audio connectors You may connect CDROM, Walkman or others audio input devices to Line In jack, speakers, earphone or others output...
...Sensing function. - 73 - English Jack-Sensing Introduction Jack-Sensing provides audio connectors error-detection function. (Note) Install Microsoft DirectX8.1 or later version before to MIC In jack. Appendix Please note that 3D audio function will appear as above. Following pictures are in Windows XP: ...Introduction of audio connectors You may connect CDROM, Walkman or others audio input devices to Line In jack, speakers, earphone or others output...


