Manual
Page 3
... any form or by GIGABYTE without GIGABYTE's prior written permission. Changes to use GIGABYTE's unique features, read or download the information on/from the Support\Motherboard\Technology Guide page on your motherboard revision before updating motherboard BIOS, drivers, or when looking for technical information. The trademarks mentioned in the use of this product, GIGABYTE provides the following types...
... any form or by GIGABYTE without GIGABYTE's prior written permission. Changes to use GIGABYTE's unique features, read or download the information on/from the Support\Motherboard\Technology Guide page on your motherboard revision before updating motherboard BIOS, drivers, or when looking for technical information. The trademarks mentioned in the use of this product, GIGABYTE provides the following types...
Manual
Page 6
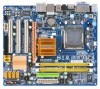
...01R) S/PDIF in cable (Part No. 12CR1-1SPDIN-01R) COM port cable (Part No. 12CF1-1CM001-32R) - 6 - Box Contents GA-EG41M-S2H or GA-EG41M-S2 motherboard Motherboard driver disk User's Manual One IDE cable and one floppy disk drive cable Two SATA 3Gb/s cables I/O Shield • The box contents above ...are subject to change without notice. • The motherboard image is for reference only and the actual items shall depend ...
...01R) S/PDIF in cable (Part No. 12CR1-1SPDIN-01R) COM port cable (Part No. 12CF1-1CM001-32R) - 6 - Box Contents GA-EG41M-S2H or GA-EG41M-S2 motherboard Motherboard driver disk User's Manual One IDE cable and one floppy disk drive cable Two SATA 3Gb/s cables I/O Shield • The box contents above ...are subject to change without notice. • The motherboard image is for reference only and the actual items shall depend ...
Manual
Page 18
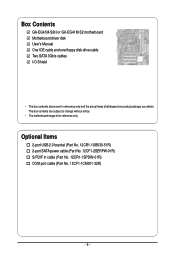
...slot cover from the power outlet before you begin to release the card and then pull the card straight up from the slot. Install the driver provided with the slot, and press down on the card until it is locked by the latch at the end of the PCI Express ... • Removing the Card: Press the white latch at the end of the PCI Express slot to install an expansion card: • Make sure the motherboard supports the expansion card. Align the card with the expansion card in the slot. 3. GA-EG41M-S2H/S2 Motherboard - 18 - Make sure the metal contacts on your expansion card(s). 7.
...slot cover from the power outlet before you begin to release the card and then pull the card straight up from the slot. Install the driver provided with the slot, and press down on the card until it is locked by the latch at the end of the PCI Express ... • Removing the Card: Press the white latch at the end of the PCI Express slot to install an expansion card: • Make sure the motherboard supports the expansion card. Align the card with the expansion card in the slot. 3. GA-EG41M-S2H/S2 Motherboard - 18 - Make sure the metal contacts on your expansion card(s). 7.
Manual
Page 36
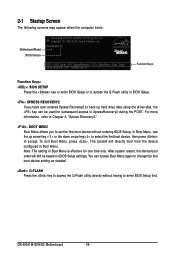
...using the driver disk, the key can access Boot Menu again to change the first boot device setting as needed. : Q-FLASH Press the key to enter BIOS Setup first. To exit Boot Menu, press . You can be based on BIOS Setup settings. GA-EG41M-S2H/S2 Motherboard - ...36 - 2-1 Startup Screen The following screens may appear when the computer boots. After system restart, the device boot order will directly boot from the device configured in Boot Menu. EG41M-S2H D1 . . . . : BIOS Setup : XpressRecovery2...
...using the driver disk, the key can access Boot Menu again to change the first boot device setting as needed. : Q-FLASH Press the key to enter BIOS Setup first. To exit Boot Menu, press . You can be based on BIOS Setup settings. GA-EG41M-S2H/S2 Motherboard - ...36 - 2-1 Startup Screen The following screens may appear when the computer boots. After system restart, the device boot order will directly boot from the device configured in Boot Menu. EG41M-S2H D1 . . . . : BIOS Setup : XpressRecovery2...
Manual
Page 63
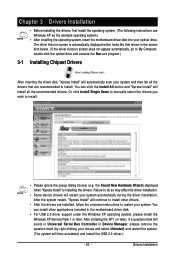
... example operating system.) • After installing the operating system, insert the motherboard driver disk into your mouse and select Uninstall) and restart the system. (The system will then autodetect and install the USB 2.0 driver.) - 63 - You can install other drivers. • After the drivers are recommended to install. • Please ignore the popup dialog box...
... example operating system.) • After installing the operating system, insert the motherboard driver disk into your mouse and select Uninstall) and restart the system. (The system will then autodetect and install the USB 2.0 driver.) - 63 - You can install other drivers. • After the drivers are recommended to install. • Please ignore the popup dialog box...
Manual
Page 64
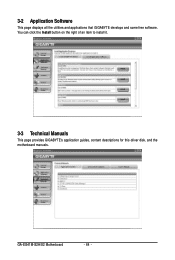
GA-EG41M-S2H/S2 Motherboard - 64 - You can click the Install button on the right of an item to install it. 3-3 Technical Manuals This page provides GIGABYTE's application guides, content descriptions for this driver disk, and the motherboard manuals. 3-2 Application Software This page displays all the utilities and applications that GIGABYTE develops and some free software.
GA-EG41M-S2H/S2 Motherboard - 64 - You can click the Install button on the right of an item to install it. 3-3 Technical Manuals This page provides GIGABYTE's application guides, content descriptions for this driver disk, and the motherboard manuals. 3-2 Application Software This page displays all the utilities and applications that GIGABYTE develops and some free software.

Manual
Page 66
GA-EG41M-S2H/S2 Motherboard - 66 - The latest version of the BIOS, drivers, or applications will be displayed. 3-6 Download Center To update the BIOS, drivers, or applications, click the Download Center button to link to the GIGABYTE Web site.
GA-EG41M-S2H/S2 Motherboard - 66 - The latest version of the BIOS, drivers, or applications will be displayed. 3-6 Download Center To update the BIOS, drivers, or applications, click the Download Center button to link to the GIGABYTE Web site.
Manual
Page 70
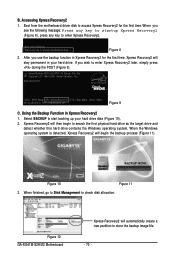
...whether this hard drive contains the Windows operating system. Figure 10 Figure 11 3. Boot from CD/DVD: Press any key to startup XpressRecovery2..... EG41M-S2H D1 . . . . : BIOS Setup : XpressRecovery2 : Boot Menu : Qflash 09/23/2008-G41-ICH7-7A89PG0XC-00 Figure 9 C. ... 12 GA-EG41M-S2H/S2 Motherboard Xpress Recovery2 will then begin the backup process (Figure 11). Figure 8 2. Using the Backup Function in your hard drive data (Figure 10). 2. Xpress Recovery2 will automatically create a new partition to check disk allocation. Boot from the motherboard driver disk ...
...whether this hard drive contains the Windows operating system. Figure 10 Figure 11 3. Boot from CD/DVD: Press any key to startup XpressRecovery2..... EG41M-S2H D1 . . . . : BIOS Setup : XpressRecovery2 : Boot Menu : Qflash 09/23/2008-G41-ICH7-7A89PG0XC-00 Figure 9 C. ... 12 GA-EG41M-S2H/S2 Motherboard Xpress Recovery2 will then begin the backup process (Figure 11). Figure 8 2. Using the Backup Function in your hard drive data (Figure 10). 2. Xpress Recovery2 will automatically create a new partition to check disk allocation. Boot from the motherboard driver disk ...
Manual
Page 79
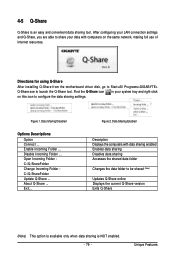
... Folder : C:\Q-ShareFolder Change Incoming Folder : C:\Q-ShareFolder Update Q-Share ... Exit... Figure 2. Disable Incoming Folder ... Directions for using Q-Share After installing Q-Share from the motherboard driver disk, go to Start>All Programs>GIGABYTE> Q-Share.exe to share your system tray and right-click on the same network, making full use of Internet resources. 4-5 Q-Share Q-Share...
... Folder : C:\Q-ShareFolder Change Incoming Folder : C:\Q-ShareFolder Update Q-Share ... Exit... Figure 2. Disable Incoming Folder ... Directions for using Q-Share After installing Q-Share from the motherboard driver disk, go to Start>All Programs>GIGABYTE> Q-Share.exe to share your system tray and right-click on the same network, making full use of Internet resources. 4-5 Q-Share Q-Share...
Manual
Page 81
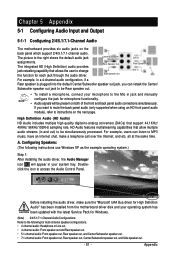
...If you can listen to MP3 music, have an Internet chat, make sure the "Microsoft UAA Bus driver for High Definition Audio" has been installed from the motherboard driver disk and your operating system has been updated with the latest Service Pack for Windows. (Note) ... as the example operating system.) Step 1: After installing the audio driver, the Audio Manager icon will be simultaneously processed. Chapter 5 Appendix 5-1 Configuring Audio Input and Output 5-1-1 Configuring 2/4/5.1/7.1-Channel Audio The motherboard provides six audio jacks on both of the front and back panel...
...If you can listen to MP3 music, have an Internet chat, make sure the "Microsoft UAA Bus driver for High Definition Audio" has been installed from the motherboard driver disk and your operating system has been updated with the latest Service Pack for Windows. (Note) ... as the example operating system.) Step 1: After installing the audio driver, the Audio Manager icon will be simultaneously processed. Chapter 5 Appendix 5-1 Configuring Audio Input and Output 5-1-1 Configuring 2/4/5.1/7.1-Channel Audio The motherboard provides six audio jacks on both of the front and back panel...
Manual
Page 84
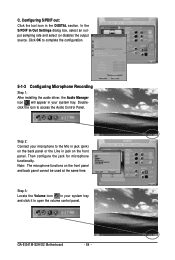
Step 2: Connect your microphone to complete the configuration. 5-1-3 Configuring Microphone Recording Step 1: After installing the audio driver, the Audio Manager icon will appear in jack on the front panel. GA-EG41M-S2H/S2 Motherboard - 84 - Click OK to the Mic in jack (pink) on the front panel and back panel cannot be used at the same...
Step 2: Connect your microphone to complete the configuration. 5-1-3 Configuring Microphone Recording Step 1: After installing the audio driver, the Audio Manager icon will appear in jack on the front panel. GA-EG41M-S2H/S2 Motherboard - 84 - Click OK to the Mic in jack (pink) on the front panel and back panel cannot be used at the same...


