
Manual
Page 4
... Box Contents ...6 OptionalItems ...6 GA-EG41M-S2H/S2 Motherboard Layout 7 Block Diagram ...8 Chapter 1 Hardware Installation 9 1-1 Installation Precautions 9 1-2 Product Specifications 10 1-3 Installing the CPU and CPU Cooler 13 1-3-1 Installing the CPU 13 1-3-2 Installing the CPU Cooler 15 1-4 Installing the Memory 16 1-4-1 Dual Channel Memory Configuration 16 1-4-2 Installing a Memory 17 1-5 Installing an Expansion Card 18 1-6 Back Panel Connectors 21 1-7 Internal Connectors 23 Chapter 2 BIOS Setup 35 2-1 Startup Screen 36 2-2 The Main Menu 37 2-3 MB Intelligent Tweaker...
... Box Contents ...6 OptionalItems ...6 GA-EG41M-S2H/S2 Motherboard Layout 7 Block Diagram ...8 Chapter 1 Hardware Installation 9 1-1 Installation Precautions 9 1-2 Product Specifications 10 1-3 Installing the CPU and CPU Cooler 13 1-3-1 Installing the CPU 13 1-3-2 Installing the CPU Cooler 15 1-4 Installing the Memory 16 1-4-1 Dual Channel Memory Configuration 16 1-4-2 Installing a Memory 17 1-5 Installing an Expansion Card 18 1-6 Back Panel Connectors 21 1-7 Internal Connectors 23 Chapter 2 BIOS Setup 35 2-1 Startup Screen 36 2-2 The Main Menu 37 2-3 MB Intelligent Tweaker...
Manual
Page 10
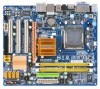
...; 1 x PCI Express x16 slot, running at x4 (Refer to page 19 for the graphics cards support list.) 3 x PCI slots South Bridge: - 1 x IDE connector supporting ATA-100/66/33 and up to 2 IDE devices - 4 x SATA 3Gb/s connectors supporting up to 4 SATA 3Gb/s devices iTE IT8718 chip: - 1 x floppy disk drive connector supporting up to 1 floppy disk drive Integrated in the South Bridge Up to 8 USB 2.0/1.1 ports (4 on the back panel, 4 via the USB brackets connected to the internal USB headers) * Only for GA-EG41M-S2H. GA-EG41M-S2H/S2 Motherboard...
...; 1 x PCI Express x16 slot, running at x4 (Refer to page 19 for the graphics cards support list.) 3 x PCI slots South Bridge: - 1 x IDE connector supporting ATA-100/66/33 and up to 2 IDE devices - 4 x SATA 3Gb/s connectors supporting up to 4 SATA 3Gb/s devices iTE IT8718 chip: - 1 x floppy disk drive connector supporting up to 1 floppy disk drive Integrated in the South Bridge Up to 8 USB 2.0/1.1 ports (4 on the back panel, 4 via the USB brackets connected to the internal USB headers) * Only for GA-EG41M-S2H. GA-EG41M-S2H/S2 Motherboard...
Manual
Page 11
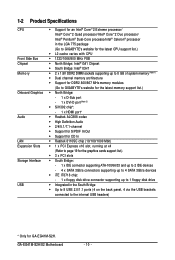
...-pin ATX main power connector 1 x 4-pin ATX 12V power connector 1 x floppy disk drive connector 1 x IDE connector 4 x SATA 3Gb/s connectors 1 x CPU fan header 1 x system fan header 1 x front panel header 1 x front panel audio header 1 x CD In connector 1 x S/PDIF In header 1 x S/PDIF Out header 2 x USB 2.0/1.1 headers 1 x serial port header 1 x power LED header 1 x chassis intrusion header Back Panel 1 x PS/2 keyboard port Connectors...
...-pin ATX main power connector 1 x 4-pin ATX 12V power connector 1 x floppy disk drive connector 1 x IDE connector 4 x SATA 3Gb/s connectors 1 x CPU fan header 1 x system fan header 1 x front panel header 1 x front panel audio header 1 x CD In connector 1 x S/PDIF In header 1 x S/PDIF Out header 2 x USB 2.0/1.1 headers 1 x serial port header 1 x power LED header 1 x chassis intrusion header Back Panel 1 x PS/2 keyboard port Connectors...
Manual
Page 16
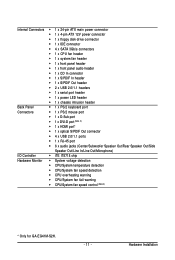
.... GA-EG41M-S2H/S2 Motherboard - 16 - If you begin to install the memory: • Make sure that the motherboard supports the memory. The two DDR2 memory sockets are installed, a message which says memory is recommended that memory of the memory. It is installed. 2. 1-4 Installing the Memory Read the following guidelines before installing the memory in Dual Channel mode. 1. Intel® Flex Memory Technology offers greater flexibility to upgrade by allowing different memory sizes to be used . When enabling Dual Channel mode with two memory...
.... GA-EG41M-S2H/S2 Motherboard - 16 - If you begin to install the memory: • Make sure that the motherboard supports the memory. The two DDR2 memory sockets are installed, a message which says memory is recommended that memory of the memory. It is installed. 2. 1-4 Installing the Memory Read the following guidelines before installing the memory in Dual Channel mode. 1. Intel® Flex Memory Technology offers greater flexibility to upgrade by allowing different memory sizes to be used . When enabling Dual Channel mode with two memory...
Manual
Page 18
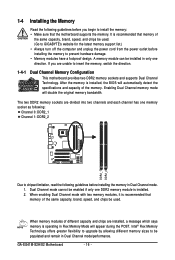
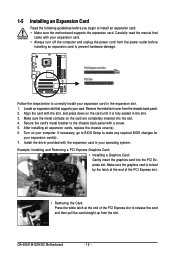
... cards, replace the chassis cover(s). 6. Example: Installing and Removing a PCI Express Graphics Card: • Installing a Graphics Card: Gently insert the graphics card into the slot. 4. 1-5 Installing an Expansion Card Read the following guidelines before installing an expansion card to prevent hardware damage. Remove the metal slot cover from the slot. Carefully read the manual that supports your operating system. Locate an expansion slot that came with the expansion card in your card. Install the driver provided with your computer. GA-EG41M-S2H/S2 Motherboard...
... cards, replace the chassis cover(s). 6. Example: Installing and Removing a PCI Express Graphics Card: • Installing a Graphics Card: Gently insert the graphics card into the slot. 4. 1-5 Installing an Expansion Card Read the following guidelines before installing an expansion card to prevent hardware damage. Remove the metal slot cover from the slot. Carefully read the manual that supports your operating system. Locate an expansion slot that came with the expansion card in your card. Install the driver provided with your computer. GA-EG41M-S2H/S2 Motherboard...
Manual
Page 21
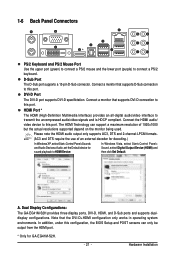
.../2 Keyboard and PS/2 Mouse Port Use the upper port (green) to connect a PS/2 mouse and the lower port (purple) to this port. A. Connect a monitor that the DVI-D+HDMI configuration only works in operating system environments. In addition, under this configuration, the BIOS Setup and POST screens can support a maximum resolution of an external decoder for decoding.) In Windows XP, select Start>Control Panel>Sounds and Audio Devices>Audio, set the Default device for GA-EG41M-S2H. - 21 - Hardware Installation D-Sub Port The D-Sub port supports a 15-pin...
.../2 Keyboard and PS/2 Mouse Port Use the upper port (green) to connect a PS/2 mouse and the lower port (purple) to this port. A. Connect a monitor that the DVI-D+HDMI configuration only works in operating system environments. In addition, under this configuration, the BIOS Setup and POST screens can support a maximum resolution of an external decoder for decoding.) In Windows XP, select Start>Control Panel>Sounds and Audio Devices>Audio, set the Default device for GA-EG41M-S2H. - 21 - Hardware Installation D-Sub Port The D-Sub port supports a 15-pin...
Manual
Page 32
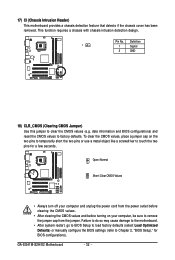
... (Chassis Intrusion Header) This motherboard provides a chassis detection feature that detects if the chassis cover has been removed. date information and BIOS configurations) and reset the CMOS values to clear the CMOS values (e.g. Definition 1 1 Signal 2 GND 18) CLR_CMOS (Clearing CMOS Jumper) Use this jumper to factory defaults. GA-EG41M-S2H/S2 Motherboard - 32 - Open: Normal Short: Clear CMOS Values • Always turn off your computer, be sure to remove the jumper cap from the power outlet before clearing the CMOS values...
... (Chassis Intrusion Header) This motherboard provides a chassis detection feature that detects if the chassis cover has been removed. date information and BIOS configurations) and reset the CMOS values to clear the CMOS values (e.g. Definition 1 1 Signal 2 GND 18) CLR_CMOS (Clearing CMOS Jumper) Use this jumper to factory defaults. GA-EG41M-S2H/S2 Motherboard - 32 - Open: Normal Short: Clear CMOS Values • Always turn off your computer, be sure to remove the jumper cap from the power outlet before clearing the CMOS values...
Manual
Page 38
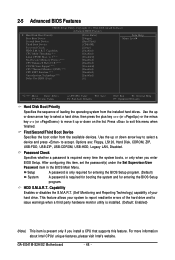
..., hard drive types, floppy disk drive types, and the type of errors that stop the system boot, etc. Advanced BIOS Features Use this menu to configure the device boot order, advanced features available on the CPU, and the primary display adapter. Advanced Chipset Features Use this menu to configure advanced features available on the chipset. Integrated Peripherals Use this menu to configure all peripheral devices, such as IDE, SATA, USB, integrated audio, and integrated LAN, etc. Power Management Setup Use this menu...
..., hard drive types, floppy disk drive types, and the type of errors that stop the system boot, etc. Advanced BIOS Features Use this menu to configure the device boot order, advanced features available on the CPU, and the primary display adapter. Advanced Chipset Features Use this menu to configure advanced features available on the chipset. Integrated Peripherals Use this menu to configure all peripheral devices, such as IDE, SATA, USB, integrated audio, and integrated LAN, etc. Power Management Setup Use this menu...
Manual
Page 39
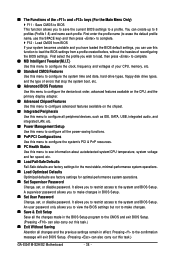
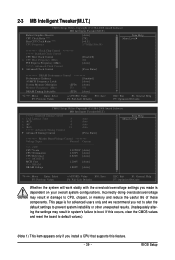
... doing overclock/overvoltage may result in damage to boot. 2-3 MB Intelligent Tweaker(M.I.T.) CMOS Setup Utility-Copyright (C) 1984-2008 Award Software MB Intelligent Tweaker(M.I.T.) Robust Graphics Booster CPU Clock Ratio (Note) Fine CPU Clock Ratio (Note) CPU Frequency [Auto] [7X] [+0.5] 3.73GHz(266x14) Item Help Menu Level ******** Clock Chip Control Standard Clock Control CPU Host Clock Control x CPU Host Frequency (Mhz) PCI Express Frequency (Mhz) >>>>> Advanced Clock Control Advanced Clock Control [Disabled] 266 [Auto] [Press Enter] ******** DRAM...
... doing overclock/overvoltage may result in damage to boot. 2-3 MB Intelligent Tweaker(M.I.T.) CMOS Setup Utility-Copyright (C) 1984-2008 Award Software MB Intelligent Tweaker(M.I.T.) Robust Graphics Booster CPU Clock Ratio (Note) Fine CPU Clock Ratio (Note) CPU Frequency [Auto] [7X] [+0.5] 3.73GHz(266x14) Item Help Menu Level ******** Clock Chip Control Standard Clock Control CPU Host Clock Control x CPU Host Frequency (Mhz) PCI Express Frequency (Mhz) >>>>> Advanced Clock Control Advanced Clock Control [Disabled] 266 [Auto] [Press Enter] ******** DRAM...
Manual
Page 40
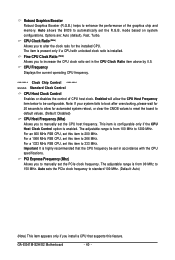
... CPU, set the PCIe clock frequency. The adjustable range is from 90 MHz to 150 MHz. GA-EG41M-S2H/S2 Motherboard - 40 - Auto allows the BIOS to be set in accordance with unlocked clock ratio is enabled. Options are: Auto (default), Fast, Turbo. Fine CPU Clock Ratio (Note) Allows you install a CPU that the CPU frequency be configurable. CPU Frequency Displays the current operating CPU frequency. ******** Clock Chip Control Standard Clock Control CPU Host Clock Control Enables or disables the control of the graphics chip and memory. Note: If your system fails to boot...
... CPU, set the PCIe clock frequency. The adjustable range is from 90 MHz to 150 MHz. GA-EG41M-S2H/S2 Motherboard - 40 - Auto allows the BIOS to be set in accordance with unlocked clock ratio is enabled. Options are: Auto (default), Fast, Turbo. Fine CPU Clock Ratio (Note) Allows you install a CPU that the CPU frequency be configurable. CPU Frequency Displays the current operating CPU frequency. ******** Clock Chip Control Standard Clock Control CPU Host Clock Control Enables or disables the control of the graphics chip and memory. Note: If your system fails to boot...
Manual
Page 46
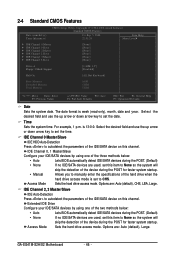
...), month, date and year. IDE Channel 0 Master/Slave IDE HDD Auto-Detection Press to None so the system will skip the detection of the IDE/SATA device on this channel. IDE Channel 0, 1 Master/Slave Configure your IDE/SATA devices by using one of the hard drive when the hard drive access mode is set the time. Options are : Auto (default), Large. IDE Channel 2, 3 Master/Slave IDE Auto-Detection Press to set to CHS. GA-EG41M-S2H/S2 Motherboard - 46 - Time Sets the system time. Select the...
...), month, date and year. IDE Channel 0 Master/Slave IDE HDD Auto-Detection Press to None so the system will skip the detection of the IDE/SATA device on this channel. IDE Channel 0, 1 Master/Slave Configure your IDE/SATA devices by using one of the hard drive when the hard drive access mode is set the time. Options are : Auto (default), Large. IDE Channel 2, 3 Master/Slave IDE Auto-Detection Press to set to CHS. GA-EG41M-S2H/S2 Motherboard - 46 - Time Sets the system time. Select the...
Manual
Page 48
... CPUID Max. Password Check Specifies whether a password is required for booting the system and for entering the BIOS Setup program. (Default) System A password is required every time the system boots, or only when you install a CPU that supports this feature. Setup A password is only required for entering the BIOS Setup program. Options are: Floppy, LS120, Hard Disk, CDROM, ZIP, USB-FDD, USB-ZIP, USB-CDROM, USB-HDD, Legacy LAN, Disabled. to report read/write errors of your hard drive. Press to accept. GA-EG41M-S2H/S2 Motherboard...
... CPUID Max. Password Check Specifies whether a password is required for booting the system and for entering the BIOS Setup program. (Default) System A password is required every time the system boots, or only when you install a CPU that supports this feature. Setup A password is only required for entering the BIOS Setup program. Options are: Floppy, LS120, Hard Disk, CDROM, ZIP, USB-FDD, USB-ZIP, USB-CDROM, USB-HDD, Legacy LAN, Disabled. to report read/write errors of your hard drive. Press to accept. GA-EG41M-S2H/S2 Motherboard...
Manual
Page 50
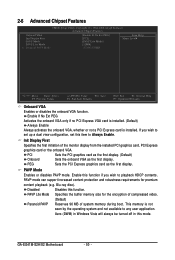
... display. GA-EG41M-S2H/S2 Motherboard - 50 - Init Display First Specifies the first initiation of system memory during boot. PEG Sets the PCI Express graphics card as the first display. PAVP mode can support increased content protection and robustness requirements for the encryption of compressed video. (Default) Paranoid PAVP Reserves 96 MB of the monitor display from the installed PCI graphics card, PCI Express graphics card or the onboard VGA. This memory is installed. If you wish to playback HDCP contents. PAVP Mode Enables...
... display. GA-EG41M-S2H/S2 Motherboard - 50 - Init Display First Specifies the first initiation of system memory during boot. PEG Sets the PCI Express graphics card as the first display. PAVP mode can support increased content protection and robustness requirements for the encryption of compressed video. (Default) Paranoid PAVP Reserves 96 MB of the monitor display from the installed PCI graphics card, PCI Express graphics card or the onboard VGA. This memory is installed. If you wish to playback HDCP contents. PAVP Mode Enables...
Manual
Page 52
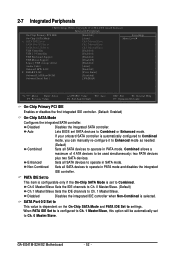
...PATA mode. Non-Combined Sets all SATA devices to Combined. GA-EG41M-S2H/S2 Motherboard - 52 - Auto Lets BIOS set to operate in SATA mode. Disabled Disables the integrated IDE controller when Non-Combined is automatically configured to Combined mode, you can manually re-configure it to Enhanced mode as needed. (Default) Combined Sets all SATA devices to USB Controller USB 2.0 Controller USB Keyboard Support USB Mouse Support Legacy USB storage detect Azalia Codec Onboard H/W LAN SMART LAN Onboard LAN Boot ROM Onboard Serial Port 1 [Enabled] [Auto...
...PATA mode. Non-Combined Sets all SATA devices to Combined. GA-EG41M-S2H/S2 Motherboard - 52 - Auto Lets BIOS set to operate in SATA mode. Disabled Disables the integrated IDE controller when Non-Combined is automatically configured to Combined mode, you can manually re-configure it to Enhanced mode as needed. (Default) Combined Sets all SATA devices to USB Controller USB 2.0 Controller USB Keyboard Support USB Mouse Support Legacy USB storage detect Azalia Codec Onboard H/W LAN SMART LAN Onboard LAN Boot ROM Onboard Serial Port 1 [Enabled] [Auto...

Manual
Page 53
...SMART LAN (LAN Cable Diagnostic Function) CMOS Setup Utility-Copyright (C) 1984-2008 Award Software SMART LAN Start detecting at Port..... Onboard H/W LAN Enables or disables the onboard LAN function. (Default: Enabled) If you wish to install a 3rd party add-in audio card instead of using the onboard LAN, set to Ch. 1 Master/Slave. Refer to Disabled. USB Controller Enables or disables the integrated USB controller. (Default: Enabled) Disabled will be used in network card instead of using the onboard audio, set this item to detect the status of the USB functionalities below. USB...
...SMART LAN (LAN Cable Diagnostic Function) CMOS Setup Utility-Copyright (C) 1984-2008 Award Software SMART LAN Start detecting at Port..... Onboard H/W LAN Enables or disables the onboard LAN function. (Default: Enabled) If you wish to install a 3rd party add-in audio card instead of using the onboard LAN, set to Ch. 1 Master/Slave. Refer to Disabled. USB Controller Enables or disables the integrated USB controller. (Default: Enabled) Disabled will be used in network card instead of using the onboard audio, set this item to detect the status of the USB functionalities below. USB...

Manual
Page 72
..., users cannot update the backup BIOS manually. Normally, the system works on the next system boot and copy the BIOS file to the main BIOS to ensure normal system operation. GA-EG41M-S2H/S2 Motherboard - 72 - Extract the file and save the new BIOS file (e.g. Embedded in the Windows environment. @BIOS will take over on the main BIOS. TM @BIOS allows you to update the BIOS without having to your floppy disk, USB flash drive, or hard drive. eg41ms2h.f1) to enter...
..., users cannot update the backup BIOS manually. Normally, the system works on the next system boot and copy the BIOS file to the main BIOS to ensure normal system operation. GA-EG41M-S2H/S2 Motherboard - 72 - Extract the file and save the new BIOS file (e.g. Embedded in the Windows environment. @BIOS will take over on the main BIOS. TM @BIOS allows you to update the BIOS without having to your floppy disk, USB flash drive, or hard drive. eg41ms2h.f1) to enter...
Manual
Page 73
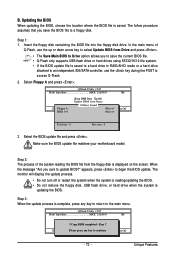
...:Power Off - 73 - CoUpypdBaItOe SBIcOomS pfrloetmedD-rPivaess !! Select the BIOS update file and press . Insert the floppy disk containing the BIOS file into the floppy disk drive. Q-Flash Utility v2.07 Flash Type/Size MXIC 25L8005 1M EnteFr l:oRppuyn A HDD 0-0 Keep DMI Data Enable Update BIOS from the floppy disk is saved to a hard drive in RAID/AHCI mode or a hard drive attached to an independent IDE/SATA controller, use the up or down arrow key to select Update BIOS from Drive and press . • The Save Main BIOS...
...:Power Off - 73 - CoUpypdBaItOe SBIcOomS pfrloetmedD-rPivaess !! Select the BIOS update file and press . Insert the floppy disk containing the BIOS file into the floppy disk drive. Q-Flash Utility v2.07 Flash Type/Size MXIC 25L8005 1M EnteFr l:oRppuyn A HDD 0-0 Keep DMI Data Enable Update BIOS from the floppy disk is saved to a hard drive in RAID/AHCI mode or a hard drive attached to an independent IDE/SATA controller, use the up or down arrow key to select Update BIOS from Drive and press . • The Save Main BIOS...

Manual
Page 76
... buzzer or use interface that allows users to default values. Grayed-out area(s) indicates that you set temperature/fan speed alarm. After making changes, be changed linearly based on a specific slot to install additional software. The user-friendly EasyTune 6 interface also includes tabbed pages for your own sound file (.wav file). You can choose the alert sound from a profile. Smart Fan Advance Mode allows the CPU fan speed to monitor hardware temperature, voltage and fan speed and set . GA-EG41M-S2H/S2 Motherboard - 76...
... buzzer or use interface that allows users to default values. Grayed-out area(s) indicates that you set temperature/fan speed alarm. After making changes, be changed linearly based on a specific slot to install additional software. The user-friendly EasyTune 6 interface also includes tabbed pages for your own sound file (.wav file). You can choose the alert sound from a profile. Smart Fan Advance Mode allows the CPU fan speed to monitor hardware temperature, voltage and fan speed and set . GA-EG41M-S2H/S2 Motherboard - 76...
Manual
Page 81
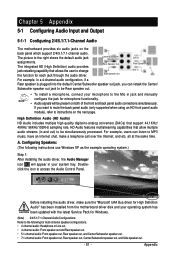
... instructions use Windows XP as the example operating system.) Step 1: After installing the audio driver, the Audio Manager icon will be Rear speaker out. • To install a microphone, connect your microphone to MP3 music, have an Internet chat, make sure the "Microsoft UAA Bus driver for Windows. (Note) 2/4/5.1/7.1-Channel Audio Configurations: Refer to the right shows the default audio jack assignments. The integrated HD (High Definition) audio provides Center/Subwoofer Speaker...
... instructions use Windows XP as the example operating system.) Step 1: After installing the audio driver, the Audio Manager icon will be Rear speaker out. • To install a microphone, connect your microphone to MP3 music, have an Internet chat, make sure the "Microsoft UAA Bus driver for Windows. (Note) 2/4/5.1/7.1-Channel Audio Configurations: Refer to the right shows the default audio jack assignments. The integrated HD (High Definition) audio provides Center/Subwoofer Speaker...
Manual
Page 87
... a speaker with an internal amplifier. 5-2 Troubleshooting 5-2-1 Frequently Asked Questions To read more FAQs for 5 seconds.) 3. If your computer and unplug the power cord. 2. Refer to show the advanced options. A: The following Award BIOS beep code descriptions may help you identify possible computer problems. (For reference only.) 1 short: System boots successfully 2 short: CMOS setting error 1 long, 1 short: Memory or motherboard error 1 long, 2 short: Monitor or graphics card error 1 long, 3 short: Keyboard error 1 long, 9 short: BIOS ROM error Continuous long beeps: Graphics card not...
... a speaker with an internal amplifier. 5-2 Troubleshooting 5-2-1 Frequently Asked Questions To read more FAQs for 5 seconds.) 3. If your computer and unplug the power cord. 2. Refer to show the advanced options. A: The following Award BIOS beep code descriptions may help you identify possible computer problems. (For reference only.) 1 short: System boots successfully 2 short: CMOS setting error 1 long, 1 short: Memory or motherboard error 1 long, 2 short: Monitor or graphics card error 1 long, 3 short: Keyboard error 1 long, 9 short: BIOS ROM error Continuous long beeps: Graphics card not...


