Manual
Page 3
...rights reserved. The trademarks mentioned in any form or by any means without prior notice. No part of the motherboard is protected by GIGABYTE without GIGABYTE's prior written permission. For example, "REV: 1.0" means the revision of this manual may be reproduced, copied, translated, transmitted, ...or download the information on/from the Support\Motherboard\Technology Guide page on your motherboard revision before updating motherboard BIOS, drivers, or when looking for technical information. Copyright © 2008 GIGA-BYTE TECHNOLOGY CO., LTD. Check your motherboard ...
...rights reserved. The trademarks mentioned in any form or by any means without prior notice. No part of the motherboard is protected by GIGABYTE without GIGABYTE's prior written permission. For example, "REV: 1.0" means the revision of this manual may be reproduced, copied, translated, transmitted, ...or download the information on/from the Support\Motherboard\Technology Guide page on your motherboard revision before updating motherboard BIOS, drivers, or when looking for technical information. Copyright © 2008 GIGA-BYTE TECHNOLOGY CO., LTD. Check your motherboard ...
Manual
Page 5
... 63 3-1 Installing Chipset Drivers 63 3-2 Application Software 64 3-3 Technical Manuals 64 3-4 Contact ...65 3-5 System ...65 3-6 Download Center 66 Chapter 4 Unique Features 67 4-1 Xpress Recovery2 67 4-2 BIOS Update Utilities 72 4-2-1 ...
... 63 3-1 Installing Chipset Drivers 63 3-2 Application Software 64 3-3 Technical Manuals 64 3-4 Contact ...65 3-5 System ...65 3-6 Download Center 66 Chapter 4 Unique Features 67 4-1 Xpress Recovery2 67 4-2 BIOS Update Utilities 72 4-2-1 ...
Manual
Page 6
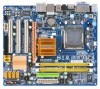
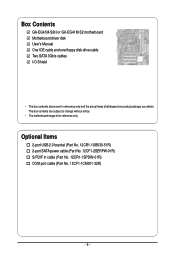
... (Part No. 12CF1-2SERPW-01R) S/PDIF in cable (Part No. 12CR1-1SPDIN-01R) COM port cable (Part No. 12CF1-1CM001-32R) - 6 - Box Contents GA-EG41M-S2H or GA-EG41M-S2 motherboard Motherboard driver disk User's Manual One IDE cable and one floppy disk drive cable Two SATA 3Gb/s cables I/O Shield • The box contents above are...
... (Part No. 12CF1-2SERPW-01R) S/PDIF in cable (Part No. 12CR1-1SPDIN-01R) COM port cable (Part No. 12CF1-1CM001-32R) - 6 - Box Contents GA-EG41M-S2H or GA-EG41M-S2 motherboard Motherboard driver disk User's Manual One IDE cable and one floppy disk drive cable Two SATA 3Gb/s cables I/O Shield • The box contents above are...
Manual
Page 18
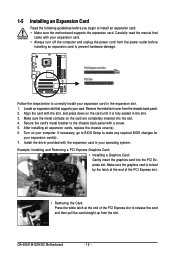
... to BIOS Setup to the chassis back panel with your operating system. GA-EG41M-S2H/S2 Motherboard - 18 - PCI Express x16 Slot PCI Slot Follow the steps below to prevent hardware damage. Locate an expansion slot that came with a screw. 5. Install the driver provided with the slot, and press down on the card until...
... to BIOS Setup to the chassis back panel with your operating system. GA-EG41M-S2H/S2 Motherboard - 18 - PCI Express x16 Slot PCI Slot Follow the steps below to prevent hardware damage. Locate an expansion slot that came with a screw. 5. Install the driver provided with the slot, and press down on the card until...
Manual
Page 19
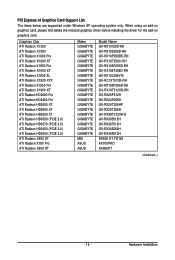
...ATI Radeon HD3450 (PCIE 2.0) ATI Radeon HD3650 (PCIE 2.0) ATI Radeon X600 XT ATI Radeon X700 Pro ATI Radeon X800 XT Maker GIGABYTE GIGABYTE GIGABYTE GIGABYTE GIGABYTE GIGABYTE GIGABYTE GIGABYTE GIGABYTE GIGABYTE GIGABYTE GIGABYTE GIGABYTE GIGABYTE GIGABYTE GIGABYTE GIGABYTE GIGABYTE GIGABYTE MSI ASUS ASUS Model Name GV-RX13128D-RH GV-RX155256D-RH GV-RX16P256DE-RH GV-RX16T256V-RH GV-RX165P256D-RH GV-RX165T256D-RH GV-... XP operating system only. When using an add-on graphics card, please first delete the onboard graphics driver before installing the driver for the add-on graphics card.
...ATI Radeon HD3450 (PCIE 2.0) ATI Radeon HD3650 (PCIE 2.0) ATI Radeon X600 XT ATI Radeon X700 Pro ATI Radeon X800 XT Maker GIGABYTE GIGABYTE GIGABYTE GIGABYTE GIGABYTE GIGABYTE GIGABYTE GIGABYTE GIGABYTE GIGABYTE GIGABYTE GIGABYTE GIGABYTE GIGABYTE GIGABYTE GIGABYTE GIGABYTE GIGABYTE GIGABYTE MSI ASUS ASUS Model Name GV-RX13128D-RH GV-RX155256D-RH GV-RX16P256DE-RH GV-RX16T256V-RH GV-RX165P256D-RH GV-RX165T256D-RH GV-... XP operating system only. When using an add-on graphics card, please first delete the onboard graphics driver before installing the driver for the add-on graphics card.
Manual
Page 36
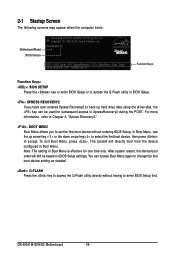
...in Boot Menu. To exit Boot Menu, press . You can be based on BIOS Setup settings. GA-EG41M-S2H/S2 Motherboard - 36 - Note: The setting in Boot Menu is effective for subsequent access to enter ...BIOS Setup first. The system will still be used for one time only. EG41M-S2H D1 . . . . : BIOS Setup : XpressRecovery2 : Boot Menu : Qflash 09/23/2008-G41-ICH7-...enter BIOS Setup or to accept. In Boot Menu, use the up hard drive data using the driver disk, the key can access Boot Menu again to change the first boot device setting as needed. ...
...in Boot Menu. To exit Boot Menu, press . You can be based on BIOS Setup settings. GA-EG41M-S2H/S2 Motherboard - 36 - Note: The setting in Boot Menu is effective for subsequent access to enter ...BIOS Setup first. The system will still be used for one time only. EG41M-S2H D1 . . . . : BIOS Setup : XpressRecovery2 : Boot Menu : Qflash 09/23/2008-G41-ICH7-...enter BIOS Setup or to accept. In Boot Menu, use the up hard drive data using the driver disk, the key can access Boot Menu again to change the first boot device setting as needed. ...
Manual
Page 63
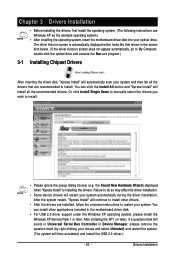
...restart the system. (The system will automatically scan your optical drive. Drivers Installation The driver Autorun screen is installing the drivers. Or click Install Single Items to manually select the drivers you wish to My Computer, double-click the optical drive and ...Install" is automatically displayed which looks like that are installed, follow the onscreen instructions to install. Chapter 3 Drivers Installation • Before installing the drivers, first install the operating system. (The following instructions use Windows XP as the example operating system.) &#...
...restart the system. (The system will automatically scan your optical drive. Drivers Installation The driver Autorun screen is installing the drivers. Or click Install Single Items to manually select the drivers you wish to My Computer, double-click the optical drive and ...Install" is automatically displayed which looks like that are installed, follow the onscreen instructions to install. Chapter 3 Drivers Installation • Before installing the drivers, first install the operating system. (The following instructions use Windows XP as the example operating system.) &#...
Manual
Page 64
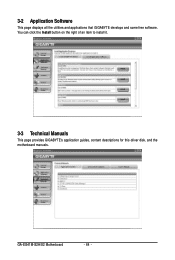
You can click the Install button on the right of an item to install it. 3-3 Technical Manuals This page provides GIGABYTE's application guides, content descriptions for this driver disk, and the motherboard manuals. GA-EG41M-S2H/S2 Motherboard - 64 - 3-2 Application Software This page displays all the utilities and applications that GIGABYTE develops and some free software.
You can click the Install button on the right of an item to install it. 3-3 Technical Manuals This page provides GIGABYTE's application guides, content descriptions for this driver disk, and the motherboard manuals. GA-EG41M-S2H/S2 Motherboard - 64 - 3-2 Application Software This page displays all the utilities and applications that GIGABYTE develops and some free software.
Manual
Page 65
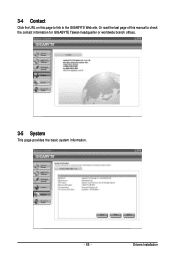
Drivers Installation Or read the last page of this page to link to check the contact information for GIGABYTE Taiwan headquarter or worldwide branch offices. 3-5 System This page provides the basic system information. - 65 - 3-4 Contact Click the URL on this manual to the GIGABYTE Web site.
Drivers Installation Or read the last page of this page to link to check the contact information for GIGABYTE Taiwan headquarter or worldwide branch offices. 3-5 System This page provides the basic system information. - 65 - 3-4 Contact Click the URL on this manual to the GIGABYTE Web site.

Manual
Page 66
The latest version of the BIOS, drivers, or applications will be displayed. GA-EG41M-S2H/S2 Motherboard - 66 - 3-6 Download Center To update the BIOS, drivers, or applications, click the Download Center button to link to the GIGABYTE Web site.
The latest version of the BIOS, drivers, or applications will be displayed. GA-EG41M-S2H/S2 Motherboard - 66 - 3-6 Download Center To update the BIOS, drivers, or applications, click the Download Center button to link to the GIGABYTE Web site.
Manual
Page 67
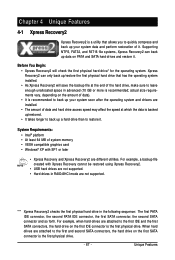
... back up/restore the first physical hard drive that allows you to quickly compress and back up your system soon after the operating system and drivers are installed. • The amount of data and hard drive access speed may affect the speed at the end of it. For example, a backup file...
... back up/restore the first physical hard drive that allows you to quickly compress and back up your system soon after the operating system and drivers are installed. • The amount of data and hard drive access speed may affect the speed at the end of it. For example, a backup file...
Manual
Page 70
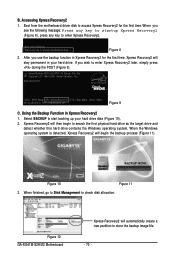
...startup XpressRecovery2..... When the Windows operating system is detected, Xpress Recovery2 will stay permanent in Xpress Recovery2 1. Boot from the motherboard driver disk to start backing up your hard drive. Using the Backup Function in your hard drive data (Figure 10). 2. Accessing ...POST (Figure 9). If you use the backup function in Xpress Recovery2 for the first time. Figure 10 Figure 11 3. Figure 12 GA-EG41M-S2H/S2 Motherboard Xpress Recovery2 will then begin the backup process (Figure 11). Figure 8 2. When finished, go to Disk Management to enter Xpress ...
...startup XpressRecovery2..... When the Windows operating system is detected, Xpress Recovery2 will stay permanent in Xpress Recovery2 1. Boot from the motherboard driver disk to start backing up your hard drive. Using the Backup Function in your hard drive data (Figure 10). 2. Accessing ...POST (Figure 9). If you use the backup function in Xpress Recovery2 for the first time. Figure 10 Figure 11 3. Figure 12 GA-EG41M-S2H/S2 Motherboard Xpress Recovery2 will then begin the backup process (Figure 11). Figure 8 2. When finished, go to Disk Management to enter Xpress ...
Manual
Page 79
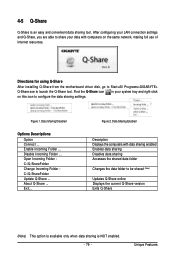
... right-click on the same network, making full use of Internet resources. Directions for using Q-Share After installing Q-Share from the motherboard driver disk, go to Start>All Programs>GIGABYTE> Q-Share.exe to be shared (Note) Updates Q-Share online Displays the current Q-Share version Exits Q-Share (Note) This option is available only...
... right-click on the same network, making full use of Internet resources. Directions for using Q-Share After installing Q-Share from the motherboard driver disk, go to Start>All Programs>GIGABYTE> Q-Share.exe to be shared (Note) Updates Q-Share online Displays the current Q-Share version Exits Q-Share (Note) This option is available only...
Manual
Page 81
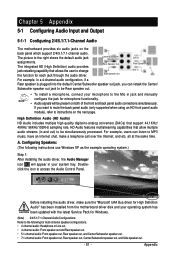
...that allows the user to instructions on the back panel which support 2/4/5.1/7.1-channel audio. all at the same time. Before installing the audio driver, make a telephone call over the Internet, and etc. Chapter 5 Appendix 5-1 Configuring Audio Input and Output 5-1-1 Configuring 2/4/5.1/7.1-Channel Audio... Appendix The picture to access the Audio Control Panel. A. Configuring Speakers: (The following for each jack through the audio driver. The integrated HD (High Definition) audio provides Center/Subwoofer Speaker Out Rear Speaker Out Line In Front Speaker Out jack ...
...that allows the user to instructions on the back panel which support 2/4/5.1/7.1-channel audio. all at the same time. Before installing the audio driver, make a telephone call over the Internet, and etc. Chapter 5 Appendix 5-1 Configuring Audio Input and Output 5-1-1 Configuring 2/4/5.1/7.1-Channel Audio... Appendix The picture to access the Audio Control Panel. A. Configuring Speakers: (The following for each jack through the audio driver. The integrated HD (High Definition) audio provides Center/Subwoofer Speaker Out Rear Speaker Out Line In Front Speaker Out jack ...
Manual
Page 84
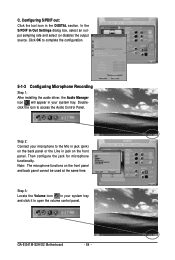
... configure the jack for microphone functionality. Click OK to complete the configuration. 5-1-3 Configuring Microphone Recording Step 1: After installing the audio driver, the Audio Manager icon will appear in your microphone to the Mic in jack (pink) on the back panel or the Line... same time. Step 2: Connect your system tray. Note: The microphone functions on the front panel. Doubleclick the icon to open the volume control panel. GA-EG41M-S2H/S2 Motherboard - 84 - In the S/PDIF In/Out Settings dialog box, select an output sampling rate and select (or disable) the output source....
... configure the jack for microphone functionality. Click OK to complete the configuration. 5-1-3 Configuring Microphone Recording Step 1: After installing the audio driver, the Audio Manager icon will appear in your microphone to the Mic in jack (pink) on the back panel or the Line... same time. Step 2: Connect your system tray. Note: The microphone functions on the front panel. Doubleclick the icon to open the volume control panel. GA-EG41M-S2H/S2 Motherboard - 84 - In the S/PDIF In/Out Settings dialog box, select an output sampling rate and select (or disable) the output source....


