Manual
Page 1
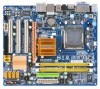
GA-EG41M-S2H/ GA-EG41M-S2 LGA775 socket motherboard for Intel® CoreTM processor family/ Intel® Pentium® processor family/Intel® Celeron® processor family User's Manual Rev. 1003 12ME-EG41MS2H-1003R
GA-EG41M-S2H/ GA-EG41M-S2 LGA775 socket motherboard for Intel® CoreTM processor family/ Intel® Pentium® processor family/Intel® Celeron® processor family User's Manual Rev. 1003 12ME-EG41MS2H-1003R
Manual
Page 3
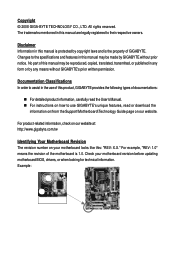
... All rights reserved. Check your motherboard looks like this manual are legally registered to their respective owners. No part of this manual may be reproduced, copied, translated, transmitted, or published in this product, GIGABYTE provides the following types of documentations: For detailed...means the revision of the motherboard is the property of this manual may be made by any form or by GIGABYTE without GIGABYTE's prior written permission. Changes to use GIGABYTE's unique features, read the User's Manual. For instructions on how to the specifications and ...
... All rights reserved. Check your motherboard looks like this manual are legally registered to their respective owners. No part of this manual may be reproduced, copied, translated, transmitted, or published in this product, GIGABYTE provides the following types of documentations: For detailed...means the revision of the motherboard is the property of this manual may be made by any form or by GIGABYTE without GIGABYTE's prior written permission. Changes to use GIGABYTE's unique features, read the User's Manual. For instructions on how to the specifications and ...
Manual
Page 5
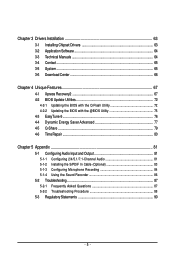
Chapter 3 Drivers Installation 63 3-1 Installing Chipset Drivers 63 3-2 Application Software 64 3-3 Technical Manuals 64 3-4 Contact ...65 3-5 System ...65 3-6 Download Center 66 Chapter 4 Unique Features 67 4-1 Xpress Recovery2 67 4-2 BIOS Update Utilities 72 4-2-1 Updating the BIOS with the Q-Flash ...
Chapter 3 Drivers Installation 63 3-1 Installing Chipset Drivers 63 3-2 Application Software 64 3-3 Technical Manuals 64 3-4 Contact ...65 3-5 System ...65 3-6 Download Center 66 Chapter 4 Unique Features 67 4-1 Xpress Recovery2 67 4-2 BIOS Update Utilities 72 4-2-1 Updating the BIOS with the Q-Flash ...
Manual
Page 6
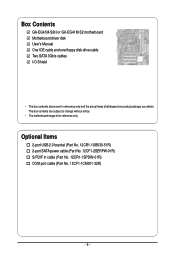
.... 12CF1-2SERPW-01R) S/PDIF in cable (Part No. 12CR1-1SPDIN-01R) COM port cable (Part No. 12CF1-1CM001-32R) - 6 - Box Contents GA-EG41M-S2H or GA-EG41M-S2 motherboard Motherboard driver disk User's Manual One IDE cable and one floppy disk drive cable Two SATA 3Gb/s cables I/O Shield • The box contents above are subject to...
.... 12CF1-2SERPW-01R) S/PDIF in cable (Part No. 12CR1-1SPDIN-01R) COM port cable (Part No. 12CF1-1CM001-32R) - 6 - Box Contents GA-EG41M-S2H or GA-EG41M-S2 motherboard Motherboard driver disk User's Manual One IDE cable and one floppy disk drive cable Two SATA 3Gb/s cables I/O Shield • The box contents above are subject to...
Manual
Page 9
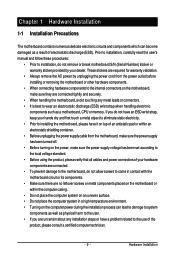
.... • Turning on the computer power during the installation process can become damaged as a motherboard, CPU or memory. Prior to installation, carefully read the user's manual and follow these procedures: • Prior to the use of electrostatic discharge (ESD). Hardware Installation If you are connected tightly and securely. • When handling...
.... • Turning on the computer power during the installation process can become damaged as a motherboard, CPU or memory. Prior to installation, carefully read the user's manual and follow these procedures: • Prior to the use of electrostatic discharge (ESD). Hardware Installation If you are connected tightly and securely. • When handling...
Manual
Page 15
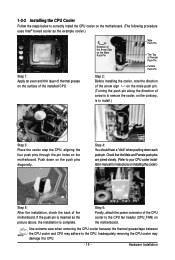
... cooler may adhere to the CPU fan header (CPU_FAN) on the motherboard. 1-3-2 Installing the CPU Cooler Follow the steps below to your CPU cooler installation manual for instructions on installing the cooler.) Step 5: After the installation, check the back of the motherboard. Step 4: You should hear a "click" when pushing down on...
... cooler may adhere to the CPU fan header (CPU_FAN) on the motherboard. 1-3-2 Installing the CPU Cooler Follow the steps below to your CPU cooler installation manual for instructions on installing the cooler.) Step 5: After the installation, check the back of the motherboard. Step 4: You should hear a "click" when pushing down on...
Manual
Page 18
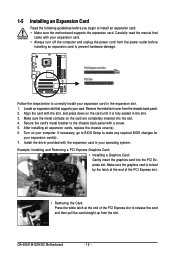
... insert the graphics card into the slot. 4. GA-EG41M-S2H/S2 Motherboard - 18 - If necessary, go to BIOS Setup to correctly install your computer. Locate an expansion slot that came with the slot, and press down on your expansion card in the slot. 3. Carefully read the manual that supports your expansion card(s). 7. Align the...
... insert the graphics card into the slot. 4. GA-EG41M-S2H/S2 Motherboard - 18 - If necessary, go to BIOS Setup to correctly install your computer. Locate an expansion slot that came with the slot, and press down on your expansion card in the slot. 3. Carefully read the manual that supports your expansion card(s). 7. Align the...
Manual
Page 30
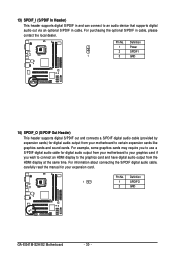
... the S/PDIF digital audio cable, carefully read the manual for digital audio output from your motherboard to your graphics card if you to use a S/PDIF digital audio cable for your motherboard to certain expansion cards like graphics cards and sound cards. Definition 1 1 SPDIFO 2 GND GA-EG41M-S2H/S2 Motherboard - 30 - Pin No. For example...
... the S/PDIF digital audio cable, carefully read the manual for digital audio output from your motherboard to your graphics card if you to use a S/PDIF digital audio cable for your motherboard to certain expansion cards like graphics cards and sound cards. Definition 1 1 SPDIFO 2 GND GA-EG41M-S2H/S2 Motherboard - 30 - Pin No. For example...
Manual
Page 32
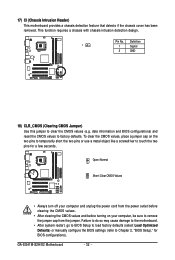
...cause damage to the motherboard. • After system restart, go to BIOS Setup to load factory defaults (select Load Optimized Defaults) or manually configure the BIOS settings (refer to factory defaults. Open: Normal Short: Clear CMOS Values • Always turn off your computer and ... has been removed. To clear the CMOS values, place a jumper cap on your computer, be sure to touch the two pins for BIOS configurations). GA-EG41M-S2H/S2 Motherboard - 32 - Definition 1 1 Signal 2 GND 18) CLR_CMOS (Clearing CMOS Jumper) Use this jumper to clear the CMOS values (e.g. This...
...cause damage to the motherboard. • After system restart, go to BIOS Setup to load factory defaults (select Load Optimized Defaults) or manually configure the BIOS settings (refer to factory defaults. Open: Normal Short: Clear CMOS Values • Always turn off your computer and ... has been removed. To clear the CMOS values, place a jumper cap on your computer, be sure to touch the two pins for BIOS configurations). GA-EG41M-S2H/S2 Motherboard - 32 - Definition 1 1 Signal 2 GND 18) CLR_CMOS (Clearing CMOS Jumper) Use this jumper to clear the CMOS values (e.g. This...
Manual
Page 40
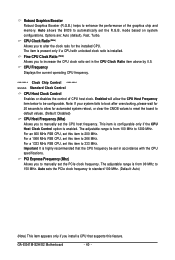
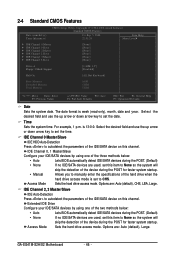
...allows the BIOS to increase the CPU clock ratio set the R.G.B. Important It is installed. Fine CPU Clock Ratio (Note) Allows you to manually set this feature. CPU Frequency Displays the current operating CPU frequency. ******** Clock Chip Control Standard Clock Control CPU Host Clock Control Enables or ... installed CPU. The adjustable range is enabled. CPU Clock Ratio (Note) Allows you install a CPU that the CPU frequency be configurable. GA-EG41M-S2H/S2 Motherboard - 40 - Robust Graphics Booster Robust Graphics Booster (R.G.B.) helps to be set the CPU host frequency.
...allows the BIOS to increase the CPU clock ratio set the R.G.B. Important It is installed. Fine CPU Clock Ratio (Note) Allows you to manually set this feature. CPU Frequency Displays the current operating CPU frequency. ******** Clock Chip Control Standard Clock Control CPU Host Clock Control Enables or ... installed CPU. The adjustable range is enabled. CPU Clock Ratio (Note) Allows you install a CPU that the CPU frequency be configurable. GA-EG41M-S2H/S2 Motherboard - 40 - Robust Graphics Booster Robust Graphics Booster (R.G.B.) helps to be set the CPU host frequency.
Manual
Page 42
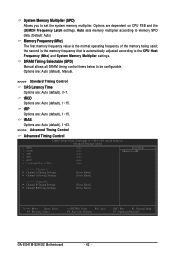
...Previous Values +/-/PU/PD: Value F10: Save F6: Fail-Safe Defaults ESC: Exit F1: General Help F7: Optimized Defaults GA-EG41M-S2H/S2 Motherboard - 42 - Options are: Auto (default), Manual. >>>>> Standard Timing Control CAS Latency Time Options are : Auto (default), 1~15. tRP Options are : Auto (default),... value is automatically adjusted according to the CPU Host Frequency (Mhz) and System Memory Multiplier settings. DRAM Timing Selectable (SPD) Manual allows all DRAM timing control items below to set the system memory multiplier. tRCD Options are: Auto (default), 1~15. the...
...Previous Values +/-/PU/PD: Value F10: Save F6: Fail-Safe Defaults ESC: Exit F1: General Help F7: Optimized Defaults GA-EG41M-S2H/S2 Motherboard - 42 - Options are: Auto (default), Manual. >>>>> Standard Timing Control CAS Latency Time Options are : Auto (default), 1~15. tRP Options are : Auto (default),... value is automatically adjusted according to the CPU Host Frequency (Mhz) and System Memory Multiplier settings. DRAM Timing Selectable (SPD) Manual allows all DRAM timing control items below to set the system memory multiplier. tRCD Options are: Auto (default), 1~15. the...
Manual
Page 46
... of the two methods below : • Auto • None • Manual Access Mode Lets BIOS automatically detect IDE/SATA devices during the POST for faster system startup. For example, 1 p.m. Options are : Auto (default), Large. Options are : Auto (default), CHS, LBA, Large. GA-EG41M-S2H/S2 Motherboard - 46 - Access Mode Sets the hard drive access...
... of the two methods below : • Auto • None • Manual Access Mode Lets BIOS automatically detect IDE/SATA devices during the POST for faster system startup. For example, 1 p.m. Options are : Auto (default), Large. Options are : Auto (default), CHS, LBA, Large. GA-EG41M-S2H/S2 Motherboard - 46 - Access Mode Sets the hard drive access...
Manual
Page 47
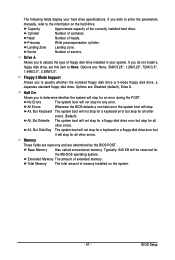
... not stop for a keyboard or a floppy disk drive error but stop . Total Memory The total amount of cylinders. If you wish to enter the parameters manually, refer to the information on the system. - 47 - The system boot will stop for all other errors. Write precompensation cylinder.
... not stop for a keyboard or a floppy disk drive error but stop . Total Memory The total amount of cylinders. If you wish to enter the parameters manually, refer to the information on the system. - 47 - The system boot will stop for all other errors. Write precompensation cylinder.
Manual
Page 52
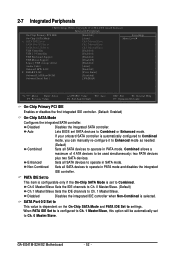
...mode. Enhanced Sets all SATA devices to Combined. When PATA IDE Set to is automatically configured to Combined mode, you can manually re-configure it to Enhanced mode as needed. (Default) Combined Sets all SATA devices to USB Controller USB 2.0 Controller USB...devices plus two SATA devices. Disabled Disables the integrated IDE controller when Non-Combined is set SATA devices to Ch. 0 Master/Slave. GA-EG41M-S2H/S2 Motherboard - 52 - 2-7 Integrated Peripherals CMOS Setup Utility-Copyright (C) 1984-2008 Award Software Integrated Peripherals On-Chip Primary PCI IDE ...
...mode. Enhanced Sets all SATA devices to Combined. When PATA IDE Set to is automatically configured to Combined mode, you can manually re-configure it to Enhanced mode as needed. (Default) Combined Sets all SATA devices to USB Controller USB 2.0 Controller USB...devices plus two SATA devices. Disabled Disables the integrated IDE controller when Non-Combined is set SATA devices to Ch. 0 Master/Slave. GA-EG41M-S2H/S2 Motherboard - 52 - 2-7 Integrated Peripherals CMOS Setup Utility-Copyright (C) 1984-2008 Award Software Integrated Peripherals On-Chip Primary PCI IDE ...
Manual
Page 63
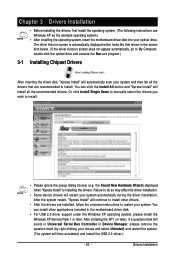
... the driver Autorun screen does not appear automatically, go to install. • Please ignore the popup dialog box(es) (e.g. Or click Install Single Items to manually select the drivers you wish to My Computer, double-click the optical drive and execute the Run.exe program.) 3-1 Installing Chipset Drivers After inserting the...
... the driver Autorun screen does not appear automatically, go to install. • Please ignore the popup dialog box(es) (e.g. Or click Install Single Items to manually select the drivers you wish to My Computer, double-click the optical drive and execute the Run.exe program.) 3-1 Installing Chipset Drivers After inserting the...
Manual
Page 64
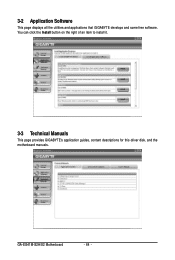
You can click the Install button on the right of an item to install it. 3-3 Technical Manuals This page provides GIGABYTE's application guides, content descriptions for this driver disk, and the motherboard manuals. 3-2 Application Software This page displays all the utilities and applications that GIGABYTE develops and some free software. GA-EG41M-S2H/S2 Motherboard - 64 -
You can click the Install button on the right of an item to install it. 3-3 Technical Manuals This page provides GIGABYTE's application guides, content descriptions for this driver disk, and the motherboard manuals. 3-2 Application Software This page displays all the utilities and applications that GIGABYTE develops and some free software. GA-EG41M-S2H/S2 Motherboard - 64 -
Manual
Page 65
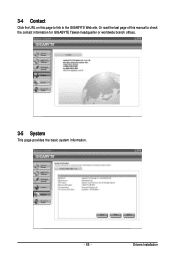
Drivers Installation 3-4 Contact Click the URL on this manual to the GIGABYTE Web site. Or read the last page of this page to link to check the contact information for GIGABYTE Taiwan headquarter or worldwide branch offices. 3-5 System This page provides the basic system information. - 65 -
Drivers Installation 3-4 Contact Click the URL on this manual to the GIGABYTE Web site. Or read the last page of this page to link to check the contact information for GIGABYTE Taiwan headquarter or worldwide branch offices. 3-5 System This page provides the basic system information. - 65 -
Manual
Page 72
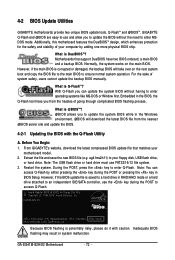
... or damaged, the backup BIOS will download the latest BIOS file from the hassles of system safety, users cannot update the backup BIOS manually. From GIGABYTE's website, download the latest compressed BIOS update file that support DualBIOS have two BIOS onboard, a main BIOS and a backup BIOS. ... while in system malfunction. Inadequate BIOS flashing may result in the Windows environment. @BIOS will take over on the main BIOS. GA-EG41M-S2H/S2 Motherboard - 72 - TM @BIOS allows you from the nearest @BIOS server site and update the BIOS. 4-2-1 Updating the BIOS with caution...
... or damaged, the backup BIOS will download the latest BIOS file from the hassles of system safety, users cannot update the backup BIOS manually. From GIGABYTE's website, download the latest compressed BIOS update file that support DualBIOS have two BIOS onboard, a main BIOS and a backup BIOS. ... while in system malfunction. Inadequate BIOS flashing may result in the Windows environment. @BIOS will take over on the main BIOS. GA-EG41M-S2H/S2 Motherboard - 72 - TM @BIOS allows you from the nearest @BIOS server site and update the BIOS. 4-2-1 Updating the BIOS with caution...
Manual
Page 75
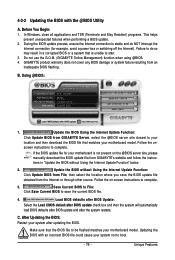
...Update the BIOS without Using the Internet Update Function: Click Update BIOS from the Internet or through other source. Do not use the G.O.M. (GIGABYTE Online Management) function when using @BIOS. 4. Using @BIOS: 1. Unique Features Failure to do NOT interrupt the Internet connection (for your ...that the BIOS file to complete. Updating the BIOS with the @BIOS Utility A. Follow the on the @BIOS server site, please manually download the BIOS update file from an inadequate BIOS flashing. 4-2-2 Updating the BIOS with an incorrect BIOS file could cause your system ...
...Update the BIOS without Using the Internet Update Function: Click Update BIOS from the Internet or through other source. Do not use the G.O.M. (GIGABYTE Online Management) function when using @BIOS. 4. Using @BIOS: 1. Unique Features Failure to do NOT interrupt the Internet connection (for your ...that the BIOS file to complete. Updating the BIOS with the @BIOS Utility A. Follow the on the @BIOS server site, please manually download the BIOS update file from an inadequate BIOS flashing. 4-2-2 Updating the BIOS with an incorrect BIOS file could cause your system ...
Manual
Page 81
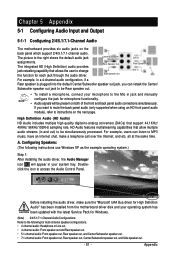
... retask the Center/ Subwoofer speaker out jack to be Rear speaker out. • To install a microphone, connect your microphone to the Mic in jack and manually configure the jack for microphone functionality. • Audio signals will appear in a 4-channel audio configuration, if a Rear speaker is plugged into the default Center/Subwoofer...
... retask the Center/ Subwoofer speaker out jack to be Rear speaker out. • To install a microphone, connect your microphone to the Mic in jack and manually configure the jack for microphone functionality. • Audio signals will appear in a 4-channel audio configuration, if a Rear speaker is plugged into the default Center/Subwoofer...


