Manual
Page 1
GA-8AENXP Dual Graphic Intel® Pentium® 4 LGA775 Processor Motherboard User's Manual Rev. 1001 12ME-8AENXPDG-1001
GA-8AENXP Dual Graphic Intel® Pentium® 4 LGA775 Processor Motherboard User's Manual Rev. 1001 12ME-8AENXPDG-1001
Manual
Page 2
Motherboard GA-8AENXP Dual Graphic Feb. 4, 2005 Motherboard GA-8AENXP Dual Graphic Feb. 4, 2005
Motherboard GA-8AENXP Dual Graphic Feb. 4, 2005 Motherboard GA-8AENXP Dual Graphic Feb. 4, 2005

Manual
Page 4
Table of Contents GA-8AENXP Dual Graphic Motherboard Layout 6 Block Diagram ...7 Chapter 1 Hardware Installation 9 1-1 Considerations Prior to Installation 9 1-2 Feature Summary 10 1-3 Installation of the CPU and Heatsink 12 1-3-1 Installation ...(Northbridge Cooling Fan 14 1-5 Installation of Memory 14 1-6 Installation of Expansion Cards 16 1-7 Configuring a Quad View System 17 1-8 Installation of U-Plus DPS (Universal Plus Dual Power System 19 1-9 I/O Back Panel Introduction 20 1-10 Connectors Introduction 21 Chapter 2 BIOS Setup 31 The Main Menu (For example: BIOS Ver. : E15 32 ...
Table of Contents GA-8AENXP Dual Graphic Motherboard Layout 6 Block Diagram ...7 Chapter 1 Hardware Installation 9 1-1 Considerations Prior to Installation 9 1-2 Feature Summary 10 1-3 Installation of the CPU and Heatsink 12 1-3-1 Installation ...(Northbridge Cooling Fan 14 1-5 Installation of Memory 14 1-6 Installation of Expansion Cards 16 1-7 Configuring a Quad View System 17 1-8 Installation of U-Plus DPS (Universal Plus Dual Power System 19 1-9 I/O Back Panel Introduction 20 1-10 Connectors Introduction 21 Chapter 2 BIOS Setup 31 The Main Menu (For example: BIOS Ver. : E15 32 ...

Manual
Page 10
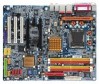
...; Northbridge: Intel® 925XE Express Chipset Š Southbridge: Intel® ICH6R Š 4 DDR II DIMM memory slots (supports up to 4GB memory) (Note 1) Š Supports dual channel DDR II 711/600(Note 2)/533/400 unbrffered DIMM Š Supports 1.8V DDR II DIMM Š 2 PCI Express x 16 slots Š 1 PCI Express x 1 slot... less than the stated amount. To use a DDRII 711 memory module on the motherboard, you must install an 800MHz FSB processor and overclock in BIOS. GA-8AENXP Dual Graphic Motherboard - 10 -
...; Northbridge: Intel® 925XE Express Chipset Š Southbridge: Intel® ICH6R Š 4 DDR II DIMM memory slots (supports up to 4GB memory) (Note 1) Š Supports dual channel DDR II 711/600(Note 2)/533/400 unbrffered DIMM Š Supports 1.8V DDR II DIMM Š 2 PCI Express x 16 slots Š 1 PCI Express x 1 slot... less than the stated amount. To use a DDRII 711 memory module on the motherboard, you must install an 800MHz FSB processor and overclock in BIOS. GA-8AENXP Dual Graphic Motherboard - 10 -
Manual
Page 12
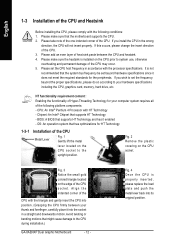
... might cause damage to the upright position. Fig. 4 Once the CPU is installed on the CPU socket to the CPU during installation.) GA-8AENXP Dual Graphic Motherboard - 12 - Please set the frequency beyond hardware specifications since it enabled - If you install the CPU in the wrong direction, ... frequency in a straight and downwards motion. Please add an even layer of heat sink paste between your hardware specifications including the CPU, graphics card, memory, hard drive, etc. Please make sure that supports HT Technology - Align the indented corner of the CPU with the ...
... might cause damage to the upright position. Fig. 4 Once the CPU is installed on the CPU socket to the CPU during installation.) GA-8AENXP Dual Graphic Motherboard - 12 - Please set the frequency beyond hardware specifications since it enabled - If you install the CPU in the wrong direction, ... frequency in a straight and downwards motion. Please add an even layer of heat sink paste between your hardware specifications including the CPU, graphics card, memory, hard drive, etc. Please make sure that supports HT Technology - Align the indented corner of the CPU with the ...

Manual
Page 14
..., please comply with each slot. If you are designed so that memory of the fan, carefully use a screwdriver to dislodge the extension on one side. GA-8AENXP Dual Graphic Motherboard - 14 - Please make sure that the fan's power cable is recommended that they can be inserted only in one direction. It is disconnected. Notch...
..., please comply with each slot. If you are designed so that memory of the fan, carefully use a screwdriver to dislodge the extension on one side. GA-8AENXP Dual Graphic Motherboard - 14 - Please make sure that the fan's power cable is recommended that they can be inserted only in one direction. It is disconnected. Notch...

Manual
Page 15
...DS/SS DDR II 2 X DS/SS DS/SS DDR II 3 DS/SS X DS/SS DDR II 4 X DS/SS DS/SS - 15 - The GA-8AENXP Dual Graphic includes 4 DIMM sockets, and each Channel has 2 DIMM sockets as following is activated, the bandwidth of the same storage capacity in order to slot two...in order to remove the DIMM module. We'll strongly recommend our user to use dual channel memory. Then push it down. Hardware Installation Dual Channel DDR II Memory Configuration The GA-8AENXP Dual Graphic supports the Dual Channel Technology. If four DDR II memory modules are installed, please use memory of memory...
...DS/SS DDR II 2 X DS/SS DS/SS DDR II 3 DS/SS X DS/SS DDR II 4 X DS/SS DS/SS - 15 - The GA-8AENXP Dual Graphic includes 4 DIMM sockets, and each Channel has 2 DIMM sockets as following is activated, the bandwidth of the same storage capacity in order to slot two...in order to remove the DIMM module. We'll strongly recommend our user to use dual channel memory. Then push it down. Hardware Installation Dual Channel DDR II Memory Configuration The GA-8AENXP Dual Graphic supports the Dual Channel Technology. If four DDR II memory modules are installed, please use memory of memory...

Manual
Page 16
... on the card are based on the slot. GA-8AENXP Dual Graphic Motherboard - 16 - Replace the screw to install/uninstall the VGA card. Make sure your VGA card is locked by following the steps outlined below: 1. The GA-8AENXP Dual Graphic will allow a four-monitor configuration(Quad View) when... used in conjunction with two PCI Express graphics cards that are indeed seated in motherboard. 4. Install related driver from BIOS. 8....
... on the card are based on the slot. GA-8AENXP Dual Graphic Motherboard - 16 - Replace the screw to install/uninstall the VGA card. Make sure your VGA card is locked by following the steps outlined below: 1. The GA-8AENXP Dual Graphic will allow a four-monitor configuration(Quad View) when... used in conjunction with two PCI Express graphics cards that are indeed seated in motherboard. 4. Install related driver from BIOS. 8....
Manual
Page 17
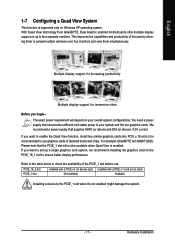
... and view them simultaneously. We recommend a power supply that the PCIE_1 slot will depend on Windows XP operating system. For example: GIGABYTE GV-NX66T128D). If you want to four separate monitors. If you begin-- Please note that supplies 400W (or above) and 25A ... PCIE_1 slot when it is recommended to use . With Quad View technology from GIGABYTE, Dual Graphic enabled motherboards offer multiple display support on up a single graphics card system, we recommend installing the graphics card on the PCIE_16_1 slot to check the availability of the PCIE_1 slot before use...
... and view them simultaneously. We recommend a power supply that the PCIE_1 slot will depend on Windows XP operating system. For example: GIGABYTE GV-NX66T128D). If you want to four separate monitors. If you begin-- Please note that supplies 400W (or above) and 25A ... PCIE_1 slot when it is recommended to use . With Quad View technology from GIGABYTE, Dual Graphic enabled motherboards offer multiple display support on up a single graphics card system, we recommend installing the graphics card on the PCIE_16_1 slot to check the availability of the PCIE_1 slot before use...
Manual
Page 18
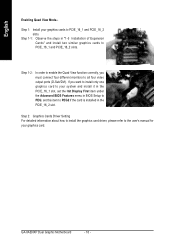
... the steps in BIOS Setup to PCIE_16_1 and PCIE_16_2 slots. Step 2: Graphics Cards Driver Setting For detailed information about how to install the graphics card driver, please refer to the user's manual for your graphics cards to PEG; Step 1-2: In order to enable the Quad View ...Display First item under the Advanced BIOS Features menu in "1-5 Installation of Expansion Cards" and install two similar graphics cards to PEG2 if the card is installed in the PCIE_16_2 slot. GA-8AENXP Dual Graphic Motherboard - 18 - Step 1: Install your graphics card. English Enabling Quad View Mode--
... the steps in BIOS Setup to PCIE_16_1 and PCIE_16_2 slots. Step 2: Graphics Cards Driver Setting For detailed information about how to install the graphics card driver, please refer to the user's manual for your graphics cards to PEG; Step 1-2: In order to enable the Quad View ...Display First item under the Advanced BIOS Features menu in "1-5 Installation of Expansion Cards" and install two similar graphics cards to PEG2 if the card is installed in the PCIE_16_2 slot. GA-8AENXP Dual Graphic Motherboard - 18 - Step 1: Install your graphics card. English Enabling Quad View Mode--

Manual
Page 20
... surround speakers to MIC In jack. For more information please contact your OS or device(s) vendors. MIC In Microphone can be connected to this connector. GA-8AENXP Dual Graphic Motherboard - 20 -
... surround speakers to MIC In jack. For more information please contact your OS or device(s) vendors. MIC In Microphone can be connected to this connector. GA-8AENXP Dual Graphic Motherboard - 20 -
Manual
Page 22
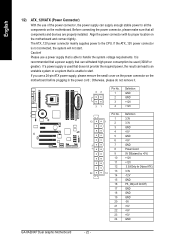
... 14 -12V 15 GND 16 PS_ON(soft On/Off) 17 GND 18 GND 19 GND 20 -5V 21 +5V 22 +5V 23 +5V 24 GND GA-8AENXP Dual Graphic Motherboard - 22 - If the ATX_12V power connector is recommended that a power supply that can withstand high power consumption be used that does not provide the...
... 14 -12V 15 GND 16 PS_ON(soft On/Off) 17 GND 18 GND 19 GND 20 -5V 21 +5V 22 +5V 23 +5V 24 GND GA-8AENXP Dual Graphic Motherboard - 22 - If the ATX_12V power connector is recommended that a power supply that can withstand high power consumption be used that does not provide the...
Manual
Page 24
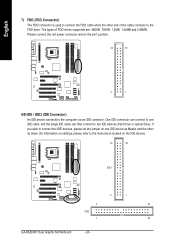
... position. 34 33 2 1 8/9) IDE / IDE2 (IDE Connector) An IDE device connects to the instructions located on the IDE device). 40 39 IDE1 2 1 2 40 IDE2 1 39 GA-8AENXP Dual Graphic Motherboard - 24 - One IDE connector can then connect to the FDD drive. The types of the cable connects to two IDE devices (hard drive or...
... position. 34 33 2 1 8/9) IDE / IDE2 (IDE Connector) An IDE device connects to the instructions located on the IDE device). 40 39 IDE1 2 1 2 40 IDE2 1 39 GA-8AENXP Dual Graphic Motherboard - 24 - One IDE connector can then connect to the FDD drive. The types of the cable connects to two IDE devices (hard drive or...
Manual
Page 26
... Operation Close: Power On/Off Pin 1: LED anode(+) Pin 2: LED cathode(-) Open: Normal Operation Close: Reset Hardware System Pin 1: LED anode(+) Pin 2: LED cathode(-) NC GA-8AENXP Dual Graphic Motherboard - 26 - Speaker Connector Power Switch Message LED/ Power/ Sleep LED SPEAK- 20 19 SPEAK+ PWPW+ MSGMSG+ 21 NCRES+ RES- HDHD+ Reset Switch IDE Hard...
... Operation Close: Power On/Off Pin 1: LED anode(+) Pin 2: LED cathode(-) Open: Normal Operation Close: Reset Hardware System Pin 1: LED anode(+) Pin 2: LED cathode(-) NC GA-8AENXP Dual Graphic Motherboard - 26 - Speaker Connector Power Switch Message LED/ Power/ Sleep LED SPEAK- 20 19 SPEAK+ PWPW+ MSGMSG+ 21 NCRES+ RES- HDHD+ Reset Switch IDE Hard...
Manual
Page 28
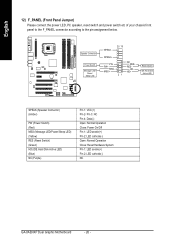
...) F_ USB1 / F_USB2 (Front USB Connector) Be careful with the polarity of the IEEE1394 connector. Be careful with the polarity of the front USB connector. GA-8AENXP Dual Graphic Motherboard - 28 - Check the pin assignment carefully while you connect the IEEE1394 cable, incorrect connection between the cable and connector will make the device unable...
...) F_ USB1 / F_USB2 (Front USB Connector) Be careful with the polarity of the IEEE1394 connector. Be careful with the polarity of the front USB connector. GA-8AENXP Dual Graphic Motherboard - 28 - Check the pin assignment carefully while you connect the IEEE1394 cable, incorrect connection between the cable and connector will make the device unable...

Manual
Page 30
Turn OFF the computer and unplug the power cord. 2. Remove the battery, wait for 30 seconds. 3. Plug the power cord and turn ON the computer. Dispose of explosion if battery is incorrectly replaced. If you want to the manufacturer's instructions. Replace only with the same or equivalent type recommended by the manufacturer. Re-install the battery. 4. English 19) BATTERY Danger of used batteries according to erase CMOS... 1. GA-8AENXP Dual Graphic Motherboard - 30 -
Turn OFF the computer and unplug the power cord. 2. Remove the battery, wait for 30 seconds. 3. Plug the power cord and turn ON the computer. Dispose of explosion if battery is incorrectly replaced. If you want to the manufacturer's instructions. Replace only with the same or equivalent type recommended by the manufacturer. Re-install the battery. 4. English 19) BATTERY Danger of used batteries according to erase CMOS... 1. GA-8AENXP Dual Graphic Motherboard - 30 -

Manual
Page 32
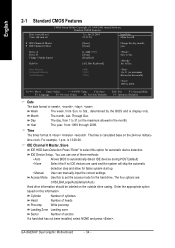
... and frequency ratio. „ Select Language This setup page is the System auto detect Temperature, voltage, fan, speed. „ MB Intelligent Tweaker(M.I .T.) ESC: Quit F8: Dual BIOS/Q-Flash Select Language Load Fail-Safe Defaults Load Optimized Defaults Set Supervisor Password Set User Password Save & Exit Setup Exit Without Saving F3: Change... you enter Award BIOS CMOS Setup Utility, the Main Menu (as usual. This action makes the system reset to accept or enter the sub-menu. GA-8AENXP Dual Graphic Motherboard - 32 -
... and frequency ratio. „ Select Language This setup page is the System auto detect Temperature, voltage, fan, speed. „ MB Intelligent Tweaker(M.I .T.) ESC: Quit F8: Dual BIOS/Q-Flash Select Language Load Fail-Safe Defaults Load Optimized Defaults Set Supervisor Password Set User Password Save & Exit Setup Exit Without Saving F3: Change... you enter Award BIOS CMOS Setup Utility, the Main Menu (as usual. This action makes the system reset to accept or enter the sub-menu. GA-8AENXP Dual Graphic Motherboard - 32 -
Manual
Page 34
... methods: • Auto Allows BIOS to set the access mode for automatic device detection. time clock. IDE Device Setup. The time is 13:00:00. GA-8AENXP Dual Graphic Motherboard - 34 - to Sat. Base Memory Extended Memory Total Memory 640K 511M 512M 1 to 31 (or maximum allowed in the month) 1999 to Dec. to...
... methods: • Auto Allows BIOS to set the access mode for automatic device detection. time clock. IDE Device Setup. The time is 13:00:00. GA-8AENXP Dual Graphic Motherboard - 34 - to Sat. Base Memory Extended Memory Total Memory 640K 511M 512M 1 to 31 (or maximum allowed in the month) 1999 to Dec. to...

Manual
Page 36
... < > or < > to select a device, then press to move it up, or to exit this function. USB-HDD Select your boot device priority by USB-HDD. GA-8AENXP Dual Graphic Motherboard - 36 -
... < > or < > to select a device, then press to move it up, or to exit this function. USB-HDD Select your boot device priority by USB-HDD. GA-8AENXP Dual Graphic Motherboard - 36 -
Manual
Page 37
... Maximum value to select the first initiation of the monitor display from which supports this item to the graphics card in the PCIE_16_2 slot and set this function. - 37 - In order to enable the Dual Graphic function correctly, you to 3 when use older OS like NT4. Disabled Disables CPU Enhanced Halt (C1E) function...
... Maximum value to select the first initiation of the monitor display from which supports this item to the graphics card in the PCIE_16_2 slot and set this function. - 37 - In order to enable the Dual Graphic function correctly, you to 3 when use older OS like NT4. Disabled Disables CPU Enhanced Halt (C1E) function...


