
Manual
Page 3
... © 2011 GIGA-BYTE TECHNOLOGY CO., LTD. For product-related information, check on our website at: http://www.gigabyte.com Identifying Your Motherboard Revision The revision number on your motherboard revision before updating motherboard BIOS, drivers, or when looking for technical information. Disclaimer Information in any means without prior notice. All rights reserved...
... © 2011 GIGA-BYTE TECHNOLOGY CO., LTD. For product-related information, check on our website at: http://www.gigabyte.com Identifying Your Motherboard Revision The revision number on your motherboard revision before updating motherboard BIOS, drivers, or when looking for technical information. Disclaimer Information in any means without prior notice. All rights reserved...

Manual
Page 5
... 3-3 Technical Manuals 66 3-4 Contact...67 3-5 System...67 3-6 Download Center 68 3-7 New Utilities...68 Chapter 4 Unique Features 69 4-1 Xpress Recovery2 69 4-2 BIOS Update Utilities 72 4-2-1 Updating the BIOS with the Q-Flash Utility 72 4-2-2 Updating the BIOS with the @BIOS Utility 75 4-3 EasyTune 6...76 4-4 Dynamic Energy Saver™ 2 77 4-5 Q-Share...79 4-6 Smart 6™ ...80 4-7 Auto Green...84 4-8 eXtreme Hard...
... 3-3 Technical Manuals 66 3-4 Contact...67 3-5 System...67 3-6 Download Center 68 3-7 New Utilities...68 Chapter 4 Unique Features 69 4-1 Xpress Recovery2 69 4-2 BIOS Update Utilities 72 4-2-1 Updating the BIOS with the Q-Flash Utility 72 4-2-2 Updating the BIOS with the @BIOS Utility 75 4-3 EasyTune 6...76 4-4 Dynamic Energy Saver™ 2 77 4-5 Q-Share...79 4-6 Smart 6™ ...80 4-7 Auto Green...84 4-8 eXtreme Hard...
Manual
Page 37
...BIOS, use either the GIGABYTE Q-Flash or @BIOS utility. • Q-Flash allows the user to quickly and easily upgrade or back up BIOS without entering the operating system. • @BIOS is a Windows-based utility that you do it is recommended that searches and downloads the latest version of the BIOS Setup program. Inadequate BIOS... flashing may result in system's failure to boot. To flash the BIOS, do not encounter problems using the Q-Flash and @BIOS utilities, refer to Chapter 4, "BIOS Update Utilities." • Because BIOS flashing is...
...BIOS, use either the GIGABYTE Q-Flash or @BIOS utility. • Q-Flash allows the user to quickly and easily upgrade or back up BIOS without entering the operating system. • @BIOS is a Windows-based utility that you do it is recommended that searches and downloads the latest version of the BIOS Setup program. Inadequate BIOS... flashing may result in system's failure to boot. To flash the BIOS, do not encounter problems using the Q-Flash and @BIOS utilities, refer to Chapter 4, "BIOS Update Utilities." • Because BIOS flashing is...

Manual
Page 61
...defaults after updating the BIOS or after clearing the CMOS values. - 61 - BIOS Setup ENxit Setup Exit Without Saving ESC: Quit F8: Q-Flash Select Item F10: Save & Exit Setup Load Fail-Safe Defaults F11: Save CMOS to BIOS F12: Load CMOS from BIOS Press on... Award Software MB Intelligent Tweaker(M.I .T.) Load Fail-Safe Defaults Standard CMOS Features Load Optimized Defaults Advanced BIOS Features Set Supervisor Password Integrated Peripherals Set User Password Power Management Setup PC Health Status Load Optimized DefaultsS...
...defaults after updating the BIOS or after clearing the CMOS values. - 61 - BIOS Setup ENxit Setup Exit Without Saving ESC: Quit F8: Q-Flash Select Item F10: Save & Exit Setup Load Fail-Safe Defaults F11: Save CMOS to BIOS F12: Load CMOS from BIOS Press on... Award Software MB Intelligent Tweaker(M.I .T.) Load Fail-Safe Defaults Standard CMOS Features Load Optimized Defaults Advanced BIOS Features Set Supervisor Password Integrated Peripherals Set User Password Power Management Setup PC Health Status Load Optimized DefaultsS...
Manual
Page 68
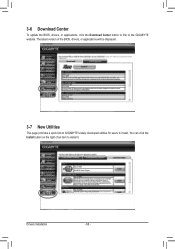
You can click the Install button on the right of the BIOS, drivers, or applications will be displayed. 3-7 New Utilities This page provides a quick link to GIGABYTE's lately developed utilities for users to install. The latest version of an item to the GIGABYTE website. Drivers Installation - 68 - 3-6 Download Center To update the BIOS, drivers, or applications, click the Download Center button to link to install it.
You can click the Install button on the right of the BIOS, drivers, or applications will be displayed. 3-7 New Utilities This page provides a quick link to GIGABYTE's lately developed utilities for users to install. The latest version of an item to the GIGABYTE website. Drivers Installation - 68 - 3-6 Download Center To update the BIOS, drivers, or applications, click the Download Center button to link to install it.

Manual
Page 72
..., Award Software, Inc. Assassin F1c . . . . : BIOS Setup : XpressRecovery2 : Boot Menu : Qflash 12/24/2010-X58-ICH10-7A89QG0QC-00 Because BIOS flashing is corrupted or damaged, the backup BIOS will download the latest BIOS file from the hassles of system safety, users cannot update the backup BIOS manually. From GIGABYTE's website, download the latest compressed BIOS update file that support DualBIOS...
..., Award Software, Inc. Assassin F1c . . . . : BIOS Setup : XpressRecovery2 : Boot Menu : Qflash 12/24/2010-X58-ICH10-7A89QG0QC-00 Because BIOS flashing is corrupted or damaged, the backup BIOS will download the latest BIOS file from the hassles of system safety, users cannot update the backup BIOS manually. From GIGABYTE's website, download the latest compressed BIOS update file that support DualBIOS...

Manual
Page 73
...key during the POST to a USB flash drive. Step 3: When the update process is complete, press any key to return to begin the BIOS update. B. The following procedure assumes that you sure to select Update BIOS from Drive Please SparevsesBaInOySketoy Dtoricvoentinue Enter : Run hi:Move ESC:Reset F10:...Power Off - 73 - Select HDD 1-0 and press . Select the BIOS update file and press . Make sure the BIOS update file matches your motherboard model. When the message "Are you save the current BIOS file. • Q-Flash only supports USB flash drive or hard drives using ...
...key during the POST to a USB flash drive. Step 3: When the update process is complete, press any key to return to begin the BIOS update. B. The following procedure assumes that you sure to select Update BIOS from Drive Please SparevsesBaInOySketoy Dtoricvoentinue Enter : Run hi:Move ESC:Reset F10:...Power Off - 73 - Select HDD 1-0 and press . Select the BIOS update file and press . Make sure the BIOS update file matches your motherboard model. When the message "Are you save the current BIOS file. • Q-Flash only supports USB flash drive or hard drives using ...

Manual
Page 74
...F11: Save CMOS to BIOS F12: Load CMOS from BIOS Press to load BIOS defaults Step 6: Select Save & Exit Setup and then press to save settings to enter BIOS Setup. The procedure is complete after a BIOS update, so we recommend that you should see the new BIOS version is present on ...the POST screen. As the system boots, you reload BIOS defaults. Step 5: During the POST, press to CMOS...
...F11: Save CMOS to BIOS F12: Load CMOS from BIOS Press to load BIOS defaults Step 6: Select Save & Exit Setup and then press to save settings to enter BIOS Setup. The procedure is complete after a BIOS update, so we recommend that you should see the new BIOS version is present on ...the POST screen. As the system boots, you reload BIOS defaults. Step 5: During the POST, press to CMOS...

Manual
Page 75
... that is not present on the @BIOS server site, please manually download the BIOS update file from GIGABYTE Server, select the @BIOS server site closest to start. 3. Load BIOS Defaults after BIOS Update: Select the Load CMOS default after BIOS update check box and then the system will automatically load BIOS defaults after BIOS update and after updating the BIOS. Unique Features Failure to do...
... that is not present on the @BIOS server site, please manually download the BIOS update file from GIGABYTE Server, select the @BIOS server site closest to start. 3. Load BIOS Defaults after BIOS Update: Select the Load CMOS default after BIOS update check box and then the system will automatically load BIOS defaults after BIOS update and after updating the BIOS. Unique Features Failure to do...

Manual
Page 78
... In Stealth Mode, the system continues to run in taskbar) 14 INFO/Help 15 Motherboard Phase LED On/Off Switch (Default: On) 16 Live Utility Update (Check for the first time (Note 3). 12 13 14 3 2 4 65 7 1 8 15 10 11 9 16 Total Mode - B. Re-enter the application only if you want ...-defined power saving settings, even after the system is unable to reset to see how much total power savings they have accumulated in the BIOS Setup program are able to zero. (Note 4) Dynamic Energy Saver Meter will automatically reset when the total power saving reaches 99999999 Watts.
... In Stealth Mode, the system continues to run in taskbar) 14 INFO/Help 15 Motherboard Phase LED On/Off Switch (Default: On) 16 Live Utility Update (Check for the first time (Note 3). 12 13 14 3 2 4 65 7 1 8 15 10 11 9 16 Total Mode - B. Re-enter the application only if you want ...-defined power saving settings, even after the system is unable to reset to see how much total power savings they have accumulated in the BIOS Setup program are able to zero. (Note 4) Dynamic Energy Saver Meter will automatically reset when the total power saving reaches 99999999 Watts.
Manual
Page 117
...the Microsoft UAA Bus Driver for your speaker is present in Chapter 1 to short the jumper to clear the CMOS values. If not, please update it from GIGABYTE's website to install. If yes, please disable this device. (If not, skip this jumper, refer to the instructions on the CLR_CMOS jumper ... for High Definition Audio and select Disable and Uninstall. In the Main Menu, press + to the instructions on the motherboard battery in the BIOS Setup program. You can temporarily remove the battery from the battery holder to stop supplying power to the CMOS, which will clear the CMOS ...
...the Microsoft UAA Bus Driver for your speaker is present in Chapter 1 to short the jumper to clear the CMOS values. If not, please update it from GIGABYTE's website to install. If yes, please disable this device. (If not, skip this jumper, refer to the instructions on the CLR_CMOS jumper ... for High Definition Audio and select Disable and Uninstall. In the Main Menu, press + to the instructions on the motherboard battery in the BIOS Setup program. You can temporarily remove the battery from the battery holder to stop supplying power to the CMOS, which will clear the CMOS ...


