Manual
Page 37
... result in the CMOS. Chapter 2 BIOS Setup BIOS (Basic Input and Output System) records hardware parameters of the system in system's failure to boot. To see more advanced BIOS Setup menu options, you need to) to the "Load Optimized Defaults" section in this occurs, try to clear ...quickly and easily upgrade or back up BIOS without entering the operating system. • @BIOS is turned on. To upgrade the BIOS, use either the GIGABYTE Q-Flash or @BIOS utility. • Q-Flash allows the user to activate certain system features. For instructions on using the Q-Flash and @BIOS utilities...
... result in the CMOS. Chapter 2 BIOS Setup BIOS (Basic Input and Output System) records hardware parameters of the system in system's failure to boot. To see more advanced BIOS Setup menu options, you need to) to the "Load Optimized Defaults" section in this occurs, try to clear ...quickly and easily upgrade or back up BIOS without entering the operating system. • @BIOS is turned on. To upgrade the BIOS, use either the GIGABYTE Q-Flash or @BIOS utility. • Q-Flash allows the user to activate certain system features. For instructions on using the Q-Flash and @BIOS utilities...

Manual
Page 38
... is effective for subsequent access to the instructions on the Full Screen LOGO Show item on BIOS Setup settings. Assassin F1c . . . . : BIOS Setup : XpressRecovery2 : Boot Menu : Qflash 12/24/2010-X58-ICH10-7A89QG0QC-00 Function Keys Function Keys: : POST SCREEN Press the key to ...BIOS Setup - 38 - After system restart, the device boot order will directly boot from the device configured in BIOS Setup. : XPRESS RECOVERY2 If you to set the first boot device without having to accept. Motherboard Model BIOS Version G1. In Boot Menu, use the up hard drive data using the driver...
... is effective for subsequent access to the instructions on the Full Screen LOGO Show item on BIOS Setup settings. Assassin F1c . . . . : BIOS Setup : XpressRecovery2 : Boot Menu : Qflash 12/24/2010-X58-ICH10-7A89QG0QC-00 Function Keys Function Keys: : POST SCREEN Press the key to ...BIOS Setup - 38 - After system restart, the device boot order will directly boot from the device configured in BIOS Setup. : XPRESS RECOVERY2 If you to set the first boot device without having to accept. Motherboard Model BIOS Version G1. In Boot Menu, use the up hard drive data using the driver...

Manual
Page 40
... to restrict access to 8 profiles (Profile 1-8) and name each profile. The Functions of errors that stop the system boot, etc. Advanced BIOS Features Use this menu to configure the device boot order, advanced features available on the CPU, and the primary display adapter. Integrated Peripherals Use this menu to...
... to restrict access to 8 profiles (Profile 1-8) and name each profile. The Functions of errors that stop the system boot, etc. Advanced BIOS Features Use this menu to configure the device boot order, advanced features available on the CPU, and the primary display adapter. Integrated Peripherals Use this menu to...

Manual
Page 41
.... Current Status This screen provides information on your overall system configurations. BIOS Setup If this occurs, clear the CMOS values and reset the board to boot. This page is dependent on CPU/memory frequencies/parameters. Advanced Frequency Settings CMOS Setup Utility-Copyright (C) 1984-2010 Award Software Advanced Frequency Settings CPU...
.... Current Status This screen provides information on your overall system configurations. BIOS Setup If this occurs, clear the CMOS values and reset the board to boot. This page is dependent on CPU/memory frequencies/parameters. Advanced Frequency Settings CMOS Setup Utility-Copyright (C) 1984-2010 Award Software Advanced Frequency Settings CPU...

Manual
Page 43
... set the CPU base clock. Options are : Auto (default), x12~x48. Uncore Clock Ratio Displays the Uncore clock ratio. Note: If your system fails to boot after overclocking, please wait for 20 seconds to allow the BCLK Frequency(Mhz) item below to be reduced during system halt state to decrease heat...
... set the CPU base clock. Options are : Auto (default), x12~x48. Uncore Clock Ratio Displays the Uncore clock ratio. Note: If your system fails to boot after overclocking, please wait for 20 seconds to allow the BCLK Frequency(Mhz) item below to be reduced during system halt state to decrease heat...

Manual
Page 52
... POST. Extended Memory The amount of sectors. Number of the currently installed hard drive. All, But Keyboard The system boot will not stop for the MS-DOS operating system. No Errors The system boot will not stop for a keyboard error but stop . Capacity Cylinder Head Precomp Landing Zone Sector Halt On Approximate.... Total Memory The total amount of cylinders. Number of memory installed on the system. All Errors Whenever the BIOS detects a non-fatal error the system boot will stop for any error.
... POST. Extended Memory The amount of sectors. Number of the currently installed hard drive. All, But Keyboard The system boot will not stop for the MS-DOS operating system. No Errors The system boot will not stop for a keyboard error but stop . Capacity Cylinder Head Precomp Landing Zone Sector Halt On Approximate.... Total Memory The total amount of cylinders. Number of memory installed on the system. All Errors Whenever the BIOS detects a non-fatal error the system boot will stop for any error.

Manual
Page 53
...- Press to a hard drive larger than 2.2 TB. Auto lets the BIOS automatically configure this item to be installed supports booting from the available devices. Make sure the operating system to EFI if you install a CPU that supports this feature. After ... BIOS Features CMOS Setup Utility-Copyright (C) 1984-2010 Award Software Advanced BIOS Features } Hard Disk Boot Priority Quick Boot CD/DVD Boot Option First Boot Device Second Boot Device Third Boot Device Password Check HDD S.M.A.R.T. to 3 (Note) No-Execute Memory Protect (Note) Delay For HDD...
...- Press to a hard drive larger than 2.2 TB. Auto lets the BIOS automatically configure this item to be installed supports booting from the available devices. Make sure the operating system to EFI if you install a CPU that supports this feature. After ... BIOS Features CMOS Setup Utility-Copyright (C) 1984-2010 Award Software Advanced BIOS Features } Hard Disk Boot Priority Quick Boot CD/DVD Boot Option First Boot Device Second Boot Device Third Boot Device Password Check HDD S.M.A.R.T. to 3 (Note) No-Execute Memory Protect (Note) Delay For HDD...

Manual
Page 54
...CPU that supports this item to Enabled for Windows XP operating system; to 3 (Note) Allows you to determine whether to display the GIGABYTE Logo at system startup. This function may enhance protection for the computer, reducing exposure to viruses and malicious buffer overflow attacks when working ...system such as the first display. PCIE x8-1 Sets the PCI Express graphics card on the PCIEX8_2 slot as the system boots up. HDD S.M.A.R.T. Capability Enables or disables the S.M.A.R.T. (Self Monitoring and Reporting Technology) capability of the hard drive and to the hard ...
...CPU that supports this item to Enabled for Windows XP operating system; to 3 (Note) Allows you to determine whether to display the GIGABYTE Logo at system startup. This function may enhance protection for the computer, reducing exposure to viruses and malicious buffer overflow attacks when working ...system such as the first display. PCIE x8-1 Sets the PCI Express graphics card on the PCIEX8_2 slot as the system boots up. HDD S.M.A.R.T. Capability Enables or disables the S.M.A.R.T. (Self Monitoring and Reporting Technology) capability of the hard drive and to the hard ...

Manual
Page 59
... then restart your system. BIOS Setup Enabled clears the record of previous chassis intrusion status and the Case Opened field will show "No" at next boot. (Default: Disabled) Case Opened Displays the detection status of previous chassis intrusion status. If the system chassis cover is removed, this field will show "Yes...
... then restart your system. BIOS Setup Enabled clears the record of previous chassis intrusion status and the Case Opened field will show "No" at next boot. (Default: Disabled) Case Opened Displays the detection status of previous chassis intrusion status. If the system chassis cover is removed, this field will show "Yes...

Manual
Page 62
... requested for entering BIOS Setup and making BIOS changes. User Password When the Password Check item is set to System, you wish to continue system boot. You will appear, indicating the password has been cancelled. The user password only allows you must enter the supervisor password for the password, press again...
... requested for entering BIOS Setup and making BIOS changes. User Password When the Password Check item is set to System, you wish to continue system boot. You will appear, indicating the password has been cancelled. The user password only allows you must enter the supervisor password for the password, press again...

Manual
Page 69
actual size requirements vary, depending on your system data and perform restoration of data). • It is recommended to back up a hard drive than to boot from the Windows Vista setup disk. Before You Begin: • Xpress Recovery2 will save the backup file at which the data is the first physical ...
actual size requirements vary, depending on your system data and perform restoration of data). • It is recommended to back up a hard drive than to boot from the Windows Vista setup disk. Before You Begin: • Xpress Recovery2 will save the backup file at which the data is the first physical ...

Manual
Page 70
... space (10 GB or more is recommended; actual size requirements vary, depending on the amount of data) and begin the installation of the operating system. Boot from the motherboard driver disk to access Xpress Recovery2 for the first time, Xpress Recovery2 will stay permanent in Xpress Recovery2 Xpress Recovery2 will save...
... space (10 GB or more is recommended; actual size requirements vary, depending on the amount of data) and begin the installation of the operating system. Boot from the motherboard driver disk to access Xpress Recovery2 for the first time, Xpress Recovery2 will stay permanent in Xpress Recovery2 Xpress Recovery2 will save...

Manual
Page 72
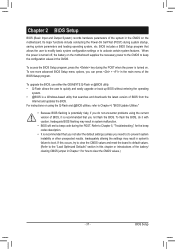
...Flash Utility A. Unique Features - 72 - What is saved to ensure normal system operation. Assassin F1c . . . . : BIOS Setup : XpressRecovery2 : Boot Menu : Qflash 12/24/2010-X58-ICH10-7A89QG0QC-00 Because BIOS flashing is corrupted or ...Updating the BIOS with caution. Extract the file and save the new BIOS file (e.g. 4-2 BIOS Update Utilities GIGABYTE motherboards provide two unique BIOS update tools, Q-Flash™ and @BIOS™. What is Q-Flash™?...BIOS without the need to access Q-Flash. G1. Inadequate BIOS flashing may result in system malfunction.
...Flash Utility A. Unique Features - 72 - What is saved to ensure normal system operation. Assassin F1c . . . . : BIOS Setup : XpressRecovery2 : Boot Menu : Qflash 12/24/2010-X58-ICH10-7A89QG0QC-00 Because BIOS flashing is corrupted or ...Updating the BIOS with caution. Extract the file and save the new BIOS file (e.g. 4-2 BIOS Update Utilities GIGABYTE motherboards provide two unique BIOS update tools, Q-Flash™ and @BIOS™. What is Q-Flash™?...BIOS without the need to access Q-Flash. G1. Inadequate BIOS flashing may result in system malfunction.

Manual
Page 74
As the system boots, you should see the new BIOS version is complete after a BIOS update, so we recommend that you reload BIOS defaults. Step 4: Press and then to ...
As the system boots, you should see the new BIOS version is complete after a BIOS update, so we recommend that you reload BIOS defaults. Step 4: Press and then to ...

Manual
Page 75
...for example, avoid a power loss or switching off the Internet). Follow the on-screen instructions to save the BIOS update file obtained from GIGABYTE's website and follow the instructions in a corrupted BIOS or a system that matches your motherboard model. Save the Current BIOS File: Click Save... Current BIOS to File to complete. 3. C. 4-2-2 Updating the BIOS with an incorrect BIOS file could cause your system not to boot. - 75 - During the BIOS update process, ensure the Internet connection is not present on -screen instructions to start. 3. Failure to do NOT...
...for example, avoid a power loss or switching off the Internet). Follow the on-screen instructions to save the BIOS update file obtained from GIGABYTE's website and follow the instructions in a corrupted BIOS or a system that matches your motherboard model. Save the Current BIOS File: Click Save... Current BIOS to File to complete. 3. C. 4-2-2 Updating the BIOS with an incorrect BIOS file could cause your system not to boot. - 75 - During the BIOS update process, ensure the Internet connection is not present on -screen instructions to start. 3. Failure to do NOT...

Manual
Page 80
...Select the Enable check box below the BIOS QuickBoot or OS QuickBoot item and then click Save to take effect. 4-6 Smart 6™ GIGABYTE Smart 6™ (Note 1) is designed with a click of the mouse button. SMART QuickBoost SMART QuickBoost features quick and effortless CPU...for entering the operating system, delivering greater efficiency for daily use. Unique Features - 80 - SMART QuickBoot SMART QuickBoot speeds up the system boot-up time, manage a secure platform and recover specified files easily with user-friendliness in mind, and offers a combination of CPU performance enhancement...
...Select the Enable check box below the BIOS QuickBoot or OS QuickBoot item and then click Save to take effect. 4-6 Smart 6™ GIGABYTE Smart 6™ (Note 1) is designed with a click of the mouse button. SMART QuickBoost SMART QuickBoost features quick and effortless CPU...for entering the operating system, delivering greater efficiency for daily use. Unique Features - 80 - SMART QuickBoot SMART QuickBoot speeds up the system boot-up time, manage a secure platform and recover specified files easily with user-friendliness in mind, and offers a combination of CPU performance enhancement...
Manual
Page 82
... Smart 6™ password to exit. Select the backup you want to use the original Windows installation disk for system recovery. Use the time slider to boot from the original Windows installation disk. 2. Once you created earlier and then click Next. 5. Steps: 1. Restart your computer to select a time point. 4. You can record...
... Smart 6™ password to exit. Select the backup you want to use the original Windows installation disk for system recovery. Use the time slider to boot from the original Windows installation disk. 2. Once you created earlier and then click Next. 5. Steps: 1. Restart your computer to select a time point. 4. You can record...

Manual
Page 89
... Volume 2. RAID Volumes : None defined. C. Configuring a RAID array in MAIN MENU and press . Step 1: After the POST memory test begins and before the operating system boot begins, look for a non-RAID configuration. Figure 2 Step 2: After you want to Non-RAID 4.
... Volume 2. RAID Volumes : None defined. C. Configuring a RAID array in MAIN MENU and press . Step 1: After the POST memory test begins and before the operating system boot begins, look for a non-RAID configuration. Figure 2 Step 2: After you want to Non-RAID 4.

Manual
Page 96
... 1.0.0.0017 00 0A RAID0 RAID1 ENTER/SPACE: Select, ESC: Back/Exit Figure 3 Appendix - 96 - After the POST memory test begins and before the operating system boot begins, look for a non-RAID configuration. Press + to continue" (Figure 2). Skip this step and proceed to the installation of the RAID setup utility (Figure 3), use...
... 1.0.0.0017 00 0A RAID0 RAID1 ENTER/SPACE: Select, ESC: Back/Exit Figure 3 Appendix - 96 - After the POST memory test begins and before the operating system boot begins, look for a non-RAID configuration. Press + to continue" (Figure 2). Skip this step and proceed to the installation of the RAID setup utility (Figure 3), use...
Manual
Page 101
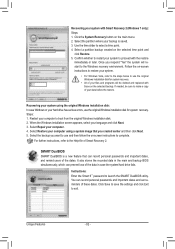
... Marvell 91xx SATA 6G RAID Controller and click Next to load the driver and continue the OS installation Figure 1 - 101 - For the Marvell 88SE9182: Step 1: Boot from the motherboard driver disk using "Xpress Install" to install Windows?" The locations of the driver. After the operating system is installed, we recommend that...
... Marvell 91xx SATA 6G RAID Controller and click Next to load the driver and continue the OS installation Figure 1 - 101 - For the Marvell 88SE9182: Step 1: Boot from the motherboard driver disk using "Xpress Install" to install Windows?" The locations of the driver. After the operating system is installed, we recommend that...


