
Manual
Page 1
G1.Assassin LGA1366 socket motherboard for Intel® Core™ i7 processor family User's Manual Rev. 1002 12ME-G1ASSAS-1002R
G1.Assassin LGA1366 socket motherboard for Intel® Core™ i7 processor family User's Manual Rev. 1002 12ME-G1ASSAS-1002R

Manual
Page 3
... for technical information. For example, "REV: 1.0" means the revision of the motherboard is the property of this manual may be made by GIGABYTE without GIGABYTE's prior written permission. Disclaimer Information in the use of GIGABYTE. The trademarks mentioned in this product, GIGABYTE provides the following types of documentations: For quick set-up of this...
... for technical information. For example, "REV: 1.0" means the revision of the motherboard is the property of this manual may be made by GIGABYTE without GIGABYTE's prior written permission. Disclaimer Information in the use of GIGABYTE. The trademarks mentioned in this product, GIGABYTE provides the following types of documentations: For quick set-up of this...

Manual
Page 5
Chapter 3 Drivers Installation 65 3-1 Installing Chipset Drivers 65 3-2 Application Software 66 3-3 Technical Manuals 66 3-4 Contact...67 3-5 System...67 3-6 Download Center 68 3-7 New Utilities...68 Chapter 4 Unique Features 69 4-1 Xpress Recovery2 69 4-2 BIOS Update Utilities 72 4-2-1 Updating the BIOS ...
Chapter 3 Drivers Installation 65 3-1 Installing Chipset Drivers 65 3-2 Application Software 66 3-3 Technical Manuals 66 3-4 Contact...67 3-5 System...67 3-6 Download Center 68 3-7 New Utilities...68 Chapter 4 Unique Features 69 4-1 Xpress Recovery2 69 4-2 BIOS Update Utilities 72 4-2-1 Updating the BIOS ...

Manual
Page 6
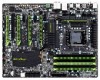
Optional Items 2-port USB 2.0 bracket (Part No. 12CR1-1UB030-5*R) 2-port SATA power cable (Part No. 12CF1-2SERPW-0*R) - 6 - Box Contents G1.Assassin motherboard Motherboard driver disk User's Manual Quick Installation Guide Four SATA cables I/O Shield 5.25" Front Access Control Panel with 2 USB 3.0/2.0 ports, 1 Power eSATA port, and 1 Quick Boost button One 2-Way SLI ...
Optional Items 2-port USB 2.0 bracket (Part No. 12CR1-1UB030-5*R) 2-port SATA power cable (Part No. 12CF1-2SERPW-0*R) - 6 - Box Contents G1.Assassin motherboard Motherboard driver disk User's Manual Quick Installation Guide Four SATA cables I/O Shield 5.25" Front Access Control Panel with 2 USB 3.0/2.0 ports, 1 Power eSATA port, and 1 Quick Boost button One 2-Way SLI ...

Manual
Page 9
... supply voltage has been set according to system components as well as a motherboard, CPU or memory. Hardware Installation Prior to installation, carefully read the user's manual and follow these procedures: • Prior to installation, do not allow screws to come in contact with the motherboard circuit or its components. • Make...
... supply voltage has been set according to system components as well as a motherboard, CPU or memory. Hardware Installation Prior to installation, carefully read the user's manual and follow these procedures: • Prior to installation, do not allow screws to come in contact with the motherboard circuit or its components. • Make...

Manual
Page 15
Check that the Male and Female push pins are joined closely. (Refer to your CPU cooler installation manual for instructions on the motherboard. Push down each push pin. 1-3-2 Installing the CPU Cooler Follow the steps below to correctly install the CPU cooler on ...
Check that the Male and Female push pins are joined closely. (Refer to your CPU cooler installation manual for instructions on the motherboard. Push down each push pin. 1-3-2 Installing the CPU Cooler Follow the steps below to correctly install the CPU cooler on ...
Manual
Page 18
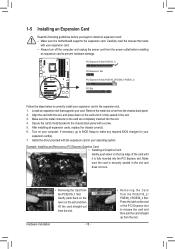
... fully seated in your expansion card. • Always turn off the computer and unplug the power cord from the chassis back panel. 2. Carefully read the manual that supports your computer. Make sure the metal contacts on the top edge of the PCI Express slot to the chassis back panel with a screw. 5.
... fully seated in your expansion card. • Always turn off the computer and unplug the power cord from the chassis back panel. 2. Carefully read the manual that supports your computer. Make sure the metal contacts on the top edge of the PCI Express slot to the chassis back panel with a screw. 5.
Manual
Page 19
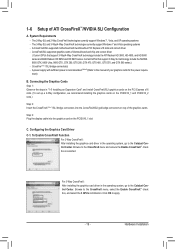
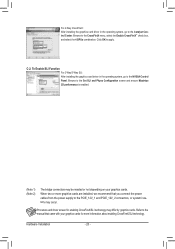
... motherboard with sufficient power is selected. C. Browse to the CrossFireX menu and ensure the Enable CrossFireX™ check box is recommended (Note 2)(Refer to the manual of the graphics cards. The 3-Way SLI and 3-Way/4-Way CrossFireX technologies currently support Windows 7 and Vista operating systems - Step 3: Plug the display cable into...
... motherboard with sufficient power is selected. C. Browse to the CrossFireX menu and ensure the Enable CrossFireX™ check box is recommended (Note 2)(Refer to the manual of the graphics cards. The 3-Way SLI and 3-Way/4-Way CrossFireX technologies currently support Windows 7 and Vista operating systems - Step 3: Plug the display cable into...
Manual
Page 20
... system instability may be needed or not depending on your graphics cards for enabling CrossFireX/SLI technology may differ by graphics cards. Refer to the manual that you connect the power cables from the power supply to the NVIDIA Control Panel. Procedure and driver screen for more graphics cards are installed...
... system instability may be needed or not depending on your graphics cards for enabling CrossFireX/SLI technology may differ by graphics cards. Refer to the manual that you connect the power cables from the power supply to the NVIDIA Control Panel. Procedure and driver screen for more graphics cards are installed...

Manual
Page 32
... and have digital audio output from the HDMI display at the same time. For information about connecting the S/PDIF digital audio cable, carefully read the manual for digital audio output from your motherboard to your expansion card. 1 Pin No. Incorrect connection between the module connector and the motherboard header will make...
... and have digital audio output from the HDMI display at the same time. For information about connecting the S/PDIF digital audio cable, carefully read the manual for digital audio output from your motherboard to your expansion card. 1 Pin No. Incorrect connection between the module connector and the motherboard header will make...
Manual
Page 34
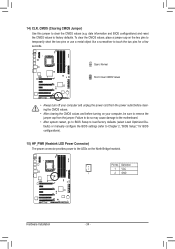
... do so may cause damage to the motherboard. • After system restart, go to BIOS Setup to load factory defaults (select Load Optimized Defaults) or manually configure the BIOS settings (refer to Chapter 2, "BIOS Setup," for a few seconds. Open: Normal Short: Clear CMOS Values • Always turn off your computer, be...
... do so may cause damage to the motherboard. • After system restart, go to BIOS Setup to load factory defaults (select Load Optimized Defaults) or manually configure the BIOS settings (refer to Chapter 2, "BIOS Setup," for a few seconds. Open: Normal Short: Clear CMOS Values • Always turn off your computer, be...

Manual
Page 43
... supports this setting. (Default) Enabled When the CPU or chipset detects that the CPU frequency be reduced when the CPU is from 100 MHz to manually set the QPI clock ratio. Auto lets the BIOS automatically configure this setting. (Default: Auto) CPU EIST Function (Note) Enables or disables Enhanced Intel SpeedStep...
... supports this setting. (Default) Enabled When the CPU or chipset detects that the CPU frequency be reduced when the CPU is from 100 MHz to manually set the QPI clock ratio. Auto lets the BIOS automatically configure this setting. (Default: Auto) CPU EIST Function (Note) Enables or disables Enhanced Intel SpeedStep...

Manual
Page 44
... to enhance memory performance when enabled. Options are : 700mV, 800mV (default), 900mV, 1000mV. Options are : 0ps~750ps. (Default: 0ps) IOH Clock Skew Allows you to manually set the North Bridge clock prior to 150 MHz. Disabled Disables this feature. Profile2 (Note) Uses Profile 2 settings.
... to enhance memory performance when enabled. Options are : 700mV, 800mV (default), 900mV, 1000mV. Options are : 0ps~750ps. (Default: 0ps) IOH Clock Skew Allows you to manually set the North Bridge clock prior to 150 MHz. Disabled Disables this feature. Profile2 (Note) Uses Profile 2 settings.

Manual
Page 51
...devices during the POST for faster system startup. • Auto Lets the BIOS automatically detect SATA devices during the POST. (Default) • Manual Allows you wish to enter the parameters manually, refer to CHS. BIOS Setup is week (read-only), month, date and year. Options are : Auto (default), Large. If you... to manually enter the specifications of the device during the POST. (Default) • None If no SATA devices are used, set this item to None ...
...devices during the POST for faster system startup. • Auto Lets the BIOS automatically detect SATA devices during the POST. (Default) • Manual Allows you wish to enter the parameters manually, refer to CHS. BIOS Setup is week (read-only), month, date and year. Options are : Auto (default), Large. If you... to manually enter the specifications of the device during the POST. (Default) • None If no SATA devices are used, set this item to None ...

Manual
Page 60
..., 80oC/176oF, 90oC/194oF. BIOS Setup - 60 - CPU FAN Fail Warning Allows the system to emit warning sound if the CPU fan is set to Manual. You can adjust the fan speed with EasyTune based on your system requirements. (Default) Silent Allows the CPU fan to run at different speeds according... fan to enable the CPU fan speed control function and adjust the fan speed. When CPU temperature exceeds the threshold, BIOS will emit warning sound. Manual Allows you to run at full speeds. Current CPU FAN/SYS FAN/FAN1/FAN2/FAN3 Speed (RPM) Displays current CPU/system fan speeds detected by...
..., 80oC/176oF, 90oC/194oF. BIOS Setup - 60 - CPU FAN Fail Warning Allows the system to emit warning sound if the CPU fan is set to Manual. You can adjust the fan speed with EasyTune based on your system requirements. (Default) Silent Allows the CPU fan to run at different speeds according... fan to enable the CPU fan speed control function and adjust the fan speed. When CPU temperature exceeds the threshold, BIOS will emit warning sound. Manual Allows you to run at full speeds. Current CPU FAN/SYS FAN/FAN1/FAN2/FAN3 Speed (RPM) Displays current CPU/system fan speeds detected by...
Manual
Page 65
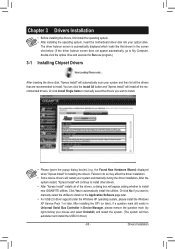
... if you wish to install. • Please ignore the popup dialog box(es) (e.g. Or click Install Single Items to manually select the drivers you want to manually select the utilities to do so may affect the driver installation. • Some device drivers will then autodetect and install the... in Universal Serial Bus Controller in the screen shot below. (If the driver Autorun screen does not appear automatically, go to install new GIGABYTE utilities. Drivers Installation You can click the Install All button and "Xpress Install" will appear asking whether to My Computer, double-click the...
... if you wish to install. • Please ignore the popup dialog box(es) (e.g. Or click Install Single Items to manually select the drivers you want to manually select the utilities to do so may affect the driver installation. • Some device drivers will then autodetect and install the... in Universal Serial Bus Controller in the screen shot below. (If the driver Autorun screen does not appear automatically, go to install new GIGABYTE utilities. Drivers Installation You can click the Install All button and "Xpress Install" will appear asking whether to My Computer, double-click the...
Manual
Page 66
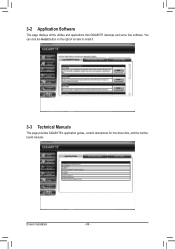
You can click the Install button on the right of an item to install it. 3-3 Technical Manuals This page provides GIGABYTE's application guides, content descriptions for this driver disk, and the motherboard manuals. Drivers Installation - 66 - 3-2 Application Software This page displays all the utilities and applications that GIGABYTE develops and some free software.
You can click the Install button on the right of an item to install it. 3-3 Technical Manuals This page provides GIGABYTE's application guides, content descriptions for this driver disk, and the motherboard manuals. Drivers Installation - 66 - 3-2 Application Software This page displays all the utilities and applications that GIGABYTE develops and some free software.

Manual
Page 72
... Note: The USB flash drive or hard drive must use and allow you from the nearest @BIOS server 4-2-1 Updating the BIOS with caution. G1. GIGABYTE Q-Flash and @BIOS are easy-to enter MS-DOS mode. Motherboards that matches your motherboard model. 2. Note: You can update the system ... download the latest BIOS file from the hassles of system safety, users cannot update the backup BIOS manually. However, if the BIOS update file is potentially risky, please do it with the Q-Flash Utility A. Assassin F1c . . . . : BIOS Setup : XpressRecovery2 : Boot Menu : Qflash 12/24/2010-X58...
... Note: The USB flash drive or hard drive must use and allow you from the nearest @BIOS server 4-2-1 Updating the BIOS with caution. G1. GIGABYTE Q-Flash and @BIOS are easy-to enter MS-DOS mode. Motherboards that matches your motherboard model. 2. Note: You can update the system ... download the latest BIOS file from the hassles of system safety, users cannot update the backup BIOS manually. However, if the BIOS update file is potentially risky, please do it with the Q-Flash Utility A. Assassin F1c . . . . : BIOS Setup : XpressRecovery2 : Boot Menu : Qflash 12/24/2010-X58...

Manual
Page 75
... (for your motherboard model. C. After Updating the BIOS Restart your motherboard model. Before You Begin 1. Do not use the G.O.M. (GIGABYTE Online Management) function when using @BIOS. 4. Updating the BIOS with the @BIOS Utility A. Unique Features Update the BIOS Using the Internet... BIOS file. 4. Failure to complete. Using @BIOS 1. Make sure that is not present on the @BIOS server site, please manually download the BIOS update file from the Internet or through other source. B. Update the BIOS without Using the Internet Update Function" below...
... (for your motherboard model. C. After Updating the BIOS Restart your motherboard model. Before You Begin 1. Do not use the G.O.M. (GIGABYTE Online Management) function when using @BIOS. 4. Updating the BIOS with the @BIOS Utility A. Unique Features Update the BIOS Using the Internet... BIOS file. 4. Failure to complete. Using @BIOS 1. Make sure that is not present on the @BIOS server site, please manually download the BIOS update file from the Internet or through other source. B. Update the BIOS without Using the Internet Update Function" below...
Manual
Page 85
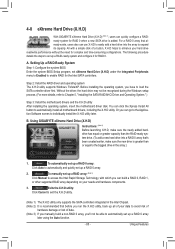
...the SATA controllers integrated in the array. ) 1. Exits the X.H.D utility: Click Cancel to expand its capacity. B. 4-8 eXtreme Hard Drive (X.H.D) With GIGABYTE eXtreme Hard Drive (X.H.D) (Note 1), users can quickly configure a RAIDready system for RAID 0 when a new SATA drive is recommended that already exists, users... Click Auto to enable RAID for the Intel SATA controllers. To manually set up a RAID array: (Note 3) Click Manual to access the Intel Rapid Storage Technology, with a simple click of data. (Note 3) If you manually build a non-RAID 0 array, you have to load the...
...the SATA controllers integrated in the array. ) 1. Exits the X.H.D utility: Click Cancel to expand its capacity. B. 4-8 eXtreme Hard Drive (X.H.D) With GIGABYTE eXtreme Hard Drive (X.H.D) (Note 1), users can quickly configure a RAIDready system for RAID 0 when a new SATA drive is recommended that already exists, users... Click Auto to enable RAID for the Intel SATA controllers. To manually set up a RAID array: (Note 3) Click Manual to access the Intel Rapid Storage Technology, with a simple click of data. (Note 3) If you manually build a non-RAID 0 array, you have to load the...


