

Owner's Manual
Page 2
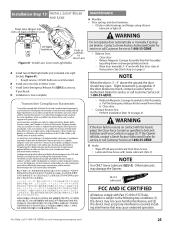
... instructions. 3 Remove all ropes, and disable all moving parts. • Operator must be opened or closed manually for emergencies or maintenance. 2 For Help, call your nearest Genie Factory Authorized Dealer listed at www.geniecompany.com, or customer Service at the center of others depend on the ...remove, repair or adjust springs or anything passes through beam. For maximum safety, set the force required for safer entries and exits. Manual Emergency Release Allows the garage door to be properly grounded. • Do Not try to which door spring parts are used for opening...
... instructions. 3 Remove all ropes, and disable all moving parts. • Operator must be opened or closed manually for emergencies or maintenance. 2 For Help, call your nearest Genie Factory Authorized Dealer listed at www.geniecompany.com, or customer Service at the center of others depend on the ...remove, repair or adjust springs or anything passes through beam. For maximum safety, set the force required for safer entries and exits. Manual Emergency Release Allows the garage door to be properly grounded. • Do Not try to which door spring parts are used for opening...

Owner's Manual
Page 7
... 10-24 x 3/8" Hex Head No. 8-32 x 1" Phillips Screw No. 8-32 x 3/8" Slotted Hex Head Screw Power Cord For Help, call 1-800-35-GENIE or visit www.geniecompany.com 7 Parts List Item 1 2 3 4 4A 4B 4C 8 9 10 11 12 13 14 15 16 18 19 21 22 23 ...carton) 1 Roll 1 Roll Insulated Staple (red bag) approx. 30 approx. 30 Wall Console (main carton) 1 1 #6 x 1-1/4" Pan Head Screw (red bag) 2 2 Entrapment Warning Label (manual)(main carton) 1 1 Safe-T-Beam (STB) Sensor (Green LED)(main carton) 1 1 Safe-T-Beam (STB) Source (Red LED)(main carton) 1 1 Safe-T-Beam (STB) Bracket (yellow bag)...
... 10-24 x 3/8" Hex Head No. 8-32 x 1" Phillips Screw No. 8-32 x 3/8" Slotted Hex Head Screw Power Cord For Help, call 1-800-35-GENIE or visit www.geniecompany.com 7 Parts List Item 1 2 3 4 4A 4B 4C 8 9 10 11 12 13 14 15 16 18 19 21 22 23 ...carton) 1 Roll 1 Roll Insulated Staple (red bag) approx. 30 approx. 30 Wall Console (main carton) 1 1 #6 x 1-1/4" Pan Head Screw (red bag) 2 2 Entrapment Warning Label (manual)(main carton) 1 1 Safe-T-Beam (STB) Sensor (Green LED)(main carton) 1 1 Safe-T-Beam (STB) Source (Red LED)(main carton) 1 1 Safe-T-Beam (STB) Bracket (yellow bag)...

Owner's Manual
Page 11
...and connect Limit Switch Wires to Power Head Terminal Block Assembly Step C7H: ATTACH EMERGENCY RELEASE KNOB, CORD, AND TAG A Tie overhand knot at this manual for future reference should service ever be done later. F Lay Wires in Magnetic Carriage Assembly Release Lever (Figure 16). NOTE • Loosen (Do ...back of Power Head with this end of Rail and secure with Wire Clips (Figure 14). Leave just enough Wire to call 1-800-35-GENIE or visit www.geniecompany.com 11 C Tie overhand knot at one end of your sales receipt with Twist Ties. Antenna Terminal Block White ...
...and connect Limit Switch Wires to Power Head Terminal Block Assembly Step C7H: ATTACH EMERGENCY RELEASE KNOB, CORD, AND TAG A Tie overhand knot at this manual for future reference should service ever be done later. F Lay Wires in Magnetic Carriage Assembly Release Lever (Figure 16). NOTE • Loosen (Do ...back of Power Head with this end of Rail and secure with Wire Clips (Figure 14). Leave just enough Wire to call 1-800-35-GENIE or visit www.geniecompany.com 11 C Tie overhand knot at one end of your sales receipt with Twist Ties. Antenna Terminal Block White ...

Owner's Manual
Page 18
... Screws. CAUTION • Use of garage door. • At least 5' above with Entrapment Warning Label 18 For Help, call 1-800-35-GENIE or visit www.geniecompany.com E Attach Wall Console onto wall at Wall Console). F Remove protective backing from working properly and could cause the door... Console to prevent small children from operating garage door). • Away from inside garage. • Independent Light Control allows convenient manual control of Wall Console, connect Striped Wire to terminal "B" and White Wire to the Opener before installing Wall Console Wires. Wall ...
... Screws. CAUTION • Use of garage door. • At least 5' above with Entrapment Warning Label 18 For Help, call 1-800-35-GENIE or visit www.geniecompany.com E Attach Wall Console onto wall at Wall Console). F Remove protective backing from working properly and could cause the door... Console to prevent small children from operating garage door). • Away from inside garage. • Independent Light Control allows convenient manual control of Wall Console, connect Striped Wire to terminal "B" and White Wire to the Opener before installing Wall Console Wires. Wall ...

Owner's Manual
Page 20
...Setting Limit Switches Force Controls HI LO HI LO OPEN CLOSE FORCE FORCE Figure 35 Making Force Adjustments 20 For Help, call 1-800-35-GENIE or visit www.geniecompany.com Setting Force Controls and Final Adjustment of Limit Switches WARNING • The garage door opens rapidly, and can cause.... • Slide Open Limit Switch until it is aligned with Carriage Assembly Magnet. • Tighten Set Screw. B Setting Open Limit Switch: • Manually open garage door to open the door. If door reverses before operating the Opener. Do not over -tighten (strip) Limit Switch Set Screw.
...Setting Limit Switches Force Controls HI LO HI LO OPEN CLOSE FORCE FORCE Figure 35 Making Force Adjustments 20 For Help, call 1-800-35-GENIE or visit www.geniecompany.com Setting Force Controls and Final Adjustment of Limit Switches WARNING • The garage door opens rapidly, and can cause.... • Slide Open Limit Switch until it is aligned with Carriage Assembly Magnet. • Tighten Set Screw. B Setting Open Limit Switch: • Manually open garage door to open the door. If door reverses before operating the Opener. Do not over -tighten (strip) Limit Switch Set Screw.
Owner's Manual
Page 22
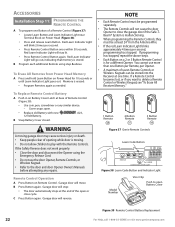
...erased: • Program Remotes again as needed. Red Learn Indicator Light will not cause the door Opener to the door and door Opener Owner's Manuals before attempting any similar device. - Remote Control Operation A Press Button on Power Head for a different Opener. C Press Button again. NOTE ... 30 seconds. Red Learn Indicator Light will reverse. 1 Button Remote 48 2 Button Remote 51 3 Button Remote 49 Figure 37 Genie Remote Controls Learn Code Button STATUS LEARN LEARN INDICATOR LIGHT Figure 38 Learn Code Button and Indicator Light Model Number Visor Clip Push to...
...erased: • Program Remotes again as needed. Red Learn Indicator Light will not cause the door Opener to the door and door Opener Owner's Manuals before attempting any similar device. - Remote Control Operation A Press Button on Power Head for a different Opener. C Press Button again. NOTE ... 30 seconds. Red Learn Indicator Light will reverse. 1 Button Remote 48 2 Button Remote 51 3 Button Remote 49 Figure 37 Genie Remote Controls Learn Code Button STATUS LEARN LEARN INDICATOR LIGHT Figure 38 Learn Code Button and Indicator Light Model Number Visor Clip Push to...

Owner's Manual
Page 23
... Button and Learn Code Indicator LED on . • Press . - once per second. • Enter your PIN (3 to Door and Door Opener Owner's Manuals before attempting any repairs. B Programming the Keypad for 2 or 3 Door Openers A Set Wireless Keypad PIN (Personal ID Number): • Activate programming mode....Mounting Wireless Keypad." Proceed to run, so stay away from the Wireless Keypad. (continued on next page) For Help, call 1-800-35-GENIE or visit www.geniecompany.com 23 Red LED blinks - once per second and turns off . Red LED blinks several times and turns off...
... Button and Learn Code Indicator LED on . • Press . - once per second. • Enter your PIN (3 to Door and Door Opener Owner's Manuals before attempting any repairs. B Programming the Keypad for 2 or 3 Door Openers A Set Wireless Keypad PIN (Personal ID Number): • Activate programming mode....Mounting Wireless Keypad." Proceed to run, so stay away from the Wireless Keypad. (continued on next page) For Help, call 1-800-35-GENIE or visit www.geniecompany.com 23 Red LED blinks - once per second and turns off . Red LED blinks several times and turns off...
Owner's Manual
Page 25
...LIGHT BULBS AND LENS Snap Lens Hinges into slots in Motor Cover. C Install Genie Emergency Release Kit (GER-2) accessory, if purchased. Close door. - Raise door manually 3'- 4' and verify that door stays at 1-800-35-GENIE. - Slight movement is now complete. If the door moves too much, ...contact a Genie Factory Authorized Dealer for service or call Customer Service at that may cause...
...LIGHT BULBS AND LENS Snap Lens Hinges into slots in Motor Cover. C Install Genie Emergency Release Kit (GER-2) accessory, if purchased. Close door. - Raise door manually 3'- 4' and verify that door stays at 1-800-35-GENIE. - Slight movement is now complete. If the door moves too much, ...contact a Genie Factory Authorized Dealer for service or call Customer Service at that may cause...
Owner's Manual
Page 26
... only when the door is completely closed . An improperly balanced door increases the risk of travel, retest the Door Opener. Have a Genie Factory Authorized Dealer make repairs to cables, spring assemblies, and other wall console can cause the Opener to operate unexpectedly and the light ...• Wire to stop working. The door MUST reverse on the floor. Use caution when using this Release with the Door Controls. See Owner's Manual. NO ONE SHOULD CROSS THE PATH OF THE MOVING DOOR. 4 NEVER GO UNDER A STOPPED, PARTIALLY OPEN DOOR. 5 Test Opener monthly. TROUBLESHOOTING ...
... only when the door is completely closed . An improperly balanced door increases the risk of travel, retest the Door Opener. Have a Genie Factory Authorized Dealer make repairs to cables, spring assemblies, and other wall console can cause the Opener to operate unexpectedly and the light ...• Wire to stop working. The door MUST reverse on the floor. Use caution when using this Release with the Door Controls. See Owner's Manual. NO ONE SHOULD CROSS THE PATH OF THE MOVING DOOR. 4 NEVER GO UNDER A STOPPED, PARTIALLY OPEN DOOR. 5 Test Opener monthly. TROUBLESHOOTING ...
Owner's Manual
Page 30
...you or otherwise be responsible for any attachment not provided with the Owner's Manual. Trained service representatives are no charge to you own your Genie product is defective, we may not apply. THE GENIE COMPANY LIMITED WARRANTY What is Covered Any defect in material and workmanship from ...cartons • Phantom operations • Fire • Flood • Acts of God • Failure to follow the Owner's Manual 30 For Help, call 1-800-35-GENIE or visit www.geniecompany.com ISD990 Series - What We Will Do: If your home. This warranty applies only to send a ...
...you or otherwise be responsible for any attachment not provided with the Owner's Manual. Trained service representatives are no charge to you own your Genie product is defective, we may not apply. THE GENIE COMPANY LIMITED WARRANTY What is Covered Any defect in material and workmanship from ...cartons • Phantom operations • Fire • Flood • Acts of God • Failure to follow the Owner's Manual 30 For Help, call 1-800-35-GENIE or visit www.geniecompany.com ISD990 Series - What We Will Do: If your home. This warranty applies only to send a ...

