

Owner's Manual
Page 1
...: 1-800-35-GENIE (354-3643) www.geniecompany.com Please have Model information ready when calling. Extension Kit is available for 8' Doors Included Wall Console MUST be Properly set to Operation of Contents Safety Information 2 Important Installation Instructions 2 Safety Features 2 Pre-installation Checklist 3 Garage Door Opener Assembly 9 Record Data (for Service 11 Garage Door Opener Installation 12...
...: 1-800-35-GENIE (354-3643) www.geniecompany.com Please have Model information ready when calling. Extension Kit is available for 8' Doors Included Wall Console MUST be Properly set to Operation of Contents Safety Information 2 Important Installation Instructions 2 Safety Features 2 Pre-installation Checklist 3 Garage Door Opener Assembly 9 Record Data (for Service 11 Garage Door Opener Installation 12...
Owner's Manual
Page 2
... do not understand the information presented, call 1-800-35-GENIE or visit www.geniecompany.com activated and automatically turns off power before installing the opener. 4 Install door opener at the center of the doorway. An improperly balanced door may cause injuries, your nearest Genie Factory Authorized Dealer listed at www.geniecompany.com, or customer...
... do not understand the information presented, call 1-800-35-GENIE or visit www.geniecompany.com activated and automatically turns off power before installing the opener. 4 Install door opener at the center of the doorway. An improperly balanced door may cause injuries, your nearest Genie Factory Authorized Dealer listed at www.geniecompany.com, or customer...
Owner's Manual
Page 3
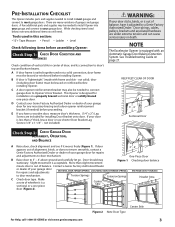
... go. C A door opener reinforcement bracket may be braced or reinforced before installing Opener. NOTE The Excelerator Opener is out of your garage door for any additional items you have it moves freely (Figure 1). Make a note of your garage door for installing Door Bracket onto door. If door appears out of alignment, binds, or does not move smoothly, contact a 3' - 4' Genie Factory Authorized...
... go. C A door opener reinforcement bracket may be braced or reinforced before installing Opener. NOTE The Excelerator Opener is out of your garage door for any additional items you have it moves freely (Figure 1). Make a note of your garage door for installing Door Bracket onto door. If door appears out of alignment, binds, or does not move smoothly, contact a 3' - 4' Genie Factory Authorized...
Owner's Manual
Page 4
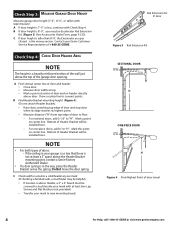
... Excelerator Rail Extension Kit. (Figure 3) (See Accessories Order Form, page 31/32). A Find vertical center line of door travel 4 For Help, call 1-800-35-GENIE or visit www.geniecompany.com Draw a center line to floor. - NOTE • For both types of the garage door opening. C Check wall for 8' door Figure 3 Rail Extension Kit SECTIONAL DOOR ONE-PIECE DOOR...
... Excelerator Rail Extension Kit. (Figure 3) (See Accessories Order Form, page 31/32). A Find vertical center line of door travel 4 For Help, call 1-800-35-GENIE or visit www.geniecompany.com Draw a center line to floor. - NOTE • For both types of the garage door opening. C Check wall for 8' door Figure 3 Rail Extension Kit SECTIONAL DOOR ONE-PIECE DOOR...
Owner's Manual
Page 5
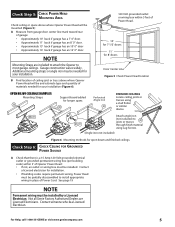
...or wiring box within 3' of Power Cord. Not all Genie Factory Authorized Dealers are included to attach the Opener to most garage ceilings. Contact a licensed electrician for your installation. For Help, call 1-800-35-GENIE or visit www.geniecompany.com 5 C heck Step 5: Check... Power Head Mounting Area Check ceiling or space above where Opener Power Head will be mounted (Figure 5): A Measure from garage door center line mark toward rear of garage: ...
...or wiring box within 3' of Power Cord. Not all Genie Factory Authorized Dealers are included to attach the Opener to most garage ceilings. Contact a licensed electrician for your installation. For Help, call 1-800-35-GENIE or visit www.geniecompany.com 5 C heck Step 5: Check... Power Head Mounting Area Check ceiling or space above where Opener Power Head will be mounted (Figure 5): A Measure from garage door center line mark toward rear of garage: ...
Owner's Manual
Page 6
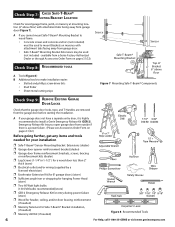
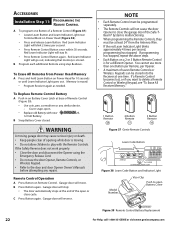
... going further, get any items and tools needed ) Figure 8 Recommended Tools 6 For Help, call 1-800-35-GENIE or visit www.geniecompany.com Emergency Release Kit lets you cannot mount Safe-T-Beam® Mounting Bracket to wood frame:...) p Garage door opener reinforcement bracket (dealer) p Garage door frame reinforcement brackets, screws, bracing or reinforcement kits (dealer) p Lag Screws (1-1/4"or 1-1/2" ) for a wood door less than 2" thick (store) p Electrical outlet and/or wiring (supplied by a licensed electrician) p Excelerator Extension Kit (for 8' garage doors) (store)...
... going further, get any items and tools needed ) Figure 8 Recommended Tools 6 For Help, call 1-800-35-GENIE or visit www.geniecompany.com Emergency Release Kit lets you cannot mount Safe-T-Beam® Mounting Bracket to wood frame:...) p Garage door opener reinforcement bracket (dealer) p Garage door frame reinforcement brackets, screws, bracing or reinforcement kits (dealer) p Lag Screws (1-1/4"or 1-1/2" ) for a wood door less than 2" thick (store) p Electrical outlet and/or wiring (supplied by a licensed electrician) p Excelerator Extension Kit (for 8' garage doors) (store)...
Owner's Manual
Page 7
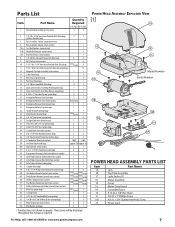
...3 Retaining Clip (blue bag) 3 Rail Strap (blue bag) 1 1 1/4"-20 Hex Head Bolt (blue bag) 2 2 Open Limit Switch Assembly (White)(green bag) 1 1 Close Limit Switch Assembly (Brown) (green bag) 1 1 # 8-32 x ...bag) 1 1 Emergency Release Tag (carriage) 1 1 Header Bracket (orange bag) 1 1 Door Bracket (orange bag) varies1/m ode l 1 1/4" x 2" Lag Screw (orange bag) 8 Straight Door Arm (main carton) 1 1 Clevis Pin, 3/8" x 15/16" (yellow bag) 2...call 1-800-35-GENIE or visit www.geniecompany.com 7 These items will be illustrated throughout the manual as...
...3 Retaining Clip (blue bag) 3 Rail Strap (blue bag) 1 1 1/4"-20 Hex Head Bolt (blue bag) 2 2 Open Limit Switch Assembly (White)(green bag) 1 1 Close Limit Switch Assembly (Brown) (green bag) 1 1 # 8-32 x ...bag) 1 1 Emergency Release Tag (carriage) 1 1 Header Bracket (orange bag) 1 1 Door Bracket (orange bag) varies1/m ode l 1 1/4" x 2" Lag Screw (orange bag) 8 Straight Door Arm (main carton) 1 1 Clevis Pin, 3/8" x 15/16" (yellow bag) 2...call 1-800-35-GENIE or visit www.geniecompany.com 7 These items will be illustrated throughout the manual as...
Owner's Manual
Page 8
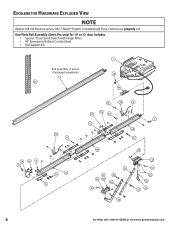
Excelerator Hardware Exploded View NOTE Opener will not function unless Safe-T-Beam® System is installed and Force Controls are properly set. Rail Assembly (1 piece) (Packaged separately) 3 8 For Help, call 1-800-35-GENIE or visit www.geniecompany.com One-Piece Rail Assembly (Genie Pro only) for 10' or 12' door includes: • Special "Close" Limit Switch with longer Wires. • 96" Emergency Release Cord (yellow). • Rail Support Kit.
Excelerator Hardware Exploded View NOTE Opener will not function unless Safe-T-Beam® System is installed and Force Controls are properly set. Rail Assembly (1 piece) (Packaged separately) 3 8 For Help, call 1-800-35-GENIE or visit www.geniecompany.com One-Piece Rail Assembly (Genie Pro only) for 10' or 12' door includes: • Special "Close" Limit Switch with longer Wires. • 96" Emergency Release Cord (yellow). • Rail Support Kit.
Owner's Manual
Page 9
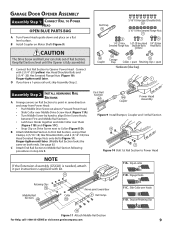
Garage Door Opener Assembly A ssembly Step C1h: Connect Rail to Power Head OPEN BLUE PARTS BAG A Turn Power Head upside down and ...out of Rail Sections. Slip on a flat level surface. Snap on Motor Shaft (Figure 9). B Attach Middle Rail Section to Opener Power Head. See page 8.) C Attach End Rail Section to point in step A & B. D If you have a 1-...11D. B Install Coupler on Retaining Clip Figure 11 Attach Middle Rail Section For Help, call 1-800-35-GENIE or visit www.geniecompany.com 9 Connect with kit. 11A. First Rail Section Coupler Power Head Assembly Figure ...
Garage Door Opener Assembly A ssembly Step C1h: Connect Rail to Power Head OPEN BLUE PARTS BAG A Turn Power Head upside down and ...out of Rail Sections. Slip on a flat level surface. Snap on Motor Shaft (Figure 9). B Attach Middle Rail Section to Opener Power Head. See page 8.) C Attach End Rail Section to point in step A & B. D If you have a 1-...11D. B Install Coupler on Retaining Clip Figure 11 Attach Middle Rail Section For Help, call 1-800-35-GENIE or visit www.geniecompany.com 9 Connect with kit. 11A. First Rail Section Coupler Power Head Assembly Figure ...
Owner's Manual
Page 11
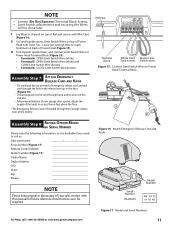
...pull cord through the hole in the release lever up to Power Head Terminal Block A s se m b ly Step C8h: Record Opener Model and Serial Number Please note the following information so it is threaded through the Carriage release lever at the factory. Leave just ...Zip: Phone: NOTE Please keep original or photocopy of your garage door opener, adjust the height of your sales receipt with Twist Ties. H Turn Opener upside down, and connect Limit Switch Wires to call 1-800-35-GENIE or visit www.geniecompany.com Figure 16 Attach Emergency Release Cord and ...
...pull cord through the hole in the release lever up to Power Head Terminal Block A s se m b ly Step C8h: Record Opener Model and Serial Number Please note the following information so it is threaded through the Carriage release lever at the factory. Leave just ...Zip: Phone: NOTE Please keep original or photocopy of your garage door opener, adjust the height of your sales receipt with Twist Ties. H Turn Opener upside down, and connect Limit Switch Wires to call 1-800-35-GENIE or visit www.geniecompany.com Figure 16 Attach Emergency Release Cord and ...
Owner's Manual
Page 12
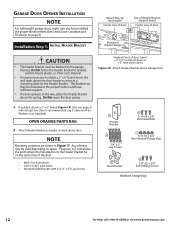
...-18 x 3/4" Hex Head Bolts 1/4" x 2" Lag Screws 5/16-18 x 3/4" Hex Serrated Flange Nuts Door Bracket 1/4"-20 x 3/4" Self-Drilling Screws Hardware (orange bag) 12 For Help, call 1-800-35-GENIE or visit www.geniecompany.com Garage Door Opener Installation NOTE For lightweight garage doors, make sure you have sufficient support. • If a door spring is in Figure 17.
...-18 x 3/4" Hex Head Bolts 1/4" x 2" Lag Screws 5/16-18 x 3/4" Hex Serrated Flange Nuts Door Bracket 1/4"-20 x 3/4" Self-Drilling Screws Hardware (orange bag) 12 For Help, call 1-800-35-GENIE or visit www.geniecompany.com Garage Door Opener Installation NOTE For lightweight garage doors, make sure you have sufficient support. • If a door spring is in Figure 17.
Owner's Manual
Page 13
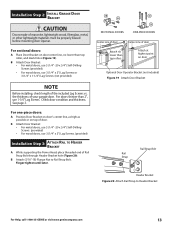
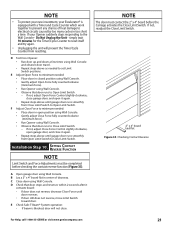
... to Rail Strap Bolt. B Attach Door Bracket: • For metal doors, use 3 (1/4" -20 x 3/4") Self-Drilling Screws. (provided) • For wood doors, use 3 (1/4" x 2") Lag Screws or 3 (1/4" x 1-1/4") Lag Screws (not provided). SECTIONAL DOORS ONE-PIECE DOORS Center Line of door Center Line of masonite, lightweight wood, fiberglass, metal, or other lightweight materials must be properly braced before mounting door Opener.
... to Rail Strap Bolt. B Attach Door Bracket: • For metal doors, use 3 (1/4" -20 x 3/4") Self-Drilling Screws. (provided) • For wood doors, use 3 (1/4" x 2") Lag Screws or 3 (1/4" x 1-1/4") Lag Screws (not provided). SECTIONAL DOORS ONE-PIECE DOORS Center Line of door Center Line of masonite, lightweight wood, fiberglass, metal, or other lightweight materials must be properly braced before mounting door Opener.

Owner's Manual
Page 16
...8226; Position top of garage door frame or wall 6" above floor Figure 26 Final Check Safe-T-Beams® 16 For Help, call 1-800-35-GENIE or visit www.geniecompany.com If Opener is plugged into outlet, Unplug it will not close the door automatically unless the Safe-T-Beam&#...174; System is beyond door, tracks, or any door hardware. If not, Safe-TBeam® Mounting Bracket Extensions are available from the door opening, where it...
...8226; Position top of garage door frame or wall 6" above floor Figure 26 Final Check Safe-T-Beams® 16 For Help, call 1-800-35-GENIE or visit www.geniecompany.com If Opener is plugged into outlet, Unplug it will not close the door automatically unless the Safe-T-Beam&#...174; System is beyond door, tracks, or any door hardware. If not, Safe-TBeam® Mounting Bracket Extensions are available from the door opening, where it...
Owner's Manual
Page 18
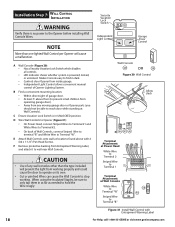
...Switch which disables all controls LED Indicator shows whether system is in dark. • Controls door Opener from inside garage. • Independent Light Control allows convenient manual control of Opener Lighting System. Makes Console easy to Terminal "W". B Find a convenient mounting location: Within ...Wall Console White Wire to Terminal "W" Striped Wire to the Opener before installing Wall Console Wires. At least 5' above with Entrapment Warning Label 18 For Help, call 1-800-35-GENIE or visit www.geniecompany.com F Remove protective backing from Entrapment ...
...Switch which disables all controls LED Indicator shows whether system is in dark. • Controls door Opener from inside garage. • Independent Light Control allows convenient manual control of Opener Lighting System. Makes Console easy to Terminal "W". B Find a convenient mounting location: Within ...Wall Console White Wire to Terminal "W" Striped Wire to the Opener before installing Wall Console Wires. At least 5' above with Entrapment Warning Label 18 For Help, call 1-800-35-GENIE or visit www.geniecompany.com F Remove protective backing from Entrapment ...
Owner's Manual
Page 19
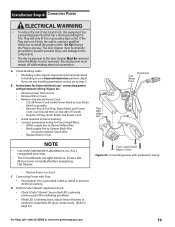
...are not installing permanent wiring, go to page 26.) For Help, call 1-800-35-GENIE or visit www.geniecompany.com 19 A Check building codes: • • If building code requires Opener be properly grounded to prevent personal injury and damage to the components. • The ...power from circuit. • Remove Motor Cover. • Remove and discard Power Cord. - Electrical power must be permanently wired to the door Opener Must Be removed when the Motor Cover is removed. In sta lla tion SteCph8: Connecting Power ELECTRICAL WARNING • To reduce the risk of...
...are not installing permanent wiring, go to page 26.) For Help, call 1-800-35-GENIE or visit www.geniecompany.com 19 A Check building codes: • • If building code requires Opener be properly grounded to prevent personal injury and damage to the components. • The ...power from circuit. • Remove Motor Cover. • Remove and discard Power Cord. - Electrical power must be permanently wired to the door Opener Must Be removed when the Motor Cover is removed. In sta lla tion SteCph8: Connecting Power ELECTRICAL WARNING • To reduce the risk of...
Owner's Manual
Page 20
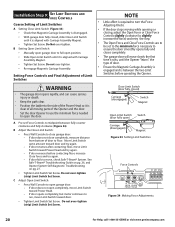
... Controls Figure 34 Making Force Adjustments 20 For Help, call 1-800-35-GENIE or visit www.geniecompany.com B Adjust the Close Limit Switch: • Press Wall Console to run, move Limit Switch toward door. • Tighten Limit Switch Set Screw. In sta lla tio n SteCph9...Screw. NOTE • Little effort is required to turn the Force Adjusting Knobs. • If the door stops moving parts of the Opener and the door. • Set the door Opener to use the minimum force needed to midpoint between the two Limit Switches before contacting floor, increase Close ...
... Controls Figure 34 Making Force Adjustments 20 For Help, call 1-800-35-GENIE or visit www.geniecompany.com B Adjust the Close Limit Switch: • Press Wall Console to run, move Limit Switch toward door. • Tighten Limit Switch Set Screw. In sta lla tio n SteCph9...Screw. NOTE • Little effort is required to turn the Force Adjusting Knobs. • If the door stops moving parts of the Opener and the door. • Set the door Opener to use the minimum force needed to midpoint between the two Limit Switches before contacting floor, increase Close ...
Owner's Manual
Page 21
... readjust the Close Limit Switch. 2" x 4" board laid flat Figure 35 Checking Contact Reverse For Help, call 1-800-35-GENIE or visit www.geniecompany.com 21 E Adjust Open Force to minimum needed to set Limit Switch positions. B Lay a 2" x 4" board flat in too short a time. ... Opener suddenly stops responding to reset itself and try again. • Unplugging the unit will not close it again. • Repeat steps above until door reverses. • If door still does not reverse, move Limit Switch toward door. If your Excelerator® is blocked, door will...
... readjust the Close Limit Switch. 2" x 4" board laid flat Figure 35 Checking Contact Reverse For Help, call 1-800-35-GENIE or visit www.geniecompany.com 21 E Adjust Open Force to minimum needed to set Limit Switch positions. B Lay a 2" x 4" board flat in too short a time. ... Opener suddenly stops responding to reset itself and try again. • Unplugging the unit will not close it again. • Repeat steps above until door reverses. • If door still does not reverse, move Limit Switch toward door. If your Excelerator® is blocked, door will...
Owner's Manual
Page 22
..., see "To Erase All Receiver Memory." 1 Button Remote 2 Button Remote 3 Button Remote Figure 37 Genie Remote Controls Learn Code Button Figure 38 Learn Code Button and Indicator Light Model Number Visor Clip Push to the door and door Opener Owner's Manuals before attempting any similar device. - To Replace Remote Control Battery A Push in on...
..., see "To Erase All Receiver Memory." 1 Button Remote 2 Button Remote 3 Button Remote Figure 37 Genie Remote Controls Learn Code Button Figure 38 Learn Code Button and Indicator Light Model Number Visor Clip Push to the door and door Opener Owner's Manuals before attempting any similar device. - To Replace Remote Control Battery A Push in on...

Owner's Manual
Page 24
... Customer Service 24 For Help, call 1-800-35-GENIE or visit www.geniecompany.com After adjusting either the Force or the Limit of travel, retest the Door Opener. See Owner's Manual. Use caution when using this Release with Opener. WARNING Use the Wall Console included with the door open. Troubleshooting Guide Safe-T-Beam® System Self...
... Customer Service 24 For Help, call 1-800-35-GENIE or visit www.geniecompany.com After adjusting either the Force or the Limit of travel, retest the Door Opener. See Owner's Manual. Use caution when using this Release with Opener. WARNING Use the Wall Console included with the door open. Troubleshooting Guide Safe-T-Beam® System Self...
Owner's Manual
Page 26
... the Status LED Light) Problem What To Do Opener does not run closed Check Open Limit Switch for a short circuit and for proper wiring. Door Opener starts • for service, or contact Customer Service at 1-800-35-GENIE. Adjust as needed. Adjust as needed . Check...service, or contact Customer Service at 1-800-35-GENIE. If Opener is connected to a wiring box: • Check that Ribbon Cable between Controller Board and Motor Drive Board is completely closed , that garage door and Opener are OK. • If not, check fuse ...
... the Status LED Light) Problem What To Do Opener does not run closed Check Open Limit Switch for a short circuit and for proper wiring. Door Opener starts • for service, or contact Customer Service at 1-800-35-GENIE. Adjust as needed. Adjust as needed . Check...service, or contact Customer Service at 1-800-35-GENIE. If Opener is connected to a wiring box: • Check that Ribbon Cable between Controller Board and Motor Drive Board is completely closed , that garage door and Opener are OK. • If not, check fuse ...


