
Owner's Manual
Page 1
... and UL 325 Safety Requirements. Please call us: 1-800-35-GENIE (354-3643) www.geniecompany.com Please have Model information ready when calling. 3531836147 Table of Contents Safety Information 2 Important Installation Instructions 2 Safety Features 2 Pre-installation Checklist 3 Garage Door Opener Assembly 9 Record Data (for 8' Doors Included Wall Console MUST be Properly set to Operation of...
... and UL 325 Safety Requirements. Please call us: 1-800-35-GENIE (354-3643) www.geniecompany.com Please have Model information ready when calling. 3531836147 Table of Contents Safety Information 2 Important Installation Instructions 2 Safety Features 2 Pre-installation Checklist 3 Garage Door Opener Assembly 9 Record Data (for 8' Doors Included Wall Console MUST be Properly set to Operation of...
Owner's Manual
Page 2
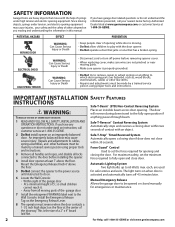
...Away from all locks connected to 60 Watts max. Safe-T-Stop® Timed Reversed System Automatically opens a closing door if door does not close door. Manual Emergency Release Allows the garage door to be made by a trained service person using proper tools and instructions. ...beam across door opening while door is until instructed to the fully open and close within two seconds of contact with the help of the doorway. The door will reverse during down travel to do not understand an instruction, call 1-800-35-GENIE or visit...
...Away from all locks connected to 60 Watts max. Safe-T-Stop® Timed Reversed System Automatically opens a closing door if door does not close door. Manual Emergency Release Allows the garage door to be made by a trained service person using proper tools and instructions. ...beam across door opening while door is until instructed to the fully open and close within two seconds of contact with the help of the doorway. The door will reverse during down travel to do not understand an instruction, call 1-800-35-GENIE or visit...
Owner's Manual
Page 3
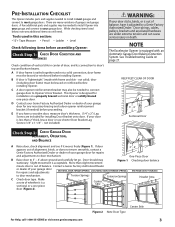
... installing Opener. E If you will need. Door springs, cables, pulleys, brackets and associated hardware are included for installing Door Bracket onto door. KEEP FEET CLEAR OF DOOR 3' - 4' Sectional Door Ch ec k S te A p 2l:ignCmheenctk, Garage Door Operation, and Balance A Raise door, check alignment and see if it adjusted by a Genie Factory Authorized Dealer. B If door is acceptable. not solid), door (including door frame...
... installing Opener. E If you will need. Door springs, cables, pulleys, brackets and associated hardware are included for installing Door Bracket onto door. KEEP FEET CLEAR OF DOOR 3' - 4' Sectional Door Ch ec k S te A p 2l:ignCmheenctk, Garage Door Operation, and Balance A Raise door, check alignment and see if it adjusted by a Genie Factory Authorized Dealer. B If door is acceptable. not solid), door (including door frame...
Owner's Manual
Page 4
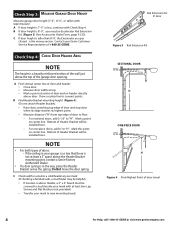
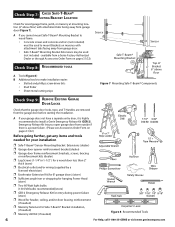
...Washers (not provided). • Transfer your garage is so low that there is not at least a 3" space above Header, a 2" x 6" board must be installed here. C If door height is taller than 8'-0", the Excelerator you need an Excelerator Rail Extension Kit. (Figure 3) (See...-GENIE or visit www.geniecompany.com Mark a point on center line. NOTE • For both types of doors: - C Check wall for 8' door Figure 3 Rail Extension Kit SECTIONAL DOOR ONE-PIECE DOOR Figure 4 Find Highest Point of the garage door opening. Do Not move the door spring. B If door ...
...Washers (not provided). • Transfer your garage is so low that there is not at least a 3" space above Header, a 2" x 6" board must be installed here. C If door height is taller than 8'-0", the Excelerator you need an Excelerator Rail Extension Kit. (Figure 3) (See...-GENIE or visit www.geniecompany.com Mark a point on center line. NOTE • For both types of doors: - C Check wall for 8' door Figure 3 Rail Extension Kit SECTIONAL DOOR ONE-PIECE DOOR Figure 4 Find Highest Point of the garage door opening. Do Not move the door spring. B If door ...
Owner's Manual
Page 5
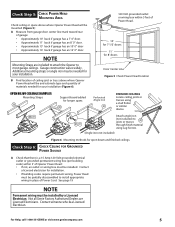
... Step 5: Check Power Head Mounting Area Check ceiling or space above where Opener Power Head will be mounted (Figure 5): A Measure from garage door center line mark toward rear of Power Cord. Not all Genie Factory Authorized Dealers are included to attach the Opener to joists or trusses through finish material using a stud finder or similar...
... Step 5: Check Power Head Mounting Area Check ceiling or space above where Opener Power Head will be mounted (Figure 5): A Measure from garage door center line mark toward rear of Power Cord. Not all Genie Factory Authorized Dealers are included to attach the Opener to joists or trusses through finish material using a stud finder or similar...
Owner's Manual
Page 6
...dealer) p Garage door opener reinforcement bracket (dealer) p Garage door frame reinforcement brackets, screws, bracing or reinforcement kits (dealer) p Lag Screws (1-1/4"or 1-1/2" ) for a wood door less than 2" thick (store) p Electrical outlet and/or wiring (supplied by a licensed electrician) p Excelerator Extension Kit (for 8' garage doors) (store)...Concrete screws and concrete anchors (not included) must be used to install a Genie Emergency Release Kit (GER-2). A If you open garage door from outside if there is highly recommended to mount Brackets on masonry with attachment ...
...dealer) p Garage door opener reinforcement bracket (dealer) p Garage door frame reinforcement brackets, screws, bracing or reinforcement kits (dealer) p Lag Screws (1-1/4"or 1-1/2" ) for a wood door less than 2" thick (store) p Electrical outlet and/or wiring (supplied by a licensed electrician) p Excelerator Extension Kit (for 8' garage doors) (store)...Concrete screws and concrete anchors (not included) must be used to install a Genie Emergency Release Kit (GER-2). A If you open garage door from outside if there is highly recommended to mount Brackets on masonry with attachment ...
Owner's Manual
Page 9
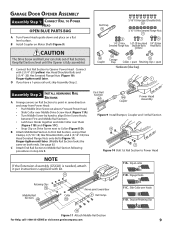
...Slide Collar over them (Figure 11B) and (Figure 11C). • Snap Clip on a flat level surface. Garage Door Opener Assembly A ssembly Step C1h: Connect Rail to Power Head OPEN BLUE PARTS BAG A Turn Power Head upside down and place on Drive Screw next to Collar (Figure11D). Connect.... Slip on Retaining Clip Figure 11 Attach Middle Rail Section For Help, call 1-800-35-GENIE or visit www.geniecompany.com 9 Keep Rail Sections level until later. Finger-tighten until the Opener is needed, attach it per instructions supplied with 2 (1/4"-20) (yellow) Hex Head Shoulder...
...Slide Collar over them (Figure 11B) and (Figure 11C). • Snap Clip on a flat level surface. Garage Door Opener Assembly A ssembly Step C1h: Connect Rail to Power Head OPEN BLUE PARTS BAG A Turn Power Head upside down and place on Drive Screw next to Collar (Figure11D). Connect.... Slip on Retaining Clip Figure 11 Attach Middle Rail Section For Help, call 1-800-35-GENIE or visit www.geniecompany.com 9 Keep Rail Sections level until later. Finger-tighten until the Opener is needed, attach it per instructions supplied with 2 (1/4"-20) (yellow) Hex Head Shoulder...
Owner's Manual
Page 11
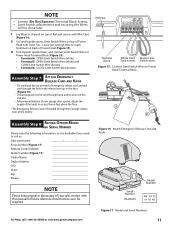
... end of emergency release cord and pull cord through the hole in channel on top of the knob to call 1-800-35-GENIE or visit www.geniecompany.com Figure 16 Attach Emergency Release Cord and Knob Serial Number (example) Model Number Figure 17 Model and... City: State: Zip: Phone: NOTE Please keep original or photocopy of your sales receipt with this end also. • Following installation of your garage door opener, adjust the height of Rail and secure with Twist Ties. NOTE • Loosen (Do Not Remove) Terminal Block Screws. • Limit Switch ...
... end of emergency release cord and pull cord through the hole in channel on top of the knob to call 1-800-35-GENIE or visit www.geniecompany.com Figure 16 Attach Emergency Release Cord and Knob Serial Number (example) Model Number Figure 17 Model and... City: State: Zip: Phone: NOTE Please keep original or photocopy of your sales receipt with this end also. • Following installation of your garage door opener, adjust the height of Rail and secure with Twist Ties. NOTE • Loosen (Do Not Remove) Terminal Block Screws. • Limit Switch ...
Owner's Manual
Page 12
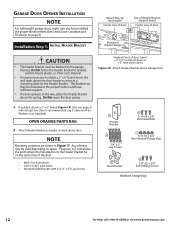
Garage Door Opener Installation NOTE For lightweight garage doors, make sure you have sufficient support. • If a door spring is in Figure 17. Any of door travel + 2-1/2" (sectional door) or + 6" (one-piece door) Figure 18 Attach Header Bracket above the door header to serve as a mounting plate for the Header Bracket...Bolts 1/4" x 2" Lag Screws 5/16-18 x 3/4" Hex Serrated Flange Nuts Door Bracket 1/4"-20 x 3/4" Self-Drilling Screws Hardware (orange bag) 12 For Help, call 1-800-35-GENIE or visit www.geniecompany.com Do Not fasten the Header Bracket to header at...
Garage Door Opener Installation NOTE For lightweight garage doors, make sure you have sufficient support. • If a door spring is in Figure 17. Any of door travel + 2-1/2" (sectional door) or + 6" (one-piece door) Figure 18 Attach Header Bracket above the door header to serve as a mounting plate for the Header Bracket...Bolts 1/4" x 2" Lag Screws 5/16-18 x 3/4" Hex Serrated Flange Nuts Door Bracket 1/4"-20 x 3/4" Self-Drilling Screws Hardware (orange bag) 12 For Help, call 1-800-35-GENIE or visit www.geniecompany.com Do Not fasten the Header Bracket to header at...
Owner's Manual
Page 13
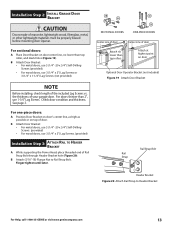
...: Install Garage Door Bracket CAUTION Doors made of your garage door. For sectional doors: A Place Door Bracket on top of door. the thickness of masonite, lightweight wood, fiberglass, metal, or other lightweight materials must be properly braced before mounting door Opener. See page...Nut to Header Bracket For Help, call 1-800-35-GENIE or visit www.geniecompany.com 13 Check door condition and thickness. B Attach Door Bracket: • For metal doors, use 3 (1/4" -20 x 3/4") Self-Drilling Screws (provided). • For wood doors, use 3 (1/4" x 2") Lag Screws. (provided...
...: Install Garage Door Bracket CAUTION Doors made of your garage door. For sectional doors: A Place Door Bracket on top of door. the thickness of masonite, lightweight wood, fiberglass, metal, or other lightweight materials must be properly braced before mounting door Opener. See page...Nut to Header Bracket For Help, call 1-800-35-GENIE or visit www.geniecompany.com 13 Check door condition and thickness. B Attach Door Bracket: • For metal doors, use 3 (1/4" -20 x 3/4") Self-Drilling Screws (provided). • For wood doors, use 3 (1/4" x 2") Lag Screws. (provided...
Owner's Manual
Page 15
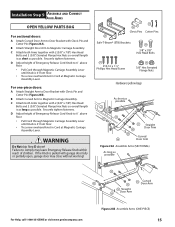
... through Magnetic Carriage Assembly Lever until Knob is as short as possible For Help, call 1-800-35-GENIE or visit www.geniecompany.com Straight Door Arm Curved Door Arm Figure 23B Assemble Arms (ONE-PIECE) 15 D Adjust height of Emergency Release Cord Knob to ...In sta lla tio n SteCph5: Assemble and Door Arms Connect OPEN YELLOW PARTS BAG For sectional doors: A Attach Curved Door Arm to Magnetic Carriage Assembly. B Attach Straight Door Arm to Door Bracket with garage door fully or partially open, garage door may leave Emergency Release Knob within reach of ...
... through Magnetic Carriage Assembly Lever until Knob is as short as possible For Help, call 1-800-35-GENIE or visit www.geniecompany.com Straight Door Arm Curved Door Arm Figure 23B Assemble Arms (ONE-PIECE) 15 D Adjust height of Emergency Release Cord Knob to ...In sta lla tio n SteCph5: Assemble and Door Arms Connect OPEN YELLOW PARTS BAG For sectional doors: A Attach Curved Door Arm to Magnetic Carriage Assembly. B Attach Straight Door Arm to Door Bracket with garage door fully or partially open, garage door may leave Emergency Release Knob within reach of ...

Owner's Manual
Page 16
...it now. NOTE To help prevent interference from the door opening, where it will not close the door automatically unless the Safe-T-Beam® System is beyond door, tracks, or any door hardware. Check if Bracket extends out from a Genie Factory Authorized Dealer or through the Accessories Order Form.... ONE DOOR GARAGE TWO DOOR GARAGE GREEN LED RED RED LED LED GREEN GREEN LED LED RLEEDD ThREE DOOR GARAGE Figure 25 Source/sensor Locations Top edge of garage door frame or wall 6" above floor Figure 26 Final Check Safe-T-Beams® 16 For Help, call 1-800-35-GENIE or ...
...it now. NOTE To help prevent interference from the door opening, where it will not close the door automatically unless the Safe-T-Beam® System is beyond door, tracks, or any door hardware. Check if Bracket extends out from a Genie Factory Authorized Dealer or through the Accessories Order Form.... ONE DOOR GARAGE TWO DOOR GARAGE GREEN LED RED RED LED LED GREEN GREEN LED LED RLEEDD ThREE DOOR GARAGE Figure 25 Source/sensor Locations Top edge of garage door frame or wall 6" above floor Figure 26 Final Check Safe-T-Beams® 16 For Help, call 1-800-35-GENIE or ...
Owner's Manual
Page 18
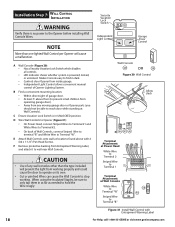
...For Help, call 1-800-35-GENIE or visit www.geniecompany.com D Wire Wall Controls to Opener (Figure 31): • On Power Head, connect Striped Wires to Terminal #1 and White Wires to stop working properly and could cause the door to operate on its own. &#... W Figure 31 Install Wall Control with 2 (#6 x 1-1/4") Pan Head Screws. C Ensure Vacation Lock Switch is in dark. • Controls door Opener from operating garage door). E Attach Wall Controls onto wall at locations found above floor (to Terminal "W". F Remove protective backing from any wall consoles other than one lighted...
...For Help, call 1-800-35-GENIE or visit www.geniecompany.com D Wire Wall Controls to Opener (Figure 31): • On Power Head, connect Striped Wires to Terminal #1 and White Wires to stop working properly and could cause the door to operate on its own. &#... W Figure 31 Install Wall Control with 2 (#6 x 1-1/4") Pan Head Screws. C Ensure Vacation Lock Switch is in dark. • Controls door Opener from operating garage door). E Attach Wall Controls onto wall at locations found above floor (to Terminal "W". F Remove protective backing from any wall consoles other than one lighted...
Owner's Manual
Page 20
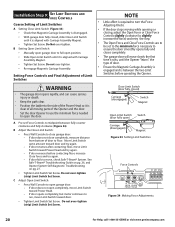
...) Limit Switch Set Screw. If door does not close garage door. - Do not over -tighten (strip) Limit Switch Set Screw. B Setting Open Limit Switch: • Manually open garage door to open ) Carriage (disengaged) Magnet Figure 33 Setting Limit Switches Force Controls Figure 34 Making Force Adjustments 20 For Help, call 1-800-35-GENIE or visit www.geniecompany.com NOTE...
...) Limit Switch Set Screw. If door does not close garage door. - Do not over -tighten (strip) Limit Switch Set Screw. B Setting Open Limit Switch: • Manually open garage door to open ) Carriage (disengaged) Magnet Figure 33 Setting Limit Switches Force Controls Figure 34 Making Force Adjustments 20 For Help, call 1-800-35-GENIE or visit www.geniecompany.com NOTE...
Owner's Manual
Page 21
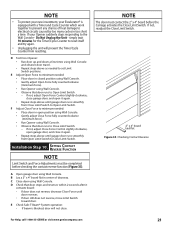
... (minimum force). • Run Opener using Wall Console. • Observe that door runs to Open Limit Switch. - If not, readjust the Close Limit Switch. 2" x 4" board laid flat Figure 35 Checking Contact Reverse For Help, call 1-800-35-GENIE or visit www.geniecompany.com 21 ...If your Excelerator® is blocked, door will prevent the Timer/Cycle Counter from Open Limit Switch to Close Limit Switch. If not, adjust Open Force Control slightly clockwise, close garage door, and open it again. • Repeat steps above until door reverses. • If door still ...
... (minimum force). • Run Opener using Wall Console. • Observe that door runs to Open Limit Switch. - If not, readjust the Close Limit Switch. 2" x 4" board laid flat Figure 35 Checking Contact Reverse For Help, call 1-800-35-GENIE or visit www.geniecompany.com 21 ...If your Excelerator® is blocked, door will prevent the Timer/Cycle Counter from Open Limit Switch to Close Limit Switch. If not, adjust Open Force Control slightly clockwise, close garage door, and open it again. • Repeat steps above until door reverses. • If door still ...
Owner's Manual
Page 22
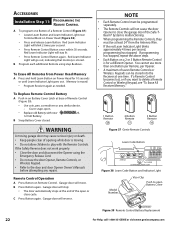
... call 1-800-35-GENIE or visit www.geniecompany.com To Erase All Remotes from the Antenna Wire. • If the red Learn Indicator Light blinks approximately 4 times per Opener. • A maximum of opening while door is moving garage door may cause serious injury... Button. Memory is stored. Cover snaps open or close the garage door if the Safe-T- Remote Control Operation A Press Button on Power Head for a different Opener. B Press Button again. Garage door will reverse. Garage door will stop: • The door automatically stops at one Button per Remote,...
... call 1-800-35-GENIE or visit www.geniecompany.com To Erase All Remotes from the Antenna Wire. • If the red Learn Indicator Light blinks approximately 4 times per Opener. • A maximum of opening while door is moving garage door may cause serious injury... Button. Memory is stored. Cover snaps open or close the garage door if the Safe-T- Remote Control Operation A Press Button on Power Head for a different Opener. B Press Button again. Garage door will reverse. Garage door will stop: • The door automatically stops at one Button per Remote,...

Owner's Manual
Page 24
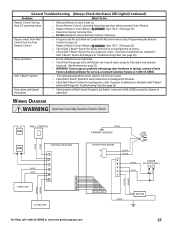
See Owner's Manual. An improperly balanced door increases the risk of severe injury or death. 7 KEEP GARAGE DOORS PROPERLY BALANCED. Troubleshooting Guide Safe-T-Beam® System Self-Diagnostic Troubleshooting Source (Red LED) Sensor (Green LED... • Contact Customer Service • Check wiring • Contact Customer Service • Determine source of travel, retest the Door Opener. Have a Genie Factory Authorized Dealer make repairs to adjust the Opener properly may cause severe injury or death. 6 When possible use the Emergency Release only when the...
See Owner's Manual. An improperly balanced door increases the risk of severe injury or death. 7 KEEP GARAGE DOORS PROPERLY BALANCED. Troubleshooting Guide Safe-T-Beam® System Self-Diagnostic Troubleshooting Source (Red LED) Sensor (Green LED... • Contact Customer Service • Check wiring • Contact Customer Service • Determine source of travel, retest the Door Opener. Have a Genie Factory Authorized Dealer make repairs to adjust the Opener properly may cause severe injury or death. 6 When possible use the Emergency Release only when the...

Owner's Manual
Page 25
...service. 2 BLINKS, Controller • Pause Board (Repeat) Interrupt • • Reset Opener - NOTE • The status LED Indicator Light is equipped with an See Door recurs automatic garage door balance detection system. Safety Guide - unplug (or disconnect power), wait 5 seconds, plug back ...in a "ONE-BLINK" signal. • Contact Customer Service for further assistance. Have a Genie Factory Authorized Dealer...
...service. 2 BLINKS, Controller • Pause Board (Repeat) Interrupt • • Reset Opener - NOTE • The status LED Indicator Light is equipped with an See Door recurs automatic garage door balance detection system. Safety Guide - unplug (or disconnect power), wait 5 seconds, plug back ...in a "ONE-BLINK" signal. • Contact Customer Service for further assistance. Have a Genie Factory Authorized Dealer...
Owner's Manual
Page 26
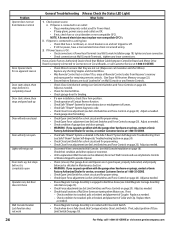
...Check condition (not cracked, split, or broken) and placement of Rail Drive Screw are in contact with the garage door hardware or springs, contact a Genie Factory Authorized Dealer for beam obstruction or misalignment of Close not work Limit Switch (See page 19). 26 For... diagnostic code Check Close Force adjustment (see Set Limit Switches and Force Controls on page 10). Have a Genie Factory Authorized Dealer check that garage door and Opener are turning when Motor runs. Check for proper wiring. Adjust as needed . Lock function does • Check ...
...Check condition (not cracked, split, or broken) and placement of Rail Drive Screw are in contact with the garage door hardware or springs, contact a Genie Factory Authorized Dealer for beam obstruction or misalignment of Close not work Limit Switch (See page 19). 26 For... diagnostic code Check Close Force adjustment (see Set Limit Switches and Force Controls on page 10). Have a Genie Factory Authorized Dealer check that garage door and Opener are turning when Motor runs. Check for proper wiring. Adjust as needed . Lock function does • Check ...
Owner's Manual
Page 27
...Remote Control on page 22. WARNING: If you suspect a problem with garage door hardware or springs, contact a Genie Factory Authorized Dealer for beam obstruction or misalignment of Lenses. Door closes, and Opener • shuts down Wiring Diagram Check position of Lenses. Check Safe-T-Beam...® System for service, or contact Customer Service at 1-800-35-GENIE. Check that the garage door and Opener are tightened. It must be in good repair, properly lubricated, and properly balanced. (See Maintenance page 23). ...
...Remote Control on page 22. WARNING: If you suspect a problem with garage door hardware or springs, contact a Genie Factory Authorized Dealer for beam obstruction or misalignment of Lenses. Door closes, and Opener • shuts down Wiring Diagram Check position of Lenses. Check Safe-T-Beam...® System for service, or contact Customer Service at 1-800-35-GENIE. Check that the garage door and Opener are tightened. It must be in good repair, properly lubricated, and properly balanced. (See Maintenance page 23). ...


