

Owner's Manual
Page 3
... Help, call 1-800-35-GENIE or visit www.geniecompany.com 3 not solid), door (including door frame) must be needed to connect garage door to your door is a sectional or a one -piece door. NOTE The Excelerator Opener is designed for installing Door Bracket onto door. One-Piece Door... See Troubleshooting Guide on a properly braced sectional door or solidly braced one -piece Torsion Springs Center Stile Extension Springs Header Area door (Figure 2). Contact a Genie Factory Authorized Dealer or dealer of your door sticks, binds, or is out of whether it is less than slight ...
... Help, call 1-800-35-GENIE or visit www.geniecompany.com 3 not solid), door (including door frame) must be needed to connect garage door to your door is a sectional or a one -piece door. NOTE The Excelerator Opener is designed for installing Door Bracket onto door. One-Piece Door... See Troubleshooting Guide on a properly braced sectional door or solidly braced one -piece Torsion Springs Center Stile Extension Springs Header Area door (Figure 2). Contact a Genie Factory Authorized Dealer or dealer of your door sticks, binds, or is out of whether it is less than slight ...

Owner's Manual
Page 4
... types of Travel 4 For Help, call 1-800-35-GENIE or visit www.geniecompany.com Check Step 4: CHECK DOOR HEADER AREA NOTE The header is a heavily reinforced section of the wall just above the Header Bracket mounting point, contact a Genie Factory Authorized Dealer. • If a door spring is... is above 7'-6", make sure your Customer Service Representative at 1-800-35-GENIE. Do Not move the door spring. For sectional doors, add 2-1/2" to "H". B Find Header Bracket mounting height (Figure 4): (Do not attach Header Bracket). • Raise door, watching top edge of door and stop door...
... types of Travel 4 For Help, call 1-800-35-GENIE or visit www.geniecompany.com Check Step 4: CHECK DOOR HEADER AREA NOTE The header is a heavily reinforced section of the wall just above the Header Bracket mounting point, contact a Genie Factory Authorized Dealer. • If a door spring is... is above 7'-6", make sure your Customer Service Representative at 1-800-35-GENIE. Do Not move the door spring. For sectional doors, add 2-1/2" to "H". B Find Header Bracket mounting height (Figure 4): (Do not attach Header Bracket). • Raise door, watching top edge of door and stop door...

Owner's Manual
Page 6
...Excelerator Extension Kit (for 8' garage doors) (store) ❐ Sufficient angle iron or strapping for hanging Power Head (store) ❐ Two 60 Watt light bulbs (Rough service bulbs recommended)(store) ❐ GER-2 Emergency Release Kit for entry during power failure (store) ❐ Wood for header...used (not included - Emergency Release Kit lets you cannot mount Safe-T-Beam® Mounting Bracket to install a Genie Emergency Release Kit (GER-2). Source Safe-T-Beam® Mounting Bracket Sensor Check Step 8: RECOMMENDED TOOLS A Tools (Figure 8): B Additional tools to make ...
...Excelerator Extension Kit (for 8' garage doors) (store) ❐ Sufficient angle iron or strapping for hanging Power Head (store) ❐ Two 60 Watt light bulbs (Rough service bulbs recommended)(store) ❐ GER-2 Emergency Release Kit for entry during power failure (store) ❐ Wood for header...used (not included - Emergency Release Kit lets you cannot mount Safe-T-Beam® Mounting Bracket to install a Genie Emergency Release Kit (GER-2). Source Safe-T-Beam® Mounting Bracket Sensor Check Step 8: RECOMMENDED TOOLS A Tools (Figure 8): B Additional tools to make ...

Owner's Manual
Page 7
...2 2 Emergency Release Cord (green bag) 1 1 Emergency Release Cord (long)(yellow) 10'&12'only Emergency Release Knob (green bag) 1 1 Emergency Release Tag (green bag) 1 1 Header Bracket (orange bag) 1 1 Door Bracket (orange bag) 1/4" x 2" Lag Screw (orange bag) Straight Door Arm (main carton) 1 1 varies/model 8 1 1 Clevis Pin, 3/8" x 15/16" (yellow bag) ... Head No. 8-32 x 1" Phillips Screw No. 8-32 x 3/8" Slotted Hex Head Screw Power Cord For Help, call 1-800-35-GENIE or visit www.geniecompany.com 7 These items will be illustrated throughout the manual as required.
...2 2 Emergency Release Cord (green bag) 1 1 Emergency Release Cord (long)(yellow) 10'&12'only Emergency Release Knob (green bag) 1 1 Emergency Release Tag (green bag) 1 1 Header Bracket (orange bag) 1 1 Door Bracket (orange bag) 1/4" x 2" Lag Screw (orange bag) Straight Door Arm (main carton) 1 1 varies/model 8 1 1 Clevis Pin, 3/8" x 15/16" (yellow bag) ... Head No. 8-32 x 1" Phillips Screw No. 8-32 x 3/8" Slotted Hex Head Screw Power Cord For Help, call 1-800-35-GENIE or visit www.geniecompany.com 7 These items will be illustrated throughout the manual as required.

Owner's Manual
Page 12
...(sectional door) or + 6" (one-piece door) Figure 18 Attach Header Bracket above the door header to serve as a mounting plate for the Header Bracket. Do Not fasten the Header Bracket to header at the proper location and have installed the proper reinforcement (See Check Door... Hex Serrated Flange Nuts 28 Door Bracket 56 1/4"-20 x 3/4" Self-Drilling Screws Hardware (orange bag) 12 For Help, call 1-800-35-GENIE or visit www.geniecompany.com Alternative Header Bracket orientations Highest Point of bracket flange CAUTION • The Header Bracket must be necessary to the garage ...
...(sectional door) or + 6" (one-piece door) Figure 18 Attach Header Bracket above the door header to serve as a mounting plate for the Header Bracket. Do Not fasten the Header Bracket to header at the proper location and have installed the proper reinforcement (See Check Door... Hex Serrated Flange Nuts 28 Door Bracket 56 1/4"-20 x 3/4" Self-Drilling Screws Hardware (orange bag) 12 For Help, call 1-800-35-GENIE or visit www.geniecompany.com Alternative Header Bracket orientations Highest Point of bracket flange CAUTION • The Header Bracket must be necessary to the garage ...
Owner's Manual
Page 13
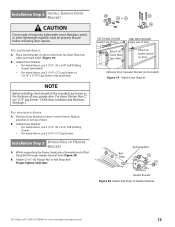
...on door Optional Door Operator Bracket (not included) Figure 19 Attach Door Bracket Rail Strap Rail Strap Bolt 26 11 Header Bracket Figure 20 Attach Rail Strap to Rail Strap Bolt. B Attach (5/16"-18) Flange Nut to Header Bracket For Help, call 1-800-35-GENIE or visit www.geniecompany.com... 13 For sectional doors: A Place Door Bracket on door center line, no OR lower than 2", use 11/4" Lag Screws. B Attach Door Bracket: • For metal doors, use 3 (1/4" -20 ...
...on door Optional Door Operator Bracket (not included) Figure 19 Attach Door Bracket Rail Strap Rail Strap Bolt 26 11 Header Bracket Figure 20 Attach Rail Strap to Rail Strap Bolt. B Attach (5/16"-18) Flange Nut to Header Bracket For Help, call 1-800-35-GENIE or visit www.geniecompany.com... 13 For sectional doors: A Place Door Bracket on door center line, no OR lower than 2", use 11/4" Lag Screws. B Attach Door Bracket: • For metal doors, use 3 (1/4" -20 ...
