

Owner's Manual
Page 1
Will not operate twice as fast on a one-piece door. SAVEFTUHTIUSRMEARNEUFEARLEFNOCRE 3531835447 TABLE OF CONTENTS Safety Information 2 Important Installation Instructions 2 Safety Features 2 Pre-installation Checklist 3 Garage Door Opener Assembly 9 Record Data (for 8' Doors Included Wall Control MUST be Properly... Safety Reverse System Must be Installed and the Force Controls MUST be installed prior to close door. Please call us: 1-800-35-GENIE (354-3643) www.geniecompany.com Please have Model information ready when calling. This Equipment meets or exceeds all Federal, State and UL ...
Will not operate twice as fast on a one-piece door. SAVEFTUHTIUSRMEARNEUFEARLEFNOCRE 3531835447 TABLE OF CONTENTS Safety Information 2 Important Installation Instructions 2 Safety Features 2 Pre-installation Checklist 3 Garage Door Opener Assembly 9 Record Data (for 8' Doors Included Wall Control MUST be Properly... Safety Reverse System Must be Installed and the Force Controls MUST be installed prior to close door. Please call us: 1-800-35-GENIE (354-3643) www.geniecompany.com Please have Model information ready when calling. This Equipment meets or exceeds all Federal, State and UL ...

Owner's Manual
Page 2
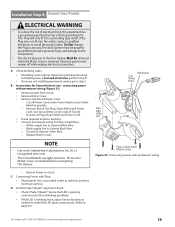
... assembly, and other like items. • Repairs and adjustments must be made by a trained service person using proper tools and instructions. each, are used for opening , that reverses the door during down travel to fully open position if anything to set the minimum... be made by a trained service person using proper tools and instructions. 3 Remove all ropes, and disable all moving objects, springs under high tension and electric opening equipment may cause injuries, your nearest Genie Factory Authorized Dealer listed at www.geniecompany.com, or customer Service...
... assembly, and other like items. • Repairs and adjustments must be made by a trained service person using proper tools and instructions. each, are used for opening , that reverses the door during down travel to fully open position if anything to set the minimum... be made by a trained service person using proper tools and instructions. 3 Remove all ropes, and disable all moving objects, springs under high tension and electric opening equipment may cause injuries, your nearest Genie Factory Authorized Dealer listed at www.geniecompany.com, or customer Service...

Owner's Manual
Page 9
... 11C). • Snap Clip on Rail Sections to point in step A & B. Keep Rail Sections level until the Opener is needed, attach it per instructions supplied with 2 (1/4"-20) (yellow) Hex Head Shoulder Bolts and 2 (1/4" -20) Hex Serrated Flange Nuts (Figure 10). C Install Coupler on Retaining ...Clip 10 Figure 11 Attach Middle Rail Section For Help, call 1-800-35-GENIE or visit www.geniecompany.com 9 Finger-tighten until later. Slip on a flat level surface. B Attach Middle Rail Section to First Rail Section, ...
... 11C). • Snap Clip on Rail Sections to point in step A & B. Keep Rail Sections level until the Opener is needed, attach it per instructions supplied with 2 (1/4"-20) (yellow) Hex Head Shoulder Bolts and 2 (1/4" -20) Hex Serrated Flange Nuts (Figure 10). C Install Coupler on Retaining ...Clip 10 Figure 11 Attach Middle Rail Section For Help, call 1-800-35-GENIE or visit www.geniecompany.com 9 Finger-tighten until later. Slip on a flat level surface. B Attach Middle Rail Section to First Rail Section, ...

Owner's Manual
Page 14
D Securely tighten all instructions completely. • Garage constructions differ. H ONE-PIECE DOORS Set clearance at 1"-11/2" between Rail and door at highest point of travel (using Lag Screws. (Angle ... or trusses and to drywall, particle board, plaster, or other such materials. Check for open beam and finished ceilings 14 For Help, call 1-800-35-GENIE or visit www.geniecompany.com See Check Power Head Mounting Area on page 5. Do Not over-tighten. Adjust as needed for mounting Opener Power Head...
D Securely tighten all instructions completely. • Garage constructions differ. H ONE-PIECE DOORS Set clearance at 1"-11/2" between Rail and door at highest point of travel (using Lag Screws. (Angle ... or trusses and to drywall, particle board, plaster, or other such materials. Check for open beam and finished ceilings 14 For Help, call 1-800-35-GENIE or visit www.geniecompany.com See Check Power Head Mounting Area on page 5. Do Not over-tighten. Adjust as needed for mounting Opener Power Head...
Owner's Manual
Page 19
... line to Opener Green Wire. - The door Opener must remain off Power Cord inside Power Head as near Strain Relief as possible. - Replace Motor Cover. B Instructions for licensed electrician - If the Plug does not fit into a grounding type outlet. White supply line to Opener White Wire. - Knockout Cut Wires here NOTE... only Underwriters Laboratories, Inc. (U.L.) recognized wire nuts. • The Circuit Boards are not installing permanent wiring, go to page 26.) For Help, call 1-800-35-GENIE or visit www.geniecompany.com 19
... line to Opener Green Wire. - The door Opener must remain off Power Cord inside Power Head as near Strain Relief as possible. - Replace Motor Cover. B Instructions for licensed electrician - If the Plug does not fit into a grounding type outlet. White supply line to Opener White Wire. - Knockout Cut Wires here NOTE... only Underwriters Laboratories, Inc. (U.L.) recognized wire nuts. • The Circuit Boards are not installing permanent wiring, go to page 26.) For Help, call 1-800-35-GENIE or visit www.geniecompany.com 19
Owner's Manual
Page 24
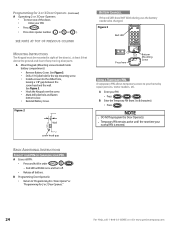
...PIN • Press . See Figure 3. • Drill a 1/16"pilot hole for 2 or 3 Door Openers." 24 For Help, call 1-800-35-GENIE or visit www.geniecompany.com B Enter the Temporary PIN (from 3 to be mounted in order . - Red LED will blink once and turn off. •...8226; Temporary PIN remains active until the next time your PIN. • Press . • Press door opener number ( or or ). BASIC ADDITIONAL INSTRUCTIONS FORGOT YOUR PIN OR CHANGING YOUR PIN. A Mount Keypad.(Mounting screws located inside battery compartment.) • Remove Battery Cover. A Erase old PIN : ...
...PIN • Press . See Figure 3. • Drill a 1/16"pilot hole for 2 or 3 Door Openers." 24 For Help, call 1-800-35-GENIE or visit www.geniecompany.com B Enter the Temporary PIN (from 3 to be mounted in order . - Red LED will blink once and turn off. •...8226; Temporary PIN remains active until the next time your PIN. • Press . • Press door opener number ( or or ). BASIC ADDITIONAL INSTRUCTIONS FORGOT YOUR PIN OR CHANGING YOUR PIN. A Mount Keypad.(Mounting screws located inside battery compartment.) • Remove Battery Cover. A Erase old PIN : ...
Owner's Manual
Page 26
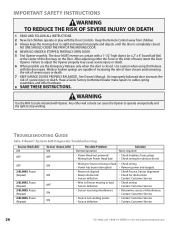
...wall console can cause the Opener to operate unexpectedly and the light to cables, spring assemblies, and other hardware. 8 SAVE THESE INSTRUCTIONS. Weak or broken springs are capable of increasing the rate of door closure and increasing the risk of severe injury or death. ... source of interference • Contact Customer Service • Contact Customer Service • Contact Customer Service 26 For Help, call 1-800-35-GENIE or visit www.geniecompany.com Failure to Sensor missing or bad • Sensor defective • Sensor receiving interference • Source not sending ...
...wall console can cause the Opener to operate unexpectedly and the light to cables, spring assemblies, and other hardware. 8 SAVE THESE INSTRUCTIONS. Weak or broken springs are capable of increasing the rate of door closure and increasing the risk of severe injury or death. ... source of interference • Contact Customer Service • Contact Customer Service • Contact Customer Service 26 For Help, call 1-800-35-GENIE or visit www.geniecompany.com Failure to Sensor missing or bad • Sensor defective • Sensor receiving interference • Source not sending ...

