
Owner's Manual
Page 1
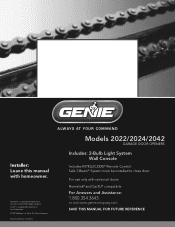
d/b/a The Genie Company PN# 37026500123, 5/15/2009 ALWAYS AT YOUR COMMAND Models 2022/2024/2042 GARAGE DOOR OPENERS Includes: 2-Bulb Light System Wall Console Includes INTELLICODE® Remote Control Safe-T-Beam® System must be installed to close door. Homelink® and Car2U® compatible For Answers and Assistance: 1.800.354.3643 or visit www.geniecompany.com...
d/b/a The Genie Company PN# 37026500123, 5/15/2009 ALWAYS AT YOUR COMMAND Models 2022/2024/2042 GARAGE DOOR OPENERS Includes: 2-Bulb Light System Wall Console Includes INTELLICODE® Remote Control Safe-T-Beam® System must be installed to close door. Homelink® and Car2U® compatible For Answers and Assistance: 1.800.354.3643 or visit www.geniecompany.com...
Owner's Manual
Page 2
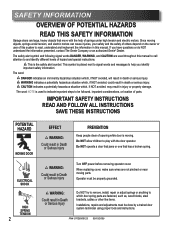
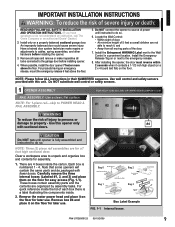
...Genie Company or an authorized Genie® Dealer. If you identify important safety information The word: DANGER indicates an imminently hazardous situation which door...THESE INSTRUCTIONS POTENTIAL HAZARD MOVING DOOR EFFECT WARNING: CoourldSererisouultsinInDjueryath PREVENTION Keep people clear of opening while door is the safety alert symbol...door that jams or one that move with the door operator. Operator must be done by a trained door system technician using proper tools and instructions. SAFETY INFORMATION OVERVIEW OF POTENTIAL HAZARDS READ THIS SAFETY INFORMATION Garage doors...
...Genie Company or an authorized Genie® Dealer. If you identify important safety information The word: DANGER indicates an imminently hazardous situation which door...THESE INSTRUCTIONS POTENTIAL HAZARD MOVING DOOR EFFECT WARNING: CoourldSererisouultsinInDjueryath PREVENTION Keep people clear of opening while door is the safety alert symbol...door that jams or one that move with the door operator. Operator must be done by a trained door system technician using proper tools and instructions. SAFETY INFORMATION OVERVIEW OF POTENTIAL HAZARDS READ THIS SAFETY INFORMATION Garage doors...
Owner's Manual
Page 3
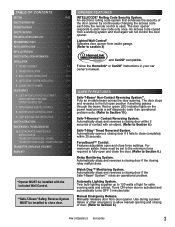
... Twin bulb lighting supplies up to fully open and close door. Manually releases door from a working system and tried again will not control the door opener. An access code copied from door opener. Automatically opens a closing door if it fails to close the door. (Refer to Section 6.) Safe-T-Stop®...® Rolling Code Security System. Use during a power failure or other emergency to allow manual opening . Lighted Wall Control* Operates door opener from inside garage. (Refer to Section 10.) Safe-T-Reverse® Contact Reversing System. Red or green LED indicator...
... Twin bulb lighting supplies up to fully open and close door. Manually releases door from a working system and tried again will not control the door opener. An access code copied from door opener. Automatically opens a closing door if it fails to close the door. (Refer to Section 6.) Safe-T-Stop®...® Rolling Code Security System. Use during a power failure or other emergency to allow manual opening . Lighted Wall Control* Operates door opener from inside garage. (Refer to Section 10.) Safe-T-Reverse® Contact Reversing System. Red or green LED indicator...
Owner's Manual
Page 4
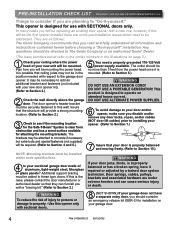
...to these type doors. Any questions should be directed to The Genie Company or an authorized Genie® Dealer. (The issue numbers below refer to the circled numbers in the position needed with your new door opener kit). (Refer to Section 2.) 2 Check the wall directly above the garage door. It may..."Do-it repaired or adjusted by a trained door system technician. PRE-INSTALLATION CHECK LIST FOR HELP-1.800.354.3643 OR WWW.GENIECOMPANY.COM Things to consider if you should consider an emergency release kit (GER-2) for installation on your garage door. 4 PN# 37026500123 05/15/2009 This ...
...to these type doors. Any questions should be directed to The Genie Company or an authorized Genie® Dealer. (The issue numbers below refer to the circled numbers in the position needed with your new door opener kit). (Refer to Section 2.) 2 Check the wall directly above the garage door. It may..."Do-it repaired or adjusted by a trained door system technician. PRE-INSTALLATION CHECK LIST FOR HELP-1.800.354.3643 OR WWW.GENIECOMPANY.COM Things to consider if you should consider an emergency release kit (GER-2) for installation on your garage door. 4 PN# 37026500123 05/15/2009 This ...
Owner's Manual
Page 6
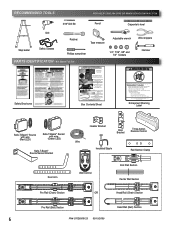
... 3/8" and 1/2" Sockets Hammer Child can result. • Never let child walk or run under automatic garage door. Remove lens Box and motor power head. Quite las secciones de riel no conectadas a la cadena o...off chain or plastic tie off belt. id flat) on floor. RECOMMENDED TOOLS FOR HELP-1.800.354.3643 OR WWW.GENIECOMPANY.COM 3/16" Drill Bit Pencil Carpenter's level Drill Step ladder... quite el tercer riel (con la cadena o correa acoplada) y ponga en el piso. If opener still fails to wall control. ©1999 Entrapment Warning Label Safe-T-Beam® Source with wire ...
... 3/8" and 1/2" Sockets Hammer Child can result. • Never let child walk or run under automatic garage door. Remove lens Box and motor power head. Quite las secciones de riel no conectadas a la cadena o...off chain or plastic tie off belt. id flat) on floor. RECOMMENDED TOOLS FOR HELP-1.800.354.3643 OR WWW.GENIECOMPANY.COM 3/16" Drill Bit Pencil Carpenter's level Drill Step ladder... quite el tercer riel (con la cadena o correa acoplada) y ponga en el piso. If opener still fails to wall control. ©1999 Entrapment Warning Label Safe-T-Beam® Source with wire ...
Owner's Manual
Page 9
... sight of door, • At minimum height of power until opener is fully assembled and instructed to do so. After installing the opener, the door must reverse within 2 seconds when it , and • Away from all locks connected to the garage door before installing the opener. 3. NOTE... RAIL ASSEMBLY. An improperly balanced door could cause severe injury. Install the Emergency Release Tag on a properly balanced sectional garage door. CAUTION Do NOT run until instructed to do not understand an instruction, call The Genie Company or an authorized Genie® Dealer.) 2. NOTE: ...
... sight of door, • At minimum height of power until opener is fully assembled and instructed to do so. After installing the opener, the door must reverse within 2 seconds when it , and • Away from all locks connected to the garage door before installing the opener. 3. NOTE... RAIL ASSEMBLY. An improperly balanced door could cause severe injury. Install the Emergency Release Tag on a properly balanced sectional garage door. CAUTION Do NOT run until instructed to do not understand an instruction, call The Genie Company or an authorized Genie® Dealer.) 2. NOTE: ...
Owner's Manual
Page 11
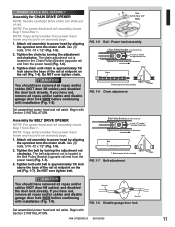
...CAUTION You should have removed all ropes and/or cables (NOT door lift cables) and disabled the door lock already. Begin with Section 2 INSTALLATION. Set assembled power head and rail aside. Assembly for CHAIN DRIVE OPENER NOTE: Handle carefully! Tighten the belt by aligning the sprocket...chain adjustment nut is approximately 1/8 inch above the base of rail. If you have not, remove all ropes and/or cables and disable garage door lock NOW before continuing with installation (Fig. 1-8). The belt adjustment nut is approximately 1/8 inch above the base of rail assembly T-Rail ...
...CAUTION You should have removed all ropes and/or cables (NOT door lift cables) and disabled the door lock already. Begin with Section 2 INSTALLATION. Set assembled power head and rail aside. Assembly for CHAIN DRIVE OPENER NOTE: Handle carefully! Tighten the belt by aligning the sprocket...chain adjustment nut is approximately 1/8 inch above the base of rail. If you have not, remove all ropes and/or cables and disable garage door lock NOW before continuing with installation (Fig. 1-8). The belt adjustment nut is approximately 1/8 inch above the base of rail assembly T-Rail ...

Owner's Manual
Page 12
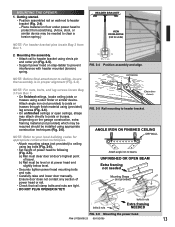
...800.354.3643 OR WWW.GENIECOMPANY.COM b) - a) - 6" vertical line 2-1/2" HIGHEST POINT OF TRAVEL HEADER TRACK WARNING Door springs are designed to be fastened to wall studs on wall. NOTE: For header bracket and bolts locate Bag 2 from top edge of your location for garage door opening...locations on vertical line, - Finding header bracket mounting location. • Close garage door. - 2 OPENER INSTALLATION HEADER AND DOOR MOUNTING BRACKETS: WARNING Header bracket must be used on the garage door centerline and mark this line on wall above header for header bracket. Do ...
...800.354.3643 OR WWW.GENIECOMPANY.COM b) - a) - 6" vertical line 2-1/2" HIGHEST POINT OF TRAVEL HEADER TRACK WARNING Door springs are designed to be fastened to wall studs on wall. NOTE: For header bracket and bolts locate Bag 2 from top edge of your location for garage door opening...locations on vertical line, - Finding header bracket mounting location. • Close garage door. - 2 OPENER INSTALLATION HEADER AND DOOR MOUNTING BRACKETS: WARNING Header bracket must be used on the garage door centerline and mark this line on wall above header for header bracket. Do ...
Owner's Manual
Page 13
...and align. ANGLE IRON ON FINISHED CEILING DRYWALL Attach angle iron to beams UNFINISHED OR OPEN BEAM Extra framing not needed to prevent interference with header mounted (torsion) spring. ...to joists or trusses. a) Rail must be level or at door's highest point of travel. b) Rail must clear door at power head end slightly below level. • Securely tighten...Rail mounting to header bracket (Fig. 2-4). - Getting started. • Position assembled rail on the garage construction, extra framing material (not provided) which may be installed using lag bolts (Fig. 2-6). ...
...and align. ANGLE IRON ON FINISHED CEILING DRYWALL Attach angle iron to beams UNFINISHED OR OPEN BEAM Extra framing not needed to prevent interference with header mounted (torsion) spring. ...to joists or trusses. a) Rail must be level or at door's highest point of travel. b) Rail must clear door at power head end slightly below level. • Securely tighten...Rail mounting to header bracket (Fig. 2-4). - Getting started. • Position assembled rail on the garage construction, extra framing material (not provided) which may be installed using lag bolts (Fig. 2-6). ...
Owner's Manual
Page 15
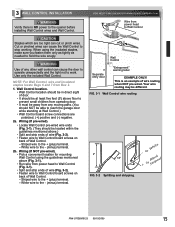
...locate Bags 6 and 7 from operating door. • It must be able to work. FOR HELP-1.800.354.3643 OR WWW.GENIECOMPANY.COM Wire from any other wall control can cause the door to operate unexpectedly and the light not to reach the garage door while standing at least five feet ... WARNING Verify there is an example of wire (Fig. 3-2). • Fasten wire to the + (plus ) terminal. - Striped wire to the opener before installing Wall Control wires and Wall Control. FIG. 3-1 Wall Control wire routing or White 2" - 1/2" + or BStlaricpked FIG. 3-2 Splitting and stripping.
...locate Bags 6 and 7 from operating door. • It must be able to work. FOR HELP-1.800.354.3643 OR WWW.GENIECOMPANY.COM Wire from any other wall control can cause the door to operate unexpectedly and the light not to reach the garage door while standing at least five feet ... WARNING Verify there is an example of wire (Fig. 3-2). • Fasten wire to the + (plus ) terminal. - Striped wire to the opener before installing Wall Control wires and Wall Control. FIG. 3-1 Wall Control wire routing or White 2" - 1/2" + or BStlaricpked FIG. 3-2 Splitting and stripping.
Owner's Manual
Page 16
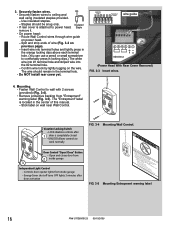
...; Fasten Wall Control to power head, Insulated Staple remove it. • On power head: - Vacation Locking Switch - Controls door opener lights from inside garage 3 Independent Light Control - FIG. 3-5 DCehailAeNNItdfhmleewpcTovveeaeaeerrsIIRPrnyffMgsrrtlesodasobofedopcllueeeeeoenonnrektrrnttto1ecwoeif1i/parccoarys2eyil-llDoshhioiuspncntrpupoiiioctlsellrlo'nnehiddnmftnolrarnooeeioweintnwuoleblvsnadrojeereesvPejutasruolmctrdmaeisu'tleoncesrork,ef(eno.vgoydcmonvpenhrodeneoaix2tuldcordrtnchesoxr'tosousaeo4lrrprynarhwoundleatl:a.aaoaaoirnlincclcdorpuhcttir,ooef,unoe(ltnaaarvnstonetdrnteos...
...; Fasten Wall Control to power head, Insulated Staple remove it. • On power head: - Vacation Locking Switch - Controls door opener lights from inside garage 3 Independent Light Control - FIG. 3-5 DCehailAeNNItdfhmleewpcTovveeaeaeerrsIIRPrnyffMgsrrtlesodasobofedopcllueeeeeoenonnrektrrnttto1ecwoeif1i/parccoarys2eyil-llDoshhioiuspncntrpupoiiioctlsellrlo'nnehiddnmftnolrarnooeeioweintnwuoleblvsnadrojeereesvPejutasruolmctrdmaeisu'tleoncesrork,ef(eno.vgoydcmonvpenhrodeneoaix2tuldcordrtnchesoxr'tosousaeo4lrrprynarhwoundleatl:a.aaoaaoirnlincclcdorpuhcttir,ooef,unoe(ltnaaarvnstonetdrnteos...
Owner's Manual
Page 17
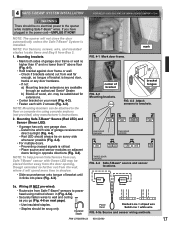
...Staples should be placed further away from the door opening, though extended no further out from sun, Safe-T-Beam® sensor with 2 screws (Fig. 4-2). 4 SAFE-T-BEAM® SYSTEM INSTALLATION FOR HELP-1.800.354.3643 OR WWW.GENIECOMPANY.COM WARNING There ... extensions are available through an authorized Genie® Dealer. RLEEDD GRLEEDEN GRLEEDEN RLEEDD RLEEDD GRLEEDEN ONE DOOR GARAGE TWO DOOR GARAGE GRLEEDEN RLEEDD RLEEDD GRLEEDEN GREEN LED RED LED THREE DOOR GARAGE FIG. 4-4 Safe-T-Beam® source and sensor locations. NOTE: The opener will spend more time in opposite...
...Staples should be placed further away from the door opening, though extended no further out from sun, Safe-T-Beam® sensor with 2 screws (Fig. 4-2). 4 SAFE-T-BEAM® SYSTEM INSTALLATION FOR HELP-1.800.354.3643 OR WWW.GENIECOMPANY.COM WARNING There ... extensions are available through an authorized Genie® Dealer. RLEEDD GRLEEDEN GRLEEDEN RLEEDD RLEEDD GRLEEDEN ONE DOOR GARAGE TWO DOOR GARAGE GRLEEDEN RLEEDD RLEEDD GRLEEDEN GREEN LED RED LED THREE DOOR GARAGE FIG. 4-4 Safe-T-Beam® source and sensor locations. NOTE: The opener will spend more time in opposite...
Owner's Manual
Page 19
... using standard household current. • Do NOT use a portable generator. NOTE: The Genie Company is designed to have your garage door opener permanently wired, with permanent wiring. The brackets are not required to operate using 7/8" diameter...door moves to make sure that you release the "open /close " button on both sensors. This plug will reverse automatically to inform you do not have a qualified licensed electrician connect power with circuit breaker protection. If you are flexible, and can be at the Green LED receiver. 5 CONNECTING TO POWER FOR HELP-1.800...
... using standard household current. • Do NOT use a portable generator. NOTE: The Genie Company is designed to have your garage door opener permanently wired, with permanent wiring. The brackets are not required to operate using 7/8" diameter...door moves to make sure that you release the "open /close " button on both sensors. This plug will reverse automatically to inform you do not have a qualified licensed electrician connect power with circuit breaker protection. If you are flexible, and can be at the Green LED receiver. 5 CONNECTING TO POWER FOR HELP-1.800...
Owner's Manual
Page 20
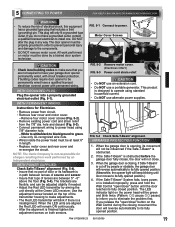
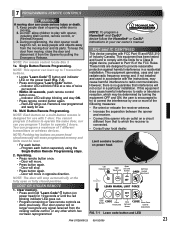
... release the "Close Travel Limit" button to move the door to move the door in small increments. Belt Connector Latch Movement FIG. 6-2 Engage Chain/Belt Connector to rail components. 6 DOOR LIMITS FOR HELP-1.800.354.3643 OR WWW.GENIECOMPANY.COM WARNING • Severe ...that you desire, then release this direction Latch Movement Latch Movement Carriage Assembly 1. LED Indicator Light Open Open Set Limit Travel Limit Button Up Force OPEN Control Adjustment To Garage Door SET LEARN MANUAL LIMIT FORCE SET A) ENGAGE CHAIN/BELT CONNECTOR TO CARRIAGE 1. CAUTION Learn Code ...
... release the "Close Travel Limit" button to move the door to move the door in small increments. Belt Connector Latch Movement FIG. 6-2 Engage Chain/Belt Connector to rail components. 6 DOOR LIMITS FOR HELP-1.800.354.3643 OR WWW.GENIECOMPANY.COM WARNING • Severe ...that you desire, then release this direction Latch Movement Latch Movement Carriage Assembly 1. LED Indicator Light Open Open Set Limit Travel Limit Button Up Force OPEN Control Adjustment To Garage Door SET LEARN MANUAL LIMIT FORCE SET A) ENGAGE CHAIN/BELT CONNECTOR TO CARRIAGE 1. CAUTION Learn Code ...

Owner's Manual
Page 22
... indicator light blinks (about 5 seconds). 2. Press and hold both of garage door opening . 22 PN# 37026500123 05/15/2009 Testing. • Open garage door using Wall Control. • When door contacts board, the door must stop (within 2 seconds) and reverse direction returning to open position. 2. Adjustment. • If the door does not properly reverse. - It should not have reached its...
... indicator light blinks (about 5 seconds). 2. Press and hold both of garage door opening . 22 PN# 37026500123 05/15/2009 Testing. • Open garage door using Wall Control. • When door contacts board, the door must stop (within 2 seconds) and reverse direction returning to open position. 2. Adjustment. • If the door does not properly reverse. - It should not have reached its...
Owner's Manual
Page 23
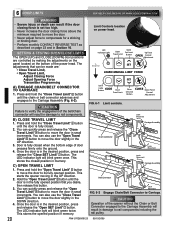
... a multi-button remote is connected. • Consult your car owner's manual. Your door opener will erase programmed memory and limits must be determined by one or more of opening while door is encouraged to try to correct the interference by turning the equipment OFF and ON, the...• Within 30 seconds, push remote control button once. - Program each button. - Operating. • Press remote button once. - To Garage Door SET LOST OR STOLEN REMOTE 1. LEARN MANUAL LIMIT FORCE SET Learn Code CODE Button Close Travel Limit Close CLOSE Down Force Set Limit Control Button...
... a multi-button remote is connected. • Consult your car owner's manual. Your door opener will erase programmed memory and limits must be determined by one or more of opening while door is encouraged to try to correct the interference by turning the equipment OFF and ON, the...• Within 30 seconds, push remote control button once. - Program each button. - Operating. • Press remote button once. - To Garage Door SET LOST OR STOLEN REMOTE 1. LEARN MANUAL LIMIT FORCE SET Learn Code CODE Button Close Travel Limit Close CLOSE Down Force Set Limit Control Button...
Owner's Manual
Page 24
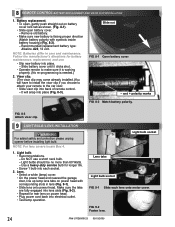
... are fully engaged into lens slots (Fig. 9-2). • Repeat for battery maintenance, replacement, and use a short neck bulb. - Slide out FIG. 8-1 Open battery cover. - Light bulb. • Recommendations. - FIG. 9-2 Fasten lens. 24 PN# 37026500123 05/15/2009 Slide battery cover until it clicks shut...Lens. • Select a white (lamp) cover. • On the power head end nearest the garage door, line up lamp lens tabs on battery cover lock tab as shown. (Fig. 8-1). • Slide open , gently push straight out on power head with symbols inside battery housing) (Fig. 8-2). - 8 ...
... are fully engaged into lens slots (Fig. 9-2). • Repeat for battery maintenance, replacement, and use a short neck bulb. - Slide out FIG. 8-1 Open battery cover. - Light bulb. • Recommendations. - FIG. 9-2 Fasten lens. 24 PN# 37026500123 05/15/2009 Slide battery cover until it clicks shut...Lens. • Select a white (lamp) cover. • On the power head end nearest the garage door, line up lamp lens tabs on battery cover lock tab as shown. (Fig. 8-1). • Slide open , gently push straight out on power head with symbols inside battery housing) (Fig. 8-2). - 8 ...

Owner's Manual
Page 25
... the emergency release only when the door is closed . SAVE THESE INSTRUCTIONS. Door fails to repair or adjust door springs or any questions, please do not hesitate to contact Genie® customer service at the center of garage door opening. • Close door by using remote. - Door will re-attach itself to adjust the opener properly may cause severe injury...
... the emergency release only when the door is closed . SAVE THESE INSTRUCTIONS. Door fails to repair or adjust door springs or any questions, please do not hesitate to contact Genie® customer service at the center of garage door opening. • Close door by using remote. - Door will re-attach itself to adjust the opener properly may cause severe injury...
Owner's Manual
Page 27
...: If you suspect a problem with the garage door hardware or springs, contact an authorized Genie® Dealer or a trained door system technician, or contact The Genie Company at 1-800-35-GENIE. • Check door balance, condition, and door spring. • Check "OPEN FORCE" adjustment (See section 6 ). • WARNING: If you suspect a problem with the garage door hardware or springs, contact an authorized...
...: If you suspect a problem with the garage door hardware or springs, contact an authorized Genie® Dealer or a trained door system technician, or contact The Genie Company at 1-800-35-GENIE. • Check door balance, condition, and door spring. • Check "OPEN FORCE" adjustment (See section 6 ). • WARNING: If you suspect a problem with the garage door hardware or springs, contact an authorized...


