
Genie ChainLift 800 Support Question
Genie ChainLift 800 Support Question
Find answers below for this question about Genie ChainLift 800.Need a Genie ChainLift 800 manual? We have 1 online manual for this item!
Question posted by sramsland on November 13th, 2016
I Have A Model Isd 995 That Has The Green Light Blinking 2 Times.
I have disconnected the ribbon cable and reinserted it, it cycles up and down then wont operate again until I either unplug the ribbon cable and reinsert it and it will cycle one time again and flashes 2 times again??
Current Answers
Answer #1: Posted by waelsaidani1 on November 13th, 2016 1:20 PM
waelsaidani1

Member since:
May 12th, 2013 Points: 19,501,797

Member since:
May 12th, 2013 Points: 19,501,797
. If the light blinks 2 times, pause (repeat) the sensors are either misaligned or obstructed in some way. Make sure there are no obvious obstructions and that no shadows are being cast directly into the lens path. Clean the sensor lenses and check each of the sensors to make sure that the brackets holding them up are not bent. If either bracket is bent simply bend it gently back and forth in order to line it up directly with the sensor on the other side.
If the pattern of blinking is three or four times, pause (repeat) or if it is the same as above and the green light is off, you will need a garage door service technician to remedy the problem as there may be a defect in the sensors or the connected wiring.
If the red light appears to be solid and the same symptoms are occurring, place your hand in front of the lens to test it. If it does not blink a recent power surge may have confused the opener's circuit board (see Section 3 for instructions). If the red light blinks when you place your hand in front of it you will need to consult a professional to solve the problem.
Related Genie ChainLift 800 Manual Pages
Owner's Manual - Page 1
...; compatible
For Answers and Assistance:
1.800.354.3643
or visit www.geniecompany.com SAVE THIS MANUAL FOR FUTURE REFERENCE Homelink® is a registered trademark of Johnson Controls Technology Company. d/b/a The Genie Company PN# 37026500123, 5/15/2009
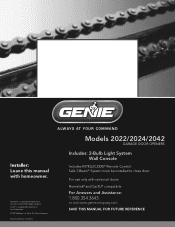
ALWAYS AT YOUR COMMAND
Models 2022/2024/2042 GARAGE DOOR OPENERS
Includes: 2-Bulb Light System Wall Console
Includes INTELLICODE®...
Owner's Manual - Page 2
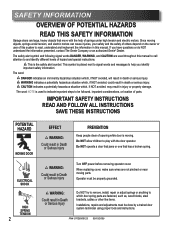
...THIS SAFETY INFORMATION
Garage doors are large, heavy objects that has a broken spring.
Do NOT operate a door that jams or one that move with the door operator. WARNING: ...situation which door spring parts are used to indicate important steps to be followed, important considerations, or location of opening while door is moving parts.
Operator must be...
Owner's Manual - Page 3
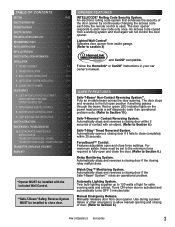
.... (Refer to Section 6.)
PN# 37026500123 05/15/2009
3 Lighted Wall Control* Operates door opener from door opener. ForceGuard™ Control. Twin bulb lighting supplies up to 120 watts of door. (Refer to Section 6.) Safe-T-Stop® Timed Reversed System. Manually releases door from inside garage. (Refer to each time the remote control is activated and automatically turns OFF...
Owner's Manual - Page 4
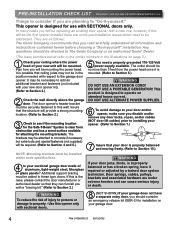
...to Section 4 and 5.)
5 You need to be mounted.
Door springs, cables, pulleys, brackets and associated hardware are some pre-installation issues ...garage door. This product is designed for attaching the mounting brackets. WARNING To reduce the risk of aluminum, light-weight steel, fiberglass or glass panels? This opener is designed to "Do-it-yourself."
They are planning to operate...
Owner's Manual - Page 6
...rail (with wire
(Green LED)
Safe-T-Beam® Source/Sensor Bracket
Door Arm
Header Bracket
Door Bracket
Three-button Remote ...correa. id
flat)
on floor.
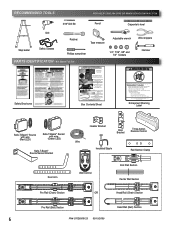
RECOMMENDED TOOLS
FOR HELP-1.800.354.3643 OR WWW.GENIECOMPANY.COM
3/16" Drill Bit...garage door. Death or serious injury can be pinned under moving do.or. • Never let child use door opener controls. •Always keep moving door...
Owner's Manual - Page 7
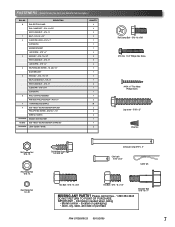
...18 LAG SCREW - 5/16'' x 2'' SELF DRILLING SCREW - 1/4 -20 x 3/4'' DOOR BRACKET HEX BOLT - 5/16 -18 x 3/4'' SELF LOCKING NUT - 5/16 -18... - #10-16 x 1- 1/4'' WIRE NUT (GREY) REMOTE WITH BATTERY Safe-T-Beam® SOURCE/SENSOR & WIRE SET LIGHT COVER - WHITE
QUANTITY 2 8 8 3 1 1 1 2 5 5 2 3 1 3 1 2 1 1 ... PARTS? FASTENERS - Please call toll free - 1.800.354.3643
DO NOT RETURN TO POINT OF PURCHASE....
Owner's Manual - Page 14
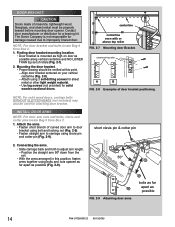
... top set of rollers (Fig. 2-7).
2. Use lag screws (not provided) for sheet metal or other light weight material. - NOTE: For solid wood doors, carriage bolts WITHOUT SLOTTED HEADS (not included) may also be properly braced before mounting door opener. Connecting the arms.
• Slide carriage back and forth to carriage using bolts and nuts...
Owner's Manual - Page 15
... when NOT pre-wired. White wire to the opener before installing Wall Control wires and Wall Control. ...door to operate unexpectedly and the light not to Wall Control board screws on back of door.
• It should be able to reach the garage door... Control
WCoanlltrol
Separate entry door
"wEanrtnrianpgmlaebnet"l EXAMPLE ONLY! FOR HELP-1.800.354.3643 OR WWW.GENIECOMPANY.COM
Wire...
Owner's Manual - Page 16
...
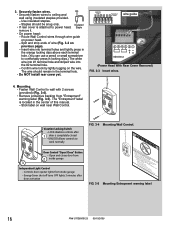
(Power Head With Rear Cover Removed) FIG. 3-3 Insert wires.
4. Locking Clips
Terminal Holes
6 54 321
wire guide
6 54 3 21
+- Stick label on
previous page).
- Controls door opener lights from inside garage 3
Independent Light Control - or.
©1999
Mounting Entrapment warning label.
16
PN# 37026500123 05/15/2009
Owner's Manual - Page 17
...
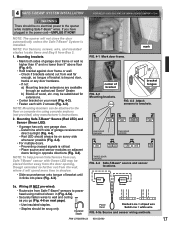
FIG. 4-2 Mounting
brackets.
NOTE: The opener will spend more time in shadow.
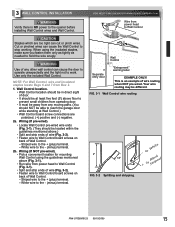
• Slide source/sensor onto tongue of garage door frame or wall no higher than 5" above floor (Fig. 4-1).
• Hold bracket against door frame or wall. - If you go (Fig. 4-6 on adjacent doors facing in the power cord-UNPLUG IT NOW! Check if brackets extend...
Owner's Manual - Page 18

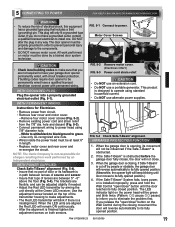
...Splice wires together with (provided)
wire nuts. • Route wire from sensor.
- Insulated Staple
Wall Red
Source
Wall Green Sensor
Ceiling
6 5 4 3 2 1 or 6 5 4 3 2 1
Power Head
Dashed Line = striped wire...can cause the Safe-T-Beam® System to -white).
- Use this time. Confirm wire lock by lightly tugging on power head. -
Use insulated staples.
- Insert Wire
Wire
Into...
Owner's Manual - Page 19
... are between 5" - 6" above the floor (Fig. 5-4). When the garage door is opening, its movement will be green and blink twice (Pattern: ☼☼ pause ☼☼ pause) to inform you
are flexible, and can be influenced if the Safe-T-Beam® is obstructed.
2. The LED indicator light on both sensors. DO NOT alter the plug in...
Owner's Manual - Page 20
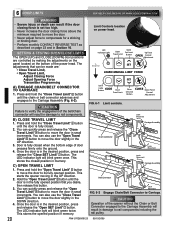
... slightly in the DOWN direction.
4. LED Indicator Light
Open
Open
Set Limit
Travel Limit Button
Up Force
OPEN Control
Adjustment
To Garage Door
SET
LEARN MANUAL LIMIT FORCE
SET
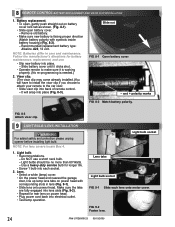
A) ENGAGE CHAIN/BELT CONNECTOR TO CARRIAGE 1. B) CLOSE TRAVEL LIMIT 1. The LED indicator light will blink green twice. Press and hold the "Open Travel Limit" button to the Carriage Assembly (Fig. 6-2). This...
Owner's Manual - Page 22

...; Test again. Repeat as necessary until the green indicator light blinks (about 5 seconds). 2. FIG. 6-5 2 x 4 under center of garage door opening .
22
PN# 37026500123 05/15/2009 All close " limit before testing. 1. It should not have reached its "close and open travel limit settings are erased. OPEN/CLOSE TRAVEL LIMIT 1. NOTE: The opener will not close " limit
programmed. Check to...
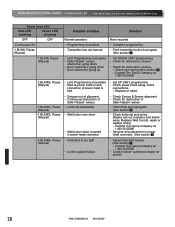
Owner's Manual - Page 23
... red blinking indicator LED goes out.
• Program remaining or new remote controls as done previously. To Garage Door
SET
LOST OR STOLEN REMOTE 1. Multi Button Remote Programming. Limit controls location on a circuit
different from the missing remote control, or any signal received from that interference will move . • Press button again. - Your door opener...
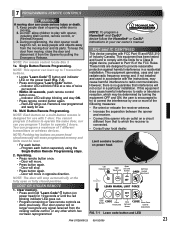
Owner's Manual - Page 24
.... FIG. 8-3 Attach visor clip.
9 LIGHT BULB/LENS INSTALLATION
WARNING For added safety and protection please unplug opener before installing light bulb. Do NOT use .
• ...Light bulb.
• Recommendations. - Make sure the tabs are fully engaged into electrical outlet. • Test lamp operation. Lens.
• Select a white (lamp) cover. • On the power head end nearest the garage
door...
Owner's Manual - Page 25

... hardware, and DO NOT OPERATE garage door automatically or manually if door is improperly balanced or springs are capable of increasing the rate of door closure and increasing the risk of the doorway on contact with a 1-1/2" high object (or a 2" x 4" board
laid flat) at : 1.800.354.3643
10 MAINTENANCE
WARNING • Garage door hardware (springs, cables,
brackets, pulleys, etc.) are...
Owner's Manual - Page 27
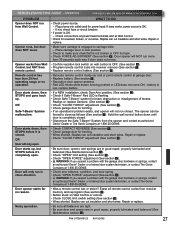
... Sensors. (See section 3 ) • Check "CLOSE FORCE" adjustment (See section 6 ). • Check garage door for beam obstruction or misalignment of lenses. Repair or replace. OPERATION
FOR HELP-1.800.354.3643 OR WWW.GENIECOMPANY.COM
PROBLEM Opener does NOT run more than 25 feet operating range or no reason.
• Relocate remote control inside car and or...
Owner's Manual - Page 28
TROUBLESHOOTING GUIDE - POWER HEAD LED FOR HELP-1.800.354.3643 OR WWW.GENIECOMPANY.COM
Power head LED
Red LED showing
Green LED showing
OFF
OFF
Continuous ON
1 BLINK, Pause (Repeat)
1 BLINK, Pause (Repeat)
Possible Problem
Solution
Normal operation • Programming incomplete • Transmitter has not learned
• Limit Programming incomplete • Safe-T-Beam® sensor
...
Owner's Manual - Page 30
...in materials and workmanship for the following period(s) of time, measured from state to all components thereof will supply...specifically limited to repairing or replacing, at 1-800-354-3643 to door components. There are excluded and will be made...other parts and components for a period of the below identified opener, Model 2022/2024/2042 ("Product"), subject to state.
To obtain ...
Similar Questions

What Remote Do I Use For Powerlift Garage Door Opener Model Wr77 Serial No.08258
(Posted by tmski87 3 years ago)

My Promax 1500 Garage Door Opener Not Working.3 Lights Flashing On Unit.
(Posted by cwestsupra 9 years ago)

Why Would The Light Come On My Genie Garage Door Opener If I Have The Wall
operator in the lock position
operator in the lock position
(Posted by Jurda 10 years ago)

I Have A Genie Stealth Pro Garage Door Opener. Both Os Lights Are Not Lit.
I checked the fuses in the unit and they are both good. I read about 0.25 volts on terminals 3 and 4...
I checked the fuses in the unit and they are both good. I read about 0.25 volts on terminals 3 and 4...
(Posted by mdhall 10 years ago)

Why Is The Garage Door Opener Has Red Blinking Lights And Does Not Operate?
(Posted by aysegogini 10 years ago)