Gateway M 6841 Keyboard
Related Manual Pages


Similar Questions

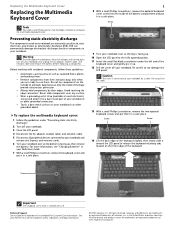
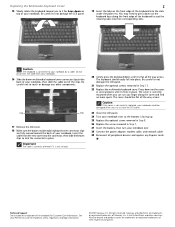
Diagram Of All Screws To Remove And Replace Keyboard
need to replace keyboard
need to replace keyboard
(Posted by Kasper 12 years ago)

Where Can I Get A Manual For Installing A Keyboard For An Mx6920 Gateway Laptop
I need instructions for removing the defective keyboard from my MX69210 llaptop and installing a rep...
I need instructions for removing the defective keyboard from my MX69210 llaptop and installing a rep...
(Posted by Danch301 12 years ago)

How Do I Remove Keyboard From A Gateway Nv5207u
i need to change bad keyboard
i need to change bad keyboard
(Posted by pfm260 13 years ago)
Related Terms
The following terms were also used when searching for Gateway M 6841 Keyboard:- gateway m-6841
- gateway m 6841
- gateway m 6841 laptop
- gateway m6841 laptop
- gateway m-6841 laptop
- format m-6841
- m-6841 notebook
- m-6841 spec
- gateway m 6841 notebook
- gateway m-6841 spec
- m 6841 gateway
- m 6841 notebook
- format gateway m-6841
- gateway m 6841 keyboard
- how to format m-6841
- m 6841 specs
- m-6841 drivers
- m-6841 gateway
- m-6841 parts
- m-6841 review
- format m-6841 notebook
- gateway laptop m6841
- gateway m 6841 manual
- gateway m 6841 specs
- gateway m-6841 drivers
- gateway m-6841 keyboard
- gateway m-6841 review
- gateway m-6841 specifications
- gateway m6841 charger
- gateway m6841 review
- gateway m6841 specs
- m-6841 charger
- m-6841 keyboard
- m-6841 laptop
- m-6841 specifications
- m-6841 upgrade
- battery for gateway m-6841
- battery for m-6841
- gateway laptop m 6841
- gateway laptop m-6841
- gateway laptop m-6841 manual
- gateway m 6841 accessories
- gateway m 6841 battery
- gateway m 6841 display to tv
- gateway m 6841 drivers
- gateway m 6841 hard drive
- gateway m 6841 ram
- gateway m 6841 restore set
- gateway m 6841 review
- gateway m 6841 update
- gateway m 6846
- gateway m 6846 laptop
- gateway m 6847
- gateway m 6848
- gateway m series 6841
- gateway m-6841 15.4
- gateway m-6841 battery
- gateway m-6841 bezel
- gateway m-6841 bluetooth
- gateway m-6841 charger
- gateway m-6841 disassembly
- gateway m-6841 hinge cover
- gateway m-6841 manual
- gateway m-6841 memory
- gateway m-6841 motherboard
- gateway m-6841 notebook
- gateway m-6841 parts
- gateway m-6841 power adapter
- gateway m-6841 reviews
- gateway m-6841 specs
- gateway m-6841 upgrade
- gateway m-6841 will not boot
- gateway m-6841 xp drivers
- gateway m-6843
- gateway m6841 battery
- gateway m6841 drivers
- gateway m6841 graphics card
- gateway m6841 hard drive
- gateway m6841 keyboard
- gateway m6841 laptop computer
- gateway m6841 motherboard
- gateway m6841 reviews
- gateway m6841 touchpad replacement
- gateway m6841 update
- gateway m6841 wireless network switch
- m 6841
- m 6841 accessories
- m 6841 battery
- m 6841 display to tv
- m 6841 drivers
- m 6841 gateway recovery set
- m 6841 hard drive
- m 6841 keyboard
- m 6841 laptop
- m 6841 manual
- m 6841 ram
- m 6841 restore set
- m 6841 review
- m 6841 update
- m 6846 laptop
- m series 6841
- m-6841
- m-6841 15.4
- m-6841 battery
- m-6841 bezel
- m-6841 bluetooth
- m-6841 disassembly
- m-6841 gateway camera driver
- m-6841 gateway computer
- m-6841 hinge cover
- m-6841 laptop keyboard
- m-6841 manual
- m-6841 memory
- m-6841 motherboard
- m-6841 plastic casing
- m-6841 power adapter
- m-6841 ram
- m-6841 reviews
- m-6841 specs
- m-6841 video card
- m-6841 will not boot
- m-6841 xp drivers
- m6841 battery
- m6841 drivers
- m6841 gateway recovery set
- m6841 graphics card
- m6841 parts
- m6841 power cord
- m6841 price
- m6841 specs
- m6841 touchpad replacement
- m6841 update
- m6841 wireless network switch
- m6841 xp drivers