Owner's Manual
Page 77
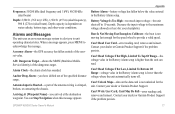
...remove and reinsert. Contact your dealer or Garmin Product Support. Can't Read Voltages That High... contacting the chassis. remove and reinsert. Contact your dealer or Garmin Product Support if the problem persists. Frequency: 50/200 kHz ... Target-shows the MMSI (Maritime Mobile Service Identity) of the antenna wiring is not moving fast enough for the unit. Antenna Input is dependent...voltage allowed (or less) for your dealer or Garmin Product Support if the problem persists. Decrease the ...error reading card; GPSMAP 400/500 Series Owner's Manual 71 Depth capacity ...
...remove and reinsert. Contact your dealer or Garmin Product Support. Can't Read Voltages That High... contacting the chassis. remove and reinsert. Contact your dealer or Garmin Product Support if the problem persists. Frequency: 50/200 kHz ... Target-shows the MMSI (Maritime Mobile Service Identity) of the antenna wiring is not moving fast enough for the unit. Antenna Input is dependent...voltage allowed (or less) for your dealer or Garmin Product Support if the problem persists. Decrease the ...error reading card; GPSMAP 400/500 Series Owner's Manual 71 Depth capacity ...
Flush Mount Kit Instructions and Template (Multilingual)
Page 1
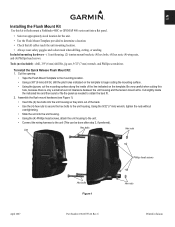
... bolts, (4) hex nuts, (4) wing nuts, and (4) Phillips head screws. Be very careful when cutting this kit to flush mount a Fishfinder 400C or GPSMAP 400 series unit into a flat panel. • Select an appropriately sized location for the unit. • Use the Flush Mount Template provided to the ...8226; Slide the unit into the unit housing. • Using the (4) Phillips head screws, attach the unit housing to the unit. • Connect the wiring harness to begin cutting the mounting surface. • Using the jig saw , 9/32" (7 mm) wrench, and Phillips screwdriver. Unit Hex bolts Hex ...
... bolts, (4) hex nuts, (4) wing nuts, and (4) Phillips head screws. Be very careful when cutting this kit to flush mount a Fishfinder 400C or GPSMAP 400 series unit into a flat panel. • Select an appropriately sized location for the unit. • Use the Flush Mount Template provided to the ...8226; Slide the unit into the unit housing. • Using the (4) Phillips head screws, attach the unit housing to the unit. • Connect the wiring harness to begin cutting the mounting surface. • Using the jig saw , 9/32" (7 mm) wrench, and Phillips screwdriver. Unit Hex bolts Hex ...
Flush Mount Kit Instructions and Template (Multilingual)
Page 2
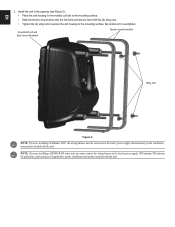
... unit and flush mount hardware Tension mount brackets Wing nuts Figure 2 NOTE: If you are installing a GPSMAP 400 series unit, you are installing a Fishfinder 400C, the wiring harness must connect the wiring harness to the boat's power supply, GPS antenna, XM antenna (if applicable), and transducer (if applicable) per the installation instructions included with...
... unit and flush mount hardware Tension mount brackets Wing nuts Figure 2 NOTE: If you are installing a GPSMAP 400 series unit, you are installing a Fishfinder 400C, the wiring harness must connect the wiring harness to the boat's power supply, GPS antenna, XM antenna (if applicable), and transducer (if applicable) per the installation instructions included with...


