Owner's Manual
Page 3
...Sensors 7 Using the Weight Scale 7 History 7 Viewing Your Ride 7 Viewing Data Totals 7 Sending Your Ride to Garmin Connect 7 Garmin Connect 7 Connected Features 8 Deleting History 8 Data Recording 8 Changing the Data Storage Location 8 Installing a Memory ... Using Auto Scroll 12 Changing the Start Notice 12 System Settings 12 GPS Settings 12 Display Settings 12 Data Recording Settings 12 Changing the Units ... the Device Tones 12 Time Zones 12 Device Information 13 Specifications 13 Edge Specifications 13 Heart Rate Monitor Specifications 13 GSC 10 Specifications 13 Device ...
...Sensors 7 Using the Weight Scale 7 History 7 Viewing Your Ride 7 Viewing Data Totals 7 Sending Your Ride to Garmin Connect 7 Garmin Connect 7 Connected Features 8 Deleting History 8 Data Recording 8 Changing the Data Storage Location 8 Installing a Memory ... Using Auto Scroll 12 Changing the Start Notice 12 System Settings 12 GPS Settings 12 Display Settings 12 Data Recording Settings 12 Changing the Units ... the Device Tones 12 Time Zones 12 Device Information 13 Specifications 13 Edge Specifications 13 Heart Rate Monitor Specifications 13 GSC 10 Specifications 13 Device ...
Owner's Manual
Page 5
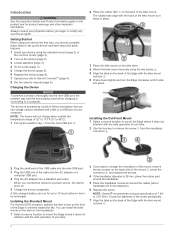
... tabs align with the bike mount notches Â. 6 Press down slightly and turn the Edge clockwise until it must be recharged. Getting Started When using your device the first time, ...-USB port Á. About the Battery WARNING This device contains a lithium-ion battery. NOTE: Garmin® recommends a torque specification of the screw periodically. Charging the Device NOTICE To prevent corrosion,...14). 7 Upload your computer. Installing the Standard Mount For the best GPS reception, position the bike mount so the front of your bike. 2 Use the hex key to a computer.
... tabs align with the bike mount notches Â. 6 Press down slightly and turn the Edge clockwise until it must be recharged. Getting Started When using your device the first time, ...-USB port Á. About the Battery WARNING This device contains a lithium-ion battery. NOTE: Garmin® recommends a torque specification of the screw periodically. Charging the Device NOTICE To prevent corrosion,...14). 7 Upload your computer. Installing the Standard Mount For the best GPS reception, position the bike mount so the front of your bike. 2 Use the hex key to a computer.
Owner's Manual
Page 6
... to adjust the backlight brightness and timeout. À Select to turn on the device, you to use the GPS tracking and navigation features, you quick access to all the features of the Edge. From the home screen, select the status bar at the top of the page. Using the Backlight •...and turn the device on and off. Á Select to mark a new lap. Â Select to start and stop the timer. Releasing the Edge 1 Turn the Edge clockwise to save your history, courses, workouts, and personal records. Select to manage your changes and close the page. • Select to close the...
... to adjust the backlight brightness and timeout. À Select to turn on the device, you to use the GPS tracking and navigation features, you quick access to all the features of the Edge. From the home screen, select the status bar at the top of the page. Using the Backlight •...and turn the device on and off. Á Select to mark a new lap. Â Select to start and stop the timer. Releasing the Edge 1 Turn the Edge clockwise to save your history, courses, workouts, and personal records. Select to manage your changes and close the page. • Select to close the...
Owner's Manual
Page 8
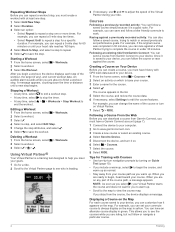
...Select Repeat Until to repeat a step for you to warm up . Following a Course From the Web Before you can download a course from Garmin Connect, you must have a Garmin Connect account (page 7). 1 Connect the device to your computer. 2 Go to www.garminconnect.com. 3 Create a new course or select an...previously recorded activity: You can also follow a saved course, trying to match or exceed previously set your course. 3 Enter a name for Training with GPS track data saved to your device. 1 From the home screen, select > Courses > . 2 Select an activity on which to base your commute...
...Select Repeat Until to repeat a step for you to warm up . Following a Course From the Web Before you can download a course from Garmin Connect, you must have a Garmin Connect account (page 7). 1 Connect the device to your computer. 2 Go to www.garminconnect.com. 3 Create a new course or select an...previously recorded activity: You can also follow a saved course, trying to match or exceed previously set your course. 3 Enter a name for Training with GPS track data saved to your device. 1 From the home screen, select > Courses > . 2 Select an activity on which to base your commute...
Owner's Manual
Page 10
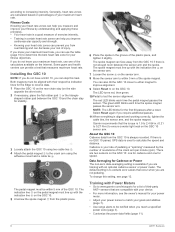
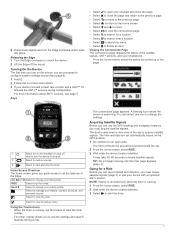
...; on the sensor arm. 7 Loosen the screw È on the GSC 10 sensor arm. Garmin recommends that measures maximum heart rate. About the GSC 10 Cadence data from overtraining and can also tilt...If necessary, place the flat rubber pad À or the triangle- If there is no GSC 10 paired, GPS data is a good measure of exercise intensity. • Training in the groove of pedaling or "spinning" measured... test that the torque is not enough room between the GSC 10 and the chain stay for the Edge to receive data. 1 Place the GSC 10 on the rear chain stay (on the GSC 10. ...
...; on the sensor arm. 7 Loosen the screw È on the GSC 10 sensor arm. Garmin recommends that measures maximum heart rate. About the GSC 10 Cadence data from overtraining and can also tilt...If necessary, place the flat rubber pad À or the triangle- If there is no GSC 10 paired, GPS data is a good measure of exercise intensity. • Training in the groove of pedaling or "spinning" measured... test that the torque is not enough room between the GSC 10 and the chain stay for the Edge to receive data. 1 Place the GSC 10 on the rear chain stay (on the GSC 10. ...
Owner's Manual
Page 11
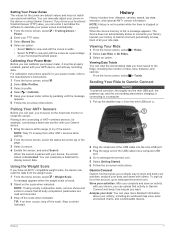
...paired with your zones on when indicated. 2 Plug the small end of the USB cable into a computer USB port. 4 Go to the Edge, including the number of your power meter active by pedaling until the message appears. 6 Follow the on -screen instructions. A message appears when...time, distance, and calories. Analyze your data: You can manually adjust your GPS device, and actively recording data. If you know your functional threshold power (FTP) value, you must be properly installed, paired with your Garmin device. 1 Bring the device within range (3 m) of all body composition ...
...paired with your zones on when indicated. 2 Plug the small end of the USB cable into a computer USB port. 4 Go to the Edge, including the number of your power meter active by pedaling until the message appears. 6 Follow the on -screen instructions. A message appears when...time, distance, and calories. Analyze your data: You can manually adjust your GPS device, and actively recording data. If you know your functional threshold power (FTP) value, you must be properly installed, paired with your Garmin device. 1 Bring the device within range (3 m) of all body composition ...

Owner's Manual
Page 13
...Navigation 1 Tap the screen to your ride. Navigation 9 Your device memory contains important system files that should not be deleted. 1 Open the Garmin drive or volume. 2 If necessary, open a folder or volume. 3 Select a file. 4 Press the Delete key on -screen directions... to view the timer overlay. 2 Select > Where To > Stop Navigation. From the home screen, select > System > GPS > Mark Location > . Projecting a Location You can return to the starting point of your destination. Navigating to Known Coordinates 1 From the home screen, ...
...Navigation 1 Tap the screen to your ride. Navigation 9 Your device memory contains important system files that should not be deleted. 1 Open the Garmin drive or volume. 2 If necessary, open a folder or volume. 3 Select a file. 4 Press the Delete key on -screen directions... to view the timer overlay. 2 Select > Where To > Stop Navigation. From the home screen, select > System > GPS > Mark Location > . Projecting a Location You can return to the starting point of your destination. Navigating to Known Coordinates 1 From the home screen, ...
Owner's Manual
Page 15
...are using a speed and cadence sensor or power sensor, select an option: • Select Wheel Size > Automatic to calculate your wheel size using GPS distance. • Select Crank Length > Custom to enter your crank length. Any changes you want to see page 16. • Select Crank ...Length > Automatic to calculate your crank length using GPS distance. • Select Wheel Size > Custom to enter your wheel size. The device uses this information to set an Auto Lap® ...
...are using a speed and cadence sensor or power sensor, select an option: • Select Wheel Size > Automatic to calculate your wheel size using GPS distance. • Select Crank Length > Custom to enter your crank length. Any changes you want to see page 16. • Select Crank ...Length > Automatic to calculate your crank length using GPS distance. • Select Wheel Size > Custom to enter your wheel size. The device uses this information to set an Auto Lap® ...
Owner's Manual
Page 16
... of the training data pages while the timer is helpful for comparing your current GPS satellite information. Changing the Configuration Settings You can select Auto to allow the device to www.garmin.com / aboutGPS. System Settings Select > System. • GPS Settings (page 12) • Display Settings (page 12) • Data Recording Settings (page...
... of the training data pages while the timer is helpful for comparing your current GPS satellite information. Changing the Configuration Settings You can select Auto to allow the device to www.garmin.com / aboutGPS. System Settings Select > System. • GPS Settings (page 12) • Display Settings (page 12) • Data Recording Settings (page...
Owner's Manual
Page 17
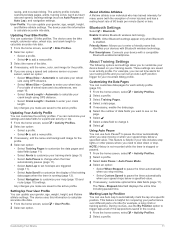
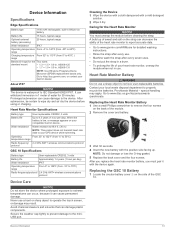
Device Information Specifications Edge Specifications Battery type 1100 mAh rechargable,... side facing up of sweat and salt on your compatible Garmin device. Prolonged submersion can damage plastic components. Go to http: / / buy .garmin .com, or contact your GPS device while swimming. Operating From 23° to 122...: This product does not transmit heart rate data to the miniUSB port. Secure the weather cap tightly to prevent damage to your Garmin dealer. NOTE: Do not damage or lose the O-ring gasket. 5 Replace the back cover and the four screws. AS568-125...
Device Information Specifications Edge Specifications Battery type 1100 mAh rechargable,... side facing up of sweat and salt on your compatible Garmin device. Prolonged submersion can damage plastic components. Go to http: / / buy .garmin .com, or contact your GPS device while swimming. Operating From 23° to 122...: This product does not transmit heart rate data to the miniUSB port. Secure the weather cap tightly to prevent damage to your Garmin dealer. NOTE: Do not damage or lose the O-ring gasket. 5 Replace the back cover and the four screws. AS568-125...
Owner's Manual
Page 19
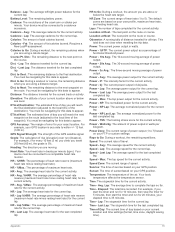
...the next point on your user profile, maximum heart rate, and resting heart rate. Dist. - You must be navigating for the current lap. GPS Signal Strength: The strength of functional threshold power. HR - HR - The default zones are based on the course. Power - %FTP: The... current power output as a percentage of the GPS satellite signal. Power - 30s Avg. : The 30-second moving average of sunrise based on your elapsed time is 5%. Lap: The average power ...
...the next point on your user profile, maximum heart rate, and resting heart rate. Dist. - You must be navigating for the current lap. GPS Signal Strength: The strength of functional threshold power. HR - HR - The default zones are based on the course. Power - %FTP: The... current power output as a percentage of the GPS satellite signal. Power - 30s Avg. : The 30-second moving average of sunrise based on your elapsed time is 5%. Lap: The average power ...
Owner's Manual
Page 21
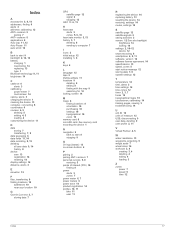
... care 13 registration 14 resetting 14 display settings 12 distance, alerts 3 E elevation 12 F files, transferring 8 finding locations 10 addresses 10 near your location 10 G Garmin Connect 3, 7 storing data 7 GPS satellite page 12 signal 2 stopping 12 GSC 10 6, 13 H heart rate alerts 3 zones 5, 6, 16 heart rate monitor 5, 13 history 3, 7 deleting 8 sending to start...
... care 13 registration 14 resetting 14 display settings 12 distance, alerts 3 E elevation 12 F files, transferring 8 finding locations 10 addresses 10 near your location 10 G Garmin Connect 3, 7 storing data 7 GPS satellite page 12 signal 2 stopping 12 GSC 10 6, 13 H heart rate alerts 3 zones 5, 6, 16 heart rate monitor 5, 13 history 3, 7 deleting 8 sending to start...
Quick Start Manual
Page 2
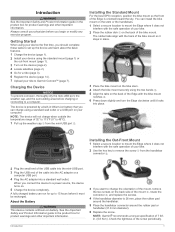
... Á. 2 Place the rubber disk À on the back side of the bike mount. NOTE: Garmin® recommends a torque specification of the Edge with the safe operation of your bike. 2 Use the hex key to Garmin Connect™ (page 4). 8 Get the owner's manual (page 6). Check the tightness of the screw ... the connector Ã, and replace the screws. 4 If the handlebar diameter is oriented toward the sky. Installing the Standard Mount For the best GPS reception, position the bike mount so the front of the cable into the AC adapter or a computer USB port. 4 Plug the AC adapter ...
... Á. 2 Place the rubber disk À on the back side of the bike mount. NOTE: Garmin® recommends a torque specification of the Edge with the safe operation of your bike. 2 Use the hex key to Garmin Connect™ (page 4). 8 Get the owner's manual (page 6). Check the tightness of the screw ... the connector Ã, and replace the screws. 4 If the handlebar diameter is oriented toward the sky. Installing the Standard Mount For the best GPS reception, position the bike mount so the front of the cable into the AC adapter or a computer USB port. 4 Plug the AC adapter ...
Quick Start Manual
Page 3
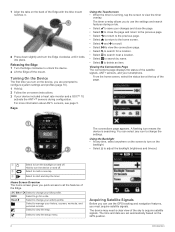
...Select to save your activity profile. The device may take 30-60 seconds to start the timer. 3 Releasing the Edge 1 Turn the Edge clockwise to unlock the device. 2 Lift the Edge off . Á Select to mark a new lap. Â Select to locate satellite signals. Viewing the Connections...RIDE. 3 Wait while the device locates satellites. Hold to an open area. Turning On the Device The first time you turn on the GPS position. 1 Go outdoors to turn the device on -screen instructions. 3 If your history, courses, workouts, and personal records. Using the ...
...Select to save your activity profile. The device may take 30-60 seconds to start the timer. 3 Releasing the Edge 1 Turn the Edge clockwise to unlock the device. 2 Lift the Edge off . Á Select to mark a new lap. Â Select to locate satellite signals. Viewing the Connections...RIDE. 3 Wait while the device locates satellites. Hold to an open area. Turning On the Device The first time you turn on the GPS position. 1 Go outdoors to turn the device on -screen instructions. 3 If your history, courses, workouts, and personal records. Using the ...

Quick Start Manual
Page 4
...For more detailed information about how to use your Edge, go to view your activity to stop the timer. 7 Select Save. From the home screen, select > System > GPS > Mark Location > . To sign up the weather cap À from Garmin Connect, you must be connected to your races... RIDE. Following a Course From the Web Before you can upload that you can record and store locations in real time. NOTE: Your Edge must have a Garmin Connect account (page 4). 1 Connect the device to your compatible Bluetooth®-enabled smartphone. 4 Swipe the screen for additional data pages. ...
...For more detailed information about how to use your Edge, go to view your activity to stop the timer. 7 Select Save. From the home screen, select > System > GPS > Mark Location > . To sign up the weather cap À from Garmin Connect, you must be connected to your races... RIDE. Following a Course From the Web Before you can upload that you can record and store locations in real time. NOTE: Your Edge must have a Garmin Connect account (page 4). 1 Connect the device to your compatible Bluetooth®-enabled smartphone. 4 Swipe the screen for additional data pages. ...


