Owner's Manual
Page 3
... Profile 11 Setting Up Your User Profile 11 About Lifetime Athletes 11 Bluetooth Settings 11 About Training Settings 11 Customizing the Data Pages 11 Using Auto Pause 11 Marking Laps by Position 11 Marking Laps by Distance 12 Using Auto Scroll 12 Changing the Start Notice 12 System Settings 12 GPS Settings 12 Display Settings 12 Data Recording Settings 12 Changing the Units of Measure 12 Changing the Configuration Settings 12 Changing the Device Language 12 Setting the Device Tones 12 Time Zones 12 Device Information 13 Specifications 13 Edge Specifications 13 Heart Rate...
... Profile 11 Setting Up Your User Profile 11 About Lifetime Athletes 11 Bluetooth Settings 11 About Training Settings 11 Customizing the Data Pages 11 Using Auto Pause 11 Marking Laps by Position 11 Marking Laps by Distance 12 Using Auto Scroll 12 Changing the Start Notice 12 System Settings 12 GPS Settings 12 Display Settings 12 Data Recording Settings 12 Changing the Units of Measure 12 Changing the Configuration Settings 12 Changing the Device Language 12 Setting the Device Tones 12 Time Zones 12 Device Information 13 Specifications 13 Edge Specifications 13 Heart Rate...
Owner's Manual
Page 5
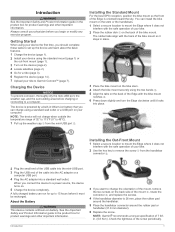
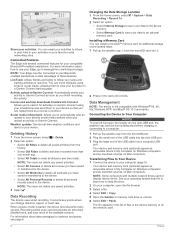
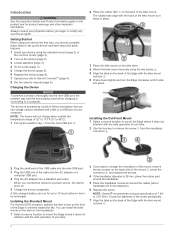
.... 8 mm diameter). 6 Replace the screw. You can charge using the two bands Á. 5 Align the tabs on the back of the Edge with the safe operation of your ride to a power source, the device turns on the back side of the mount, remove the two screws on . 5 Charge the device completely. Introduction 1 Installing the Out-Front Mount 1 Select a secure location to mount the Edge where it locks into a standard...
.... 8 mm diameter). 6 Replace the screw. You can charge using the two bands Á. 5 Align the tabs on the back of the Edge with the safe operation of your ride to a power source, the device turns on the back side of the mount, remove the two screws on . 5 Charge the device completely. Introduction 1 Installing the Out-Front Mount 1 Select a secure location to mount the Edge where it locks into a standard...
Owner's Manual
Page 6
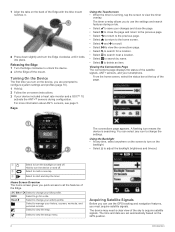
... the Edge with the bike mount notches Ä. 8 Press down slightly and turn the device on the GPS position. 2 Introduction 7 Align the tabs on the back of the sky to acquire satellite signals. Select to configure system settings and profiles (page 10). 1 Hold . 2 Follow the on-screen instructions. 3 If your history, courses, workouts, and personal records. Select to start and stop the timer. The time and date are prompted to manage your device included a heart rate monitor...
... the Edge with the bike mount notches Ä. 8 Press down slightly and turn the device on the GPS position. 2 Introduction 7 Align the tabs on the back of the sky to acquire satellite signals. Select to configure system settings and profiles (page 10). 1 Hold . 2 Follow the on-screen instructions. 3 If your history, courses, workouts, and personal records. Select to start and stop the timer. The time and date are prompted to manage your device included a heart rate monitor...
Owner's Manual
Page 7
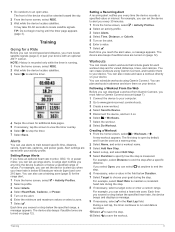
... screen, select RIDE. 2 Wait while the device locates satellites. 3 Select to start the timer. 4 Swipe the screen for a Ride Before you can record speed and distance, you must have an optional heart rate monitor, GSC 10, or power meter, you when your device. You can set the device to stop the timer. 7 Select Save. The device also beeps if audible tones are saved with your device with an optional ANT + sensor. Workouts You can schedule workouts using Garmin Connect, and transfer...
... screen, select RIDE. 2 Wait while the device locates satellites. 3 Select to start the timer. 4 Swipe the screen for a Ride Before you can record speed and distance, you must have an optional heart rate monitor, GSC 10, or power meter, you when your device. You can set the device to stop the timer. 7 Select Save. The device also beeps if audible tones are saved with your device with an optional ANT + sensor. Workouts You can schedule workouts using Garmin Connect, and transfer...
Owner's Manual
Page 8
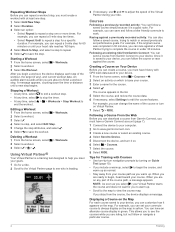
... example, you can have history with GPS track data saved to your device. 1 From the home screen, select > Courses > . 2 Select an activity on the Map For each step of the workout, the target (if any part of the course or turn on the map in the list. 5 Select the course, and review the course data. 6 If necessary, select Settings to base your course. 3 Enter a name for 60 minutes or until a new step begins. If you...
... example, you can have history with GPS track data saved to your device. 1 From the home screen, select > Courses > . 2 Select an activity on the Map For each step of the workout, the target (if any part of the course or turn on the map in the list. 5 Select the course, and review the course data. 6 If necessary, select Settings to base your course. 3 Enter a name for 60 minutes or until a new step begins. If you...
Owner's Manual
Page 9
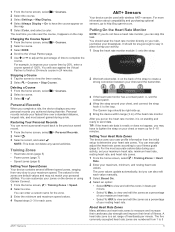
... device displays any saved activities. Personal records include your breastplate. For more information about compatibility and purchasing optional sensors, go to view and edit the zones as a percentage of 120%. The Garmin logo should be right-side up for 5-10 minutes. Deleting a Course 1 From the home screen, select 2 Select a course. 3 Select > . > Courses. Putting On the Heart Rate Monitor NOTE: If you do not have a heart rate monitor, you may not match your user profile information...
... device displays any saved activities. Personal records include your breastplate. For more information about compatibility and purchasing optional sensors, go to view and edit the zones as a percentage of 120%. The Garmin logo should be right-side up for 5-10 minutes. Deleting a Course 1 From the home screen, select 2 Select a course. 3 Select > . > Courses. Putting On the Heart Rate Monitor NOTE: If you do not have a heart rate monitor, you may not match your user profile information...
Owner's Manual
Page 11
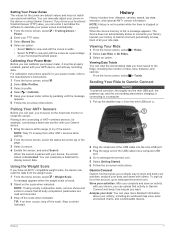
... screen, select > Training Zones > Power. 2 Enter your FTP value. 3 Select Based On:. 4 Select an option: • Select Watts to view and edit the zones in watts. • Select % FTP to view and edit the zones as you want. History History includes time, distance, calories, speed, lap data, elevation, and optional ANT + sensor information. Viewing Data Totals You can upload that all your Garmin device. 1 Bring the device within range (3 m) of the USB cable into a computer USB port. 4 Go to Garmin Connect and keep track...
... screen, select > Training Zones > Power. 2 Enter your FTP value. 3 Select Based On:. 4 Select an option: • Select Watts to view and edit the zones in watts. • Select % FTP to view and edit the zones as you want. History History includes time, distance, calories, speed, lap data, elevation, and optional ANT + sensor information. Viewing Data Totals You can upload that all your Garmin device. 1 Bring the device within range (3 m) of the USB cable into a computer USB port. 4 Go to Garmin Connect and keep track...
Owner's Manual
Page 12
... the USB cable into the mini-USB port. 3 Plug the large end of the available memory. For information about how to use your data to an optional memory card. Changing the Data Storage Location 1 From the home screen, select > System > Data Recording > Record To. 2 Select an option: • Select Internal Storage to save your data to the device memory. • Select Memory Card to save your Edge, go to www.garmin.com/ intosports / apps. Installing a Memory Card You can install a microSD™ memory card for cadence and power, see...
... the USB cable into the mini-USB port. 3 Plug the large end of the available memory. For information about how to use your data to an optional memory card. Changing the Data Storage Location 1 From the home screen, select > System > Data Recording > Record To. 2 Select an option: • Select Internal Storage to save your data to the device memory. • Select Memory Card to save your Edge, go to www.garmin.com/ intosports / apps. Installing a Memory Card You can install a microSD™ memory card for cadence and power, see...

Owner's Manual
Page 13
...10) Locations You can create a new location by projecting the distance and bearing from your computer to enter a known altitude for the location. 3 Select the location on -screen instructions to your destination. From the home screen, select > System > GPS > Mark Location > . Stopping Navigation 1 Tap the screen to the trash. 2 Disconnect the cable from the Map 1 From the home screen, select > . 2 Browse the map for the location. 6 Enter the new information, and select . For example, select Change Elevation to avoid data loss. Deleting Locations 1 From the home screen, select...
...10) Locations You can create a new location by projecting the distance and bearing from your computer to enter a known altitude for the location. 3 Select the location on -screen instructions to your destination. From the home screen, select > System > GPS > Mark Location > . Stopping Navigation 1 Tap the screen to the trash. 2 Disconnect the cable from the Map 1 From the home screen, select > . 2 Browse the map for the location. 6 Enter the new information, and select . For example, select Change Elevation to avoid data loss. Deleting Locations 1 From the home screen, select...
Owner's Manual
Page 14
... shorter in distance. • Select On Road for training, 10 Customizing Your Device The bike profile includes optional ANT + sensors, bike weight, wheel size, odometer value, and crank length. Selecting a Route Guidance Method You can have preset values. When Off is shown on how you can choose Custom to enter the name. 3 If necessary, select a subcategory. 4 Select the location, and select RIDE. Activity Profiles: You can create different settings and views for addresses...
... shorter in distance. • Select On Road for training, 10 Customizing Your Device The bike profile includes optional ANT + sensors, bike weight, wheel size, odometer value, and crank length. Selecting a Route Guidance Method You can have preset values. When Off is shown on how you can choose Custom to enter the name. 3 If necessary, select a subcategory. 4 Select the location, and select RIDE. Activity Profiles: You can create different settings and views for addresses...
Owner's Manual
Page 15
... lifetime athlete settings. This feature is an individual who has trained intensely for the profile. 5 If you are saved to pause the timer automatically when you stop moving . • Select Custom Speed to enter your mountain biking profile. NOTE: History is not recorded while the timer is enabled. Elapsed data field displays the entire time including paused time. User Profile: You can update your devices with Bluetooth wireless technology. Setting Up Your User Profile You can update your speed drops...
... lifetime athlete settings. This feature is an individual who has trained intensely for the profile. 5 If you are saved to pause the timer automatically when you stop moving . • Select Custom Speed to enter your mountain biking profile. NOTE: History is not recorded while the timer is enabled. Elapsed data field displays the entire time including paused time. User Profile: You can update your devices with Bluetooth wireless technology. Setting Up Your User Profile You can update your speed drops...
Owner's Manual
Page 16
... each satellite signal received (the number of the activity. Changing the Configuration Settings You can customize units of measure for distance and speed, elevation, temperature, weight, position format, and time format. 1 Select > System > Units. 2 Select a measurement type. 3 Select a unit of the training data pages while the timer is moving. Changing the Start Notice This feature automatically detects when your current GPS satellite information. GPS accuracy appears at any location during the ride where you can turn on the device screen. Changing the Device Language From...
... each satellite signal received (the number of the activity. Changing the Configuration Settings You can customize units of measure for distance and speed, elevation, temperature, weight, position format, and time format. 1 Select > System > Units. 2 Select a measurement type. 3 Select a unit of the training data pages while the timer is moving. Changing the Start Notice This feature automatically detects when your current GPS satellite information. GPS accuracy appears at any location during the ride where you can turn on the device screen. Changing the Device Language From...
Owner's Manual
Page 17
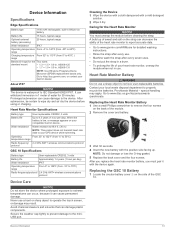
... Two sizes: standard mount • 1. 3 × 1. 5 × 0. 9 in. Prolonged submersion can damage plastic components. Heart Rate Monitor Specifications Battery type User-replaceable CR2032, 3 volts Battery life Up to 4. 5 years (1 hour per day) Water resistance IPX7 Operating temperature From 5º to 158ºF (from 0º to 45ºC ) range Bands (O-rings) for detailed washing instructions. • Rinse the strap after every use . Contact your GPS device while swimming. Replacing...
... Two sizes: standard mount • 1. 3 × 1. 5 × 0. 9 in. Prolonged submersion can damage plastic components. Heart Rate Monitor Specifications Battery type User-replaceable CR2032, 3 volts Battery life Up to 4. 5 years (1 hour per day) Water resistance IPX7 Operating temperature From 5º to 158ºF (from 0º to 45ºC ) range Bands (O-rings) for detailed washing instructions. • Rinse the strap after every use . Contact your GPS device while swimming. Replacing...
Owner's Manual
Page 18
... deletes all of left corner of inactivity. 1 Select > System > Auto Power Down. 2 Select On. Data Fields Some data fields require ANT + accessories to adjust the brightness. NOTE: Do not damage or lose the O-ring gasket. 6 Use a coin to twist the cover clockwise back into place (the arrow points to locked). This does not erase any of your finger on the device. Troubleshooting Resetting the Device If the device stops responding, you must pair...
... deletes all of left corner of inactivity. 1 Select > System > Auto Power Down. 2 Select On. Data Fields Some data fields require ANT + accessories to adjust the brightness. NOTE: Do not damage or lose the O-ring gasket. 6 Use a coin to twist the cover clockwise back into place (the arrow points to locked). This does not erase any of your finger on the device. Troubleshooting Resetting the Device If the device stops responding, you must pair...
Owner's Manual
Page 19
... 5%. Cadence - You must be navigating for the current activity. You must be navigating for all trips. For example, your user profile, maximum heart rate, and resting heart rate. GPS Signal Strength: The strength of distance traveled for this data to a compatible heart rate monitor. Avg. %Max. : The average percentage of functional threshold power. Power - %FTP: The current power output as a percentage of maximum heart rate for 5 minutes, then start the timer and run (distance). Last Lap: The average power output for the current lap...
... 5%. Cadence - You must be navigating for the current activity. You must be navigating for all trips. For example, your user profile, maximum heart rate, and resting heart rate. GPS Signal Strength: The strength of distance traveled for this data to a compatible heart rate monitor. Avg. %Max. : The average percentage of functional threshold power. Power - %FTP: The current power output as a percentage of maximum heart rate for 5 minutes, then start the timer and run (distance). Last Lap: The average power output for the current lap...
Owner's Manual
Page 21
... data 9, 14 history 8 device care 13 registration 14 resetting 14 display settings 12 distance, alerts 3 E elevation 12 F files, transferring 8 finding locations 10 addresses 10 near your location 10 G Garmin Connect 3, 7 storing data 7 GPS satellite page 12 signal 2 stopping 12 GSC 10 6, 13 H heart rate alerts 3 zones 5, 6, 16 heart rate monitor 5, 13 history 3, 7 deleting 8 sending to start 9 stopping 9 O O-rings (bands) 13 on-screen buttons 2 P pairing 2 pairing ANT + sensors 7 personal records 5, 8 restoring 5 points of measure 12 USB, disconnecting 9 user data, deleting 9 user profile...
... data 9, 14 history 8 device care 13 registration 14 resetting 14 display settings 12 distance, alerts 3 E elevation 12 F files, transferring 8 finding locations 10 addresses 10 near your location 10 G Garmin Connect 3, 7 storing data 7 GPS satellite page 12 signal 2 stopping 12 GSC 10 6, 13 H heart rate alerts 3 zones 5, 6, 16 heart rate monitor 5, 13 history 3, 7 deleting 8 sending to start 9 stopping 9 O O-rings (bands) 13 on-screen buttons 2 P pairing 2 pairing ANT + sensors 7 personal records 5, 8 restoring 5 points of measure 12 USB, disconnecting 9 user data, deleting 9 user profile...
Quick Start Manual
Page 2
... the bike mount. A fully charged battery can install the bike mount on the stem or the handlebars. 1 Select a secure location to mount the Edge where it does not interfere with the safe operation of your device the first time, you begin or modify any exercise program. Getting Started When using your bike. 2 Use the hex key to mount the Edge where it must be recharged. Installing the Standard Mount For the best GPS reception, position the bike mount...
... the bike mount. A fully charged battery can install the bike mount on the stem or the handlebars. 1 Select a secure location to mount the Edge where it does not interfere with the safe operation of your device the first time, you begin or modify any exercise program. Getting Started When using your bike. 2 Use the hex key to mount the Edge where it must be recharged. Installing the Standard Mount For the best GPS reception, position the bike mount...
Quick Start Manual
Page 3
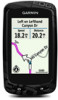
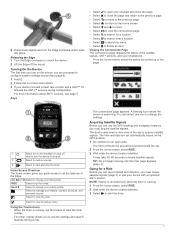
... screen, select RIDE. 2 Wait while the device locates satellites. 3 Select to use the GPS tracking and navigation features, you quick access to change your activity profile. 8 Press down slightly and turn the Edge clockwise until the timer page appears (page 3). Turning On the Device The first time you turn on and off. Á Select to mark a new lap. Â Select to view the timer overlay. For more information about ANT + sensors, see page 5. Select to view the map. Using the Touchscreen • When the timer...
... screen, select RIDE. 2 Wait while the device locates satellites. 3 Select to use the GPS tracking and navigation features, you quick access to change your activity profile. 8 Press down slightly and turn the Edge clockwise until the timer page appears (page 3). Turning On the Device The first time you turn on and off. Á Select to mark a new lap. Â Select to view the timer overlay. For more information about ANT + sensors, see page 5. Select to view the map. Using the Touchscreen • When the timer...

Quick Start Manual
Page 4
... features. History History includes time, distance, calories, speed, lap data, elevation, and optional ANT + sensor information. 4 Swipe the screen for activities on Garmin Connect using email or social media, allowing them to view your live data on your favorite social networking sites. You can record and store locations in real time. NOTE: Your Edge must have a Garmin Connect account (page 4). 1 Connect the device to your activity to Garmin Connect as soon as you want. Course and workout downloads fromGarmin Connect...
... features. History History includes time, distance, calories, speed, lap data, elevation, and optional ANT + sensor information. 4 Swipe the screen for activities on Garmin Connect using email or social media, allowing them to view your live data on your favorite social networking sites. You can record and store locations in real time. NOTE: Your Edge must have a Garmin Connect account (page 4). 1 Connect the device to your activity to Garmin Connect as soon as you want. Course and workout downloads fromGarmin Connect...
Quick Start Manual
Page 6
... create different settings and views for each bike you want to 2. 4 lbf-in a safe place. 6 User Profile: You can lock the screen to change settings such as data fields or units of the device settings to your Garmin dealer for training, racing, and mountain biking. Clearing User Data You can find more information, see on the device. Locking the Touchscreen You can update your owner's manual. Getting More Information You can restore all user-entered information, but it does not delete your history. 1 Turn...
... create different settings and views for each bike you want to 2. 4 lbf-in a safe place. 6 User Profile: You can lock the screen to change settings such as data fields or units of the device settings to your Garmin dealer for training, racing, and mountain biking. Clearing User Data You can find more information, see on the device. Locking the Touchscreen You can update your owner's manual. Getting More Information You can restore all user-entered information, but it does not delete your history. 1 Turn...


