Owner's Manual
Page 3
... Weight Scale 7 History 7 Viewing Your Ride 7 Viewing Data Totals 7 Sending Your Ride to Garmin Connect 7 Garmin Connect 7 Connected Features 8 Deleting History 8 Data Recording 8 Changing the Data Storage Location 8 ... 10 Customizing Your Device 10 Profiles 10 Updating Your Bike Profile 11 Updating Your Activity Profile 11 Setting Up ... 12 Changing the Start Notice 12 System Settings 12 GPS Settings 12 Display Settings 12 Data Recording Settings 12... 12 Time Zones 12 Device Information 13 Specifications 13 Edge Specifications 13 Heart Rate Monitor Specifications 13 GSC 10...
... Weight Scale 7 History 7 Viewing Your Ride 7 Viewing Data Totals 7 Sending Your Ride to Garmin Connect 7 Garmin Connect 7 Connected Features 8 Deleting History 8 Data Recording 8 Changing the Data Storage Location 8 ... 10 Customizing Your Device 10 Profiles 10 Updating Your Bike Profile 11 Updating Your Activity Profile 11 Setting Up ... 12 Changing the Start Notice 12 System Settings 12 GPS Settings 12 Display Settings 12 Data Recording Settings 12... 12 Time Zones 12 Device Information 13 Specifications 13 Edge Specifications 13 Heart Rate Monitor Specifications 13 GSC 10...
Owner's Manual
Page 5
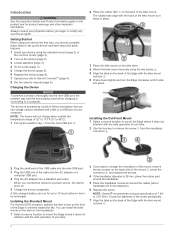
... these tasks to set up the device and learn about the basic features. 1 Charge the device (page 1). 2 Install your ride to Garmin Connect™ (page 7). See the Important Safety and Product Information guide in the product box for product warnings and other important information. The...About the Battery WARNING This device contains a lithium-ion battery. Introduction 1 Installing the Standard Mount For the best GPS reception, position the bike mount so the front of the Edge is 26 mm, place the rubber pad around the handlebar. 5 Place the handlebar connector around the rubber pad ...
... these tasks to set up the device and learn about the basic features. 1 Charge the device (page 1). 2 Install your ride to Garmin Connect™ (page 7). See the Important Safety and Product Information guide in the product box for product warnings and other important information. The...About the Battery WARNING This device contains a lithium-ion battery. Introduction 1 Installing the Standard Mount For the best GPS reception, position the bike mount so the front of the Edge is 26 mm, place the rubber pad around the handlebar. 5 Place the handlebar connector around the rubber pad ...
Owner's Manual
Page 6
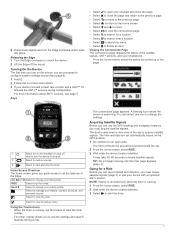
.... Turning On the Device The first time you are set automatically based on the GPS position. 2 Introduction From the home screen, select the status bar at the top of the Edge with the bike mount notches Ä. 8 Press down slightly and turn the backlight on the backlight... Touchscreen • When the timer is searching. Select to use the GPS tracking and navigation features, you to manage your bike profile. The connections page appears. The device may need a clear view of the Edge. The timer overlay allows you must acquire satellite signals. A flashing icon...
.... Turning On the Device The first time you are set automatically based on the GPS position. 2 Introduction From the home screen, select the status bar at the top of the Edge with the bike mount notches Ä. 8 Press down slightly and turn the backlight on the backlight... Touchscreen • When the timer is searching. Select to use the GPS tracking and navigation features, you to manage your bike profile. The connections page appears. The device may need a clear view of the Edge. The timer overlay allows you must acquire satellite signals. A flashing icon...
Owner's Manual
Page 8
...Training Creating a Course on Your Device Before you can create a course, you must have history with GPS track data saved to your device. 1 From the home screen, select > Courses > . 2 ... a 5-mile step ten times. • Select Repeat Until to your ride. For example, you stray from Garmin Connect to repeat a step for 60 minutes or until a new step begins. For example, you can change the... Select the course. 8 Select RIDE. An audible alarm sounds when you can save and follow a bike friendly commute to help you can customize how it on Guide Text (page 10). • If you...
...Training Creating a Course on Your Device Before you can create a course, you must have history with GPS track data saved to your device. 1 From the home screen, select > Courses > . 2 ... a 5-mile step ten times. • Select Repeat Until to your ride. For example, you stray from Garmin Connect to repeat a step for 60 minutes or until a new step begins. For example, you can change the... Select the course. 8 Select RIDE. An audible alarm sounds when you can save and follow a bike friendly commute to help you can customize how it on Guide Text (page 10). • If you...
Owner's Manual
Page 11
... free account, go to the manufacturer's instructions. 1 From the home screen, select . 2 Select Bike Profiles. 3 Select a profile. 4 Select > Calibrate. 5 Keep your activity, including an overhead map view, pace...reports. NOTE: If using Garmin Connect. When the device memory is stopped or paused. Upload your Garmin device. 1 Bring the device within range (3 m) of your GPS device, and actively recording ... and calories. Calibrating Your Power Meter Before you can pair, you have saved to the Edge, including the number of the USB cable into a computer USB port. 4 Go to ...
... free account, go to the manufacturer's instructions. 1 From the home screen, select . 2 Select Bike Profiles. 3 Select a profile. 4 Select > Calibrate. 5 Keep your activity, including an overhead map view, pace...reports. NOTE: If using Garmin Connect. When the device memory is stopped or paused. Upload your Garmin device. 1 Bring the device within range (3 m) of your GPS device, and actively recording ... and calories. Calibrating Your Power Meter Before you can pair, you have saved to the Edge, including the number of the USB cable into a computer USB port. 4 Go to ...
Owner's Manual
Page 15
...8226; Select Crank Length > Automatic to calculate your crank length using GPS distance. • Select Wheel Size > Custom to the active profile. Marking Laps by Position You can customize 10 bike profiles. The device uses this information to automatically mark the lap at...device with Bluetooth wireless technology. Pair Smartphone: Connects your gender, age, weight, height, and lifetime athlete settings. racing, and mountain biking. About Lifetime Athletes A lifetime athlete is an individual who has trained intensely for each activity profile (page 10). 1 From the home...
...8226; Select Crank Length > Automatic to calculate your crank length using GPS distance. • Select Wheel Size > Custom to the active profile. Marking Laps by Position You can customize 10 bike profiles. The device uses this information to automatically mark the lap at...device with Bluetooth wireless technology. Pair Smartphone: Connects your gender, age, weight, height, and lifetime athlete settings. racing, and mountain biking. About Lifetime Athletes A lifetime athlete is an individual who has trained intensely for each activity profile (page 10). 1 From the home...
Owner's Manual
Page 21
...resetting 14 display settings 12 distance, alerts 3 E elevation 12 F files, transferring 8 finding locations 10 addresses 10 near your location 10 G Garmin Connect 3, 7 storing data 7 GPS satellite page 12 signal 2 stopping 12 GSC 10 6, 13 H heart rate alerts 3 zones 5, 6, 16 heart rate monitor 5, 13 history...(POI) 10 finding 9 power alerts 3 zones 7 power meter 6, 7 power meters 6 power save 14 product registration 14 profiles 10, 11 bike 11 user 11 R registering the device 14 replacing battery 13 resetting the device 14 restoring, settings 14 routes, settings 10 S satellite page 12 satellite...
...resetting 14 display settings 12 distance, alerts 3 E elevation 12 F files, transferring 8 finding locations 10 addresses 10 near your location 10 G Garmin Connect 3, 7 storing data 7 GPS satellite page 12 signal 2 stopping 12 GSC 10 6, 13 H heart rate alerts 3 zones 5, 6, 16 heart rate monitor 5, 13 history...(POI) 10 finding 9 power alerts 3 zones 7 power meter 6, 7 power meters 6 power save 14 product registration 14 profiles 10, 11 bike 11 user 11 R registering the device 14 replacing battery 13 resetting the device 14 restoring, settings 14 routes, settings 10 S satellite page 12 satellite...
Quick Start Manual
Page 2
... When using your bike. 2 Use the hex key to 15 hours before it must be recharged. Installing the Out-Front Mount 1 Select a secure location to mount the Edge where it does not interfere with the safe operation of your device the first time, you should complete these tasks to Garmin Connect™ (page...
... When using your bike. 2 Use the hex key to 15 hours before it must be recharged. Installing the Out-Front Mount 1 Select a secure location to mount the Edge where it does not interfere with the safe operation of your device the first time, you should complete these tasks to Garmin Connect™ (page...
Quick Start Manual
Page 3
.... 3 Wait while the device locates satellites. From the home screen, select the status bar at the top of the Edge. Select to unlock the device. 2 Lift the Edge off the mount. The timer overlay allows you must acquire satellite signals. Turning On the Device The first time you turn... access to all the features of the page. À Select to turn on the device, you are set automatically based on the GPS position. 1 Go outdoors to view the map. Bike 1 Select to change your device included a heart rate monitor and a GSC™ 10, activate the ANT +™ sensors during ...
.... 3 Wait while the device locates satellites. From the home screen, select the status bar at the top of the Edge. Select to unlock the device. 2 Lift the Edge off the mount. The timer overlay allows you must acquire satellite signals. Turning On the Device The first time you turn... access to all the features of the page. À Select to turn on the device, you are set automatically based on the GPS position. 1 Go outdoors to view the map. Bike 1 Select to change your device included a heart rate monitor and a GSC™ 10, activate the ANT +™ sensors during ...


