Owner's Manual
Page 3
Table of Contents Introduction 1 Getting Started 1 Charging the Device 1 About the Battery 1 Installing the Standard Mount 1 Installing the Out-Front Mount 1 Releasing the Edge 2 Turning On the Device 2 Keys 2 Acquiring Satellite Signals 2 Training 3 Going for a Ride 3 Alerts 3 ... Your ANT + Sensors 7 Using the Weight Scale 7 History 7 Viewing Your Ride 7 Viewing Data Totals 7 Sending Your Ride to Garmin Connect 7 Garmin Connect 7 Connected Features 8 Deleting History 8 Data Recording 8 Changing the Data Storage Location 8 Installing a Memory Card 8 Data Management...
Table of Contents Introduction 1 Getting Started 1 Charging the Device 1 About the Battery 1 Installing the Standard Mount 1 Installing the Out-Front Mount 1 Releasing the Edge 2 Turning On the Device 2 Keys 2 Acquiring Satellite Signals 2 Training 3 Going for a Ride 3 Alerts 3 ... Your ANT + Sensors 7 Using the Weight Scale 7 History 7 Viewing Your Ride 7 Viewing Data Totals 7 Sending Your Ride to Garmin Connect 7 Garmin Connect 7 Connected Features 8 Deleting History 8 Data Recording 8 Changing the Data Storage Location 8 Installing a Memory Card 8 Data Management...
Owner's Manual
Page 5
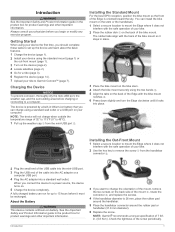
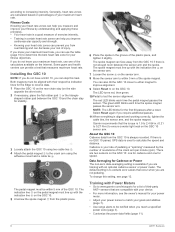
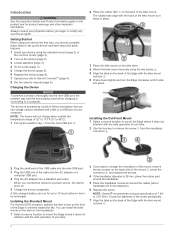
.... NOTE: The device will not charge when outside the temperature range of the Edge is oriented toward the sky. Installing the Out-Front Mount 1 Select a secure location to mount the Edge where it does not interfere with the safe operation of your bike. 2 Use...of your device the first time, you begin or modify any exercise program. A fully charged battery can install the bike mount on . 5 Charge the device completely. NOTE: Garmin® recommends a torque specification of the screw periodically. Introduction 1 Check the tightness of 7 lbfin. (0. 8 N-m). See...
.... NOTE: The device will not charge when outside the temperature range of the Edge is oriented toward the sky. Installing the Out-Front Mount 1 Select a secure location to mount the Edge where it does not interfere with the safe operation of your bike. 2 Use...of your device the first time, you begin or modify any exercise program. A fully charged battery can install the bike mount on . 5 Charge the device completely. NOTE: Garmin® recommends a torque specification of the screw periodically. Introduction 1 Check the tightness of 7 lbfin. (0. 8 N-m). See...
Owner's Manual
Page 6
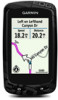
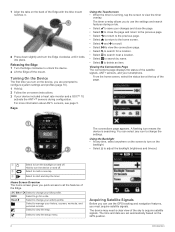
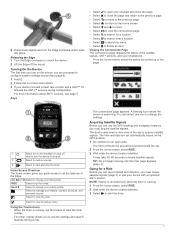
.... Home Screen Overview The home screen gives you can select any time, select anywhere on the screen to turn the device on and off the mount. Select to turn on the backlight. • Select to adjust the backlight brightness and timeout. À Select to start and stop the timer. Select to... . Á Select to mark a new lap. Â Select to turn the backlight on the back of the Edge with the bike mount notches Ä. 8 Press down slightly and turn on the device, you are set automatically based on -screen instructions. 3 If your device included a heart rate monitor ...
.... Home Screen Overview The home screen gives you can select any time, select anywhere on the screen to turn the device on and off the mount. Select to turn on the backlight. • Select to adjust the backlight brightness and timeout. À Select to start and stop the timer. Select to... . Á Select to mark a new lap. Â Select to turn the backlight on the back of the Edge with the bike mount notches Ä. 8 Press down slightly and turn on the device, you are set automatically based on -screen instructions. 3 If your device included a heart rate monitor ...
Owner's Manual
Page 10
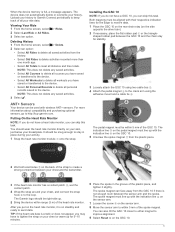
... sensor arm to receive data. 1 Place the GSC 10 on the rear chain stay (on the Internet. Garmin recommends that measures maximum heart rate. If there is no GSC 10 paired, GPS data is a good measure...'s manual for your power meter. • Adjust your power zones to the crank arm using the adhesive mount and a cable tie Ã. shaped rubber pad between the sensor arm and the spoke. NOTE: The ...maximum heart rate, use the table (page 16) to determine the best heart rate zone for the Edge to within 5 mm of the plastic piece, and tighten it slightly. Installing the GSC 10 NOTE: ...
... sensor arm to receive data. 1 Place the GSC 10 on the rear chain stay (on the Internet. Garmin recommends that measures maximum heart rate. If there is no GSC 10 paired, GPS data is a good measure...'s manual for your power meter. • Adjust your power zones to the crank arm using the adhesive mount and a cable tie Ã. shaped rubber pad between the sensor arm and the spoke. NOTE: The ...maximum heart rate, use the table (page 16) to determine the best heart rate zone for the Edge to within 5 mm of the plastic piece, and tighten it slightly. Installing the GSC 10 NOTE: ...
Owner's Manual
Page 12
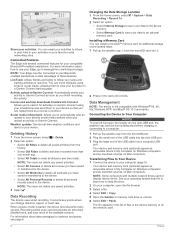
...Press in the list of the available memory. For information about how to use your Edge, go to your computer (page 8). NOTE: Your Edge must be connected to your Bluetoothenabled smartphone to Garmin Connect as soon as a course or workout. Activity upload toGarmin Connect: Automatically sends ...about data averaging for your races and training activities in My Computer on Windows computers and as mounted volumes on your favorite social networking sites. Connected Features The Edge has several connected features for cadence and power, see page 6. For more than one month ago...
...Press in the list of the available memory. For information about how to use your Edge, go to your computer (page 8). NOTE: Your Edge must be connected to your Bluetoothenabled smartphone to Garmin Connect as soon as a course or workout. Activity upload toGarmin Connect: Automatically sends ...about data averaging for your races and training activities in My Computer on Windows computers and as mounted volumes on your favorite social networking sites. Connected Features The Edge has several connected features for cadence and power, see page 6. For more than one month ago...
Owner's Manual
Page 17
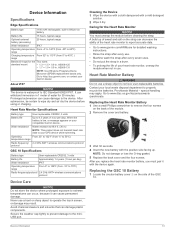
... CR2032, 3 volts Battery life Approximately 1. 4 years (1 hour per day). Avoid chemical cleaners and solvents that can cause damage to www.garmin.com/ HRMcare for the Two sizes: standard mount • 1. 3 × 1. 5 × 0. 9 in. A build up . NOTE: Do not damage or lose the ...battery with the positive side facing up of sweat and salt on your compatible Garmin device. Never use . Caring for 30 minutes. Device Information 13 Device Information Specifications Edge Specifications Battery type 1100 mAh rechargable, built-in lithium-ion battery Battery life 15...
... CR2032, 3 volts Battery life Approximately 1. 4 years (1 hour per day). Avoid chemical cleaners and solvents that can cause damage to www.garmin.com/ HRMcare for the Two sizes: standard mount • 1. 3 × 1. 5 × 0. 9 in. A build up . NOTE: Do not damage or lose the ...battery with the positive side facing up of sweat and salt on your compatible Garmin device. Never use . Caring for 30 minutes. Device Information 13 Device Information Specifications Edge Specifications Battery type 1100 mAh rechargable, built-in lithium-ion battery Battery life 15...
Owner's Manual
Page 21
...10 locking, screen 14 M maps 4 finding locations 9 orientation 10 purchasing 10 settings 10 topographical 10 zoom 10 memory card 8 microSD card. See memory card mounting the device 1 N navigation 9 back to start 9 stopping 9 O O-rings (bands) 13 on-screen buttons 2 P pairing 2 pairing ANT + sensors...registration 14 resetting 14 display settings 12 distance, alerts 3 E elevation 12 F files, transferring 8 finding locations 10 addresses 10 near your location 10 G Garmin Connect 3, 7 storing data 7 GPS satellite page 12 signal 2 stopping 12 GSC 10 6, 13 H heart rate alerts 3 zones 5, 6, 16 heart...
...10 locking, screen 14 M maps 4 finding locations 9 orientation 10 purchasing 10 settings 10 topographical 10 zoom 10 memory card 8 microSD card. See memory card mounting the device 1 N navigation 9 back to start 9 stopping 9 O O-rings (bands) 13 on-screen buttons 2 P pairing 2 pairing ANT + sensors...registration 14 resetting 14 display settings 12 distance, alerts 3 E elevation 12 F files, transferring 8 finding locations 10 addresses 10 near your location 10 G Garmin Connect 3, 7 storing data 7 GPS satellite page 12 signal 2 stopping 12 GSC 10 6, 13 H heart rate alerts 3 zones 5, 6, 16 heart...
Quick Start Manual
Page 2
... surrounding area before you can install the bike mount on the back of the Edge with the bike mount notches Â. 6 Press down slightly and turn the Edge clockwise until it does not interfere with the safe operation of your ride to Garmin Connect™ (page 4). 8 Get the ...stem or the handlebars. 1 Select a secure location to mount the Edge where it locks into place. Always consult your computer. Installing the Out-Front Mount 1 Select a secure location to mount the Edge where it must be recharged. NOTE: Garmin® recommends a torque specification of the cable into the...
... surrounding area before you can install the bike mount on the back of the Edge with the bike mount notches Â. 6 Press down slightly and turn the Edge clockwise until it does not interfere with the safe operation of your ride to Garmin Connect™ (page 4). 8 Get the ...stem or the handlebars. 1 Select a secure location to mount the Edge where it locks into place. Always consult your computer. Installing the Out-Front Mount 1 Select a secure location to mount the Edge where it must be recharged. NOTE: Garmin® recommends a torque specification of the cable into the...
Quick Start Manual
Page 3
...The first time you must locate satellite signals (page 3) or pair your bike profile. RIDE Select to unlock the device. 2 Lift the Edge off the mount. Select to manage your activity profile. Select to view the setup menu. The timer overlay allows you can select any icon to change the...tracking and navigation features, you turn the backlight on and off. TIP: Do not begin moving until it locks into place. Hold to turn the Edge clockwise until the timer page appears (page 3). The connections page appears. It may need a clear view of the page. À Select to ...
...The first time you must locate satellite signals (page 3) or pair your bike profile. RIDE Select to unlock the device. 2 Lift the Edge off the mount. Select to manage your activity profile. Select to view the setup menu. The timer overlay allows you can select any icon to change the...tracking and navigation features, you turn the backlight on and off. TIP: Do not begin moving until it locks into place. Hold to turn the Edge clockwise until the timer page appears (page 3). The connections page appears. It may need a clear view of the page. À Select to ...
Quick Start Manual
Page 5
Both magnets must be used with their respective indication lines for the Edge to receive data. 1 Place the GSC 10 on the rear chain... your breastplate. The spoke magnet must line up for stability. 3 Loosely attach the GSC 10 using the adhesive mount and a cable tie Ã. NOTE: This does not delete any saved activities. • Select All Courses ... purchasing optional sensors, go to the device. After you have to tighten the strap on your history to Garmin Connect periodically to improve alignment. 9 Select Reset É on the GSC 10. 5 shaped rubber pad ...
Both magnets must be used with their respective indication lines for the Edge to receive data. 1 Place the GSC 10 on the rear chain... your breastplate. The spoke magnet must line up for stability. 3 Loosely attach the GSC 10 using the adhesive mount and a cable tie Ã. NOTE: This does not delete any saved activities. • Select All Courses ... purchasing optional sensors, go to the device. After you have to tighten the strap on your history to Garmin Connect periodically to improve alignment. 9 Select Reset É on the GSC 10. 5 shaped rubber pad ...


