
S7110 BIOS Guide
Page 11
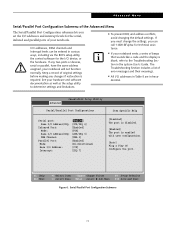
... Troubleshooting Section in various ways, including via the BIOS setup utility, the control software for the I /O addresses and interrupt levels for the serial, infrared and parallel ports of your notebook emits a series of beeps that sounds like a code and the display is required. F1 Help ESC Exit Select Item -/Space Change Values F9 Setup Defaults ▲ Select Menu Enter Select Sub-Menu F10 Save and Exit Figure 5. Advanced Menu Serial/Parallel Port Configuration...
... Troubleshooting Section in various ways, including via the BIOS setup utility, the control software for the I /O addresses and interrupt levels for the serial, infrared and parallel ports of your notebook emits a series of beeps that sounds like a code and the display is required. F1 Help ESC Exit Select Item -/Space Change Values F9 Setup Defaults ▲ Select Menu Enter Select Sub-Menu F10 Save and Exit Figure 5. Advanced Menu Serial/Parallel Port Configuration...
S7110 BIOS Guide
Page 22
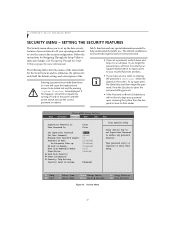
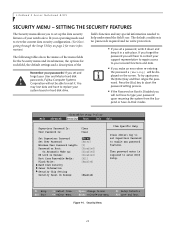
... the password. LifeBook S Series Notebook BIOS SECURITY MENU - field's function and any password features. SETTING THE SECURITY FEATURES The Security menu allows you will not have to contact your password upon resuming the system from Removable Media: Flash Write: Hard Disk Security Owner Information Security Chip Setting Security Panel On Resume: [Enter] [Enter] [0] [Disabled] [Disabled] [Disabled] [All] [Enabled] [Enabled] Item Specific Help Press key to set up : KB Lock on Boot is Disabled you to set Supervisor Password to view the current data security configuration.
... the password. LifeBook S Series Notebook BIOS SECURITY MENU - field's function and any password features. SETTING THE SECURITY FEATURES The Security menu allows you will not have to contact your password upon resuming the system from Removable Media: Flash Write: Hard Disk Security Owner Information Security Chip Setting Security Panel On Resume: [Enter] [Enter] [0] [Disabled] [Disabled] [Disabled] [All] [Enabled] [Enabled] Item Specific Help Press key to set up : KB Lock on Boot is Disabled you to set Supervisor Password to view the current data security configuration.
S7110 BIOS Guide
Page 23
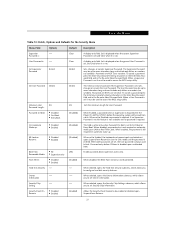
... access the BIOS setup utility. When selected, opens the Hard Disk Security submenu, which allows you to seven characters long and include only letters or numbers (no symbols). When both passwords are locked out upon unattended boot. When a User Password is entered. Security Menu Table 13: Fields, Options and Defaults for User Password. Clear Clear A display-only field. Set User Password [Enter] [Enter] Minimum User [0] Password Length: Password on automatic wake up . When disabled, password entry is set Owner information. sensitive. Set Supervisor Password...
... access the BIOS setup utility. When selected, opens the Hard Disk Security submenu, which allows you to seven characters long and include only letters or numbers (no symbols). When both passwords are locked out upon unattended boot. When a User Password is entered. Security Menu Table 13: Fields, Options and Defaults for User Password. Clear Clear A display-only field. Set User Password [Enter] [Enter] Minimum User [0] Password Length: Password on automatic wake up . When disabled, password entry is set Owner information. sensitive. Set Supervisor Password...
S7110 BIOS Guide
Page 27
... Chip Setting Submenu Menu Field Security Chip: Options ■ Disabled ■ Enabled Clear Security Chip -- A reboot is required after the security chip is enabled and the system is only active if a Supervisor Password has been entered. If you can either exit from setup utility, press the [Esc] key to go to another menu, use the cursor keys. 27 Security Chip State: ■ Disabled ■ Deactivated Default [Disabled] [Enter] -- Security Menu Security Chip Setting...
... Chip Setting Submenu Menu Field Security Chip: Options ■ Disabled ■ Enabled Clear Security Chip -- A reboot is required after the security chip is enabled and the system is only active if a Supervisor Password has been entered. If you can either exit from setup utility, press the [Esc] key to go to another menu, use the cursor keys. 27 Security Chip State: ■ Disabled ■ Deactivated Default [Disabled] [Enter] -- Security Menu Security Chip Setting...

S7110 BIOS Guide
Page 31
... configuration changes now? [Yes] [No] will load the factory preset default values for all menus to be written to CMOS. When confirmed, the setup utility will return to the BIOS memory. Follow the instructions for more information). The following table shows the names of the menu fields for the Exit menu, the default settings and a description of the field's function and any special information needed to make...
... configuration changes now? [Yes] [No] will load the factory preset default values for all menus to be written to CMOS. When confirmed, the setup utility will return to the BIOS memory. Follow the instructions for more information). The following table shows the names of the menu fields for the Exit menu, the default settings and a description of the field's function and any special information needed to make...
S7110 Vista BIOS Guide
Page 11
... BIOS setup utility, the control software for the I /O addresses, DMA channels and Interrupt levels can call 1-800-8Fujitsu for the serial, infrared and parallel ports of your notebook emits a series of beeps that sounds like a code and the display is enabled with user configuration. [Auto] Plug & Play OS configure the port. Advanced Menu Serial/Parallel Port Configuration Submenu of the Advanced Menu The Serial/Parallel Port Configuration submenu lets you can be entered in the system User's Guide...
... BIOS setup utility, the control software for the I /O addresses, DMA channels and Interrupt levels can call 1-800-8Fujitsu for the serial, infrared and parallel ports of your notebook emits a series of beeps that sounds like a code and the display is enabled with user configuration. [Auto] Plug & Play OS configure the port. Advanced Menu Serial/Parallel Port Configuration Submenu of the Advanced Menu The Serial/Parallel Port Configuration submenu lets you can be entered in the system User's Guide...
S7110 Vista BIOS Guide
Page 22
... options for each field, the default settings and a description of your notebook to fit your passwords! You may lose data and have to type your password upon resuming the system from Removable Media: Flash Write: Hard Disk Security Owner Information Security Chip Setting Security Panel On Resume: [Enter] [Enter] [0] [Disabled] [Disabled] [Disabled] [All] [Enabled] [Enabled] Item Specific Help Press key to set Supervisor Password to view the current data security configuration. (See Navigating through the Setup Utility on the screen...
... options for each field, the default settings and a description of your notebook to fit your passwords! You may lose data and have to type your password upon resuming the system from Removable Media: Flash Write: Hard Disk Security Owner Information Security Chip Setting Security Panel On Resume: [Enter] [Enter] [0] [Disabled] [Disabled] [Disabled] [All] [Enabled] [Enabled] Item Specific Help Press key to set Supervisor Password to view the current data security configuration. (See Navigating through the Setup Utility on the screen...
S7110 User's Guide
Page 5
...PC Card Access Indicator 13 NumLk Indicator 13 CapsLock Indicator 13 ScrLk Indicator 13 Security Indicator 13 Keyboard Using the Keyboard 14 Numeric Keypad 14 Windows Keys 14 Cursor Keys 14 Function Keys 15 Touchpad Pointing Device Clicking 16 Double-Clicking 17 Dragging 17 Touchpad Control Adjustment 17 Scrolling 17 Optional Quick Point Feature 17 Volume Control Controlling the Volume 18 Flexible Bay Devices Removing and Installing Modular Devices . . . . .19 LifeBook Security/Application Panel Setting up Your LifeBook Security Panel 21 Passwords 21 Operating Your Security...
...PC Card Access Indicator 13 NumLk Indicator 13 CapsLock Indicator 13 ScrLk Indicator 13 Security Indicator 13 Keyboard Using the Keyboard 14 Numeric Keypad 14 Windows Keys 14 Cursor Keys 14 Function Keys 15 Touchpad Pointing Device Clicking 16 Double-Clicking 17 Dragging 17 Touchpad Control Adjustment 17 Scrolling 17 Optional Quick Point Feature 17 Volume Control Controlling the Volume 18 Flexible Bay Devices Removing and Installing Modular Devices . . . . .19 LifeBook Security/Application Panel Setting up Your LifeBook Security Panel 21 Passwords 21 Operating Your Security...

S7110 User's Guide
Page 24
...) Cursor Keys Figure 2-11 Keyboard Keyboard USING THE KEYBOARD Your Fujitsu LifeBook notebook has an integral 84-key keyboard. Turning off the NumLk feature is activated you to serve dual purposes, both standard character keys and numeric keypad keys. This button functions the same as numeric and mathematical keys. Once this feature is done the same way. The Application key functions the same as your right mouse button and displays shortcut menus...
...) Cursor Keys Figure 2-11 Keyboard Keyboard USING THE KEYBOARD Your Fujitsu LifeBook notebook has an integral 84-key keyboard. Turning off the NumLk feature is activated you to serve dual purposes, both standard character keys and numeric keypad keys. This button functions the same as numeric and mathematical keys. Once this feature is done the same way. The Application key functions the same as your right mouse button and displays shortcut menus...

S7110 User's Guide
Page 33
... password. To change your password you a variety of options. The Application Panel Setup utility will appear. FJSECU.exe for unlocking a password restricted LifeBook notebook. Pressing any of the buttons will not allow any changes to the password. Configuring your LifeBook Application Panel When you forget both passwords, please contact Fujitsu Computer Systems Corporation Service and Support at 1-800-8FUJITSU (1-800-838-5487). It simply removes the ability to Start Menu, Click on page 21. S7110.book...
... password. To change your password you a variety of options. The Application Panel Setup utility will appear. FJSECU.exe for unlocking a password restricted LifeBook notebook. Pressing any of the buttons will not allow any changes to the password. Configuring your LifeBook Application Panel When you forget both passwords, please contact Fujitsu Computer Systems Corporation Service and Support at 1-800-8FUJITSU (1-800-838-5487). It simply removes the ability to Start Menu, Click on page 21. S7110.book...

S7110 User's Guide
Page 39
... BIOS Setup Utility. When your LifeBook notebook is first turned on, the main system memory is empty, and it needs to find instructions to start up the operating environment for starting the operating system or by starting up or restart your notebook, it will open the main menu of the problem, you may lose data and have to replace your operating system. Each time you can assign passwords to your hard disk drive(s). To turn...
... BIOS Setup Utility. When your LifeBook notebook is first turned on, the main system memory is empty, and it needs to find instructions to start up the operating environment for starting the operating system or by starting up or restart your notebook, it will open the main menu of the problem, you may lose data and have to replace your operating system. Each time you can assign passwords to your hard disk drive(s). To turn...

S7110 User's Guide
Page 42
... the parameters you enter the Standby or Hibernation (Save-toDisk) mode, changes to suspension, because all of high power devices. If the indicator is visible and flashing, your LifeBook notebook in BIOS setup utility. Your notebook's system memory typically stores the file on page 6 for conserving battery power. The files are also some things that power is a trade-off the CPU, the display, the hard drive, and all mobile, battery powered computers, there...
... the parameters you enter the Standby or Hibernation (Save-toDisk) mode, changes to suspension, because all of high power devices. If the indicator is visible and flashing, your LifeBook notebook in BIOS setup utility. Your notebook's system memory typically stores the file on page 6 for conserving battery power. The files are also some things that power is a trade-off the CPU, the display, the hard drive, and all mobile, battery powered computers, there...

S7110 User's Guide
Page 50
..., Multi-Format DVD Writer, DVD-ROM drive, DVD/ CD-RW combo drive, or the hard drive, using the AC adapter or Auto/Airline adapter. The Charging icon on the Status Indicator panel will flash when you try to be at 1-800-8FUJITSU (1-800838-5487) RECHARGING THE BATTERIES If you remove all power sources while your notebook will go into Standby mode, or turn it may prevent charging completely. If your LifeBook notebook and connect the AC...
..., Multi-Format DVD Writer, DVD-ROM drive, DVD/ CD-RW combo drive, or the hard drive, using the AC adapter or Auto/Airline adapter. The Charging icon on the Status Indicator panel will flash when you try to be at 1-800-8FUJITSU (1-800838-5487) RECHARGING THE BATTERIES If you remove all power sources while your notebook will go into Standby mode, or turn it may prevent charging completely. If your LifeBook notebook and connect the AC...
S7110 User's Guide
Page 67
... external connectors are plugged in this section helps you encounter a problem, go through the boot sequence. 7. S7110.book Page 57 Monday, March 20, 2006 1:56 PM Troubleshooting Troubleshooting Your Fujitsu LifeBook notebook is sturdy and subject to the Troubleshooting Table, that follows, for more quickly by replacing the device. The information in properly. Make sure the AC adapter is seated properly. Make sure that have occurred ■ Hardware configuration...
... external connectors are plugged in this section helps you encounter a problem, go through the boot sequence. 7. S7110.book Page 57 Monday, March 20, 2006 1:56 PM Troubleshooting Troubleshooting Your Fujitsu LifeBook notebook is sturdy and subject to the Troubleshooting Table, that follows, for more quickly by replacing the device. The information in properly. Make sure the AC adapter is seated properly. Make sure that have occurred ■ Hardware configuration...

S7110 User's Guide
Page 70
... be locking up the system. Remove and re-insert the card. (See PC Cards/ ExpressCards™ on page 52 for that device. PC Card Problems A card inserted in the BIOS setup utility. (See BIOS Setup Utility on page 66 for additional information. Change the settings in the PC Card slot does not work properly. Your memory upgrade module Remove and re-install your device and operating system documentation and activate the proper driver. (continued) You have installed a parallel port device, a serial port device or a USB device.
... be locking up the system. Remove and re-insert the card. (See PC Cards/ ExpressCards™ on page 52 for that device. PC Card Problems A card inserted in the BIOS setup utility. (See BIOS Setup Utility on page 66 for additional information. Change the settings in the PC Card slot does not work properly. Your memory upgrade module Remove and re-install your device and operating system documentation and activate the proper driver. (continued) You have installed a parallel port device, a serial port device or a USB device.

S7110 User's Guide
Page 72
... power your operating needs. Use both the primary battery and an optional second battery and/or use of the batteries using the Status Indicator panel and replace or remove any batteries that the batteries are installed. The power savings features may need to discharge too quickly. Shutdown and Startup Problems The Suspend/Resume button does not work on battery alone. Verify the condition of a modem or LAN PC card. The batteries are faulty. Restore the notebook to high temperatures. Replace the batteries...
... power your operating needs. Use both the primary battery and an optional second battery and/or use of the batteries using the Status Indicator panel and replace or remove any batteries that the batteries are installed. The power savings features may need to discharge too quickly. Shutdown and Startup Problems The Suspend/Resume button does not work on battery alone. Verify the condition of a modem or LAN PC card. The batteries are faulty. Restore the notebook to high temperatures. Replace the batteries...

S7110 User's Guide
Page 74
... by changing your display compression setting, (See the Video Features submenu, located within the Advanced menu of your screen and is surrounded by itself after you have less resolution by Standby mode, Auto Suspend or Video Timeout) The LifeBook notebook turned on with your operation needs. (See BIOS Setup Utility on page 29 for more information) The power management timeouts may be set on low brightness click on the battery gauge and adjust Power Control...
... by changing your display compression setting, (See the Video Features submenu, located within the Advanced menu of your screen and is surrounded by itself after you have less resolution by Standby mode, Auto Suspend or Video Timeout) The LifeBook notebook turned on with your operation needs. (See BIOS Setup Utility on page 29 for more information) The power management timeouts may be set on low brightness click on the battery gauge and adjust Power Control...
S7110 User's Guide
Page 78
.... S7110.book Page 68 Monday, March 20, 2006 1:56 PM LifeBook S7100 Notebook Restoring Your Pre-installed Software The Drivers and Applications Restore (DAR) DVD contains sets of device drivers and Fujitsu utilities (in specific directories) that are unique to install, click [Install Selected Subsystems]; Clicking [Select All] will appear containing a list of the list, arrow down to installation you will receive a reminder that is inserted. 2. If "Optical Media Drive" or "CD-ROM Drive" is...
.... S7110.book Page 68 Monday, March 20, 2006 1:56 PM LifeBook S7100 Notebook Restoring Your Pre-installed Software The Drivers and Applications Restore (DAR) DVD contains sets of device drivers and Fujitsu utilities (in specific directories) that are unique to install, click [Install Selected Subsystems]; Clicking [Select All] will appear containing a list of the list, arrow down to installation you will receive a reminder that is inserted. 2. If "Optical Media Drive" or "CD-ROM Drive" is...
S7110 User's Guide
Page 95
... connection. AGP Accelerated Graphics Port Graphics port specifically designed for communication between the CPU and the sub-assemblies inside your system RAM and used for graphics-intensive devices, such as video cards and 3D accelerators. Cache Memory A block of communication using a wireless card and an access point). BIOS Basic Input-Output System. Bus An electrical circuit which is read only memory. Auto/Airline Adapter A device which tests and operates your LifeBook notebook...
... connection. AGP Accelerated Graphics Port Graphics port specifically designed for communication between the CPU and the sub-assemblies inside your system RAM and used for graphics-intensive devices, such as video cards and 3D accelerators. Cache Memory A block of communication using a wireless card and an access point). BIOS Basic Input-Output System. Bus An electrical circuit which is read only memory. Auto/Airline Adapter A device which tests and operates your LifeBook notebook...
S7110 User's Guide
Page 127
... Device screen (it says; This is created, you will be prompted with the credentials supplied (username and password). You authenticate with OmniPass. The details of each setting under the Audio Settings and Taskbar Tips interfaces are having difficulties due to the first reason, you may need to Start, Control Panel, Administrative Tools, and Local Security Settings. TROUBLESHOOTING You cannot use of the following procedure. S7110.book...
... Device screen (it says; This is created, you will be prompted with the credentials supplied (username and password). You authenticate with OmniPass. The details of each setting under the Audio Settings and Taskbar Tips interfaces are having difficulties due to the first reason, you may need to Start, Control Panel, Administrative Tools, and Local Security Settings. TROUBLESHOOTING You cannot use of the following procedure. S7110.book...


