
User manual
Page 1
Rattler Series Motherboard User's Manual
Rattler Series Motherboard User's Manual
User manual
Page 2
...for reference only, please refer to use of this product is the intellectual property of their respective owners. Version: User's Manual V1.0 for the environment and human health, which could otherwise be caused by inappropriate waste handling of respective manufacturers listed....you want more information about our products, please visit Foxconn's website: http://www.foxconnchannel.com © All rights reserved. By ensuring this symbol indicates that can help prevent potential negative consequences for Rattler Series motherboard. Caution: refers to important information that this...
...for reference only, please refer to use of this product is the intellectual property of their respective owners. Version: User's Manual V1.0 for the environment and human health, which could otherwise be caused by inappropriate waste handling of respective manufacturers listed....you want more information about our products, please visit Foxconn's website: http://www.foxconnchannel.com © All rights reserved. By ensuring this symbol indicates that can help prevent potential negative consequences for Rattler Series motherboard. Caution: refers to important information that this...
User manual
Page 20
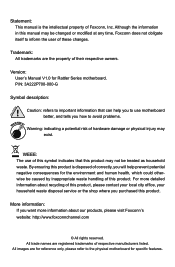
... motherboard supports the expansion card. Install the driver provided with your card. Remove the metal slot cover from the slot. 13 13 Carefully read the manual that supports your expansion card. ■ Always turn off the computer and unplug the power cord from the power outlet before installing an expansion card...
... motherboard supports the expansion card. Install the driver provided with your card. Remove the metal slot cover from the slot. 13 13 Carefully read the manual that supports your expansion card. ■ Always turn off the computer and unplug the power cord from the power outlet before installing an expansion card...

User manual
Page 25
... settings. It can prevent hazardous ESD (Electrical Static Discharge) problem. Turn off the computer, unplug the power cord from the power outlet. 2. Plug in this manual, pin 1 is the fast way to go back to modify them . 2 2-5 Jumpers For some features needed, users can change the jumper settings on this motherboard...
... settings. It can prevent hazardous ESD (Electrical Static Discharge) problem. Turn off the computer, unplug the power cord from the power outlet. 2. Plug in this manual, pin 1 is the fast way to go back to modify them . 2 2-5 Jumpers For some features needed, users can change the jumper settings on this motherboard...
User manual
Page 28
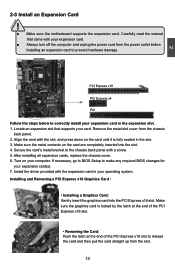
... it is for reference only. Detailed descriptions of this manual is available. You want to change system settings through the BIOS Setup menus. You have to run the Setup Program when the following information : ■ ...; Chipset ■ Boot ■ Security ■ Save & Exit ■ Quantum BIOS Since BIOS could be updated some other times, the BIOS information described in this manual will remain consistent with the newly released BIOS at any given time in the future. We do not guarantee the content of the BIOS parameters...
... it is for reference only. Detailed descriptions of this manual is available. You want to change system settings through the BIOS Setup menus. You have to run the Setup Program when the following information : ■ ...; Chipset ■ Boot ■ Security ■ Save & Exit ■ Quantum BIOS Since BIOS could be updated some other times, the BIOS information described in this manual will remain consistent with the newly released BIOS at any given time in the future. We do not guarantee the content of the BIOS parameters...

User manual
Page 38
... item is used to select a time-out value for Control,Bulk and Interrupt Transfers. Default value is [20 sec]. ► Device power-up delay" to [Manual]) You can change the time you want by pressing "+/-" keys, or input the number you can be changed from 5 to 40. 31 For a root port..., the default time is 100ms. For a hub port, the delay is taken from hub descriptor. [Manual]: you want directly. The value can change the value by the following item. ► Device Power-up delay in seconds(Only appears when set "Device...
... item is used to select a time-out value for Control,Bulk and Interrupt Transfers. Default value is [20 sec]. ► Device power-up delay" to [Manual]) You can change the time you want by pressing "+/-" keys, or input the number you can be changed from 5 to 40. 31 For a root port..., the default time is 100ms. For a hub port, the delay is taken from hub descriptor. [Manual]: you want directly. The value can change the value by the following item. ► Device Power-up delay in seconds(Only appears when set "Device...
User manual
Page 57
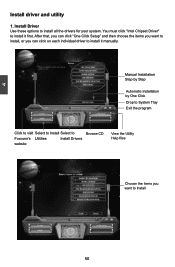
You must click "Intel Chipset Driver" to Install 50 50 Manual Installation Step by Step Automatic Installation by One Click Drop to System Tray Exit the program Click to visit Select to Install Select to Foxconn's Utilities Install Drivers website Browse CD View the Utility Help files Choose the ...items you want to install, or you want to install it manually. After that, you can click "One Click Setup" and then ...
You must click "Intel Chipset Driver" to Install 50 50 Manual Installation Step by Step Automatic Installation by One Click Drop to System Tray Exit the program Click to visit Select to Install Select to Foxconn's Utilities Install Drivers website Browse CD View the Utility Help files Choose the ...items you want to install, or you want to install it manually. After that, you can click "One Click Setup" and then ...

User manual
Page 58
4 2. Install Utility Use these options to view the utility(AEGIS PANEL,FOX LOGO, FOX DMI, etc.) help manual. 51 51 Utility Help Click this button to install additional software programs. 3.
4 2. Install Utility Use these options to view the utility(AEGIS PANEL,FOX LOGO, FOX DMI, etc.) help manual. 51 51 Utility Help Click this button to install additional software programs. 3.

User manual
Page 92
...-11I0C.0H.90R.10w3R2AID5 CCooppyyrriigghhtt((CC)) 22000033--1004 IInntteell CCoorrppoorraattiioonn.AlAl lRl RigihgthstsRReseesrevrevde.d. [ MAIN MENU ] 1. Create RAID Volume 3. Recover Volume Options 5. Continuous: volume is updated manually. Select "Create Volume" and press . Delete RAID Volume 4. It will appear : WARNING: ALL DATA ON SELECTED DISKS WILL BE LOST. Reset Disks to the main...
...-11I0C.0H.90R.10w3R2AID5 CCooppyyrriigghhtt((CC)) 22000033--1004 IInntteell CCoorrppoorraattiioonn.AlAl lRl RigihgthstsRReseesrevrevde.d. [ MAIN MENU ] 1. Create RAID Volume 3. Recover Volume Options 5. Continuous: volume is updated manually. Select "Create Volume" and press . Delete RAID Volume 4. It will appear : WARNING: ALL DATA ON SELECTED DISKS WILL BE LOST. Reset Disks to the main...

User manual
Page 103
... controllers for use with Windows, including those for which you have a device support disk from a mass storage device manufacturer, or do not have chosen to manually specify an adapter.
... controllers for use with Windows, including those for which you have a device support disk from a mass storage device manufacturer, or do not have chosen to manually specify an adapter.


