
User manual
Page 1
Rattler Series Motherboard User's Manual
Rattler Series Motherboard User's Manual
User manual
Page 2
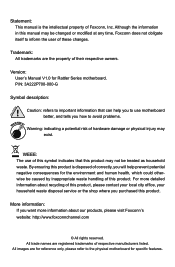
...recycling of these changes. WEEE: The use of hardware damage or physical injury may not be changed or modified at any time, Foxconn does not obligate itself to the physical motherboard for reference only, please refer to inform the user of this product, please contact... the shop where you purchased this symbol indicates that can help prevent potential negative consequences for Rattler Series motherboard. Caution: refers to important information that this product. CAUTION Statement: This manual is disposed of correctly, you will help you to use motherboard better, and tells you...
...recycling of these changes. WEEE: The use of hardware damage or physical injury may not be changed or modified at any time, Foxconn does not obligate itself to the physical motherboard for reference only, please refer to inform the user of this product, please contact... the shop where you purchased this symbol indicates that can help prevent potential negative consequences for Rattler Series motherboard. Caution: refers to important information that this product. CAUTION Statement: This manual is disposed of correctly, you will help you to use motherboard better, and tells you...
User manual
Page 20
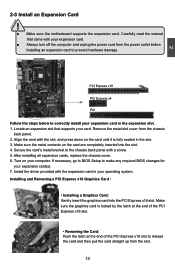
... the card are completely inserted into the PCI Express x16 slot. If necessary, go to BIOS Setup to correctly install your computer. Carefully read the manual that supports your expansion card(s). 7. Locate an expansion slot that came with a screw. 5. Remove the metal slot cover from the slot. 13 13 PCI Express...
... the card are completely inserted into the PCI Express x16 slot. If necessary, go to BIOS Setup to correctly install your computer. Carefully read the manual that supports your expansion card(s). 7. Locate an expansion slot that came with a screw. 5. Remove the metal slot cover from the slot. 13 13 PCI Express...

User manual
Page 25
... the following table explains different types of Jumpers 1. It can be done by touching two pins by the bold silkscreen next to it on this manual, pin 1 is the fast way to go back to factory default when the BIOS settings were mistakenly modified. Jumper 1 1 Diagram 1 1 1 1 Definition Closed Open 1-2 2-3 Description Set...
... the following table explains different types of Jumpers 1. It can be done by touching two pins by the bold silkscreen next to it on this manual, pin 1 is the fast way to go back to factory default when the BIOS settings were mistakenly modified. Jumper 1 1 Diagram 1 1 1 1 Definition Closed Open 1-2 2-3 Description Set...
User manual
Page 28
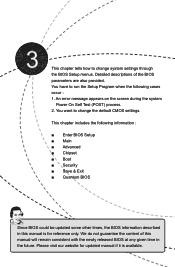
...; Quantum BIOS Since BIOS could be updated some other times, the BIOS information described in the future. Please visit our website for updated manual if it is for reference only. You want to change system settings through the BIOS Setup menus. Detailed descriptions of this... manual will remain consistent with the newly released BIOS at any given time in this manual is available. This chapter includes the following cases occur : 1. An error message appears on the ...
...; Quantum BIOS Since BIOS could be updated some other times, the BIOS information described in the future. Please visit our website for updated manual if it is for reference only. You want to change system settings through the BIOS Setup menus. Detailed descriptions of this... manual will remain consistent with the newly released BIOS at any given time in this manual is available. This chapter includes the following cases occur : 1. An error message appears on the ...

User manual
Page 38
For a root port, the default time is 100ms. For a hub port, the delay is taken from 5 to [Manual]) You can change the value by pressing "+/-" keys, or input the number you want by the following item. ► Device Power-up delay in seconds(... set the maximum time the device will take before it can change the time you want directly. The value can be changed from hub descriptor. [Manual]: you can report itself to select a time-out value for Control,Bulk and Interrupt Transfers. Default value is [20 sec]. ► Device power-up delay...
For a root port, the default time is 100ms. For a hub port, the delay is taken from 5 to [Manual]) You can change the value by pressing "+/-" keys, or input the number you want by the following item. ► Device Power-up delay in seconds(... set the maximum time the device will take before it can change the time you want directly. The value can be changed from hub descriptor. [Manual]: you can report itself to select a time-out value for Control,Bulk and Interrupt Transfers. Default value is [20 sec]. ► Device power-up delay...
User manual
Page 57
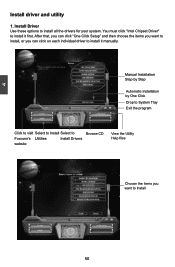
... can click "One Click Setup" and then choose the items you can click on each individual driver to Install 50 50 4 Install driver and utility 1. Manual Installation Step by Step Automatic Installation by One Click Drop to System Tray Exit the program Click to visit Select to Install Select to... Foxconn's Utilities Install Drivers website Browse CD View the Utility Help files Choose the items you want to install, or you want to install it first. ...
... can click "One Click Setup" and then choose the items you can click on each individual driver to Install 50 50 4 Install driver and utility 1. Manual Installation Step by Step Automatic Installation by One Click Drop to System Tray Exit the program Click to visit Select to Install Select to... Foxconn's Utilities Install Drivers website Browse CD View the Utility Help files Choose the items you want to install, or you want to install it first. ...

User manual
Page 58
Utility Help Click this button to install additional software programs. 3. 4 2. Install Utility Use these options to view the utility(AEGIS PANEL,FOX LOGO, FOX DMI, etc.) help manual. 51 51
Utility Help Click this button to install additional software programs. 3. 4 2. Install Utility Use these options to view the utility(AEGIS PANEL,FOX LOGO, FOX DMI, etc.) help manual. 51 51

User manual
Page 92
... Level: Recovery Disks: Select Disks Strip Size: N/A Capacity: 74.5 GB Syn c: NC/oAn tinuou s Create Volume [ HELP ] Select a sync option On Request: volume is updated manually. 5 6.
... Level: Recovery Disks: Select Disks Strip Size: N/A Capacity: 74.5 GB Syn c: NC/oAn tinuou s Create Volume [ HELP ] Select a sync option On Request: volume is updated manually. 5 6.

User manual
Page 103
... diskette into Drive A: * Press ENTER when ready ENTER=Continue ESC=Cancel F3=Exit 96 It will load support for the following picture appears, press to manually specify an adapter. Windows Setup Setup could not determine the type of one or more mass storage devices installed in your system, the following mass...
... diskette into Drive A: * Press ENTER when ready ENTER=Continue ESC=Cancel F3=Exit 96 It will load support for the following picture appears, press to manually specify an adapter. Windows Setup Setup could not determine the type of one or more mass storage devices installed in your system, the following mass...


