
English Manual.
Page 6
... the Memory 11 Install an Expansion Card 12 Install other Internal Connectors 13 Jumpers 17 Chapter 3 BIOS Setup Enter BIOS Setup 18 Main Menu 18 System Information 20 Advanced BIOS Features 21 FOX Central Control Unit 23 Advanced Chipset Features 26 Integrated Peripherals 29 Power Management Setup... 33 PC Health Status 35 BIOS Security Features 36 Load Optimal Defaults 37 Save and Exit Setup 37 Exit ...
... the Memory 11 Install an Expansion Card 12 Install other Internal Connectors 13 Jumpers 17 Chapter 3 BIOS Setup Enter BIOS Setup 18 Main Menu 18 System Information 20 Advanced BIOS Features 21 FOX Central Control Unit 23 Advanced Chipset Features 26 Integrated Peripherals 29 Power Management Setup... 33 PC Health Status 35 BIOS Security Features 36 Load Optimal Defaults 37 Save and Exit Setup 37 Exit ...
English Manual.
Page 15
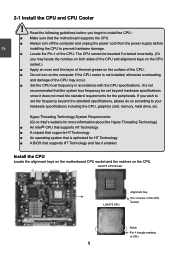
... not recommended that supports HT Technology and has it does not meet the standard requirements for the peripherals. It is optimized for HT Technology ■ A BIOS that the system bus frequency be set the frequency beyond hardware specifications since it enabled Install the CPU Locate the alignment keys on the motherboard...
... not recommended that supports HT Technology and has it does not meet the standard requirements for the peripherals. It is optimized for HT Technology ■ A BIOS that the system bus frequency be set the frequency beyond hardware specifications since it enabled Install the CPU Locate the alignment keys on the motherboard...
English Manual.
Page 19
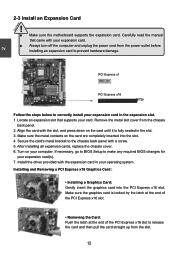
Make sure the metal contacts on your computer. If necessary, go to BIOS Setup to prevent hardware damage. Installing and Removing a PCI Express x16 Graphics Card : • Installing a Graphics Card: Gently insert the graphics card into the slot. 4. ... is fully seated in the expansion slot. 1. Remove the metal slot cover from the power outlet before installing an expansion card to make any required BIOS changes for your card. After installing all expansion cards, replace the chassis cover. 6. Secure the card's metal bracket to the chassis back panel with the...
Make sure the metal contacts on your computer. If necessary, go to BIOS Setup to prevent hardware damage. Installing and Removing a PCI Express x16 Graphics Card : • Installing a Graphics Card: Gently insert the graphics card into the slot. 4. ... is fully seated in the expansion slot. 1. Remove the metal slot cover from the power outlet before installing an expansion card to make any required BIOS changes for your card. After installing all expansion cards, replace the chassis cover. 6. Secure the card's metal bracket to the chassis back panel with the...

English Manual.
Page 22
... 9 10 F_AUDIO +5V 1 EMPTY 2 SPDIF_OUT 3 GND 4 SPDIF_OUT 12 VCC VCC D- D- The fan speed can be controlled and monitored in "PC Health Status" section of the BIOS Setup. D+ D+ GND GND EMPTY NC 9 10 F_USB 1/2 USB Connectors : F_USB1/2 In addition to make transactions and communication more trustworthy. To utilize this motherboard. TPM Connector...
... 9 10 F_AUDIO +5V 1 EMPTY 2 SPDIF_OUT 3 GND 4 SPDIF_OUT 12 VCC VCC D- D- The fan speed can be controlled and monitored in "PC Health Status" section of the BIOS Setup. D+ D+ GND GND EMPTY NC 9 10 F_USB 1/2 USB Connectors : F_USB1/2 In addition to make transactions and communication more trustworthy. To utilize this motherboard. TPM Connector...
English Manual.
Page 23
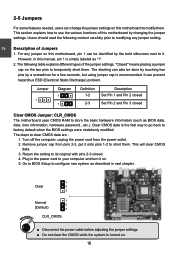
...Jumper 1 Diagram 1 1 Definition 1-2 2-3 Description Set Pin 1 and Pin 2 closed Set Pin 2 and Pin 3 closed . 4. Go to BIOS Setup to your computer and turn it on . 16 Users should read the following table explains different types of Jumpers 1. However, in this motherboard by...is simply labeled as "1". 2. The shorting can prevent hazardous ESD (Electrical Static Discharge) problem. The steps to factory default when the BIOS settings were mistakenly modified. This section explains how to temporarily short them . "Closed" means placing a jumper cap on this motherboard, ...
...Jumper 1 Diagram 1 1 Definition 1-2 2-3 Description Set Pin 1 and Pin 2 closed Set Pin 2 and Pin 3 closed . 4. Go to BIOS Setup to your computer and turn it on . 16 Users should read the following table explains different types of Jumpers 1. However, in this motherboard by...is simply labeled as "1". 2. The shorting can prevent hazardous ESD (Electrical Static Discharge) problem. The steps to factory default when the BIOS settings were mistakenly modified. This section explains how to temporarily short them . "Closed" means placing a jumper cap on this motherboard, ...
English Manual.
Page 24
... ■ Power Management Setup ■ PC Health Status ■ BIOS Security Features ■ Load Optimal Defaults ■ Save & Exit Setup ■ Exit Without Saving Since BIOS could be updated some other times, the BIOS information described in this manual will remain consistent with the newly released... BIOS at any given time in the future. This chapter tells how to change...
... ■ Power Management Setup ■ PC Health Status ■ BIOS Security Features ■ Load Optimal Defaults ■ Save & Exit Setup ■ Exit Without Saving Since BIOS could be updated some other times, the BIOS information described in this manual will remain consistent with the newly released... BIOS at any given time in the future. This chapter tells how to change...

English Manual.
Page 25
...you made. 3 CAUTION Main Menu The main menu allows you can be set up through this menu. ► Advanced BIOS Features The advanced system features can press key to maintain optimal system performance. v02.63 (c) Copyright 1985-2008, American ...CMOS Setup Utility - Copyright (C) 1985-2008, American Megatrends, Inc. ► System Information ► PC Health Status ► Advanced BIOS Features ► BIOS Security Features ► Fox Central Control Unit Load Optimal Defaults ► Advanced Chipset Features Save & Exit Setup ► Integrated Peripherals...
...you made. 3 CAUTION Main Menu The main menu allows you can be set up through this menu. ► Advanced BIOS Features The advanced system features can press key to maintain optimal system performance. v02.63 (c) Copyright 1985-2008, American ...CMOS Setup Utility - Copyright (C) 1985-2008, American Megatrends, Inc. ► System Information ► PC Health Status ► Advanced BIOS Features ► BIOS Security Features ► Fox Central Control Unit Load Optimal Defaults ► Advanced Chipset Features Save & Exit Setup ► Integrated Peripherals...

English Manual.
Page 26
It means, if your system loading is to adjust BIOS setting one by one, trial and error, to find out the best setting for your computer. What you need now is heavy, set to CMOS ...and exit. ► Exit Without Saving Do not change fan speeds, and displays temperatures and voltages of your CPU/System. ► BIOS Security Features The Supervisor/User password can be set a password, the system will ask you have more memory or I /O and other USB devices... However, it...
It means, if your system loading is to adjust BIOS setting one by one, trial and error, to find out the best setting for your computer. What you need now is heavy, set to CMOS ...and exit. ► Exit Without Saving Do not change fan speeds, and displays temperatures and voltages of your CPU/System. ► BIOS Security Features The Supervisor/User password can be set a password, the system will ask you have more memory or I /O and other USB devices... However, it...
English Manual.
Page 27
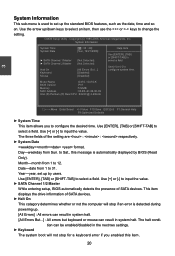
...; System Date format. Copyright (C) 1985-2008, American Megatrends, Inc. Use [+] or [-] to select a field. Keyboard [Disabled] Mouse [Disabled] Model Name :G41S / G41S-K BIOS Version :P01 Memory :512MB MAC Address :00-E0-4C-36-00-09 Intel (R) Pentium (R) Dual CPU E2220 @ 2.40GHz 3 Move Enter:Select +/-/:Value F10... select an item, then use the or keys to input the value. ► SATA Channel 1/2 Master While entering setup, BIOS automatically detects the presence of SATA devices. ► Halt On This category determines whether or not the computer will not stop ...
...; System Date format. Copyright (C) 1985-2008, American Megatrends, Inc. Use [+] or [-] to select a field. Keyboard [Disabled] Mouse [Disabled] Model Name :G41S / G41S-K BIOS Version :P01 Memory :512MB MAC Address :00-E0-4C-36-00-09 Intel (R) Pentium (R) Dual CPU E2220 @ 2.40GHz 3 Move Enter:Select +/-/:Value F10... select an item, then use the or keys to input the value. ► SATA Channel 1/2 Master While entering setup, BIOS automatically detects the presence of SATA devices. ► Halt On This category determines whether or not the computer will not stop ...
English Manual.
Page 28
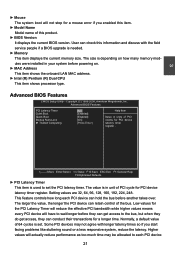
... ► MAC Address This item shows the onboard LAN MAC address. ► Intel (R) Pentium (R) Dual CPU This item shows processor type. Advanced BIOS Features CMOS Setup Utility - The larger the value, the longer the PCI device can conduct their transactions for a longer time. 3 ► Mouse The...boot will not stop for a mouse error if you start facing problems like stuttering sound or a less responsive system, reduce the latency. Advanced BIOS Features PCI Latency Timer Quiet Boot Quick Boot Bootup Num-Lock ► Trusted Computing [64] Help Item [Enabled] [Enabled] Value in ...
... ► MAC Address This item shows the onboard LAN MAC address. ► Intel (R) Pentium (R) Dual CPU This item shows processor type. Advanced BIOS Features CMOS Setup Utility - The larger the value, the longer the PCI device can conduct their transactions for a longer time. 3 ► Mouse The...boot will not stop for a mouse error if you start facing problems like stuttering sound or a less responsive system, reduce the latency. Advanced BIOS Features PCI Latency Timer Quiet Boot Quick Boot Bootup Num-Lock ► Trusted Computing [64] Help Item [Enabled] [Enabled] Value in ...
English Manual.
Page 29
... across multiple platforms TPM (Trusted Platform Module) is a specification promoted by TCG. Members should have a working knowledge of security in BIOS 3 Move Enter:Select +/-/:Value F10:Save ESC:Exit F1:General Help F9:Optimized Defaults TCG/TPM Support Trusted Computing Group (TCG) ...the normal POST messages. [Enabled] : Displays OEM customer logo instead of POST messages. ► Quick Boot While Enabled, this option allows BIOS to skip certain tests while booting, this will shorten the time needed to boot the system. ► Bootup Num-Lock This item defines ...
... across multiple platforms TPM (Trusted Platform Module) is a specification promoted by TCG. Members should have a working knowledge of security in BIOS 3 Move Enter:Select +/-/:Value F10:Save ESC:Exit F1:General Help F9:Optimized Defaults TCG/TPM Support Trusted Computing Group (TCG) ...the normal POST messages. [Enabled] : Displays OEM customer logo instead of POST messages. ► Quick Boot While Enabled, this option allows BIOS to skip certain tests while booting, this will shorten the time needed to boot the system. ► Bootup Num-Lock This item defines ...
English Manual.
Page 30
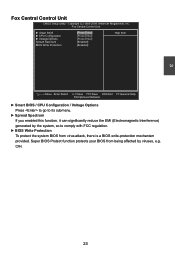
...] [Press Enter] [Enabled] [Enabled] Help Item Move Enter:Select +/-/:Value F10:Save ESC:Exit F1:General Help F9:Optimized Defaults ► Smart BIOS / CPU Configuration / Voltage Options Press to go to its submenu. ► Spread Spectrum If you enabled this function, it can significantly reduce the ...EMI (Electromagnetic Interference) generated by the system, so to comply with FCC regulation. ► BIOS Write Protection To protect the system BIOS from being affected by viruses, e.g. 3 Fox Central Control Unit CMOS Setup Utility - CIH. 23 Super...
...] [Press Enter] [Enabled] [Enabled] Help Item Move Enter:Select +/-/:Value F10:Save ESC:Exit F1:General Help F9:Optimized Defaults ► Smart BIOS / CPU Configuration / Voltage Options Press to go to its submenu. ► Spread Spectrum If you enabled this function, it can significantly reduce the ...EMI (Electromagnetic Interference) generated by the system, so to comply with FCC regulation. ► BIOS Write Protection To protect the system BIOS from being affected by viruses, e.g. 3 Fox Central Control Unit CMOS Setup Utility - CIH. 23 Super...
English Manual.
Page 31
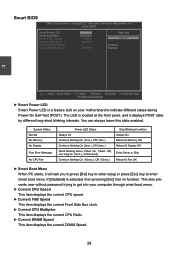
...or Skip Reboot & Fan OK ► Smart Boot Menu When PC starts, it displays POST state by different long-short blinking intervals. Smart BIOS CMOS Setup Utility - On, 1/3sec. System Status Normal No Memory No Display Post Error Message No CPU Fan Power LED Status Always On ... the current CPU Ratio. ► Current DRAM Speed This item displays the current DRAM Speed. 24 Off), one long On (1sec.), continuously. Smart BIOS Smart Power LED Smart Boot Menu Current CPU Speed Current FSB Speed Current CPU Multiplier Current DRAM Speed [Enabled] Help Item [Enabled] : 1.40GHz Options...
...or Skip Reboot & Fan OK ► Smart Boot Menu When PC starts, it displays POST state by different long-short blinking intervals. Smart BIOS CMOS Setup Utility - On, 1/3sec. System Status Normal No Memory No Display Post Error Message No CPU Fan Power LED Status Always On ... the current CPU Ratio. ► Current DRAM Speed This item displays the current DRAM Speed. 24 Off), one long On (1sec.), continuously. Smart BIOS Smart Power LED Smart Boot Menu Current CPU Speed Current FSB Speed Current CPU Multiplier Current DRAM Speed [Enabled] Help Item [Enabled] : 1.40GHz Options...

English Manual.
Page 32
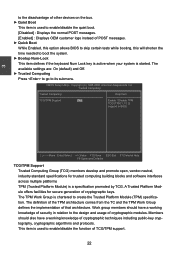
... IT resources for WinXP. ► Execute Disable Bit This item is a feature which can execute and where it should be met, including CPU, chipset, motherboard, BIOS and operation system. By combining Execute Disable Bit with Execute Disable Bit-enabled systems can help prevent certain classes of malicious buffer overflow attacks when...
... IT resources for WinXP. ► Execute Disable Bit This item is a feature which can execute and where it should be met, including CPU, chipset, motherboard, BIOS and operation system. By combining Execute Disable Bit with Execute Disable Bit-enabled systems can help prevent certain classes of malicious buffer overflow attacks when...

English Manual.
Page 35
... adjust the amount of video memory allocated depends upon the amount requested by other uses. The amount of memory available for running graphics applications. This BIOS option allows you to ensure the most of page-locked graphics memory is allocated during driver initialization. This fixed amount of memory will provide the...
... adjust the amount of video memory allocated depends upon the amount requested by other uses. The amount of memory available for running graphics applications. This BIOS option allows you to ensure the most of page-locked graphics memory is allocated during driver initialization. This fixed amount of memory will provide the...
English Manual.
Page 38
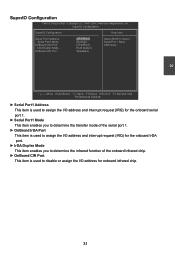
Copyright (C) 1985-2008, American Megatrends, Inc. SuperIO Configuration SuperIO Configuration Help Item Serial Port1 Address [3F8/IRQ4] Allows BIOS to disable or assign the I/O address for onboard infrared chip. 31 3 SuperIO Configuration CMOS Setup Utility - IrDA Duplex Mode [Half Duplex] OnBoard CIR Port [Disabled] ...
Copyright (C) 1985-2008, American Megatrends, Inc. SuperIO Configuration SuperIO Configuration Help Item Serial Port1 Address [3F8/IRQ4] Allows BIOS to disable or assign the I/O address for onboard infrared chip. 31 3 SuperIO Configuration CMOS Setup Utility - IrDA Duplex Mode [Half Duplex] OnBoard CIR Port [Disabled] ...
English Manual.
Page 40
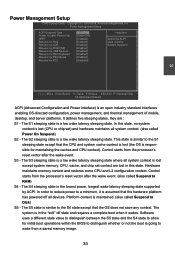
... wake event. Software uses a different state value to distinguish between the S5 state and the S4 state to allow for initial boot operations within the BIOS to distinguish whether or not the boot is the lowest power, longest wake latency sleeping state supported by RTC [S3 (STR)] Help Item [Power Off...
... wake event. Software uses a different state value to distinguish between the S5 state and the S4 state to allow for initial boot operations within the BIOS to distinguish whether or not the boot is the lowest power, longest wake latency sleeping state supported by RTC [S3 (STR)] Help Item [Power Off...
English Manual.
Page 43
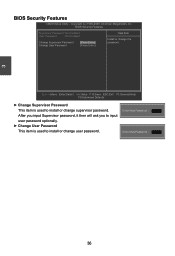
... password optionally. ► Change User Password This item is used to install or change supervisor password. Copyright (C) 1985-2008, American Megatrends, Inc. 3 BIOS Security Features CMOS Setup Utility - BIOS Security Features Supervisor Password : Not Installed Help Item User Password : Not Installed Install or change user password. Change User Password [Press Enter] Move...
... password optionally. ► Change User Password This item is used to install or change supervisor password. Copyright (C) 1985-2008, American Megatrends, Inc. 3 BIOS Security Features CMOS Setup Utility - BIOS Security Features Supervisor Password : Not Installed Help Item User Password : Not Installed Install or change user password. Change User Password [Press Enter] Move...
English Manual.
Page 44
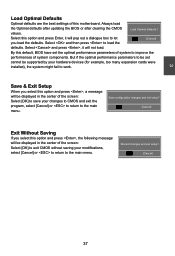
...If you load the defaults. Select and press , it will pop out a dialogue box to let [OK] [Cancel] you select this default, BIOS have set cannot be supported by your modifications, select [Cancel] or to return to improve the performances of system components. But if the optimal performance... of system to the main menu. Discard changes and exit setup? [OK] [Cancel] 37 Always load the Optimal defaults after updating the BIOS or after clearing the CMOS values. 3 Load Optimal Defaults Optimal defaults are the best settings of this option and press Enter, it will ...
...If you load the defaults. Select and press , it will pop out a dialogue box to let [OK] [Cancel] you select this default, BIOS have set cannot be supported by your modifications, select [Cancel] or to return to improve the performances of system components. But if the optimal performance... of system to the main menu. Discard changes and exit setup? [OK] [Cancel] 37 Always load the Optimal defaults after updating the BIOS or after clearing the CMOS values. 3 Load Optimal Defaults Optimal defaults are the best settings of this option and press Enter, it will ...
English Manual.
Page 46
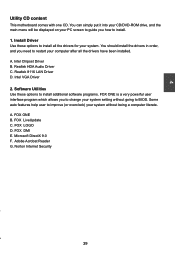
... your computer after all the drivers for your system without going to install all the drivers have been installed. Software Utilities Use these options to BIOS.
... your computer after all the drivers for your system without going to install all the drivers have been installed. Software Utilities Use these options to BIOS.


