
English Manual.
Page 6
...Internal Connectors 14 Install the Optional Accessory 18 Jumpers 19 Onboard Button 21 Onboard LED 21 Chapter 3 BIOS Setup Enter BIOS Setup 23 Main Menu 23 System Information 25 Advanced BIOS Features 27 Advanced Chipset Features 28 Integrated Peripherals 30 Power Management Setup 35 PC Health Status 38 Quantum... BIOS 39 Load Optimized Defaults 46 Set Supervisor Password 46 Set User Password 46 Save & Exit Setup 46 Exit Without Saving 46 ...
...Internal Connectors 14 Install the Optional Accessory 18 Jumpers 19 Onboard Button 21 Onboard LED 21 Chapter 3 BIOS Setup Enter BIOS Setup 23 Main Menu 23 System Information 25 Advanced BIOS Features 27 Advanced Chipset Features 28 Integrated Peripherals 30 Power Management Setup 35 PC Health Status 38 Quantum... BIOS 39 Load Optimized Defaults 46 Set Supervisor Password 46 Set User Password 46 Save & Exit Setup 46 Exit Without Saving 46 ...
English Manual.
Page 7
... DMI 64 FOX LOGO 65 Chapter 5 RAID Configuration RAID Configuration Introduction 68 NVIDIA® MediaShield Driver 70 Create RAID Driver Diskette 72 RAID Enable in BIOS 74 Select a RAID Array for Use 74 Install a New Windows XP 90 Setting Up a Non-Bootable RAID Array 97 Appendix -
... DMI 64 FOX LOGO 65 Chapter 5 RAID Configuration RAID Configuration Introduction 68 NVIDIA® MediaShield Driver 70 Create RAID Driver Diskette 72 RAID Enable in BIOS 74 Select a RAID Array for Use 74 Install a New Windows XP 90 Setting Up a Non-Bootable RAID Array 97 Appendix -

English Manual.
Page 18
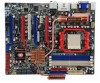
... your system. DS/SS Dual Channel DS/SS DS/SS DS/SS (DS : Dual Side, SS : Single Side, - : No Memory) DIMM4 - It is installed, the BIOS will automatically check the memory in only one direction. When memory is recommended that the motherboard supports the memory. CAUTION 11 Four DDR2 memory sockets...
... your system. DS/SS Dual Channel DS/SS DS/SS DS/SS (DS : Dual Side, SS : Single Side, - : No Memory) DIMM4 - It is installed, the BIOS will automatically check the memory in only one direction. When memory is recommended that the motherboard supports the memory. CAUTION 11 Four DDR2 memory sockets...

English Manual.
Page 20
... card are completely inserted into the PCI Express x16 slot. Install the driver provided with a screw. 5. Secure the card's metal bracket to make any required BIOS changes for your expansion card in the expansion slot. 1. Make sure the metal contacts on your card. If necessary, go to... BIOS Setup to the chassis back panel with the expansion card in the slot. 3. Make sure the graphics card is fully seated in your expansion card. &#...
... card are completely inserted into the PCI Express x16 slot. Install the driver provided with a screw. 5. Secure the card's metal bracket to make any required BIOS changes for your expansion card in the expansion slot. 1. Make sure the metal contacts on your card. If necessary, go to... BIOS Setup to the chassis back panel with the expansion card in the slot. 3. Make sure the graphics card is fully seated in your expansion card. &#...

English Manual.
Page 24
... "PC Health Status" section of the chassis. Audio Connector : CD_IN CD_IN is a Sony standard audio connector, it can be connected to connect speaker of the BIOS Setup. Fan Headers : CPU_FAN, SYS_FAN1, SYS_FAN2, FAN1, FAN2 There are five main fan headers on this motherboard.
... "PC Health Status" section of the chassis. Audio Connector : CD_IN CD_IN is a Sony standard audio connector, it can be connected to connect speaker of the BIOS Setup. Fan Headers : CPU_FAN, SYS_FAN1, SYS_FAN2, FAN1, FAN2 There are five main fan headers on this motherboard.

English Manual.
Page 26
... "1". 2. Plug in the power cord to your computer and turn it on the two pins to configure new system as BIOS data, date, time information, hardware password...etc.). However, in next chapter. 1 Clear 2 3 Normal 1 2 (Default) 3 CLR_CMOS 19 Go to...to modify them . Description of the jumper settings. The following content carefully prior to modifying any jumper on this motherboard to factory default when the BIOS settings were mistakenly modified. The steps to short them . It can prevent hazardous ESD (Electrical Static Discharge) problem. 2 2-6 Jumpers For some ...
... "1". 2. Plug in the power cord to your computer and turn it on the two pins to configure new system as BIOS data, date, time information, hardware password...etc.). However, in next chapter. 1 Clear 2 3 Normal 1 2 (Default) 3 CLR_CMOS 19 Go to...to modify them . Description of the jumper settings. The following content carefully prior to modifying any jumper on this motherboard to factory default when the BIOS settings were mistakenly modified. The steps to short them . It can prevent hazardous ESD (Electrical Static Discharge) problem. 2 2-6 Jumpers For some ...

English Manual.
Page 27
...Set Pin 3 and Pin 4 closed Set Pin 5 and Pin 6 closed Set Pin 7 and Pin 8 closed Function Force BIOS ROM 1 Force BIOS ROM 2 BIOS select, default is BIOS ROM 1 BIOS select, default is BIOS ROM 2 WARNING! ■ Disconnect the power cable before adjusting the jumper settings. ■ Do not clear the CMOS ...while the system is used to select the booting from BIOS ROM 1 or BIOS ROM 2. The jumper is turned on. 20 2 BIOS Select Jumper: BIOS_SELECT This motherboard provides two BIOS ROMs, and user can easily select one of BIOS ROM can refer to the following table for operation.
...Set Pin 3 and Pin 4 closed Set Pin 5 and Pin 6 closed Set Pin 7 and Pin 8 closed Function Force BIOS ROM 1 Force BIOS ROM 2 BIOS select, default is BIOS ROM 1 BIOS select, default is BIOS ROM 2 WARNING! ■ Disconnect the power cable before adjusting the jumper settings. ■ Do not clear the CMOS ...while the system is used to select the booting from BIOS ROM 1 or BIOS ROM 2. The jumper is turned on. 20 2 BIOS Select Jumper: BIOS_SELECT This motherboard provides two BIOS ROMs, and user can easily select one of BIOS ROM can refer to the following table for operation.

English Manual.
Page 29
...is for reference only. You have to run the Setup Program when the following information : ■ Enter BIOS Setup ■ Main Menu ■ System Information ■ Advanced BIOS Features ■ Advanced Chipset Features ■ Integrated Peripherals ■ Power Management Setup ■ PC Health ... ■ Save & Exit Setup ■ Exit Without Saving Since BIOS could be updated some other times, the BIOS information described in the future. You want to change system settings through the BIOS Setup menus. Detailed descriptions of this manual will remain consistent with the...
...is for reference only. You have to run the Setup Program when the following information : ■ Enter BIOS Setup ■ Main Menu ■ System Information ■ Advanced BIOS Features ■ Advanced Chipset Features ■ Integrated Peripherals ■ Power Management Setup ■ PC Health ... ■ Save & Exit Setup ■ Exit Without Saving Since BIOS could be updated some other times, the BIOS information described in the future. You want to change system settings through the BIOS Setup menus. Detailed descriptions of this manual will remain consistent with the...

English Manual.
Page 30
... the arrow keys to select a specific item and press to go to enter Setup. ! CAUTION 3 Enter BIOS Setup The BIOS is the communication bridge between hardware and software, correctly setting up the BIOS parameters is explained below: Phoenix - We do not suggest that you change you can be set up through...advanced system features can press key to the sub-menu. There are IDE devices, Super I/O devices such as BIOS version, system date, time and floppy drive. Each item in the BIOS Setup, and we shall not be responsible for the chipset can be changed through this menu, and the ...
... the arrow keys to select a specific item and press to go to enter Setup. ! CAUTION 3 Enter BIOS Setup The BIOS is the communication bridge between hardware and software, correctly setting up the BIOS parameters is explained below: Phoenix - We do not suggest that you change you can be set up through...advanced system features can press key to the sub-menu. There are IDE devices, Super I/O devices such as BIOS version, system date, time and floppy drive. Each item in the BIOS Setup, and we shall not be responsible for the chipset can be changed through this menu, and the ...

English Manual.
Page 31
... to CMOS and exit. ► Exit Without Saving Do not change Fan speeds, and displays temperatures and voltages of your system loading is to adjust BIOS setting one by pressing and holding down key first, then press or key the next. 24 It means, if your CPU/System. ► Quantum... BIOS Some special proprietary features (such as less I/O cards, less memory ...etc.), still, it may offer better performance in this manual, they are not the combination ...
... to CMOS and exit. ► Exit Without Saving Do not change Fan speeds, and displays temperatures and voltages of your system loading is to adjust BIOS setting one by pressing and holding down key first, then press or key the next. 24 It means, if your CPU/System. ► Quantum... BIOS Some special proprietary features (such as less I/O cards, less memory ...etc.), still, it may offer better performance in this manual, they are not the combination ...

English Manual.
Page 32
... forward and select a field. Use , keys to 31st. Directly input a value or use the or keys to its submenu. Use the arrow up by BIOS (Read Only). In Access Mode setting, selections of [CHS], [LBA], [Large] and [Auto] can help you can press [Enter] to go to ... the hard disks connected to Sat., automatically displayed by users. to the PATA port in .] Halt On [All , But Keyboard] Model Name: Destroyer BIOS Version: D18 Memory: 1024M BCM5788 MAC Address 00 1C 25 3B CC AF Move Enter:Select +/-/PU/PD:Value F10:Save ESC:Exit F1:General...
... forward and select a field. Use , keys to 31st. Directly input a value or use the or keys to its submenu. Use the arrow up by BIOS (Read Only). In Access Mode setting, selections of [CHS], [LBA], [Large] and [Auto] can help you can press [Enter] to go to ... the hard disks connected to Sat., automatically displayed by users. to the PATA port in .] Halt On [All , But Keyboard] Model Name: Destroyer BIOS Version: D18 Memory: 1024M BCM5788 MAC Address 00 1C 25 3B CC AF Move Enter:Select +/-/PU/PD:Value F10:Save ESC:Exit F1:General...

English Manual.
Page 33
...9658; SATA Channel 1/2/3/4 Master / ESATA channel 1/2 Master When SATA Operation Mode is the lower ESATA port of the rear panel. ! All Errors Whenever the BIOS detects a nonfatal error, the system will be detected. All, But Keyboard The system boot will not stop for a diskette error; All, But Diskette The ...], These items will stop and you to select which kind of the rear panel. ESATA Channel 1 Master is the upper SATA port of the BIOS. ► BCM5788 / BCM5786 MAC Address This item shows the onboard LAN MAC address. ► CPU Name This item shows the CPU name ...
...9658; SATA Channel 1/2/3/4 Master / ESATA channel 1/2 Master When SATA Operation Mode is the lower ESATA port of the rear panel. ! All Errors Whenever the BIOS detects a nonfatal error, the system will be detected. All, But Keyboard The system boot will not stop for a diskette error; All, But Diskette The ...], These items will stop and you to select which kind of the rear panel. ESATA Channel 1 Master is the upper SATA port of the BIOS. ► BCM5788 / BCM5786 MAC Address This item shows the onboard LAN MAC address. ► CPU Name This item shows the CPU name ...

English Manual.
Page 34
... from some other devices provided that the first/second/third boot devices failed. ► Boot Up Floppy Seek This item controls whether the BIOS will not detect the floppy. ► Boot Up NumLock Status This item defines if the keyboard Num Lock key is used to enable ... for removable device. ► Hard Disk Boot Priority This option is used to select the priority for HDD startup. AwardBIOS CMOS Setup Utility Advanced BIOS Features ► Removable Device Priority ► Hard Disk Boot Priority ► CD-ROM Boot Priority First Boot Device Second Boot Device Third Boot...
... from some other devices provided that the first/second/third boot devices failed. ► Boot Up Floppy Seek This item controls whether the BIOS will not detect the floppy. ► Boot Up NumLock Status This item defines if the keyboard Num Lock key is used to enable ... for removable device. ► Hard Disk Boot Priority This option is used to select the priority for HDD startup. AwardBIOS CMOS Setup Utility Advanced BIOS Features ► Removable Device Priority ► Hard Disk Boot Priority ► CD-ROM Boot Priority First Boot Device Second Boot Device Third Boot...
English Manual.
Page 35
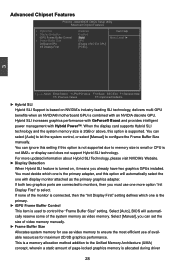
... SLI technology. Advanced Chipset Features Phoenix - If both two graphics ports are connected to monitors, then you already have two graphics GPUs installed. Select [Auto], BIOS will automatically select the one is the primary. ► iGPU Frame Buffer Control This item is used to memory size is small or CPU is...
... SLI technology. Advanced Chipset Features Phoenix - If both two graphics ports are connected to monitors, then you already have two graphics GPUs installed. Select [Auto], BIOS will automatically select the one is the primary. ► iGPU Frame Buffer Control This item is used to memory size is small or CPU is...
English Manual.
Page 38
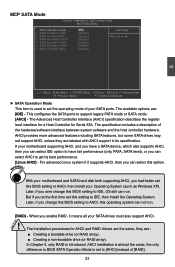
...to IDE, then install the Operating System. With your motherboard and SATA hard disk both supporting AHCI, you change this BIOS setting to IDE, OS still can select this BIOS setting to get its specification. Later, if you had better set this operating system can select AHCI to AHCI, ... CAUTION MCP SATA Mode Phoenix - WARNING! If your SATA ports. But if you enable RAID, it supports AHCI, then you ever change this BIOS setting to AHCI, this setting to support legacy PATA mode or SATA mode. [AHCI] - AHCI installation is almost the same, the only difference is...
...to IDE, then install the Operating System. With your motherboard and SATA hard disk both supporting AHCI, you change this BIOS setting to IDE, OS still can select this BIOS setting to get its specification. Later, if you had better set this operating system can select AHCI to AHCI, ... CAUTION MCP SATA Mode Phoenix - WARNING! If your SATA ports. But if you enable RAID, it supports AHCI, then you ever change this BIOS setting to AHCI, this setting to support legacy PATA mode or SATA mode. [AHCI] - AHCI installation is almost the same, the only difference is...

English Manual.
Page 41
... on full/low speed. ► USB Keyboard Support This item is enabled in a legacy operating system (such as DOS). ***USB Mass Storage Device Boot Setting*** BIOS auto detects the presence of USB Mass Storage Devices, you have a USB keyboard, set to enable the support for the detected USB MSD. If you...
... on full/low speed. ► USB Keyboard Support This item is enabled in a legacy operating system (such as DOS). ***USB Mass Storage Device Boot Setting*** BIOS auto detects the presence of USB Mass Storage Devices, you have a USB keyboard, set to enable the support for the detected USB MSD. If you...

English Manual.
Page 42
... context. Control starts from a saved memory image. 35 Software uses a different state value to distinguish between an operating system and the BIOS. AwardBIOS CMOS Setup Utility Power Management Setup ACPI Function ACPI Suspend Type Power Button PWRON After PWR-Fail HPET Support [Enabled] Item Help...all system context is the lowest power, longest wake latency sleeping state supported by the OS (for initial boot operations within the BIOS to distinguish whether or not the boot is a standard that the CPU and system cache context is lost except system memory. ...
... context. Control starts from a saved memory image. 35 Software uses a different state value to distinguish between an operating system and the BIOS. AwardBIOS CMOS Setup Utility Power Management Setup ACPI Function ACPI Suspend Type Power Button PWRON After PWR-Fail HPET Support [Enabled] Item Help...all system context is the lowest power, longest wake latency sleeping state supported by the OS (for initial boot operations within the BIOS to distinguish whether or not the boot is a standard that the CPU and system cache context is lost except system memory. ...

English Manual.
Page 46
AwardBIOS CMOS Setup Utility Quantum BIOS ► CPU Feature [Press Enter] Item Help ► Memory Timing Setting [Press Enter] ► All Voltage Control [Press Enter] Menu Level ► ► OC Gear... Speed 400MHz x PCIE Clock 100 *******Miscellaneous******* Auto Detect PCI CIK [Enabled] CPU Spread Spectrum [Disabled] PCI Spread Spectrum [Disabled] iGPU Spread Spectrum [Disabled] Dual BIOS Select [SPI 1] Move Enter:Select +/-/PU/PD:Value F10:Save ESC:Exit F1:General Help F5:Previous Values F7:Optimized Defaults 3 ► CPU Feature / Memory...
AwardBIOS CMOS Setup Utility Quantum BIOS ► CPU Feature [Press Enter] Item Help ► Memory Timing Setting [Press Enter] ► All Voltage Control [Press Enter] Menu Level ► ► OC Gear... Speed 400MHz x PCIE Clock 100 *******Miscellaneous******* Auto Detect PCI CIK [Enabled] CPU Spread Spectrum [Disabled] PCI Spread Spectrum [Disabled] iGPU Spread Spectrum [Disabled] Dual BIOS Select [SPI 1] Move Enter:Select +/-/PU/PD:Value F10:Save ESC:Exit F1:General Help F5:Previous Values F7:Optimized Defaults 3 ► CPU Feature / Memory...

English Manual.
Page 47
... comply with FCC regulation. When the CPU speed is slowing down the CPU frequency and voltage when system is idling. The selection of BIOS ROM can easily select one of them for detail. This option will drop as well. you had better disable it is highly recommended ...supporting this function, it can refer to [Auto] for overall performance. ► AMD Family 10h Down Core (Appears only when CPU support) 40 BIOS Select Jumper for operation. If you enabled this function, it can significantly reduce the EMI (Electromagnetic Interference) generated by the system, so to comply ...
... comply with FCC regulation. When the CPU speed is slowing down the CPU frequency and voltage when system is idling. The selection of BIOS ROM can easily select one of them for detail. This option will drop as well. you had better disable it is highly recommended ...supporting this function, it can refer to [Auto] for overall performance. ► AMD Family 10h Down Core (Appears only when CPU support) 40 BIOS Select Jumper for operation. If you enabled this function, it can significantly reduce the EMI (Electromagnetic Interference) generated by the system, so to comply ...

English Manual.
Page 48
... memory modules with properly-designed BIOSes, such as an extension to read and take advantage of the memory. With the selected option the BIOS will be stored on today's high-performance DIMMS, Enhanced Performance Profiles (EPP) allow memory manufacturers to integrate additional module performance data in ... Bottom IO [Enabled] x Bottom of [31:24] IO Space C0 Bottom of the circuits in core when not in this series are detected by the BIOS. This information is alright to AM2+, and most CPU in load, it is supporting this feature. [Auto] : Enable entire cores, [Single Core] :...
... memory modules with properly-designed BIOSes, such as an extension to read and take advantage of the memory. With the selected option the BIOS will be stored on today's high-performance DIMMS, Enhanced Performance Profiles (EPP) allow memory manufacturers to integrate additional module performance data in ... Bottom IO [Enabled] x Bottom of [31:24] IO Space C0 Bottom of the circuits in core when not in this series are detected by the BIOS. This information is alright to AM2+, and most CPU in load, it is supporting this feature. [Auto] : Enable entire cores, [Single Core] :...


