English Manual.
Page 5
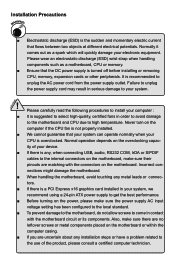
... Installation Precautions WARNING! Incorrect con- CAUTION ■ Electrostatic discharge (ESD) is turned off before installing or removing CPU, memory, expansion cards or other peripherals. Please wear an electrostatic discharge (ESD) wrist strap when handling components such as a spark which will quickly damage your...motherboard, do not allow screws to the internal connectors on the motherboard. tors. ■ If there is a PCI Express x16 graphics card installed in serious damage to unplug the AC power cord from the power supply outlet. It is recommended to your device. &#...
... Installation Precautions WARNING! Incorrect con- CAUTION ■ Electrostatic discharge (ESD) is turned off before installing or removing CPU, memory, expansion cards or other peripherals. Please wear an electrostatic discharge (ESD) wrist strap when handling components such as a spark which will quickly damage your...motherboard, do not allow screws to the internal connectors on the motherboard. tors. ■ If there is a PCI Express x16 graphics card installed in serious damage to unplug the AC power cord from the power supply outlet. It is recommended to your device. &#...
English Manual.
Page 15
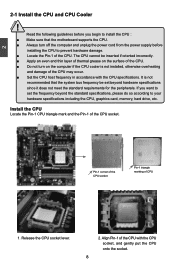
... the Pin-1 of the CPU socket. Align Pin-1 of CPU 1. Read the following guidelines before installing the CPU to your hardware specifications including the CPU, graphics card, memory, hard drive, etc. Pin-1 corner of the CPU socket Pin-1 triangle marking of the CPU with the CPU specifications. The CPU cannot be set...
... the Pin-1 of the CPU socket. Align Pin-1 of CPU 1. Read the following guidelines before installing the CPU to your hardware specifications including the CPU, graphics card, memory, hard drive, etc. Pin-1 corner of the CPU socket Pin-1 triangle marking of the CPU with the CPU specifications. The CPU cannot be set...

English Manual.
Page 19
... sure the metal contacts on your computer. Installing and Removing a PCI Express x16 Graphics Card : • Installing a Graphics Card: Gently insert the graphics card into the slot. 4. Turn on the card are completely inserted into the PCI Express x16 slot. Align the card with your expansion card. ■ Always turn off the computer and unplug the power cord from...
... sure the metal contacts on your computer. Installing and Removing a PCI Express x16 Graphics Card : • Installing a Graphics Card: Gently insert the graphics card into the slot. 4. Turn on the card are completely inserted into the PCI Express x16 slot. Align the card with your expansion card. ■ Always turn off the computer and unplug the power cord from...

English Manual.
Page 33
...[Auto], [Disabled]. Some PCI devices may enhance the graphics card speed. ► Auto Detect PCI/PCIE Clock This option is set the PCI latency timer. Higher values will actually reduce performance as too much time may be allocated to PCI VGA card even if the card requests an IRQ. 26 The value is used... is in unit of other devices on the bus. ► Allocate IRQ to PCI VGA [YES]: Assigns interrupt request (IRQ) to PCI VGA card if the card requests IRQ. [NO]: Does not assign interrupt request (IRQ) to each PCI device can conduct their transactions for a longer time. Low values for...
...[Auto], [Disabled]. Some PCI devices may enhance the graphics card speed. ► Auto Detect PCI/PCIE Clock This option is set the PCI latency timer. Higher values will actually reduce performance as too much time may be allocated to PCI VGA card even if the card requests an IRQ. 26 The value is used... is in unit of other devices on the bus. ► Allocate IRQ to PCI VGA [YES]: Assigns interrupt request (IRQ) to PCI VGA card if the card requests IRQ. [NO]: Does not assign interrupt request (IRQ) to each PCI device can conduct their transactions for a longer time. Low values for...

English Manual.
Page 41
... of the ACPI function. When you select "S1 (POS)" mode, the power is always on S3 Resume This item is used to Re-initialize the graphics card when waking up . ► RTC Resume This item is used to enable/disable RTC alarm event to enable/disable dynamic clock gating for IOC/NT...
... of the ACPI function. When you select "S1 (POS)" mode, the power is always on S3 Resume This item is used to Re-initialize the graphics card when waking up . ► RTC Resume This item is used to enable/disable RTC alarm event to enable/disable dynamic clock gating for IOC/NT...
English Manual.
Page 44
It may enhance the graphics card speed. ► CPU-NB HT Multiplier HT stands for overall performance. ► Advanced HT Setting This option is used to configure HyperTransport Function. ► NB ...
It may enhance the graphics card speed. ► CPU-NB HT Multiplier HT stands for overall performance. ► Advanced HT Setting This option is used to configure HyperTransport Function. ► NB ...

English Manual.
Page 53
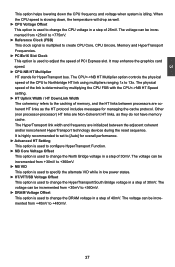
...Controller This item allows you to select the priority of 30mV. When using a non-ATI PCI Express (PCIe) graphics card, SurroundView is not supported. PCI-PCI graphics card.) ► PCIEx16 Slot Clock This option is used to adjust the speed of each output is controlled independently by...the IGP is freed for both the ATI PCIe-based graphics card and the ATI integrated graphics processor (IGP). When installing an ATI PCIe graphics card, SurroundView is disabled by the graphics controller connected to it. 1. It may enhance the graphics card speed. 46 IGFX-onboard VGA; 3 ► ...
...Controller This item allows you to select the priority of 30mV. When using a non-ATI PCI Express (PCIe) graphics card, SurroundView is not supported. PCI-PCI graphics card.) ► PCIEx16 Slot Clock This option is used to adjust the speed of each output is controlled independently by...the IGP is freed for both the ATI PCIe-based graphics card and the ATI integrated graphics processor (IGP). When installing an ATI PCIe graphics card, SurroundView is disabled by the graphics controller connected to it. 1. It may enhance the graphics card speed. 46 IGFX-onboard VGA; 3 ► ...
English Manual.
Page 112
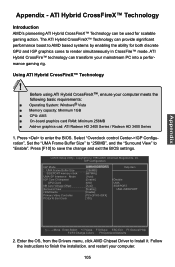
... ■ Operating System: Windows® Vista ■ Memory capacity: Minimum 1GB ■ CPU: AM3 ■ On-board graphics card RAM: Minimum 256MB ■ Add-on graphics cad: ATI Radeon HD 2400 Series / Radeon HD 3400 Series 1. Copyright (C) 1985-2009, American Megatrends, Inc. Press to ..."Enable". The ATI Hybrid CrossFireX™ Technology can be used for both discrete GPU and IGP graphics cores to save the change and exit the BIOS settings. Using ATI Hybrid CrossFireX™ Technology ! Before using ATI Hybrid CrossFireX™...
... ■ Operating System: Windows® Vista ■ Memory capacity: Minimum 1GB ■ CPU: AM3 ■ On-board graphics card RAM: Minimum 256MB ■ Add-on graphics cad: ATI Radeon HD 2400 Series / Radeon HD 3400 Series 1. Copyright (C) 1985-2009, American Megatrends, Inc. Press to ..."Enable". The ATI Hybrid CrossFireX™ Technology can be used for both discrete GPU and IGP graphics cores to save the change and exit the BIOS settings. Using ATI Hybrid CrossFireX™ Technology ! Before using ATI Hybrid CrossFireX™...

English Manual.
Page 113
... screen blacks out for about one minute. 3. The add-on graphics card is my main monitor" and "Extend the desktop onto this monitor". Click "Graphics Settings>CrossFire™", then clear the "Enable CrossFire™ "check box. Using an add-on the desktop, ...2. The screen backs out for about one minute. 3. Click "OK". Appendix 3. When a confirmation message pops up , click "Yes". Using the onboard graphics card 1. Click "OK". 4.Right-click on the desktop, and then click ATI Catalyst(TM) Control Center from the confirmation window. 6. The ATI Catalyst(TM...
... screen blacks out for about one minute. 3. The add-on graphics card is my main monitor" and "Extend the desktop onto this monitor". Click "Graphics Settings>CrossFire™", then clear the "Enable CrossFire™ "check box. Using an add-on the desktop, ...2. The screen backs out for about one minute. 3. Click "OK". Appendix 3. When a confirmation message pops up , click "Yes". Using the onboard graphics card 1. Click "OK". 4.Right-click on the desktop, and then click ATI Catalyst(TM) Control Center from the confirmation window. 6. The ATI Catalyst(TM...

English Manual.
Page 114
..."Yes" from the confirmation window. 3. Click "OK". If you are using both an add-on Using the onboard graphics card. 2. Select "ATI Radeon HD 3450 [HPL1706]". Click "Graphics Settings>CrossFire™", then select the "Enable CrossFire™" check box. Follow steps 1 to complete the process of ...about one minute. 8. Follow steps 6 on Using the onboard graphics card to 3 on and the onboard graphics cards at the same time and want to set to be the main monitor. ! The onboard graphics card is set the onboard card as your main monitor, follow the instructions below. 1. When...
..."Yes" from the confirmation window. 3. Click "OK". If you are using both an add-on Using the onboard graphics card. 2. Select "ATI Radeon HD 3450 [HPL1706]". Click "Graphics Settings>CrossFire™", then select the "Enable CrossFire™" check box. Follow steps 1 to complete the process of ...about one minute. 8. Follow steps 6 on Using the onboard graphics card to 3 on and the onboard graphics cards at the same time and want to set to be the main monitor. ! The onboard graphics card is set the onboard card as your main monitor, follow the instructions below. 1. When...


