
Quick Reference Guide
Page 2
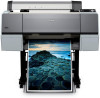
Printer Parts Front Roll paper holder Front cover Ink bay Paper basket Back Interface connector for optional equipment USB interface Roll paper cover Control panel Ink bay Casters Network interface AC inlet Maintenance tank (Pro 9890 includes two tanks, one on each side of printer) 1
Printer Parts Front Roll paper holder Front cover Ink bay Paper basket Back Interface connector for optional equipment USB interface Roll paper cover Control panel Ink bay Casters Network interface AC inlet Maintenance tank (Pro 9890 includes two tanks, one on each side of printer) 1
Quick Reference Guide
Page 5
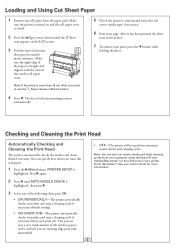
Loading and Using Cut Sheet Paper 1 Remove any roll paper from your computer using the Epson Printer Utility4 (Macintosh®) or the Utility tab in the printer. 7 To remove your User's Guide for more than 19 mil thick, you need to .... You can also run nozzle checks and head cleaning cycles from the paper path. After it meets resistance. This process uses a very small amount of ink (and no paper) and is straight and aligned with the vertical line on the LCD screen. 3 Feed the sheet down into printing position automatically. 5 Check...
Loading and Using Cut Sheet Paper 1 Remove any roll paper from your computer using the Epson Printer Utility4 (Macintosh®) or the Utility tab in the printer. 7 To remove your User's Guide for more than 19 mil thick, you need to .... You can also run nozzle checks and head cleaning cycles from the paper path. After it meets resistance. This process uses a very small amount of ink (and no paper) and is straight and aligned with the vertical line on the LCD screen. 3 Feed the sheet down into printing position automatically. 5 Check...
Quick Reference Guide
Page 7
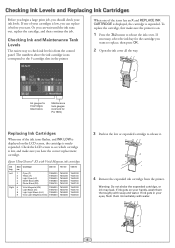
...LCD screen, the cartridge is on your ink levels. Warning: Do not shake the expended cartridge, or ink may leak. If necessary, select the ink bay for Pro 7890) Replacing Ink Cartridges When one of your eyes, flush them thoroughly with Vivid Magenta ink cartridges Ink Slot Cartridge bay no. 350 ml ...The easiest way to release it before you can wait until the ink runs out, replace the cartridge, and then continue the job. If ink gets in the printer. Epson UltraChrome® K3 with soap and water. Ink gauges for 9 cartridges listed below Maintenance tank gauges (one tank ...
...LCD screen, the cartridge is on your ink levels. Warning: Do not shake the expended cartridge, or ink may leak. If necessary, select the ink bay for Pro 7890) Replacing Ink Cartridges When one of your eyes, flush them thoroughly with Vivid Magenta ink cartridges Ink Slot Cartridge bay no. 350 ml ...The easiest way to release it before you can wait until the ink runs out, replace the cartridge, and then continue the job. If ink gets in the printer. Epson UltraChrome® K3 with soap and water. Ink gauges for 9 cartridges listed below Maintenance tank gauges (one tank ...
Quick Reference Guide
Page 8
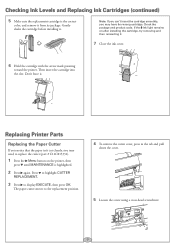
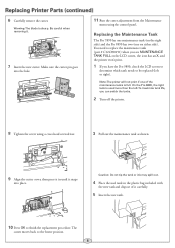
...tab and pull down the cover. 5 Loosen the screw using a cross-head screwdriver. 7 Check the package and product code. Checking Ink Levels and Replacing Ink Cartridges (continued) 5 Make sure the replacement cartridge is highlighted. 2 Press again. Don't force it from its package. The paper... button on after installing the cartridge, try removing and then reinserting it . Gently shake the cartridge before installing it . 7 Close the ink cover. 6 Hold the cartridge with the arrow mark pointing toward the printer. Press to highlight CUTTER REPLACEMENT. 3 Press to display EXECUTE, then ...
...tab and pull down the cover. 5 Loosen the screw using a cross-head screwdriver. 7 Check the package and product code. Checking Ink Levels and Replacing Ink Cartridges (continued) 5 Make sure the replacement cartridge is highlighted. 2 Press again. Don't force it from its package. The paper... button on after installing the cartridge, try removing and then reinserting it . Gently shake the cartridge before installing it . 7 Close the ink cover. 6 Hold the cartridge with the arrow mark pointing toward the printer. Press to highlight CUTTER REPLACEMENT. 3 Press to display EXECUTE, then ...
Quick Reference Guide
Page 9
... carefully. 5 Insert the new tank. 10 Press OK to the home position. 8 You need to be replaced (left . Replacing the Maintenance Tank The Pro 7890 has one maintenance tank (on the right side) and the Pro 9890 has two (one of it . 7 Insert the new cutter. To maximize tank life, you have the... Pro 9890, check the LCD screen to determine which tank needs to replace the maintenance tank (part # C12C890191) when you see MAINTENANCE TANK FULL on either side). Caution: Do not tip the tank or ink may spill out. 4 Place the used more than...
... carefully. 5 Insert the new tank. 10 Press OK to the home position. 8 You need to be replaced (left . Replacing the Maintenance Tank The Pro 7890 has one maintenance tank (on the right side) and the Pro 9890 has two (one of it . 7 Insert the new cutter. To maximize tank life, you have the... Pro 9890, check the LCD screen to determine which tank needs to replace the maintenance tank (part # C12C890191) when you see MAINTENANCE TANK FULL on either side). Caution: Do not tip the tank or ink may spill out. 4 Place the used more than...

Quick Reference Guide
Page 10
... Adjusts cutter position Moves the cutter to access the menus. most recent job is number 0 Number of capacity remaining in each maintance tank Ink in milliliters and paper in each cartridge Percentage of pages printed 9 See the User's Guide for the last 10 jobs; Press the Menu... button to the replacement position NORMAL CLEANING, CLEAN EACH COLOR, POWER CLEANING MM/DD/YY HH:MM Current firmware version Percentage of ink remaining in square centimeters for each saved job; Control Panel Menus Boldface type indicates the default setting. Menu PRINTER SETUP Item PLATEN GAP ...
... Adjusts cutter position Moves the cutter to access the menus. most recent job is number 0 Number of capacity remaining in each maintance tank Ink in milliliters and paper in each cartridge Percentage of pages printed 9 See the User's Guide for the last 10 jobs; Press the Menu... button to the replacement position NORMAL CLEANING, CLEAN EACH COLOR, POWER CLEANING MM/DD/YY HH:MM Current firmware version Percentage of ink remaining in square centimeters for each saved job; Control Panel Menus Boldface type indicates the default setting. Menu PRINTER SETUP Item PLATEN GAP ...

Quick Reference Guide
Page 13
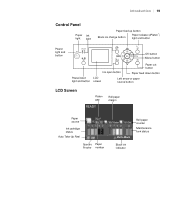
Control Panel Lights and Buttons Paper light Power light and button Pause/reset light and button Ink light Black ink change button Paper feed up button Paper release (ePlaten™) light and button Menu button Paper cut button Ink cover open button OK button Paper feed down button Left arrow or paper source button Printed in USA CPD-28260
Control Panel Lights and Buttons Paper light Power light and button Pause/reset light and button Ink light Black ink change button Paper feed up button Paper release (ePlaten™) light and button Menu button Paper cut button Ink cover open button OK button Paper feed down button Left arrow or paper source button Printed in USA CPD-28260
User's Guide
Page 5
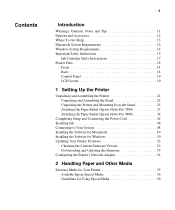
... the Stand 22 Unpacking the Printer and Mounting It on the Stand 25 Attaching the Paper Basket (Epson Stylus Pro 7890 27 Attaching the Paper Basket (Epson Stylus Pro 9890 34 Completing Setup and Connecting the Power Cord 42 Installing Ink 46 Connecting to Your System 48 Installing the Software for Macintosh 49 Installing the Software for Windows...
... the Stand 22 Unpacking the Printer and Mounting It on the Stand 25 Attaching the Paper Basket (Epson Stylus Pro 7890 27 Attaching the Paper Basket (Epson Stylus Pro 9890 34 Completing Setup and Connecting the Power Cord 42 Installing Ink 46 Connecting to Your System 48 Installing the Software for Macintosh 49 Installing the Software for Windows...
User's Guide
Page 8
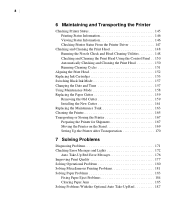
... Using the Control Panel . . 150 Automatically Checking and Cleaning the Print Head 150 Running Cleaning Cycles 151 Aligning the Print Head 152 Replacing Ink Cartridges 153 Switching Black Ink Mode 157 Changing the Date and Time 157 Using Maintenance Mode 158 Replacing the Paper Cutter 159 Removing the Old Cutter 159 Installing...
... Using the Control Panel . . 150 Automatically Checking and Cleaning the Print Head 150 Running Cleaning Cycles 151 Aligning the Print Head 152 Replacing Ink Cartridges 153 Switching Black Ink Mode 157 Changing the Date and Time 157 Using Maintenance Mode 158 Replacing the Paper Cutter 159 Removing the Old Cutter 159 Installing...
User's Guide
Page 9
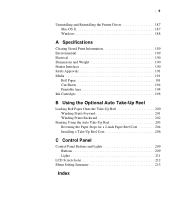
... Environmental 189 Electrical 190 Dimensions and Weight 190 Printer Interfaces 190 Safety Approvals 191 Media 191 Roll Paper 191 Cut Sheets 194 Printable Area 198 Ink Cartridges 198 B Using the Optional Auto Take-Up Reel Loading Roll Paper Onto the Take-Up Reel 200 Winding Prints Forward 201 Winding Prints Backward...
... Environmental 189 Electrical 190 Dimensions and Weight 190 Printer Interfaces 190 Safety Approvals 191 Media 191 Roll Paper 191 Cut Sheets 194 Printable Area 198 Ink Cartridges 198 B Using the Optional Auto Take-Up Reel Loading Roll Paper Onto the Take-Up Reel 200 Winding Prints Forward 201 Winding Prints Backward...
User's Guide
Page 11
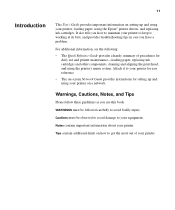
Warnings, Cautions, Notes, and Tips Please follow these guidelines as you use and printer maintenance-loading paper, replacing ink cartridges and other components, cleaning and aligning the print head, and using the printer's menu system. 11 Introduction This User's Guide provides important information on ...: WARNINGS must be followed carefully to keep it to your printer for easy reference. • The on how to your printer, loading paper, using the Epson® printer drivers, and replacing ink cartridges.
Warnings, Cautions, Notes, and Tips Please follow these guidelines as you use and printer maintenance-loading paper, replacing ink cartridges and other components, cleaning and aligning the print head, and using the printer's menu system. 11 Introduction This User's Guide provides important information on ...: WARNINGS must be followed carefully to keep it to your printer for easy reference. • The on how to your printer, loading paper, using the Epson® printer drivers, and replacing ink cartridges.
User's Guide
Page 12
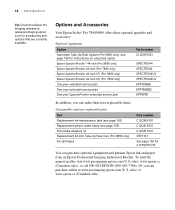
... Your Epson Stylus® Pro 7890/9890 offers these user-replaceable items: Consumables and user-replaceable parts Part Replacement ink maintenance tank (see page 163) Replacement printer cutter blade (see page 199 for instructions on using this option Epson SpectroProofer™ 44-inch (Pro 9890 only) Epson SpectroProofer 24-inch (Pro 7890 only) Epson SpectroProofer 44-inch UV (Pro 9890 only) Epson SpectroProofer...
... Your Epson Stylus® Pro 7890/9890 offers these user-replaceable items: Consumables and user-replaceable parts Part Replacement ink maintenance tank (see page 163) Replacement printer cutter blade (see page 199 for instructions on using this option Epson SpectroProofer™ 44-inch (Pro 9890 only) Epson SpectroProofer 24-inch (Pro 7890 only) Epson SpectroProofer 44-inch UV (Pro 9890 only) Epson SpectroProofer...
User's Guide
Page 15
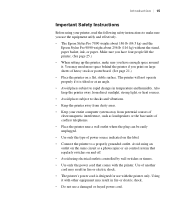
... four people lift the printer. (See page 25.) • When setting up the printer, make sure you use the equipment safely and effectively. • The Epson Stylus Pro 7890 weighs about 186 lb (84.5 kg) and the Epson Stylus Pro 9890 weighs about 256 lb (116 kg) without the stand, paper basket, ink, or paper.
... four people lift the printer. (See page 25.) • When setting up the printer, make sure you use the equipment safely and effectively. • The Epson Stylus Pro 7890 weighs about 186 lb (84.5 kg) and the Epson Stylus Pro 9890 weighs about 256 lb (116 kg) without the stand, paper basket, ink, or paper.
User's Guide
Page 17
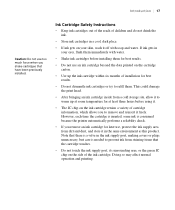
...care is consumed because the printer automatically performs a reliability check. • If you shake cartridges that the cartridge touches. • Do not touch the ink supply port, its surrounding area, or the green IC chip on your eyes, flush them . This could damage the print head. • After bringing ...an ink cartridge inside from a cold storage site, allow it to warm up at room temperature for at least three hours before installing them for best results...
...care is consumed because the printer automatically performs a reliability check. • If you shake cartridges that the cartridge touches. • Do not touch the ink supply port, its surrounding area, or the green IC chip on your eyes, flush them . This could damage the print head. • After bringing ...an ink cartridge inside from a cold storage site, allow it to warm up at room temperature for at least three hours before installing them for best results...

User's Guide
Page 18
Front Roll paper holder Roll paper cover Front cover Control panel Ink bay Paper basket Back Interface connector for optional equipment USB interface for the Pro 7890 unless otherwise noted. 18 | Introduction Printer Parts These illustrations show the Epson Stylus Pro 9890, but the parts are the same for computer Ink bay Casters Network interface Maintenance tank (Pro 9890 includes two tanks, one on each side of printer) 18 AC inlet
Front Roll paper holder Roll paper cover Front cover Control panel Ink bay Paper basket Back Interface connector for optional equipment USB interface for the Pro 7890 unless otherwise noted. 18 | Introduction Printer Parts These illustrations show the Epson Stylus Pro 9890, but the parts are the same for computer Ink bay Casters Network interface Maintenance tank (Pro 9890 includes two tanks, one on each side of printer) 18 AC inlet
User's Guide
Page 19
Introduction | 19 Control Panel Paper Ink light light Paper feed up button Black ink change button Paper release (ePlaten™) light and button Power light and button OK button Menu button Pause/reset light and button Ink open button Paper cut button Paper feed down button LCD screen Left arrow or paper source button LCD Screen Platen gap Roll paper margin Paper source Ink cartridge status Auto Take-Up Reel Spectro Paper Proofer number Roll paper counter Maintenance tank status Black ink indicator 19
Introduction | 19 Control Panel Paper Ink light light Paper feed up button Black ink change button Paper release (ePlaten™) light and button Power light and button OK button Menu button Pause/reset light and button Ink open button Paper cut button Paper feed down button LCD screen Left arrow or paper source button LCD Screen Platen gap Roll paper margin Paper source Ink cartridge status Auto Take-Up Reel Spectro Paper Proofer number Roll paper counter Maintenance tank status Black ink indicator 19
User's Guide
Page 21
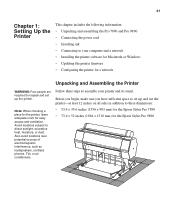
...12 inches on all sides in addition to these dimensions: • 53.4 × 35.6 inches (1356 × 903 mm) for the Epson Stylus Pro 7890 • 73.4 × 52 inches (1864 × 1318 mm) for easy access and ventilation. Also avoid locations near potential sources of...the Printer This chapter includes the following information: • Unpacking and assembling the Pro 7890 and Pro 9890 • Connecting the power cord • Installing ink • Connecting to your printer and its stand. Note: When choosing a place for the printer, leave adequate room for the Epson Stylus Pro 9890 21
...12 inches on all sides in addition to these dimensions: • 53.4 × 35.6 inches (1356 × 903 mm) for the Epson Stylus Pro 7890 • 73.4 × 52 inches (1864 × 1318 mm) for easy access and ventilation. Also avoid locations near potential sources of...the Printer This chapter includes the following information: • Unpacking and assembling the Pro 7890 and Pro 9890 • Connecting the power cord • Installing ink • Connecting to your printer and its stand. Note: When choosing a place for the printer, leave adequate room for the Epson Stylus Pro 9890 21
User's Guide
Page 25
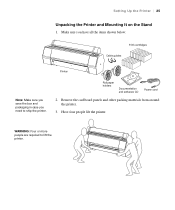
Have four people lift the printer. Roll paper holders Documentation and software CD Power cord 2. Remove the cardboard panels and other packing materials from around the printer. 3. Make sure you have all the items shown below: 9 Ink cartridges Cable guides Printer Note: Make sure you save the box and packaging in case you need to lift the printer. 25 WARNING: Four or more people are required to ship the printer. Setting Up the Printer | 25 Unpacking the Printer and Mounting It on the Stand 1.
Have four people lift the printer. Roll paper holders Documentation and software CD Power cord 2. Remove the cardboard panels and other packing materials from around the printer. 3. Make sure you have all the items shown below: 9 Ink cartridges Cable guides Printer Note: Make sure you save the box and packaging in case you need to lift the printer. 25 WARNING: Four or more people are required to ship the printer. Setting Up the Printer | 25 Unpacking the Printer and Mounting It on the Stand 1.

User's Guide
Page 43
Open the roll paper cover and remove the tape and packing material. 43 Check these areas: • the front cover • the ink compartment covers • the maintenance tank(s) 4. Setting Up the Printer | 43 3. Remove any packing tape and plastic film.
Open the roll paper cover and remove the tape and packing material. 43 Check these areas: • the front cover • the ink compartment covers • the maintenance tank(s) 4. Setting Up the Printer | 43 3. Remove any packing tape and plastic film.
User's Guide
Page 46
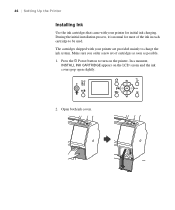
The cartridges shipped with your printer are provided mainly to charge the ink system. Press the P Power button to be used. Open both ink covers. 46 46 | Setting Up the Printer Installing Ink Use the ink cartridges that came with your printer for most of cartridges as soon as possible. 1. Make sure you order a new set of the ink in each cartridge to turn on the LCD screen and the ink covers pop open slightly. 2. In a moment, INSTALL INK CARTRIDGE appears on the printer. During the initial installation process, it is normal for initial ink charging.
The cartridges shipped with your printer are provided mainly to charge the ink system. Press the P Power button to be used. Open both ink covers. 46 46 | Setting Up the Printer Installing Ink Use the ink cartridges that came with your printer for most of cartridges as soon as possible. 1. Make sure you order a new set of the ink in each cartridge to turn on the LCD screen and the ink covers pop open slightly. 2. In a moment, INSTALL INK CARTRIDGE appears on the printer. During the initial installation process, it is normal for initial ink charging.


