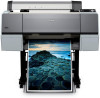
Network Guide
Page 11
... address, subnet mask, etc.) are installed on your operating system. Setting Up Your System for details. 5. Check the functions and operations of the network interface using EpsonNet Config. Configure the network interface on page 9 for details. 2. Configure the network interface using EpsonNet Config. For Windows users, see "About EpsonNet Config" on page 28. Installing Network Components on Your Computer Before configuring the network interface and printing from the computer, you need...
... address, subnet mask, etc.) are installed on your operating system. Setting Up Your System for details. 5. Check the functions and operations of the network interface using EpsonNet Config. Configure the network interface on page 9 for details. 2. Configure the network interface using EpsonNet Config. For Windows users, see "About EpsonNet Config" on page 28. Installing Network Components on Your Computer Before configuring the network interface and printing from the computer, you need...
Network Guide
Page 20
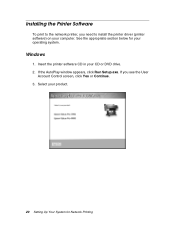
See the appropriate section below for Network Printing Windows 1. If you need to install the printer driver (printer software) on your CD or DVD drive. 2. Select your product. 20 Setting Up Your System for your operating system. Insert the printer software CD in your computer. Installing the Printer Software To print to the network printer, you see the User Account Control screen, click Yes or Continue. 3. If the AutoPlay window appears, click Run Setup.exe.
See the appropriate section below for Network Printing Windows 1. If you need to install the printer driver (printer software) on your CD or DVD drive. 2. Select your product. 20 Setting Up Your System for your operating system. Insert the printer software CD in your computer. Installing the Printer Software To print to the network printer, you see the User Account Control screen, click Yes or Continue. 3. If the AutoPlay window appears, click Run Setup.exe.
Quick Reference Guide
Page 8
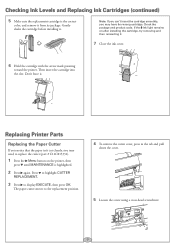
...'t cut cleanly, you may need to replace the cutter (part # C12C815331). 1 Press the Menu button on after installing the cartridge, try removing and then reinserting it from its package. Don't force it . Note: If you can't insert the cartridge smoothly, you may have the wrong cartridge. The paper cutter moves to display EXECUTE, then press OK. If the Ink light remains on the printer, then press until MAINTENANCE is the correct color, and remove...
...'t cut cleanly, you may need to replace the cutter (part # C12C815331). 1 Press the Menu button on after installing the cartridge, try removing and then reinserting it from its package. Don't force it . Note: If you can't insert the cartridge smoothly, you may have the wrong cartridge. The paper cutter moves to display EXECUTE, then press OK. If the Ink light remains on the printer, then press until MAINTENANCE is the correct color, and remove...
User's Guide
Page 8
... Head 152 Replacing Ink Cartridges 153 Switching Black Ink Mode 157 Changing the Date and Time 157 Using Maintenance Mode 158 Replacing the Paper Cutter 159 Removing the Old Cutter 159 Installing the New Cutter 161 Replacing the Maintenance Tank 163 Cleaning the Printer 165 Transporting or Storing the Printer 167 Preparing the Printer for Shipment 167 Moving the Printer on the Stand 169 Setting Up the Printer After Transportation 170 7 Solving Problems Diagnosing Problems 171 Checking Error Messages and Lights 172 Auto Take-Up Reel Error Messages 176 Improving Print Quality...
... Head 152 Replacing Ink Cartridges 153 Switching Black Ink Mode 157 Changing the Date and Time 157 Using Maintenance Mode 158 Replacing the Paper Cutter 159 Removing the Old Cutter 159 Installing the New Cutter 161 Replacing the Maintenance Tank 163 Cleaning the Printer 165 Transporting or Storing the Printer 167 Preparing the Printer for Shipment 167 Moving the Printer on the Stand 169 Setting Up the Printer After Transportation 170 7 Solving Problems Diagnosing Problems 171 Checking Error Messages and Lights 172 Auto Take-Up Reel Error Messages 176 Improving Print Quality...
User's Guide
Page 9
... 191 Media 191 Roll Paper 191 Cut Sheets 194 Printable Area 198 Ink Cartridges 198 B Using the Optional Auto Take-Up Reel Loading Roll Paper Onto the Take-Up Reel 200 Winding Prints Forward 201 Winding Prints Backward 202 Printing Using the Auto Take-Up Reel 203 Reversing the Paper Stops for a 2-inch Paper Reel Core 204 Installing a Take-Up Reel Core 206 C Control Panel Control Panel Buttons and Lights 209 Buttons 209 Lights 211 LCD Screen Icons 212 Menu Setting...
... 191 Media 191 Roll Paper 191 Cut Sheets 194 Printable Area 198 Ink Cartridges 198 B Using the Optional Auto Take-Up Reel Loading Roll Paper Onto the Take-Up Reel 200 Winding Prints Forward 201 Winding Prints Backward 202 Printing Using the Auto Take-Up Reel 203 Reversing the Paper Stops for a 2-inch Paper Reel Core 204 Installing a Take-Up Reel Core 206 C Control Panel Control Panel Buttons and Lights 209 Buttons 209 Lights 211 LCD Screen Icons 212 Menu Setting...
User's Guide
Page 11
... following: • The Quick Reference Guide provides a handy summary of your printer. Notes contain important information about your printer. 11 It also tells you how to keep it working at its best, and provides troubleshooting tips in case you use and printer maintenance-loading paper, replacing ink cartridges and other components, cleaning and aligning the print head, and using the Epson® printer drivers, and replacing ink cartridges. Attach it to your printer for easy reference. •...
... following: • The Quick Reference Guide provides a handy summary of your printer. Notes contain important information about your printer. 11 It also tells you how to keep it working at its best, and provides troubleshooting tips in case you use and printer maintenance-loading paper, replacing ink cartridges and other components, cleaning and aligning the print head, and using the Epson® printer drivers, and replacing ink cartridges. Attach it to your printer for easy reference. •...
User's Guide
Page 85
... Epson driver offers an Advanced Black and White Photo mode. A color-managed workflow using Photoshop and a color-calibrated monitor will give you can have installed the Epson printer driver and utilities from your image correctly. Before you print, make sure you plan on printing borderless images on roll paper, check the guidelines on installing and configuring the printer driver, see page 49. If you have them created by a color specialist. com for Mac OS X Tip: Check the Epson Pro Imaging website at www.proimaging.epson. Your Epson Stylus Pro 7890 or Pro...
... Epson driver offers an Advanced Black and White Photo mode. A color-managed workflow using Photoshop and a color-calibrated monitor will give you can have installed the Epson printer driver and utilities from your image correctly. Before you print, make sure you plan on printing borderless images on roll paper, check the guidelines on installing and configuring the printer driver, see page 49. If you have them created by a color specialist. com for Mac OS X Tip: Check the Epson Pro Imaging website at www.proimaging.epson. Your Epson Stylus Pro 7890 or Pro...
User's Guide
Page 107
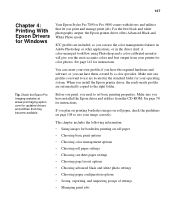
... borderless images on roll paper, check the guidelines on roll paper • Choosing basic print options • Choosing color management options • Choosing roll paper settings • Choosing cut sheet paper settings • Choosing page layout options • Choosing advanced black and white photo settings • Choosing paper configuration options • Saving, exporting, and importing groups of settings • Managing print jobs 107 107 Chapter 4: Printing With Epson Drivers for Windows Your Epson Stylus Pro 7890 or Pro 9890 comes with drivers and utilities...
... borderless images on roll paper, check the guidelines on roll paper • Choosing basic print options • Choosing color management options • Choosing roll paper settings • Choosing cut sheet paper settings • Choosing page layout options • Choosing advanced black and white photo settings • Choosing paper configuration options • Saving, exporting, and importing groups of settings • Managing print jobs 107 107 Chapter 4: Printing With Epson Drivers for Windows Your Epson Stylus Pro 7890 or Pro 9890 comes with drivers and utilities...

User's Guide
Page 152
... best print quality. When cleaning is finished and the Power light stops flashing, print the nozzle check again to align the print head using the printer utility software, it overnight, then clean the print head again the following , then press r: • NORMAL CLEANING-Press OK to start the cleaning cycle. • CLEAN COLOR PAIRS-Press r, select the color pair you see no improvement, contact Epson for deflected nozzles. 4. If you still see misregistration or "ghosting," you need to...
... best print quality. When cleaning is finished and the Power light stops flashing, print the nozzle check again to align the print head using the printer utility software, it overnight, then clean the print head again the following , then press r: • NORMAL CLEANING-Press OK to start the cleaning cycle. • CLEAN COLOR PAIRS-Press r, select the color pair you see no improvement, contact Epson for deflected nozzles. 4. If you still see misregistration or "ghosting," you need to...
User's Guide
Page 173
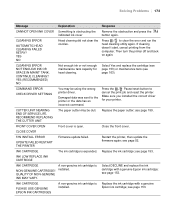
... printer. Make sure you installed the correct driver for head cleaning. CUTTER UNIT NEARING END OF SERVICE LIFE. see page 52. see page 163). Solving Problems | 173 Message Explanation Response CANNOT OPEN INK COVER Something is open. Damaged data was sent to cancel the print job and reset the printer. Epson ink cartridge; CLEANING ERROR NOT ENOUGH INK OR SPACE IN MAINT TANK. Select Yes and replace the cartridge (see page 153) or maintenance tank (see page 153. 173 Replace the paper cutter; YES NO Head cleaning did not clear...
... printer. Make sure you installed the correct driver for head cleaning. CUTTER UNIT NEARING END OF SERVICE LIFE. see page 52. see page 163). Solving Problems | 173 Message Explanation Response CANNOT OPEN INK COVER Something is open. Damaged data was sent to cancel the print job and reset the printer. Epson ink cartridge; CLEANING ERROR NOT ENOUGH INK OR SPACE IN MAINT TANK. Select Yes and replace the cartridge (see page 153) or maintenance tank (see page 153. 173 Replace the paper cutter; YES NO Head cleaning did not clear...
User's Guide
Page 174
...the cover(s). Make sure you can re-use the low ink cartridge. see page 163. MAINTENANCE REQUEST A printer part may need to install an ink cartridge that cannot be Note the code number and contact Epson as replaced soon. MAINTENANCE TANK NEARLY FULL The maintenance tank is missing; see page 153. For the Pro 9890, note which tank is not installed. error remains, replace the cartridge. INK TOO LOW TO CLEAN REPLACE INK CARTRIDGE Not enough ink for printing. Replace the cartridge(s) before cleaning; Replace the cartridge(s) before cleaning; see page 163...
...the cover(s). Make sure you can re-use the low ink cartridge. see page 163. MAINTENANCE REQUEST A printer part may need to install an ink cartridge that cannot be Note the code number and contact Epson as replaced soon. MAINTENANCE TANK NEARLY FULL The maintenance tank is missing; see page 153. For the Pro 9890, note which tank is not installed. error remains, replace the cartridge. INK TOO LOW TO CLEAN REPLACE INK CARTRIDGE Not enough ink for printing. Replace the cartridge(s) before cleaning; Replace the cartridge(s) before cleaning; see page 163...
User's Guide
Page 175
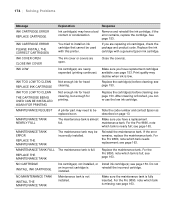
... installed. Not enough ink or maintenance Select YES, then follow the instructions to tank capacity for more information. The button has been pressed. Load paper. see page 163. button, then reload paper Paper has jammed in the printer. Solving Problems | 175 Message NOT ENOUGH EMPTY SPACE REPLACE THE RIGHT SIDE MAINTENANCE TANK NOZZLE CHECK ERROR PRESS THE BUTTON NOZZLE CLOG DETECTED NOT ENOUGH INK OR SPACE IN MAINT TANK PAPER CUT ERROR REMOVE UNCUT PAPER PAPER EJECT ERROR REMOVE PAPER FROM PRINTER PAPER ERROR LOAD PAPER CORRECTLY PAPER JAM REMOVE PAPER PAPER LOW PAPER...
... installed. Not enough ink or maintenance Select YES, then follow the instructions to tank capacity for more information. The button has been pressed. Load paper. see page 163. button, then reload paper Paper has jammed in the printer. Solving Problems | 175 Message NOT ENOUGH EMPTY SPACE REPLACE THE RIGHT SIDE MAINTENANCE TANK NOZZLE CHECK ERROR PRESS THE BUTTON NOZZLE CLOG DETECTED NOT ENOUGH INK OR SPACE IN MAINT TANK PAPER CUT ERROR REMOVE UNCUT PAPER PAPER EJECT ERROR REMOVE PAPER FROM PRINTER PAPER ERROR LOAD PAPER CORRECTLY PAPER JAM REMOVE PAPER PAPER LOW PAPER...
User's Guide
Page 178
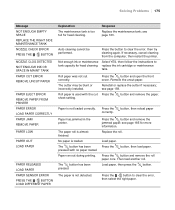
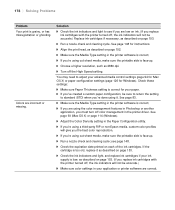
...; Make sure the Media Type setting in the Paper Configuration utility. ◗ If you're using a third-party RIP or non-Epson media, custom color profiles will not be sure to return the setting to adjust your advanced media control settings (page 94 for Mac OS X) or paper configuration settings (page 126 for your application or printer software are correct. 178 You may need to standard (STD) when you're done using cut sheet media, make sure the printable side is correct for Windows). see...
...; Make sure the Media Type setting in the Paper Configuration utility. ◗ If you're using a third-party RIP or non-Epson media, custom color profiles will not be sure to return the setting to adjust your advanced media control settings (page 94 for Mac OS X) or paper configuration settings (page 126 for your application or printer software are correct. 178 You may need to standard (STD) when you're done using cut sheet media, make sure the printable side is correct for Windows). see...
User's Guide
Page 179
... you replace ink cartridges with a custom paper configuration, be accurate.) ◗ The paper thickness setting is face-up. ◗ Ink has leaked into the paper path. See page 75 for Windows) to standard (STD). ◗ Your paper doesn't meet the required specifications or wasn't stored in the printer software is correct. ◗ Run a nozzle check and cleaning cycle (see page 187). ◗ If ink is smeared on page 153. (If you 're using cut sheet media, make sure PAPER SIZE CHECK is...
... you replace ink cartridges with a custom paper configuration, be accurate.) ◗ The paper thickness setting is face-up. ◗ Ink has leaked into the paper path. See page 75 for Windows) to standard (STD). ◗ Your paper doesn't meet the required specifications or wasn't stored in the printer software is correct. ◗ Run a nozzle check and cleaning cycle (see page 187). ◗ If ink is smeared on page 153. (If you 're using cut sheet media, make sure PAPER SIZE CHECK is...

User's Guide
Page 181
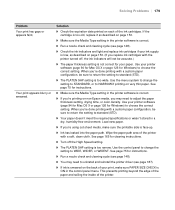
... ◗ Make sure your printer software are not what you 're using. ◗ Paper is selected. ◗ Clear any stalled print jobs. ◗ Turn off the printer and computer. Your image is incorrect. Solving Miscellaneous Printing Problems If your printouts are correct for Mac OS X or Windows from the Epson website at both ends. ◗ Check the page size or paper size settings in your software is installed correctly and the printer is loaded incorrectly. Follow the instructions beginning...
... ◗ Make sure your printer software are not what you 're using. ◗ Paper is selected. ◗ Clear any stalled print jobs. ◗ Turn off the printer and computer. Your image is incorrect. Solving Miscellaneous Printing Problems If your printouts are correct for Mac OS X or Windows from the Epson website at both ends. ◗ Check the page size or paper size settings in your software is installed correctly and the printer is loaded incorrectly. Follow the instructions beginning...
User's Guide
Page 187
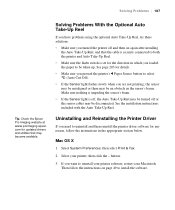
... the sensor's beam. • If the Sensor light is set for updated drivers and utilities that the cable is securely connected to select (Auto Cut Off). • If the Sensor light flashes slowly when you want to be an obstacle in which you pressed the printer's l Paper Source button to both the printer and Auto Take-Up Reel. • Make sure the Auto switch is off, the Auto Take-Up Reel may be turned off...
... the sensor's beam. • If the Sensor light is set for updated drivers and utilities that the cable is securely connected to select (Auto Cut Off). • If the Sensor light flashes slowly when you want to be an obstacle in which you pressed the printer's l Paper Source button to both the printer and Auto Take-Up Reel. • Make sure the Auto switch is off, the Auto Take-Up Reel may be turned off...
User's Guide
Page 216
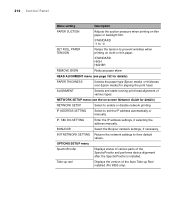
...PAPER SUCTION Adjusts the suction pressure when printing on -screen Network Guide for aligning the print head. STANDARD HIGH HIGHER REMOVE SKEW Reduces paper skew. ALIGNMENT Selects and starts running print head alignment of the Auto Take-up reel Displays the version of various types. OPTIONS SETUP menu SpectroProofer Displays status of various parts of the SpectroProofer and performs device alignment after the SpectroProofer is installed. IP ADDRESS SETTING Select to enable or disable network printing. NETWORK SETUP menu (see page 152 for details) PAPER THICKNESS...
...PAPER SUCTION Adjusts the suction pressure when printing on -screen Network Guide for aligning the print head. STANDARD HIGH HIGHER REMOVE SKEW Reduces paper skew. ALIGNMENT Selects and starts running print head alignment of the Auto Take-up reel Displays the version of various types. OPTIONS SETUP menu SpectroProofer Displays status of various parts of the SpectroProofer and performs device alignment after the SpectroProofer is installed. IP ADDRESS SETTING Select to enable or disable network printing. NETWORK SETUP menu (see page 152 for details) PAPER THICKNESS...
User's Guide
Page 217
... to 125 Black ink mode, switching, 157 Blank pages, 182 Blurry prints, 179 Borderless printing Mac OS X, 86, 87 to 90 Windows, 108, 116 to 121 Buttons, control panel, 19, 172, 209 to 210 217 217 C Cable power, 45 printer, 13, 48 to 49 problems, 181 requirements, 13, 14 Canceling print jobs Mac OS X, 103 Windows, 132 Cartridges, see Ink cartridges Checking printer status, 145 to 147 Cleaning print head, 148 to 152, 159 printer, 165 Coarse Rendering setting, 134 Color management Mac OS X, 93...
... to 125 Black ink mode, switching, 157 Blank pages, 182 Blurry prints, 179 Borderless printing Mac OS X, 86, 87 to 90 Windows, 108, 116 to 121 Buttons, control panel, 19, 172, 209 to 210 217 217 C Cable power, 45 printer, 13, 48 to 49 problems, 181 requirements, 13, 14 Canceling print jobs Mac OS X, 103 Windows, 132 Cartridges, see Ink cartridges Checking printer status, 145 to 147 Cleaning print head, 148 to 152, 159 printer, 165 Coarse Rendering setting, 134 Color management Mac OS X, 93...

User's Guide
Page 218
... Grainy prints, 178 H Head Alignment menu, 152, 153 Height of printer, 190 Help, Epson, 13 High Speed Copies setting, 133 High Speed setting Mac OS X, 92 Windows, 111 Humidity requirements, 189 I ICM setting, 116 Ink icons, 212 light, 19, 172, 211 Ink cartridges checking status, 132, 145 to 147, 153 to 154 installing, 46 to 48 ordering, 154 replacing, 153 to 156 safety instructions, 17 specifications, 198 Inverted images, 181 J Jams, paper, 185 to 186 Job...
... Grainy prints, 178 H Head Alignment menu, 152, 153 Height of printer, 190 Help, Epson, 13 High Speed Copies setting, 133 High Speed setting Mac OS X, 92 Windows, 111 Humidity requirements, 189 I ICM setting, 116 Ink icons, 212 light, 19, 172, 211 Ink cartridges checking status, 132, 145 to 147, 153 to 154 installing, 46 to 48 ordering, 154 replacing, 153 to 156 safety instructions, 17 specifications, 198 Inverted images, 181 J Jams, paper, 185 to 186 Job...
User's Guide
Page 219
... 211 Loading cut sheet paper, 72 to 73 roll paper, 57 to 67 M Mac OS X advanced media control settings, 94 to 95 basic print options, 87 to 93 black and white photos, 99 to 101 borderless printing, 86, 87 to 90 canceling print jobs, 103 checking printer status, 147 color management, 93 to 94, 99 to 101, 137 to 140 ColorSync settings, 94 custom paper size, 87 to 90 custom preset, 101 to 102 installing software, 49 to 50 Media Type setting...
... 211 Loading cut sheet paper, 72 to 73 roll paper, 57 to 67 M Mac OS X advanced media control settings, 94 to 95 basic print options, 87 to 93 black and white photos, 99 to 101 borderless printing, 86, 87 to 90 canceling print jobs, 103 checking printer status, 147 color management, 93 to 94, 99 to 101, 137 to 140 ColorSync settings, 94 custom paper size, 87 to 90 custom preset, 101 to 102 installing software, 49 to 50 Media Type setting...


