Basics
Page 5
... Your Epson Stylus® Photo R2000 Series printer gives you read your documentation: Warning: Warnings must be followed carefully to multiple computers ■ Downloadable Premium ICC Profiles for better printing. Introduction 5 Caution: Cautions must be observed to avoid damage to your R2000 Series. Tip: Tips contain hints for precise color management Please follow these advanced features: ■ Epson UltraChrome Hi-Gloss® 2 ink cartridges, including red...
... Your Epson Stylus® Photo R2000 Series printer gives you read your documentation: Warning: Warnings must be followed carefully to multiple computers ■ Downloadable Premium ICC Profiles for better printing. Introduction 5 Caution: Cautions must be observed to avoid damage to your R2000 Series. Tip: Tips contain hints for precise color management Please follow these advanced features: ■ Epson UltraChrome Hi-Gloss® 2 ink cartridges, including red...
Basics
Page 10
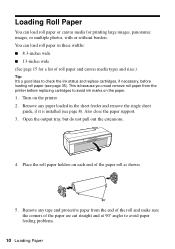
... is because you must remove roll paper from the end of the roll and make sure the corners of the paper are cut straight and at 90° angles to avoid ink marks on the paper. 1. You can load roll paper or canvas media for a list of roll paper and canvas media types and sizes.) Tip: It's a good idea to check the ink status and replace cartridges, if necessary, before replacing cartridges to avoid paper feeding problems. 10 Loading Paper
... is because you must remove roll paper from the end of the roll and make sure the corners of the paper are cut straight and at 90° angles to avoid ink marks on the paper. 1. You can load roll paper or canvas media for a list of roll paper and canvas media types and sizes.) Tip: It's a good idea to check the ink status and replace cartridges, if necessary, before replacing cartridges to avoid paper feeding problems. 10 Loading Paper
Basics
Page 14
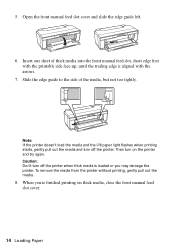
.... Insert one sheet of the media, but not too tightly. To remove the media from the printer without printing, gently pull out the media. 8. Note: If the printer doesn't load the media and the I paper light flashes when printing starts, gently pull out the media and turn off the printer. Caution: Don't turn off the printer when thick media is aligned with the arrows. 7. Open the front manual feed slot cover and slide the edge guide left. 6. When...
.... Insert one sheet of the media, but not too tightly. To remove the media from the printer without printing, gently pull out the media. 8. Note: If the printer doesn't load the media and the I paper light flashes when printing starts, gently pull out the media and turn off the printer. Caution: Don't turn off the printer when thick media is aligned with the arrows. 7. Open the front manual feed slot cover and slide the edge guide left. 6. When...
Basics
Page 21
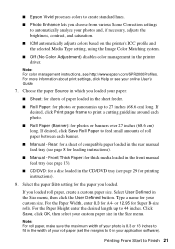
... loaded roll paper, create a custom paper size. Click Save, click OK, then select your photos and, if necessary, adjusts the brightness, contrast, and saturation. ■ ICM automatically adjusts colors based on the printer's ICC profile and the selected Media Type setting, using the Image Color Matching system. ■ Off (No Color Adjustment) disables color management in which you loaded. If you choose from various Scene Correction settings to Finish 21 Note: For color management instructions, see page 8 for a sheet...
... loaded roll paper, create a custom paper size. Click Save, click OK, then select your photos and, if necessary, adjusts the brightness, contrast, and saturation. ■ ICM automatically adjusts colors based on the printer's ICC profile and the selected Media Type setting, using the Image Color Matching system. ■ Off (No Color Adjustment) disables color management in which you loaded. If you choose from various Scene Correction settings to Finish 21 Note: For color management instructions, see page 8 for a sheet...

Basics
Page 29
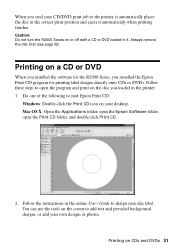
... and remove the single sheet guide, if it to print label designs directly onto ink jet-printable CDs or DVDs. Open the front manual feed tray and slide the edge guide left. Printing on page 32 Loading a CD or DVD 1. Turn on CDs and DVDs You can use your CD or DVD before printing. Open the output tray, but do not pull out the extensions. 4. Also close the paper support. 3. Remove any paper loaded...
... and remove the single sheet guide, if it to print label designs directly onto ink jet-printable CDs or DVDs. Open the front manual feed tray and slide the edge guide left. Printing on page 32 Loading a CD or DVD 1. Turn on CDs and DVDs You can use your CD or DVD before printing. Open the output tray, but do not pull out the extensions. 4. Also close the paper support. 3. Remove any paper loaded...
Basics
Page 31
... you installed the software for the R2000 Series, you installed the Epson Print CD program for printing label designs directly onto CDs or DVDs. Follow the instructions in the online User's Guide to start Epson Print CD: Windows: Double-click the Print CD icon on the disc you loaded in the printer: 1. Follow these steps to add text and provided background designs, or add your own designs or photos. You can use...
... you installed the software for the R2000 Series, you installed the Epson Print CD program for printing label designs directly onto CDs or DVDs. Follow the instructions in the online User's Guide to start Epson Print CD: Windows: Double-click the Print CD icon on the disc you loaded in the printer: 1. Follow these steps to add text and provided background designs, or add your own designs or photos. You can use...
Basics
Page 32
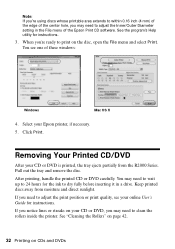
...'s Help utility for instructions. Keep printed discs away from the R2000 Series. If you notice lines or streaks on your online User's Guide for instructions. 3. When you're ready to adjust the print position or print quality, see one of these windows: Windows Mac OS X 4. Note: If you're using discs whose printable area extends to within 0.16 inch (4 mm) of the edge of the center hole, you may need to adjust...
...'s Help utility for instructions. Keep printed discs away from the R2000 Series. If you notice lines or streaks on your online User's Guide for instructions. 3. When you're ready to adjust the print position or print quality, see one of these windows: Windows Mac OS X 4. Note: If you're using discs whose printable area extends to within 0.16 inch (4 mm) of the edge of the center hole, you may need to adjust...
Basics
Page 33
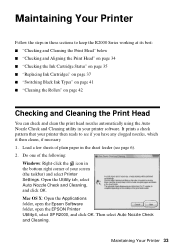
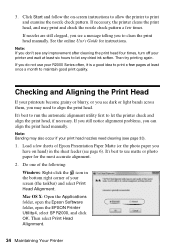
...; "Checking and Cleaning the Print Head" below ■ "Checking and Aligning the Print Head" on page 34 ■ "Checking the Ink Cartridge Status" on page 35 ■ "Replacing Ink Cartridges" on page 37 ■ "Switching Black Ink Types" on page 41 ■ "Cleaning the Rollers" on page 42 Checking and Cleaning the Print Head You can check and clean the print head nozzles automatically using the Auto Nozzle Check and Cleaning utility in the bottom right corner of your printer software. Mac OS X: Open the Applications folder, open the Epson Software folder, open the EPSON Printer...
...; "Checking and Cleaning the Print Head" below ■ "Checking and Aligning the Print Head" on page 34 ■ "Checking the Ink Cartridge Status" on page 35 ■ "Replacing Ink Cartridges" on page 37 ■ "Switching Black Ink Types" on page 41 ■ "Cleaning the Rollers" on page 42 Checking and Cleaning the Print Head You can check and clean the print head nozzles automatically using the Auto Nozzle Check and Cleaning utility in the bottom right corner of your printer software. Mac OS X: Open the Applications folder, open the Epson Software folder, open the EPSON Printer...
Basics
Page 34
... following: Windows: Right-click the icon in the sheet feeder (see any dried ink soften. See the online User's Guide for the most accurate alignment. 2. If you can align the print head manually. Checking and Aligning the Print Head If your print head nozzles need to let any improvement after cleaning the print head four times, turn off your screen (the taskbar) and select Print Head Alignment. Mac OS X: Open the Applications folder, open the Epson Software folder, open the EPSON Printer Utility4, select SP R2000, and...
... following: Windows: Right-click the icon in the sheet feeder (see any dried ink soften. See the online User's Guide for the most accurate alignment. 2. If you can align the print head manually. Checking and Aligning the Print Head If your print head nozzles need to let any improvement after cleaning the print head four times, turn off your screen (the taskbar) and select Print Head Alignment. Mac OS X: Open the Applications folder, open the Epson Software folder, open the EPSON Printer Utility4, select SP R2000, and...
Basics
Page 35
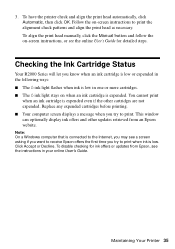
... expended cartridges before printing. ■ Your computer screen displays a message when you may see the instructions in one or more cartridges. ■ The H ink light stays on when an ink cartridge is expended even if the other updates retrieved from Epson, see a screen asking if you want to print the alignment check patterns and align the print head as necessary. Checking the Ink Cartridge Status Your R2000 Series will let you try to print when ink is low in your online User's Guide...
... expended cartridges before printing. ■ Your computer screen displays a message when you may see the instructions in one or more cartridges. ■ The H ink light stays on when an ink cartridge is expended even if the other updates retrieved from Epson, see a screen asking if you want to print the alignment check patterns and align the print head as necessary. Checking the Ink Cartridge Status Your R2000 Series will let you try to print when ink is low in your online User's Guide...
Basics
Page 41
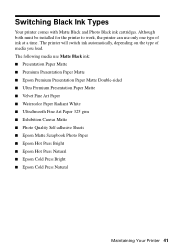
...; Watercolor Paper Radiant White ■ UltraSmooth Fine Art Paper 325 gsm ■ Exhibition Canvas Matte ■ Photo Quality Self-adhesive Sheets ■ Epson Matte Scrapbook Photo Paper ■ Epson Hot Press Bright ■ Epson Hot Press Natural ■ Epson Cold Press Bright ■ Epson Cold Press Natural Maintaining Your Printer 41 The following media use only one type of media you load. Switching Black Ink Types Your printer comes with Matte Black and Photo Black ink cartridges. The printer will switch ink automatically...
...; Watercolor Paper Radiant White ■ UltraSmooth Fine Art Paper 325 gsm ■ Exhibition Canvas Matte ■ Photo Quality Self-adhesive Sheets ■ Epson Matte Scrapbook Photo Paper ■ Epson Hot Press Bright ■ Epson Hot Press Natural ■ Epson Cold Press Bright ■ Epson Cold Press Natural Maintaining Your Printer 41 The following media use only one type of media you load. Switching Black Ink Types Your printer comes with Matte Black and Photo Black ink cartridges. The printer will switch ink automatically...
Basics
Page 43
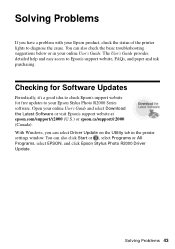
... your Epson product, check the status of the printer lights to Epson's support website, FAQs, and paper and ink purchasing. Solving Problems If you can also click Start or , select Programs or All Programs, select EPSON, and click Epson Stylus Photo R2000 Driver Update. With Windows, you have a problem with your Epson Stylus Photo R2000 Series software. The User's Guide provides detailed help and easy access to diagnose the cause. You can select Driver Update on the Utility tab in your online User's Guide and select Download...
... your Epson product, check the status of the printer lights to Epson's support website, FAQs, and paper and ink purchasing. Solving Problems If you can also click Start or , select Programs or All Programs, select EPSON, and click Epson Stylus Photo R2000 Driver Update. With Windows, you have a problem with your Epson Stylus Photo R2000 Series software. The User's Guide provides detailed help and easy access to diagnose the cause. You can select Driver Update on the Utility tab in your online User's Guide and select Download...
Basics
Page 45
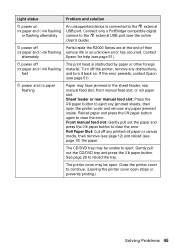
... I paper flashing Paper may be open the printer cover and remove any jammed sheets, then open . P power off the printer, remove any printed roll paper or canvas media, then remove (see page 12) and reload (see the online User's Guide). Front manual feed slot: Gently pull out the paper and press the I paper and H ink flashing service life or an unknown error has occurred. Turn off Parts inside . The CD/DVD tray may have jammed in the sheet feeder, rear manual feed slot, front manual feed slot, or roll paper slot...
... I paper flashing Paper may be open the printer cover and remove any jammed sheets, then open . P power off the printer, remove any printed roll paper or canvas media, then remove (see page 12) and reload (see the online User's Guide). Front manual feed slot: Gently pull out the paper and press the I paper and H ink flashing service life or an unknown error has occurred. Turn off Parts inside . The CD/DVD tray may have jammed in the sheet feeder, rear manual feed slot, front manual feed slot, or roll paper slot...
Basics
Page 46
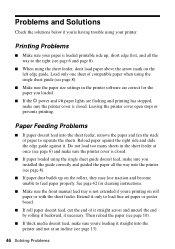
... load fine art paper or poster board. ■ If roll paper doesn't feed, cut the end of compatible paper when using the sheet feeder, don't load paper above the arrow mark on the left edge guide. Printing Problems ■ Make sure your printer. Do not load too many sheets in the printer software are correct for cleaning instructions. ■ Make sure the front manual feed tray is closed . ■ If paper loaded using the single sheet guide doesn't feed, make sure you installed the guide correctly and guided the paper...
... load fine art paper or poster board. ■ If roll paper doesn't feed, cut the end of compatible paper when using the sheet feeder, don't load paper above the arrow mark on the left edge guide. Printing Problems ■ Make sure your printer. Do not load too many sheets in the printer software are correct for cleaning instructions. ■ Make sure the front manual feed tray is closed . ■ If paper loaded using the single sheet guide doesn't feed, make sure you installed the guide correctly and guided the paper...
Basics
Page 47
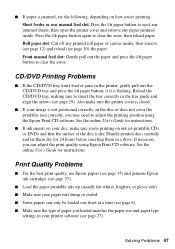
... a drive. ■ If paper is jammed, try the following, depending on ink jet-printable CDs or DVDs and that the surface of paper you loaded matches the paper size and paper type settings in your image is not positioned correctly on the disc or does not cover the printable area correctly, you may need to adjust the printing position using Epson Print CD software. Press the I paper button to eject any jammed sheets, then open the printer cover and remove any printed roll paper...
... a drive. ■ If paper is jammed, try the following, depending on ink jet-printable CDs or DVDs and that the surface of paper you loaded matches the paper size and paper type settings in your image is not positioned correctly on the disc or does not cover the printable area correctly, you may need to adjust the printing position using Epson Print CD software. Press the I paper button to eject any jammed sheets, then open the printer cover and remove any printed roll paper...

Basics
Page 48
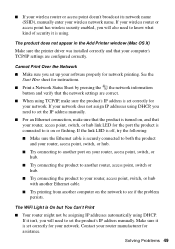
... connecting to the 802.11n standard. Avoid placing it is working correctly. ■ Make sure that the product is within range of plain paper between each print. ■ If you notice light or dark bands across your router or access point. 48 Solving Problems Network Problems If you notice jagged vertical lines, run the print head alignment utility to check and align the print head (see page 34). ■ The ink cartridges may need to...
... connecting to the 802.11n standard. Avoid placing it is working correctly. ■ Make sure that the product is within range of plain paper between each print. ■ If you notice light or dark bands across your router or access point. 48 Solving Problems Network Problems If you notice jagged vertical lines, run the print head alignment utility to check and align the print head (see page 34). ■ The ink cartridges may need to...
Basics
Page 49
... the Add Printer window (Mac OS X) Make sure the printer driver was installed correctly and that your wireless router or access point has wireless security enabled, you need to set correctly for network printing. ■ If your wireless router or access point doesn't broadcast its network name (SSID), manually enter your computer's TCP/IP settings are correct. ■ When using DHCP. The WiFi Light is set correctly for the port the product is connected to is using DHCP, you...
... the Add Printer window (Mac OS X) Make sure the printer driver was installed correctly and that your wireless router or access point has wireless security enabled, you need to set correctly for network printing. ■ If your wireless router or access point doesn't broadcast its network name (SSID), manually enter your computer's TCP/IP settings are correct. ■ When using DHCP. The WiFi Light is set correctly for the port the product is connected to is using DHCP, you...
Start Here
Page 2
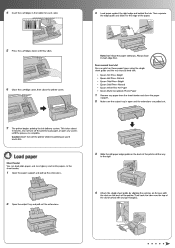
... the tab. Caution: Don't turn off the printer while it is priming or you'll waste ink. 0 Load paper Sheet feeder You can print on these paper types using the single sheet guide and the rear manual feed slot: Epson Hot Press Bright Epson Hot Press Natural Epson Cold Press Bright Epson Cold Press Natural Epson Velvet Fine Art Paper Epson Matte Scrapbook Photo Paper Remove any covers until they click. 6 Close the cartridge cover, then close the paper support.
... the tab. Caution: Don't turn off the printer while it is priming or you'll waste ink. 0 Load paper Sheet feeder You can print on these paper types using the single sheet guide and the rear manual feed slot: Epson Hot Press Bright Epson Hot Press Natural Epson Cold Press Bright Epson Cold Press Natural Epson Velvet Fine Art Paper Epson Matte Scrapbook Photo Paper Remove any covers until they click. 6 Close the cartridge cover, then close the paper support.
Start Here
Page 3
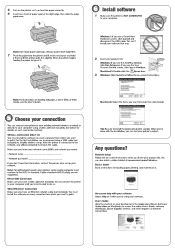
... Ethernet® Connection Make sure you can load the paper correctly. 6 Insert one Tip: Be sure to access the online User's Guide, software downloads, Epson Supplies Central®, and more (requires an Internet connection). You must conform to do so. O Install software 1 Make sure the printer is connected to the network, you want to your network name (SSID) and network password: - iI I I - You can also watch a video tutorial at: epson.com/support/wireless. Epson Stylus Photo 82000 Series Software Installation ...0••...
... Ethernet® Connection Make sure you can load the paper correctly. 6 Insert one Tip: Be sure to access the online User's Guide, software downloads, Epson Supplies Central®, and more (requires an Internet connection). You must conform to do so. O Install software 1 Make sure the printer is connected to the network, you want to your network name (SSID) and network password: - iI I I - You can also watch a video tutorial at: epson.com/support/wireless. Epson Stylus Photo 82000 Series Software Installation ...0••...
Start Here
Page 4
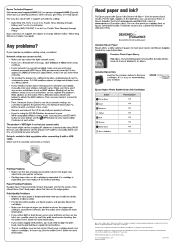
.... EPSON ULTRACHROME Epson Stylus Photo R2000 Series Ink Cartridges Color • Photo Black • Cyan al Magenta Yellow Red Orange • Matte Black Gloss Optimizer Part number 159 159 159 159 159 159 159 159 S Printing Problems • Make sure the size of support are too faint, run a nozzle check to find my printer after connecting it with a USB cable. If a cartridge is expended. Check your needs; The product's WiFi light is unable to see what network settings are set, register the product's MAC address...
.... EPSON ULTRACHROME Epson Stylus Photo R2000 Series Ink Cartridges Color • Photo Black • Cyan al Magenta Yellow Red Orange • Matte Black Gloss Optimizer Part number 159 159 159 159 159 159 159 159 S Printing Problems • Make sure the size of support are too faint, run a nozzle check to find my printer after connecting it with a USB cable. If a cartridge is expended. Check your needs; The product's WiFi light is unable to see what network settings are set, register the product's MAC address...


