
Printer Guide
Page 5
... 19 1 Setting Up the Printer 21 Unpacking and Assembling the Printer 21 Unpacking and Assembling the Stand 22 Unpacking the Printer and Mounting It on the Stand 25 Attaching the Paper Basket (Epson Stylus Pro 7900 27 Attaching the Paper Basket (Epson Stylus Pro 9900 34 Completing Setup and Connecting the Power Cord 42 Installing Ink 46 Connecting to Your System...
... 19 1 Setting Up the Printer 21 Unpacking and Assembling the Printer 21 Unpacking and Assembling the Stand 22 Unpacking the Printer and Mounting It on the Stand 25 Attaching the Paper Basket (Epson Stylus Pro 7900 27 Attaching the Paper Basket (Epson Stylus Pro 9900 34 Completing Setup and Connecting the Power Cord 42 Installing Ink 46 Connecting to Your System...

Printer Guide
Page 8
... 159 Switching Black Ink Mode 163 Changing the Date and Time 163 Using Maintenance Mode 164 Replacing the Paper Cutter 165 Removing the Old Cutter 165 Installing the New Cutter 167 Replacing the Maintenance Tank 169 Cleaning the Printer 171 Transporting or Storing the Printer 173 Preparing the Printer for Shipment 173 Moving the...
... 159 Switching Black Ink Mode 163 Changing the Date and Time 163 Using Maintenance Mode 164 Replacing the Paper Cutter 165 Removing the Old Cutter 165 Installing the New Cutter 167 Replacing the Maintenance Tank 169 Cleaning the Printer 171 Transporting or Storing the Printer 173 Preparing the Printer for Shipment 173 Moving the...
Printer Guide
Page 9
Contents | 9 Uninstalling and Reinstalling the Printer Driver 193 Macintosh OS X 10.5 193 Macintosh OS X 10.4 193 Windows 193 A Specifications 195 Environmental 195 Electrical 195 Dimensions and Weight 196 Printer Interfaces 196 Safety Approvals 196 Media 196 Roll Paper 196 Cut Sheets 197 Printable Area 199 Ink Cartridges 199 Index 201 9
Contents | 9 Uninstalling and Reinstalling the Printer Driver 193 Macintosh OS X 10.5 193 Macintosh OS X 10.4 193 Windows 193 A Specifications 195 Environmental 195 Electrical 195 Dimensions and Weight 196 Printer Interfaces 196 Safety Approvals 196 Media 196 Roll Paper 196 Cut Sheets 197 Printable Area 199 Ink Cartridges 199 Index 201 9

Printer Guide
Page 11
...'s Guide on a network. It also tells you use and printer maintenance-loading paper, replacing ink cartridges and other components, cleaning and aligning the print head, and using the Epson® printer drivers, and replacing ink cartridges. Tips contain additional hints on setting up and using your printer on the CD-ROM provides additional information about your...
...'s Guide on a network. It also tells you use and printer maintenance-loading paper, replacing ink cartridges and other components, cleaning and aligning the print head, and using the Epson® printer drivers, and replacing ink cartridges. Tips contain additional hints on setting up and using your printer on the CD-ROM provides additional information about your...
Printer Guide
Page 12
... for a complete list. Options and Accessories Your Epson Stylus® Pro 7900/9900 offers these user-replaceable items: Consumables and user-replaceable parts Part Replacement maintenance tank (see page 169) Replacement paper cutter (see page 165) Roll media adapters (2) Replacement 44-inch Take-Up Reel Core (Pro 9900 only) Ink Cartridges Part number C12C890191 C12C815331 C12C811241 C815121...
... for a complete list. Options and Accessories Your Epson Stylus® Pro 7900/9900 offers these user-replaceable items: Consumables and user-replaceable parts Part Replacement maintenance tank (see page 169) Replacement paper cutter (see page 165) Roll media adapters (2) Replacement 44-inch Take-Up Reel Core (Pro 9900 only) Ink Cartridges Part number C12C890191 C12C815331 C12C811241 C815121...

Printer Guide
Page 15
... use the equipment safely and effectively. • The Epson Stylus Pro 7900 weighs about 186 lb (84.5 kg) and the Epson Stylus Pro 9900 weighs about 256 lb (116 kg) without the stand, paper basket, ink, or paper. Use of power source indicated on the label. • Connect the printer to rapid changes in fire or electric shock. •...
... use the equipment safely and effectively. • The Epson Stylus Pro 7900 weighs about 186 lb (84.5 kg) and the Epson Stylus Pro 9900 weighs about 256 lb (116 kg) without the stand, paper basket, ink, or paper. Use of power source indicated on the label. • Connect the printer to rapid changes in fire or electric shock. •...
Printer Guide
Page 17
... port, making covers or plugs unnecessary, but care is consumed because the printer automatically performs a reliability check. • If you to prevent ink from a cold storage site, allow it to warm up the ink cartridge within six months of the ink cartridge. Introduction | 17 Caution: Do not use too much force when you shake...
... port, making covers or plugs unnecessary, but care is consumed because the printer automatically performs a reliability check. • If you to prevent ink from a cold storage site, allow it to warm up the ink cartridge within six months of the ink cartridge. Introduction | 17 Caution: Do not use too much force when you shake...

Printer Guide
Page 18
Front Roll paper holder Roll paper cover Front cover Control panel Ink bay Paper basket Back Interface connector for optional equipment USB interface for the Pro 7900 unless otherwise noted. 18 | Introduction Printer Parts These illustrations show the Epson Stylus Pro 9900, but the parts are the same for computer Ink bay Casters Network interface Maintenance tank (Pro 9900 includes two tanks, one on each side of printer) 18 AC inlet
Front Roll paper holder Roll paper cover Front cover Control panel Ink bay Paper basket Back Interface connector for optional equipment USB interface for the Pro 7900 unless otherwise noted. 18 | Introduction Printer Parts These illustrations show the Epson Stylus Pro 9900, but the parts are the same for computer Ink bay Casters Network interface Maintenance tank (Pro 9900 includes two tanks, one on each side of printer) 18 AC inlet
Printer Guide
Page 19
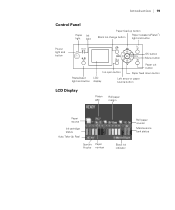
Introduction | 19 Control Panel Paper Ink light light Paper feed up button Black ink change button Paper release (ePlaten™) light and button Power light and button OK button Menu button Pause/reset light and button Ink open button Paper cut button Paper feed down button LCD display Left arrow or paper source button LCD Display Platen gap Roll paper margin Paper source Ink cartridge status Auto Take-Up Reel Spectro Paper Proofer number Roll paper counter Maintenance tank status Black ink indicator 19
Introduction | 19 Control Panel Paper Ink light light Paper feed up button Black ink change button Paper release (ePlaten™) light and button Power light and button OK button Menu button Pause/reset light and button Ink open button Paper cut button Paper feed down button LCD display Left arrow or paper source button LCD Display Platen gap Roll paper margin Paper source Ink cartridge status Auto Take-Up Reel Spectro Paper Proofer number Roll paper counter Maintenance tank status Black ink indicator 19

Printer Guide
Page 21
... sunlight, excessive heat, moisture, or dust. 21 Chapter 1: Setting Up the Printer This chapter includes the following information: • Unpacking and assembling the Pro 7900 and Pro 9900 • Connecting the power cord • Installing ink • Connecting to your printer and its stand. Note: When choosing a place for the printer, leave adequate room for the Epson Stylus Pro 9900 21
... sunlight, excessive heat, moisture, or dust. 21 Chapter 1: Setting Up the Printer This chapter includes the following information: • Unpacking and assembling the Pro 7900 and Pro 9900 • Connecting the power cord • Installing ink • Connecting to your printer and its stand. Note: When choosing a place for the printer, leave adequate room for the Epson Stylus Pro 9900 21
Printer Guide
Page 25
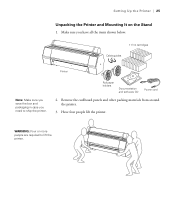
Have four people lift the printer. Remove the cardboard panels and other packing materials from around the printer. 3. Make sure you have all the items shown below: 11 Ink cartridges Cable guides Printer Note: Make sure you save the box and packaging in case you need to lift the printer. 25 Roll paper holders Documentation and software CD Power cord 2. Setting Up the Printer | 25 Unpacking the Printer and Mounting It on the Stand 1. WARNING: Four or more people are required to ship the printer.
Have four people lift the printer. Remove the cardboard panels and other packing materials from around the printer. 3. Make sure you have all the items shown below: 11 Ink cartridges Cable guides Printer Note: Make sure you save the box and packaging in case you need to lift the printer. 25 Roll paper holders Documentation and software CD Power cord 2. Setting Up the Printer | 25 Unpacking the Printer and Mounting It on the Stand 1. WARNING: Four or more people are required to ship the printer.
Printer Guide
Page 43
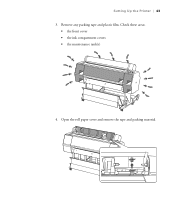
Setting Up the Printer | 43 3. Open the roll paper cover and remove the tape and packing material. 43 Check these areas: • the front cover • the ink compartment covers • the maintenance tank(s) 4. Remove any packing tape and plastic film.
Setting Up the Printer | 43 3. Open the roll paper cover and remove the tape and packing material. 43 Check these areas: • the front cover • the ink compartment covers • the maintenance tank(s) 4. Remove any packing tape and plastic film.

Printer Guide
Page 46
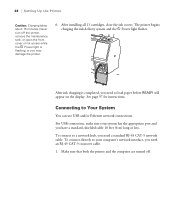
Press the P Power button to be used. In a moment, INSTALL INK CARTRIDGE appears on the printer. 46 | Setting Up the Printer Installing Ink Use the ink cartridges that came with your printer for most of cartridges as soon as possible. 1. The cartridges shipped with your printer are provided mainly to charge the ink system. Open both ink covers. 46 Make sure you order a new set of the ink in each cartridge to turn on the LCD display and the ink covers pop open slightly. 2. During the initial installation process, it is normal for initial ink charging.
Press the P Power button to be used. In a moment, INSTALL INK CARTRIDGE appears on the printer. 46 | Setting Up the Printer Installing Ink Use the ink cartridges that came with your printer for most of cartridges as soon as possible. 1. The cartridges shipped with your printer are provided mainly to charge the ink system. Open both ink covers. 46 Make sure you order a new set of the ink in each cartridge to turn on the LCD display and the ink covers pop open slightly. 2. During the initial installation process, it is normal for initial ink charging.

Printer Guide
Page 47
...Cartridge 7 Vivid Magenta (VM) 8 Light Black (LK) 9 Green (G) 10 Light Light Black (LLK) 11 Vivid Light Magenta (VLM) 5. Remove the ink cartridges from their packages, then gently shake each cartridge. Cartridge 1 Cyan (C) 2 Orange (O) 3 Yellow (Y) 4 Light Cyan (LC) 5 Matte Black (MK) ...6 Photo Black (PK) Right ink bay Slot no . Setting Up the Printer | 47 3. Make sure you insert each cartridge with the arrow pointing toward the printer, then insert it into its slot until it clicks into the correct slot. 47 Left...
...Cartridge 7 Vivid Magenta (VM) 8 Light Black (LK) 9 Green (G) 10 Light Light Black (LLK) 11 Vivid Light Magenta (VLM) 5. Remove the ink cartridges from their packages, then gently shake each cartridge. Cartridge 1 Cyan (C) 2 Orange (O) 3 Yellow (Y) 4 Light Cyan (LC) 5 Matte Black (MK) ...6 Photo Black (PK) Right ink bay Slot no . Setting Up the Printer | 47 3. Make sure you insert each cartridge with the arrow pointing toward the printer, then insert it into its slot until it clicks into the correct slot. 47 Left...
Printer Guide
Page 48
...READY will appear on the display. The printer begins charging the ink delivery system and the P Power light flashes. After ink charging is flashing, or you may damage the printer. 6. Make sure that both the printer and the computer are turned off the printer, remove the maintenance tank, or open the... front cover or ink covers while the P Power light is completed, ...
...READY will appear on the display. The printer begins charging the ink delivery system and the P Power light flashes. After ink charging is flashing, or you may damage the printer. 6. Make sure that both the printer and the computer are turned off the printer, remove the maintenance tank, or open the... front cover or ink covers while the P Power light is completed, ...
Printer Guide
Page 84
Choose the number with non-Epson media and avoid smearing the ink. Press u or d to the menu. Then press l to return to select the number that you see white lines on thin media (under number 4 are the most even. You can make similar settings using the printer driver software. Press l, then d to HIGH ... X) or page 141 (Windows). • PAPER FEED ADJUST helps eliminate banding. You can use the TEST PRINT menu to save each pass to allow ink to dry on the page. • PAPER SUCTION lets you decrease the paper suction level when printing on your prints, or a higher value if you...
Choose the number with non-Epson media and avoid smearing the ink. Press u or d to the menu. Then press l to return to select the number that you see white lines on thin media (under number 4 are the most even. You can make similar settings using the printer driver software. Press l, then d to HIGH ... X) or page 141 (Windows). • PAPER FEED ADJUST helps eliminate banding. You can use the TEST PRINT menu to save each pass to allow ink to dry on the page. • PAPER SUCTION lets you decrease the paper suction level when printing on your prints, or a higher value if you...
Printer Guide
Page 97
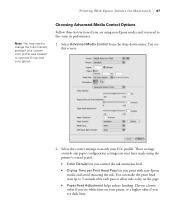
...up to 5 seconds after each pass to allow ink to fine-tune its performance. 1. Printing With Epson Drivers for Macintosh | 97 Note: You may have made using non-Epson media and you print with non-Epson media and avoid smearing the ink. Select Advanced Media Control from the drop-down ... Options Follow these instructions if you are using the printer's control panel. • Color Density lets you control the ink saturation level. • Drying Time per Print Head Pass lets you need to change the Color Density setting if your custom color profile was created to match your prints, or a...
...up to 5 seconds after each pass to allow ink to fine-tune its performance. 1. Printing With Epson Drivers for Macintosh | 97 Note: You may have made using non-Epson media and you print with non-Epson media and avoid smearing the ink. Select Advanced Media Control from the drop-down ... Options Follow these instructions if you are using the printer's control panel. • Color Density lets you control the ink saturation level. • Drying Time per Print Head Pass lets you need to change the Color Density setting if your custom color profile was created to match your prints, or a...
Printer Guide
Page 101
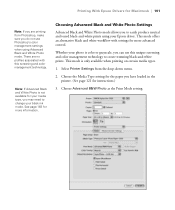
...Photo Settings Advanced Black and White Photo mode allows you may need to change your black ink mode. Select Printer Settings from Photoshop, make sure you do not use this screening and color management technology. Note: If Advanced Black and White Photo is not available for your media ... available when printing on certain media types. 1. This mode is color or grayscale, you have loaded in the printer. (See page 121 for instructions.) 3. Whether your Epson driver. See page 163 for more advanced control. Printing With Epson Drivers for Macintosh | 101 Note: If you are no profiles ...
...Photo Settings Advanced Black and White Photo mode allows you may need to change your black ink mode. Select Printer Settings from Photoshop, make sure you do not use this screening and color management technology. Note: If Advanced Black and White Photo is not available for your media ... available when printing on certain media types. 1. This mode is color or grayscale, you have loaded in the printer. (See page 121 for instructions.) 3. Whether your Epson driver. See page 163 for more advanced control. Printing With Epson Drivers for Macintosh | 101 Note: If you are no profiles ...
Printer Guide
Page 103
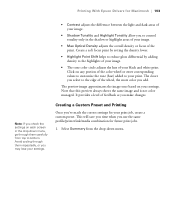
Note that this preview always shows the same image and is not color managed. It provides a level of the print. Select Summary from top to bottom. Printing With Epson Drivers for your print job, create a custom preset. Create a soft focus print by setting the density lower. • Highlight ...hue) added to the highlights of your image. • The tone color circle adjusts the hue of your image. • Max Optical Density adjusts the overall density or focus of feedback as you use the same profile/printer/ink/media combination for future print jobs. 1. Creating a Custom Preset and ...
Note that this preview always shows the same image and is not color managed. It provides a level of the print. Select Summary from top to bottom. Printing With Epson Drivers for your print job, create a custom preset. Create a soft focus print by setting the density lower. • Highlight ...hue) added to the highlights of your image. • The tone color circle adjusts the hue of your image. • Max Optical Density adjusts the overall density or focus of feedback as you use the same profile/printer/ink/media combination for future print jobs. 1. Creating a Custom Preset and ...

Printer Guide
Page 112
... | Printing With Epson Drivers for brightness, contrast, saturation, and CMY inks. Choosing Color Management Options Follow these instructions to use the driver to perform color management, make sure you are using the color management settings in your application. 112 Select one of the following settings: • Color Controls to turn it off color management in the printer driver. 1.
... | Printing With Epson Drivers for brightness, contrast, saturation, and CMY inks. Choosing Color Management Options Follow these instructions to use the driver to perform color management, make sure you are using the color management settings in your application. 112 Select one of the following settings: • Color Controls to turn it off color management in the printer driver. 1.


