Printer Guide
Page 6
... Media 57 Selecting Media for Your Printer 57 Available Epson Special Media 58 Guidelines for Using Epson Media 58 Using Roll Paper 59 Roll Paper Guidelines 59 Selecting the Paper Type 59 Setting Up Automatic Media Tracking and Identification 61 Placing the Paper in the Printer 62 Loading the Paper for Printing 68 Cutting Paper Manually with the Built-in Cutter...
... Media 57 Selecting Media for Your Printer 57 Available Epson Special Media 58 Guidelines for Using Epson Media 58 Using Roll Paper 59 Roll Paper Guidelines 59 Selecting the Paper Type 59 Setting Up Automatic Media Tracking and Identification 61 Placing the Paper in the Printer 62 Loading the Paper for Printing 68 Cutting Paper Manually with the Built-in Cutter...

Printer Guide
Page 11
..., and provides troubleshooting tips in case you use and printer maintenance-loading paper, replacing ink cartridges and other components, cleaning and aligning the print head, and using the Epson® printer drivers, and replacing ink cartridges. Cautions must be observed to avoid damage to your printer, loading paper, using the printer's menu system. Tips contain additional hints on the...
..., and provides troubleshooting tips in case you use and printer maintenance-loading paper, replacing ink cartridges and other components, cleaning and aligning the print head, and using the Epson® printer drivers, and replacing ink cartridges. Cautions must be observed to avoid damage to your printer, loading paper, using the printer's menu system. Tips contain additional hints on the...
Printer Guide
Page 48
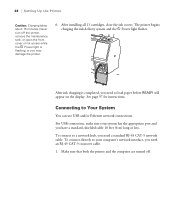
...cable. 1. 48 | Setting Up the Printer Caution: Charging takes about 15 minutes. After ink charging is flashing, or you need to your system has the appropriate port and you need a standard RJ-45 CAT-5 network cable. To connect directly to load paper before READY will appear on the display. .... After installing all 11 cartridges, close the ink covers. See page 57 for instructions. Make sure that both the printer and the computer are turned off the printer, remove the maintenance tank, or open the front cover or ink covers while the P Power light is completed, you...
...cable. 1. 48 | Setting Up the Printer Caution: Charging takes about 15 minutes. After ink charging is flashing, or you need to your system has the appropriate port and you need a standard RJ-45 CAT-5 network cable. To connect directly to load paper before READY will appear on the display. .... After installing all 11 cartridges, close the ink covers. See page 57 for instructions. Make sure that both the printer and the computer are turned off the printer, remove the maintenance tank, or open the front cover or ink covers while the P Power light is completed, you...
Printer Guide
Page 55
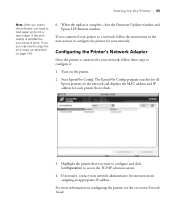
... and IP address for all Epson printers on assigning an appropriate IP address. Configuring the Printer's Network Adapter Once the printer is done. Turn on -screen Network Guide. 55 If necessary, contact your network, follow the instructions in the next section to configure the printer for your setup is connected to load paper and print a test image...
... and IP address for all Epson printers on assigning an appropriate IP address. Configuring the Printer's Network Adapter Once the printer is done. Turn on -screen Network Guide. 55 If necessary, contact your network, follow the instructions in the next section to configure the printer for your setup is connected to load paper and print a test image...

Printer Guide
Page 74
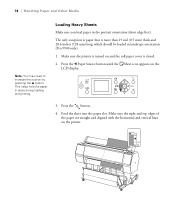
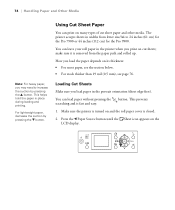
... For heavy paper, you load the paper depends on many types of cut sheets; You can print on its thickness: • For most paper, see the section below. • For stock thicker than 19 mil (0.5 mm), see page 76. How you may need to 24 inches (61 cm) for the Pro 7900 or 44 ...inches (112 cm) for the Pro 9900. Press the l Paper Source button until the Sheet icon appears on and the roll paper cover is closed. 2. make sure it is removed from letter size/A4 to increase the suction by pressing the d button. The printer accepts sheets in place during loading ...
... For heavy paper, you load the paper depends on many types of cut sheets; You can print on its thickness: • For most paper, see the section below. • For stock thicker than 19 mil (0.5 mm), see page 76. How you may need to 24 inches (61 cm) for the Pro 7900 or 44 ...inches (112 cm) for the Pro 9900. Press the l Paper Source button until the Sheet icon appears on and the roll paper cover is closed. 2. make sure it is removed from letter size/A4 to increase the suction by pressing the d button. The printer accepts sheets in place during loading ...
Printer Guide
Page 76
... the Sheet icon appears on the printer. 76 Loading Heavy Sheets Make sure you load paper in landscape orientation (Pro 9900 only). 1. This helps hold the paper in place during loading and printing. Feed the sheet into the paper slot. Press the button. 4. Make sure the printer is turned on and the roll paper cover is more than 19 mil...
... the Sheet icon appears on the printer. 76 Loading Heavy Sheets Make sure you load paper in landscape orientation (Pro 9900 only). 1. This helps hold the paper in place during loading and printing. Feed the sheet into the paper slot. Press the button. 4. Make sure the printer is turned on and the roll paper cover is more than 19 mil...
Printer Guide
Page 178
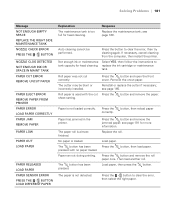
... BORDERLESS ERROR LOAD A SUPPORTED PAPER SIZE OR LOAD PAPER CORRECTLY The borderless setting is selected and paper that the power cord is not connected correctly. CALL FOR SERVICE An error has occurred. Note the error number, then turn it back on or flash. If the message remains after restarting the printer several times, contact Epson as described...
... BORDERLESS ERROR LOAD A SUPPORTED PAPER SIZE OR LOAD PAPER CORRECTLY The borderless setting is selected and paper that the power cord is not connected correctly. CALL FOR SERVICE An error has occurred. Note the error number, then turn it back on or flash. If the message remains after restarting the printer several times, contact Epson as described...
Printer Guide
Page 181
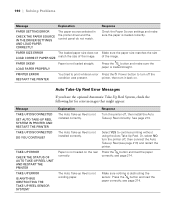
... ERROR PRESS THE BUTTON NOZZLE CLOG DETECTED NOT ENOUGH INK OR SPACE IN MAINT TANK PAPER CUT ERROR REMOVE UNCUT PAPER PAPER EJECT ERROR REMOVE PAPER FROM PRINTER PAPER ERROR LOAD PAPER CORRECTLY PAPER JAM REMOVE PAPER PAPER LOW PAPER OUT LOAD PAPER PAPER RELEASED LOAD PAPER PAPER SENSOR ERROR PRESS THE BUTTON LOAD DIFFERENT PAPER Explanation The maintenance tank is too full for head cleaning. The cutter may be...
... ERROR PRESS THE BUTTON NOZZLE CLOG DETECTED NOT ENOUGH INK OR SPACE IN MAINT TANK PAPER CUT ERROR REMOVE UNCUT PAPER PAPER EJECT ERROR REMOVE PAPER FROM PRINTER PAPER ERROR LOAD PAPER CORRECTLY PAPER JAM REMOVE PAPER PAPER LOW PAPER OUT LOAD PAPER PAPER RELEASED LOAD PAPER PAPER SENSOR ERROR PRESS THE BUTTON LOAD DIFFERENT PAPER Explanation The maintenance tank is too full for head cleaning. The cutter may be...

Printer Guide
Page 182
... page 87 (Macintosh) or page 123 (Windows). 182 printer, then turn off the condition was present. PAPER SKEW LOAD PAPER PROPERLY Paper is loaded straight. 182 | Solving Problems Message Explanation Response PAPER SETTING ERROR CHECK THE PAPER SOURCE IN THE DRIVER SETTINGS AND LOAD PAPER CORRECTLY The paper source selected in the printer driver and the control panel do not match. Check...
... page 87 (Macintosh) or page 123 (Windows). 182 printer, then turn off the condition was present. PAPER SKEW LOAD PAPER PROPERLY Paper is loaded straight. 182 | Solving Problems Message Explanation Response PAPER SETTING ERROR CHECK THE PAPER SOURCE IN THE DRIVER SETTINGS AND LOAD PAPER CORRECTLY The paper source selected in the printer driver and the control panel do not match. Check...
User's Guide
Page 11
... information on setting up and using the Epson® printer drivers, and replacing ink cartridges. Attach it working at its best, and provides troubleshooting tips in case you how to maintain your printer to keep it to your equipment. Notes contain important information about your printer, loading paper, using your printer. 11 Cautions must be observed to...
... information on setting up and using the Epson® printer drivers, and replacing ink cartridges. Attach it working at its best, and provides troubleshooting tips in case you how to maintain your printer to keep it to your equipment. Notes contain important information about your printer, loading paper, using your printer. 11 Cautions must be observed to...

User's Guide
Page 48
.../or Ethernet network connections. The printer begins charging the ink delivery system and the P Power light flashes. Never turn off . 48 After ink charging is flashing, or you have a standard, shielded cable 10 feet (6 m) long or less. To connect to load paper before READY will appear on the... display. After installing all 11 cartridges, close the ink covers. See page 57 for instructions. 48 | Setting Up the Printer Caution: Charging takes about 15 minutes. For USB connection, make sure ...
.../or Ethernet network connections. The printer begins charging the ink delivery system and the P Power light flashes. Never turn off . 48 After ink charging is flashing, or you have a standard, shielded cable 10 feet (6 m) long or less. To connect to load paper before READY will appear on the... display. After installing all 11 cartridges, close the ink covers. See page 57 for instructions. 48 | Setting Up the Printer Caution: Charging takes about 15 minutes. For USB connection, make sure ...

User's Guide
Page 55
.... 6. If you connected your network. The EpsonNet Config program searches for all Epson printers on assigning an appropriate IP address. When the update is satisfactory, your network administrator for your printer to a network, follow these steps to configure it finds. 3. Start EpsonNet ... selection screen. 4. Configuring the Printer's Network Adapter Once the printer is done. If the print quality is complete, close the Firmware Updater window and Epson LFP Remote window. If not, you want to configure and click Configuration to load paper and print a test image. ...
.... 6. If you connected your network. The EpsonNet Config program searches for all Epson printers on assigning an appropriate IP address. When the update is satisfactory, your network administrator for your printer to a network, follow these steps to configure it finds. 3. Start EpsonNet ... selection screen. 4. Configuring the Printer's Network Adapter Once the printer is done. If the print quality is complete, close the Firmware Updater window and Epson LFP Remote window. If not, you want to configure and click Configuration to load paper and print a test image. ...
User's Guide
Page 74
... inches (61 cm) for the Pro 7900 or 44 inches (112 cm) for the Pro 9900. make sure it is fast and easy. You can leave your roll paper in the printer when you load paper in place during loading and printing. Note: For heavy paper, you load the paper depends on and the roll paper cover is turned on its thickness...
... inches (61 cm) for the Pro 7900 or 44 inches (112 cm) for the Pro 9900. make sure it is fast and easy. You can leave your roll paper in the printer when you load paper in place during loading and printing. Note: For heavy paper, you load the paper depends on and the roll paper cover is turned on its thickness...

User's Guide
Page 76
Make sure the printer is turned on and the roll paper cover is more than 19 mil (0.5 mm) thick and 28.6 inches (728 mm) long, which should be loaded in landscape orientation (Pro 9900 only). 1. Make sure the right and top edges of the paper are straight and aligned with the horizontal and vertical lines on...
Make sure the printer is turned on and the roll paper cover is more than 19 mil (0.5 mm) thick and 28.6 inches (728 mm) long, which should be loaded in landscape orientation (Pro 9900 only). 1. Make sure the right and top edges of the paper are straight and aligned with the horizontal and vertical lines on...

User's Guide
Page 186
... remains after restarting the printer several times, contact Epson as described on the printer and in alphabetical order and includes an explanation and instructions for correcting the problem. Message Explanation Response BORDERLESS ERROR LOAD A SUPPORTED PAPER SIZE OR LOAD PAPER CORRECTLY The borderless setting is selected and paper that the power cord is not loaded correctly. Then check the...
... remains after restarting the printer several times, contact Epson as described on the printer and in alphabetical order and includes an explanation and instructions for correcting the problem. Message Explanation Response BORDERLESS ERROR LOAD A SUPPORTED PAPER SIZE OR LOAD PAPER CORRECTLY The borderless setting is selected and paper that the power cord is not loaded correctly. Then check the...

User's Guide
Page 189
... RIGHT SIDE MAINTENANCE TANK NOZZLE CHECK ERROR PRESS THE BUTTON NOZZLE CLOG DETECTED NOT ENOUGH INK OR SPACE IN MAINT TANK PAPER CUT ERROR REMOVE UNCUT PAPER PAPER EJECT ERROR REMOVE PAPER FROM PRINTER PAPER ERROR LOAD PAPER CORRECTLY PAPER JAM REMOVE PAPER PAPER LOW PAPER OUT LOAD PAPER PAPER RELEASED LOAD PAPER PAPER SENSOR ERROR PRESS THE BUTTON LOAD DIFFERENT PAPER Explanation The maintenance tank is used with no...
... RIGHT SIDE MAINTENANCE TANK NOZZLE CHECK ERROR PRESS THE BUTTON NOZZLE CLOG DETECTED NOT ENOUGH INK OR SPACE IN MAINT TANK PAPER CUT ERROR REMOVE UNCUT PAPER PAPER EJECT ERROR REMOVE PAPER FROM PRINTER PAPER ERROR LOAD PAPER CORRECTLY PAPER JAM REMOVE PAPER PAPER LOW PAPER OUT LOAD PAPER PAPER RELEASED LOAD PAPER PAPER SENSOR ERROR PRESS THE BUTTON LOAD DIFFERENT PAPER Explanation The maintenance tank is used with no...
User's Guide
Page 190
... it back on the reel correctly. Press the button and make sure the paper is not winding paper. The Auto Take-up Reel (see page 213) and restart the printer. printer, then turn the printer off the condition was present. PAPER SKEW LOAD PAPER PROPERLY Paper is not installed correctly. see page 214. 190 The Auto Take-up Reel...
... it back on the reel correctly. Press the button and make sure the paper is not winding paper. The Auto Take-up Reel (see page 213) and restart the printer. printer, then turn the printer off the condition was present. PAPER SKEW LOAD PAPER PROPERLY Paper is not installed correctly. see page 214. 190 The Auto Take-up Reel...
User's Guide
Page 214
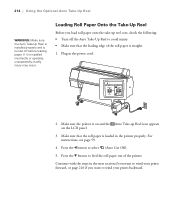
...see page 59. 4. Make sure that the leading edge of the printer. Plug in the power cord. 2. Press the l button to feed the roll paper out of the roll paper is installed incorrectly or operates unexpectedly, bodily injury may occur. Loading Roll Paper Onto the Take-Up Reel Before you want to avoid injury. •...; Make sure that the roll paper is loaded in the next section if you want to wind your prints backward. 214 Make sure the printer is turned off the Auto Take-Up Reel to wind your prints forward, or page 216 ...
...see page 59. 4. Make sure that the leading edge of the printer. Plug in the power cord. 2. Press the l button to feed the roll paper out of the roll paper is installed incorrectly or operates unexpectedly, bodily injury may occur. Loading Roll Paper Onto the Take-Up Reel Before you want to avoid injury. •...; Make sure that the roll paper is loaded in the next section if you want to wind your prints backward. 214 Make sure the printer is turned off the Auto Take-Up Reel to wind your prints forward, or page 216 ...
User's Guide
Page 225
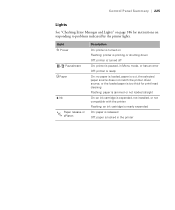
.../reset b Paper B Ink Paper release or ePlaten Description On: printer is turned on Flashing: printer is printing or shutting down Off: printer is turned off On: printer is paused, in Menu mode, or has an error Off: printer is ready On: no paper is loaded, paper is out, the selected paper source does not match the printer driver source, or the loaded paper is...
.../reset b Paper B Ink Paper release or ePlaten Description On: printer is turned on Flashing: printer is printing or shutting down Off: printer is turned off On: printer is paused, in Menu mode, or has an error Off: printer is ready On: no paper is loaded, paper is out, the selected paper source does not match the printer driver source, or the loaded paper is...
User's Guide
Page 227
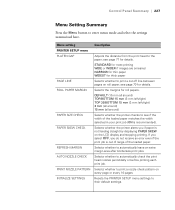
Resets the PRINTER SETUP menu settings to automatically leave an extra margin area after borderless print jobs. Selects the margins for details. Selects whether to their default settings. 227 If you select OFF, you if paper is out of range of the loaded paper matches the width ...loaded paper. Selects whether to print a cut off line between pages on every page or every 10 pages. STANDARD for most printing WIDE or WIDER if images are smeared NARROW for thin paper WIDEST for thick paper Selects whether to print a nozzle check pattern on roll paper; Menu setting PRINTER...
Resets the PRINTER SETUP menu settings to automatically leave an extra margin area after borderless print jobs. Selects the margins for details. Selects whether to their default settings. 227 If you select OFF, you if paper is out of range of the loaded paper matches the width ...loaded paper. Selects whether to print a cut off line between pages on every page or every 10 pages. STANDARD for most printing WIDE or WIDER if images are smeared NARROW for thin paper WIDEST for thick paper Selects whether to print a nozzle check pattern on roll paper; Menu setting PRINTER...


