Product Information Guide
Page 1
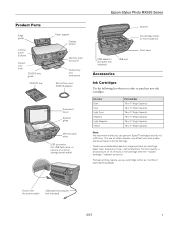
...(for power cable) USB cable for computer (not included) USB port Accessories Ink Cartridges Use the following list when you order or purchase new ink cartridges: Ink color Black Cyan Light Cyan Magenta Light Magenta Yellow Part number 78 or 77 (High...replace cartridge" indicator comes on images printed, print settings, paper type, frequency of use up a cartridge within six months of ink remains in printer damage. For best printing results, use , and temperature. Yields vary considerably based on . The use genuine Epson® cartridges and do not refill them. Epson Stylus Photo RX595...
...(for power cable) USB cable for computer (not included) USB port Accessories Ink Cartridges Use the following list when you order or purchase new ink cartridges: Ink color Black Cyan Light Cyan Magenta Light Magenta Yellow Part number 78 or 77 (High...replace cartridge" indicator comes on images printed, print settings, paper type, frequency of use up a cartridge within six months of ink remains in printer damage. For best printing results, use , and temperature. Yields vary considerably based on . The use genuine Epson® cartridges and do not refill them. Epson Stylus Photo RX595...
Product Information Guide
Page 4
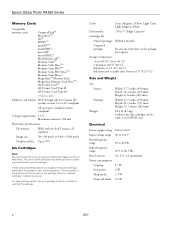
For print quality, a small amount of ink remains in printer damage. Color Cyan, Magenta, Yellow, Light Cyan, Light...V 50 to 60 Hz 49.5 to 999 Ink Cartridges Note: We recommend that you use of files: Up to 60.5 Hz 0.6 A (1.2 A maximum) 15 W 4W 1.3 W 0.2 W 4 5/07 Epson Stylus Photo RX595 Series Memory Cards Compatible memory cards CompactFlash®...printing results, use , and temperature. The use genuine Epson cartridges and do not refill them. Voltage requirements 3.3 V Maximum current is usable after the "replace cartridge" indicator comes on images printed, print settings, ...
For print quality, a small amount of ink remains in printer damage. Color Cyan, Magenta, Yellow, Light Cyan, Light...V 50 to 60 Hz 49.5 to 999 Ink Cartridges Note: We recommend that you use of files: Up to 60.5 Hz 0.6 A (1.2 A maximum) 15 W 4W 1.3 W 0.2 W 4 5/07 Epson Stylus Photo RX595 Series Memory Cards Compatible memory cards CompactFlash®...printing results, use , and temperature. The use genuine Epson cartridges and do not refill them. Voltage requirements 3.3 V Maximum current is usable after the "replace cartridge" indicator comes on images printed, print settings, ...
Product Information Guide
Page 13
...Epson Stylus Photo RX595 Series Note: PhotoEnhance uses a sophisticated face recognition technology to exit. 5/07 13 You can use the Min setting. If a cartridge is expended, you want to fit in the subject's face. Printing From Other External Devices If you have a digital camera that include faces. Replace... options for the photo, turn on Print Info. (Affects all photos you see if it if your camera too, if included with an intentional color cast, such as digital cameras, PDAs (Personal Digital Assistants), phones, and computers. Checking the Ink Supply You can ...
...Epson Stylus Photo RX595 Series Note: PhotoEnhance uses a sophisticated face recognition technology to exit. 5/07 13 You can use the Min setting. If a cartridge is expended, you want to fit in the subject's face. Printing From Other External Devices If you have a digital camera that include faces. Replace... options for the photo, turn on Print Info. (Affects all photos you see if it if your camera too, if included with an intentional color cast, such as digital cameras, PDAs (Personal Digital Assistants), phones, and computers. Checking the Ink Supply You can ...
Product Information Guide
Page 14
... cartridge from the bottom of the cartridge. Once you replace all the cartridges securely. Press OK to remove it carefully. Open the cartridge cover. 4. Epson Stylus Photo RX595 Series Removing and Installing Ink Cartridges Caution: Do not open ink cartridge packages until you are vacuum packed to install the ink. Open the scanner. 5. Caution: Never turn off the...
... cartridge from the bottom of the cartridge. Once you replace all the cartridges securely. Press OK to remove it carefully. Open the cartridge cover. 4. Epson Stylus Photo RX595 Series Removing and Installing Ink Cartridges Caution: Do not open ink cartridge packages until you are vacuum packed to install the ink. Open the scanner. 5. Caution: Never turn off the...
Product Information Guide
Page 15
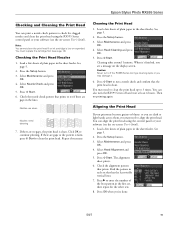
... head up to 3 times. Note: You cannot clean the print head if an ink cartridge is clean. If there are clean Nozzles need to align the print head. ...the Setup button. 3. Check the alignment pattern that has the least visible vertical lines. 7. Epson Stylus Photo RX595 Series Checking and Cleaning the Print Head You can print a nozzle check pattern to check for ... Head Cleaning and press OK. 5. You must replace the cartridge first (see a message on -screen User's Guide). 1. Caution: Never turn the RX595 Series off the RX595 Series during a cleaning cycle or you may damage...
... head up to 3 times. Note: You cannot clean the print head if an ink cartridge is clean. If there are clean Nozzles need to align the print head. ...the Setup button. 3. Check the alignment pattern that has the least visible vertical lines. 7. Epson Stylus Photo RX595 Series Checking and Cleaning the Print Head You can print a nozzle check pattern to check for ... Head Cleaning and press OK. 5. You must replace the cartridge first (see a message on -screen User's Guide). 1. Caution: Never turn the RX595 Series off the RX595 Series during a cleaning cycle or you may damage...
Quick Reference Guide
Page 2
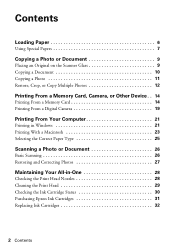
... Document 9 Placing an Original on the Scanner Glass 9 Copying a Document 10 Copying a Photo 11 Restore, Crop, or Copy Multiple Photos 12 Printing From a Memory Card, Camera, or Other Device . . 14 Printing From a Memory Card 14 Printing From a Digital Camera... Selecting the Correct Paper Type 25 Scanning a Photo or Document 26 Basic Scanning 26 Restoring and Correcting Photos 27 Maintaining Your All-in-One 28 Checking the Print Head Nozzles 28 Cleaning the Print Head 29 Checking the Ink Cartridge Status 30 Purchasing Epson Ink Cartridges 31 Replacing Ink Cartridges 32 2 Contents
... Document 9 Placing an Original on the Scanner Glass 9 Copying a Document 10 Copying a Photo 11 Restore, Crop, or Copy Multiple Photos 12 Printing From a Memory Card, Camera, or Other Device . . 14 Printing From a Memory Card 14 Printing From a Digital Camera... Selecting the Correct Paper Type 25 Scanning a Photo or Document 26 Basic Scanning 26 Restoring and Correcting Photos 27 Maintaining Your All-in-One 28 Checking the Print Head Nozzles 28 Cleaning the Print Head 29 Checking the Ink Cartridge Status 30 Purchasing Epson Ink Cartridges 31 Replacing Ink Cartridges 32 2 Contents
Quick Reference Guide
Page 28
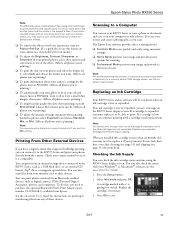
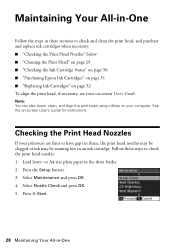
... necessary: ■ "Checking the Print Head Nozzles" below ■ "Cleaning the Print Head" on page 29 ■ "Checking the Ink Cartridge Status" on page 30 ■ "Purchasing Epson Ink Cartridges" on page 31 ■ "Replacing Ink Cartridges" on page 32 To align the print head, if necessary, see your on-screen User's Guide. Checking the...
... necessary: ■ "Checking the Print Head Nozzles" below ■ "Cleaning the Print Head" on page 29 ■ "Checking the Ink Cartridge Status" on page 30 ■ "Purchasing Epson Ink Cartridges" on page 31 ■ "Replacing Ink Cartridges" on page 32 To align the print head, if necessary, see your on-screen User's Guide. Checking the...
Quick Reference Guide
Page 29
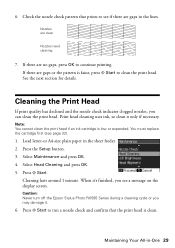
...OK to see if there are gaps in the lines. Print head cleaning uses ink, so clean it . 6. Select Head Cleaning and press OK. 5. Caution: Never turn off the Epson Stylus Photo RX595 Series during a cleaning cycle or you may damage it only if necessary. When ...it's finished, you can clean the print head. Note: You cannot clean the print head if an ink cartridge is faint, press x Start to run a nozzle check and confirm that prints to continue printing. You must replace...
...OK to see if there are gaps in the lines. Print head cleaning uses ink, so clean it . 6. Select Head Cleaning and press OK. 5. Caution: Never turn off the Epson Stylus Photo RX595 Series during a cleaning cycle or you may damage it only if necessary. When ...it's finished, you can clean the print head. Note: You cannot clean the print head if an ink cartridge is faint, press x Start to run a nozzle check and confirm that prints to continue printing. You must replace...
Quick Reference Guide
Page 30
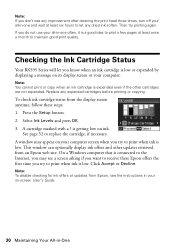
Note: You cannot print or copy when an ink cartridge is low. To check ink cartridge status from the display screen anytime, follow these Epson offers the first time you try to print when ink is expended even if the other updates retrieved from Epson, see the instructions in your computer. A ... display screen or your on ink. Select Ink Levels and press OK. 3. Checking the Ink Cartridge Status Your RX595 Series will let you know when an ink cartridge is a good idea to print a few pages at least six hours to let any dried ink soften. Replace any expended cartridges before printing ...
Note: You cannot print or copy when an ink cartridge is low. To check ink cartridge status from the display screen anytime, follow these Epson offers the first time you try to print when ink is expended even if the other updates retrieved from Epson, see the instructions in your computer. A ... display screen or your on ink. Select Ink Levels and press OK. 3. Checking the Ink Cartridge Status Your RX595 Series will let you know when an ink cartridge is a good idea to print a few pages at least six hours to let any dried ink soften. Replace any expended cartridges before printing ...
Quick Reference Guide
Page 31
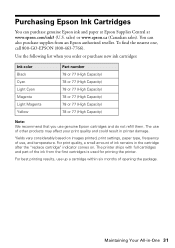
Use the following list when you order or purchase new ink cartridges: Ink color Black Cyan Light Cyan Magenta Light Magenta Yellow Part number 78 or 77 (High Capacity) 78 or 77 (High Capacity) 78 or 77 (High Capacity) ... cartridge after the "replace cartridge" indicator comes on images printed, print settings, paper type, frequency of use up a cartridge within six months of ink remains in -One 31 To find the nearest one, call 800-GO-EPSON (800-463-7766). sales) or www.epson.ca (Canadian sales). You can purchase genuine Epson ink and paper at...
Use the following list when you order or purchase new ink cartridges: Ink color Black Cyan Light Cyan Magenta Light Magenta Yellow Part number 78 or 77 (High Capacity) 78 or 77 (High Capacity) 78 or 77 (High Capacity) ... cartridge after the "replace cartridge" indicator comes on images printed, print settings, paper type, frequency of use up a cartridge within six months of ink remains in -One 31 To find the nearest one, call 800-GO-EPSON (800-463-7766). sales) or www.epson.ca (Canadian sales). You can purchase genuine Epson ink and paper at...
Quick Reference Guide
Page 32
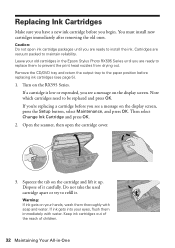
..., and press OK. If you're replacing a cartridge before you see a message on your hands, wash them thoroughly with water. If ink gets into your old cartridges in -One Cartridges are vacuum packed to install the ink. Dispose of children. 32 Maintaining Your All-in the Epson Stylus Photo RX595 Series until you are ready to maintain...
..., and press OK. If you're replacing a cartridge before you see a message on your hands, wash them thoroughly with water. If ink gets into your old cartridges in -One Cartridges are vacuum packed to install the ink. Dispose of children. 32 Maintaining Your All-in the Epson Stylus Photo RX595 Series until you are ready to maintain...
Quick Reference Guide
Page 33
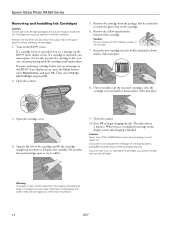
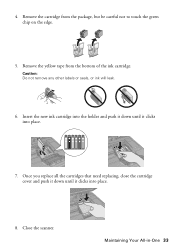
Remove the cartridge from the bottom of the ink cartridge. Maintaining Your All-in-One 33 Caution: Do not remove any other labels or seals, or ink will leak. 6. Once you replace all the cartridges that need replacing, close the cartridge cover and push it down until it clicks into place. 8. Insert the new ink cartridge into the holder and push it down until it clicks into place. 7. Remove the yellow tape from the package, but be careful not to touch the green chip on the edge. 5. Close the scanner. 4.
Remove the cartridge from the bottom of the ink cartridge. Maintaining Your All-in-One 33 Caution: Do not remove any other labels or seals, or ink will leak. 6. Once you replace all the cartridges that need replacing, close the cartridge cover and push it down until it clicks into place. 8. Insert the new ink cartridge into the holder and push it down until it clicks into place. 7. Remove the yellow tape from the package, but be careful not to touch the green chip on the edge. 5. Close the scanner. 4.
Quick Reference Guide
Page 34
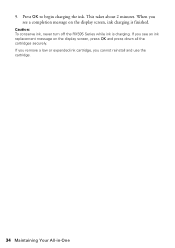
When you see an ink replacement message on the display screen, ink charging is charging. If you cannot reinstall and use the cartridge. 34 Maintaining Your All-in-One If you remove a low or expended ink cartridge, you see a completion message on the display screen, press OK and press down all the cartridges securely. 9. Caution: To conserve ink, never turn off the RX595 Series while ink is finished. This takes about 2 minutes. Press OK to begin charging the ink.
When you see an ink replacement message on the display screen, ink charging is charging. If you cannot reinstall and use the cartridge. 34 Maintaining Your All-in-One If you remove a low or expended ink cartridge, you see a completion message on the display screen, press OK and press down all the cartridges securely. 9. Caution: To conserve ink, never turn off the RX595 Series while ink is finished. This takes about 2 minutes. Press OK to begin charging the ink.
Quick Reference Guide
Page 38
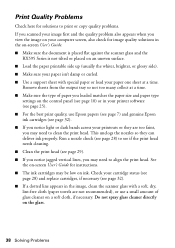
... may be low on ink. See the on-screen User's Guide for image quality solutions in the on-screen User's Guide. ■ Make sure the document is placed flat against the scanner glass and the RX595 Series is not tilted or placed on an uneven surface. ■ Load the paper printable... (see page 7) and genuine Epson ink cartridges (see page 10) or in the image, clean the scanner glass with special paper or load your printouts or they can deliver ink properly. Check your cartridge status (see page 28) and replace cartridges, if necessary (see page 32). ■ If a dotted line appears in your...
... may be low on ink. See the on-screen User's Guide for image quality solutions in the on-screen User's Guide. ■ Make sure the document is placed flat against the scanner glass and the RX595 Series is not tilted or placed on an uneven surface. ■ Load the paper printable... (see page 7) and genuine Epson ink cartridges (see page 10) or in the image, clean the scanner glass with special paper or load your printouts or they can deliver ink properly. Check your cartridge status (see page 28) and replace cartridges, if necessary (see page 32). ■ If a dotted line appears in your...
Quick Reference Guide
Page 42
...Epson within five (5) working days of receipt of the replacement printer in the United States and Canada. damage, maintenance or service from defects in the United States or Canada, will not exceed the original retail selling price of original purchase. This warranty does not cover ribbons, ink... this limited warranty. This warranty does not cover any color change or fading of prints or reimbursement of one . If service is not transferable. Epson America, Inc., Limited Warranty What Is Covered: Epson America, Inc. ("Epson") warrants to the original retail purchaser that you fail ...
...Epson within five (5) working days of receipt of the replacement printer in the United States and Canada. damage, maintenance or service from defects in the United States or Canada, will not exceed the original retail selling price of original purchase. This warranty does not cover ribbons, ink... this limited warranty. This warranty does not cover any color change or fading of prints or reimbursement of one . If service is not transferable. Epson America, Inc., Limited Warranty What Is Covered: Epson America, Inc. ("Epson") warrants to the original retail purchaser that you fail ...


