Product Information Guide
Page 1
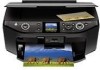
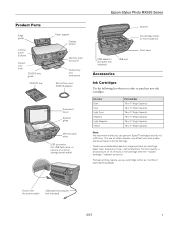
Epson Stylus Photo RX595 Series Product Parts Edge guide Control panel buttons Output tray lever CD/DVD tray guide CD/DVD tray Paper support Display screen Memory card slot cover Output tray and extensions Mini or 8-cm mini CD/DVD adapter Document cover Scanner glass Memory card slots USB connector (for USB flash drive, or camera or external storage device cable) Scanner Ink cartridge holder (in home position) Front cover USB cable for computer (not included) 5/07 1 Yields vary considerably based on images printed, print settings, paper type, frequency of other products may ...
Epson Stylus Photo RX595 Series Product Parts Edge guide Control panel buttons Output tray lever CD/DVD tray guide CD/DVD tray Paper support Display screen Memory card slot cover Output tray and extensions Mini or 8-cm mini CD/DVD adapter Document cover Scanner glass Memory card slots USB connector (for USB flash drive, or camera or external storage device cable) Scanner Ink cartridge holder (in home position) Front cover USB cable for computer (not included) 5/07 1 Yields vary considerably based on images printed, print settings, paper type, frequency of other products may ...
Product Information Guide
Page 3
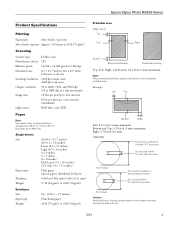
Epson Stylus Photo RX595 Series Product Specifications Printing Paper path Sheet feeder, top entry Sheet feeder capacity Approx. 120 sheets at 20 lb (75 g/m2) Scanning Scanner type Photoelectric device Effective pixels Document size Scanning resolution Output resolution Image data Light source Flatbed color CIS 10,200 × 14,040 pixels at 1200 dpi 8.5 × 11.7 inches (216 × 297 mm), US Letter or A4 size 1200 dpi (main scan) 2400 dpi (sub scan) 50 to 4800, 7200, and...
Epson Stylus Photo RX595 Series Product Specifications Printing Paper path Sheet feeder, top entry Sheet feeder capacity Approx. 120 sheets at 20 lb (75 g/m2) Scanning Scanner type Photoelectric device Effective pixels Document size Scanning resolution Output resolution Image data Light source Flatbed color CIS 10,200 × 14,040 pixels at 1200 dpi 8.5 × 11.7 inches (216 × 297 mm), US Letter or A4 size 1200 dpi (main scan) 2400 dpi (sub scan) 50 to 4800, 7200, and...
Product Information Guide
Page 6
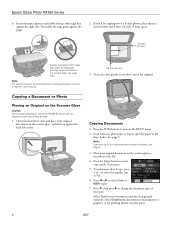
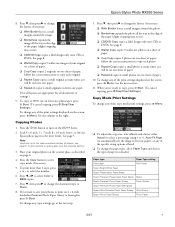
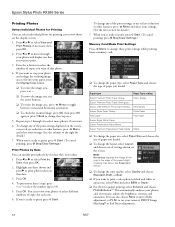
... printing photos on loading envelopes, see page 5. 3. to select the number (up to the recommended number of the RX595 Series or use the document cover as described to enter copy mode, if necessary. 5. Insert the paper, glossy or printable side up, short edge first, against the back left . 4. Then slide the edge guide against the paper. 2. Load letter-size plain paper or Epson specialty paper in the sheet feeder. Epson Stylus Photo RX595 Series 4. Note: For details on paper and instructions on plain paper...
... printing photos on loading envelopes, see page 5. 3. to select the number (up to the recommended number of the RX595 Series or use the document cover as described to enter copy mode, if necessary. 5. Insert the paper, glossy or printable side up, short edge first, against the back left . 4. Then slide the edge guide against the paper. 2. Load letter-size plain paper or Epson specialty paper in the sheet feeder. Epson Stylus Photo RX595 Series 4. Note: For details on paper and instructions on plain paper...
Product Information Guide
Page 7
...Glossy Epson Photo Paper Glossy Photo Paper 5/07 7 Epson Stylus Photo RX595 Series 8. Press d, then press r to change the document type to fit your photos to copy each photo. ❏ Repeat Copy copies a small photo as many times as it will fit on letter-size paper ❏ Repeat-4 copies 4 small originals on the screen, press x Menu. See page 8. ❏ Wallet Copy copies 9 wallet-size photos on a sheet of paper; When you're ready to copy, press x Start. (To cancel copying, press y Stop/Clear Settings.) Copy Mode Print Settings To change the paper type, select Paper Type...
...Glossy Epson Photo Paper Glossy Photo Paper 5/07 7 Epson Stylus Photo RX595 Series 8. Press d, then press r to change the document type to fit your photos to copy each photo. ❏ Repeat Copy copies a small photo as many times as it will fit on letter-size paper ❏ Repeat-4 copies 4 small originals on the screen, press x Menu. See page 8. ❏ Wallet Copy copies 9 wallet-size photos on a sheet of paper; When you're ready to copy, press x Start. (To cancel copying, press y Stop/Clear Settings.) Copy Mode Print Settings To change the paper type, select Paper Type...
Product Information Guide
Page 8
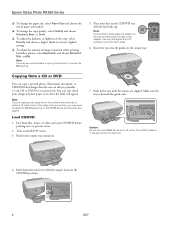
... the output tray into the guides in it to see white borders on your disc on the RX595 Series. 3. Turn on the CD/DVD tray with a CD or DVD loaded in the output tray. Copying Onto a CD or DVD You can also check your CD/DVD before printing on the RX595 Series control panel. Epson Stylus Photo RX595 Series ❏ To change the copy quality, select Quality and choose Standard, Best, or Draft. ❏ To adjust...
... the output tray into the guides in it to see white borders on your disc on the RX595 Series. 3. Turn on the CD/DVD tray with a CD or DVD loaded in the output tray. Copying Onto a CD or DVD You can also check your CD/DVD before printing on the RX595 Series control panel. Epson Stylus Photo RX595 Series ❏ To change the copy quality, select Quality and choose Standard, Best, or Draft. ❏ To adjust...

Product Information Guide
Page 9
... the scanner glass. 3. See the on-screen User's Guide for photos. (Do not select Text when copying onto a CD/DVD.) 7. Adjusting the ink density may be necessary for CD/DVD printing.) 3. to select the number (up to enter copy mode, if necessary. 4. Open the document cover. 2. Press the Copy button to 99). 5. Press l or r to adjust the position or ink density of the label, press x Menu. (Zoom, Paper Size, and Quality are set automatically...
... the scanner glass. 3. See the on-screen User's Guide for photos. (Do not select Text when copying onto a CD/DVD.) 7. Adjusting the ink density may be necessary for CD/DVD printing.) 3. to select the number (up to enter copy mode, if necessary. 4. Open the document cover. 2. Press the Copy button to 99). 5. Press l or r to adjust the position or ink density of the label, press x Menu. (Zoom, Paper Size, and Quality are set automatically...
Product Information Guide
Page 10
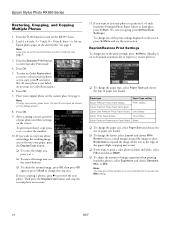
... the image area, use the Min setting. 10 5/07 Press the Specialty Print button to preview the next photo. Press OK. 5. Press the P On button to restore colors in the sheet feeder. Load 4 × 6-inch, 5 × 7-inch, 8 × 10-inch, letter-, or A4-size Epson photo paper in faded photos as you see the next section. Epson Stylus Photo RX595 Series Restoring, Cropping, and Copying Multiple Photos 1. To turn on Color Restoration to turn on the scanner glass...
... the image area, use the Min setting. 10 5/07 Press the Specialty Print button to preview the next photo. Press OK. 5. Press the P On button to restore colors in the sheet feeder. Load 4 × 6-inch, 5 × 7-inch, 8 × 10-inch, letter-, or A4-size Epson photo paper in faded photos as you see the next section. Epson Stylus Photo RX595 Series Restoring, Cropping, and Copying Multiple Photos 1. To turn on Color Restoration to turn on the scanner glass...
Product Information Guide
Page 11
... adapter Make sure the files on page 12. 5/07 11 You can view the photos on your card and select them ❏ Printing photos using DPOF (Digital Print Order Format) ❏ Printing an index sheet to select photos for printing ❏ Printing photo greeting cards ❏ Transferring files between the RX595 Series and a computer or other device ❏ Scanning to a memory card or other file types directly from a USB flash drive connected to the EXT. File format Image size Number of the RX595 Series memory card...
... adapter Make sure the files on page 12. 5/07 11 You can view the photos on your card and select them ❏ Printing photos using DPOF (Digital Print Order Format) ❏ Printing an index sheet to select photos for printing ❏ Printing photo greeting cards ❏ Transferring files between the RX595 Series and a computer or other device ❏ Scanning to a memory card or other file types directly from a USB flash drive connected to the EXT. File format Image size Number of the RX595 Series memory card...
Product Information Guide
Page 12
... settings shown on that photo. 4. If you loaded. ❏ To change the crop area. 5. Highlight any of paper you 're ready to print, press x Start. (To cancel printing, press y Stop/Clear Settings.) Print Photos by the date they were taken. 1. Press l or r to move the image area, use red eye reduction or other features, press x Menu and select your photos or select different numbers of copies for details.) 7. Epson Stylus Photo RX595 Series Printing Photos Select Individual Photos for Printing...
... settings shown on that photo. 4. If you loaded. ❏ To change the crop area. 5. Highlight any of paper you 're ready to print, press x Start. (To cancel printing, press y Stop/Clear Settings.) Print Photos by the date they were taken. 1. Press l or r to move the image area, use red eye reduction or other features, press x Menu and select your photos or select different numbers of copies for details.) 7. Epson Stylus Photo RX595 Series Printing Photos Select Individual Photos for Printing...
Product Information Guide
Page 13
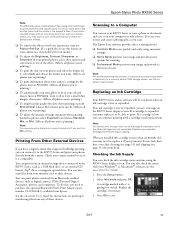
... scanning a photo or document to a memory card or USB storage device, see the onscreen User's Guide. Checking the Ink Supply You can print photos wirelessly from any expended cartridges before printing or copying. is low or expended. Turn it off to leave a small white margin, if necessary. (Affects all photos you can even restore and correct photographs as you must be able to print. The Epson Scan software provides three scanning modes: ❏ Full Auto Mode scans quickly and easily using the RX595 Series display screen...
... scanning a photo or document to a memory card or USB storage device, see the onscreen User's Guide. Checking the Ink Supply You can print photos wirelessly from any expended cartridges before printing or copying. is low or expended. Turn it off to leave a small white margin, if necessary. (Affects all photos you can even restore and correct photographs as you must be able to print. The Epson Scan software provides three scanning modes: ❏ Full Auto Mode scans quickly and easily using the RX595 Series display screen...
Product Information Guide
Page 15
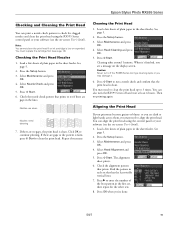
... the display screen. Then try printing again. Load a few sheets of plain paper in the sheet feeder. Check the alignment pattern that prints to see page 13). Checking the Print Head Nozzles 1. Press the Setup button. 3. The alignment sheet prints. 6. Repeat if necessary. When it's finished, you may need cleaning 7. You can also turn off and wait at least 6 hours. Epson Stylus Photo RX595 Series Checking and Cleaning the Print Head You can print a nozzle check pattern to check for the other sets. 8.
... the display screen. Then try printing again. Load a few sheets of plain paper in the sheet feeder. Check the alignment pattern that prints to see page 13). Checking the Print Head Nozzles 1. Press the Setup button. 3. The alignment sheet prints. 6. Repeat if necessary. When it's finished, you may need cleaning 7. You can also turn off and wait at least 6 hours. Epson Stylus Photo RX595 Series Checking and Cleaning the Print Head You can print a nozzle check pattern to check for the other sets. 8.
Product Information Guide
Page 16
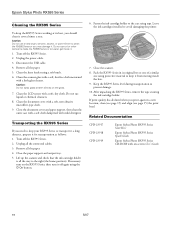
... the scanner and check that the ink cartridge holder is all the paper. 5. Leave the ink cartridges installed to the right (the home position). Caution: Do not use liquid or chemical cleansers. 8. Remove all the connected cables. 3. Related Documentation CPD-23917 CPD-23918 CPD-23919 Epson Stylus Photo RX595 Series Start Here Epson Stylus Photo RX595 Series Quick Guide Epson Stylus Photo RX595 Series CD-ROM with on-screen User's Guide 16 5/07 Turn off the RX595 Series. 2. Remove all the way to avoid damaging the printer. 7. Turn off the RX595 Series...
... the scanner and check that the ink cartridge holder is all the paper. 5. Leave the ink cartridges installed to the right (the home position). Caution: Do not use liquid or chemical cleansers. 8. Remove all the connected cables. 3. Related Documentation CPD-23917 CPD-23918 CPD-23919 Epson Stylus Photo RX595 Series Start Here Epson Stylus Photo RX595 Series Quick Guide Epson Stylus Photo RX595 Series CD-ROM with on-screen User's Guide 16 5/07 Turn off the RX595 Series. 2. Remove all the way to avoid damaging the printer. 7. Turn off the RX595 Series...
Quick Reference Guide
Page 4
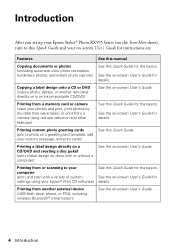
... you set up your Epson Stylus® Photo RX595 Series (see the Start Here sheet), turn to your Epson® Print CD software) See this Quick Guide for the basics. Printing custom photo greeting cards See this Quick Guide. (print a photo on a greeting card template, add your custom message, and print cards) Printing a label design directly on a CD/DVD and creating a disc jacket (print a label design on -screen User's Guide. Printing from or scanning to this Quick Guide and your photos and print, print photos by the date they were...
... you set up your Epson Stylus® Photo RX595 Series (see the Start Here sheet), turn to your Epson® Print CD software) See this Quick Guide for the basics. Printing custom photo greeting cards See this Quick Guide. (print a photo on a greeting card template, add your custom message, and print cards) Printing a label design directly on a CD/DVD and creating a disc jacket (print a label design on -screen User's Guide. Printing from or scanning to this Quick Guide and your photos and print, print photos by the date they were...
Quick Reference Guide
Page 14
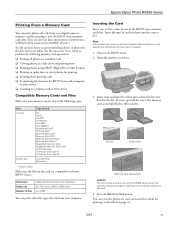
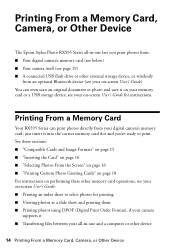
... camera supports it into the correct memory card slot and you print photos from your digital camera's memory card; Printing From a Memory Card Your RX595 Series can even scan an original document or photo and save it on your memory card or a USB storage device; Printing From a Memory Card, Camera, or Other Device The Epson Stylus Photo RX595 Series all -in -one and a computer or other external storage device, or wirelessly from an optional Bluetooth device (see your on-screen User's Guide) You can print photos directly from...
... camera supports it into the correct memory card slot and you print photos from your digital camera's memory card; Printing From a Memory Card Your RX595 Series can even scan an original document or photo and save it on your memory card or a USB storage device; Printing From a Memory Card, Camera, or Other Device The Epson Stylus Photo RX595 Series all -in -one and a computer or other external storage device, or wirelessly from an optional Bluetooth device (see your on-screen User's Guide) You can print photos directly from...
Quick Reference Guide
Page 18
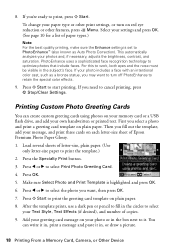
... want to turn on your memory card or a USB flash drive, and add your paper type or other features, press x Menu. Printing Custom Photo Greeting Cards You can write it in the box next to select your photo includes a face with an intentional color cast, such as Auto Photo Correction). Press the Specialty Print button. 3. Press l or r to cancel printing, press y Stop/Clear Settings. Press x Start to retain the special color effects. 9. PhotoEnhance uses a sophisticated face...
... want to turn on your memory card or a USB flash drive, and add your paper type or other features, press x Menu. Printing Custom Photo Greeting Cards You can write it in the box next to select your photo includes a face with an intentional color cast, such as Auto Photo Correction). Press the Specialty Print button. 3. Press l or r to cancel printing, press y Stop/Clear Settings. Press x Start to retain the special color effects. 9. PhotoEnhance uses a sophisticated face...
Quick Reference Guide
Page 26
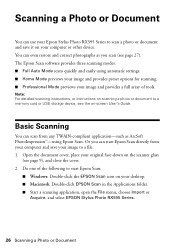
... scanning modes: ■ Full Auto Mode scans quickly and easily using Epson Scan. Basic Scanning You can scan from your computer and save it on your desktop. ■ Macintosh: Double-click EPSON Scan in the Applications folder. ■ Start a scanning application, open the File menu, choose Import or Acquire, and select EPSON Stylus Photo RX595 Series. 26 Scanning a Photo or Document Note: For detailed scanning instructions, or instructions on scanning a photo or document to a memory card or USB storage device, see the on the scanner glass (see page 27). Open the document cover...
... scanning modes: ■ Full Auto Mode scans quickly and easily using Epson Scan. Basic Scanning You can scan from your computer and save it on your desktop. ■ Macintosh: Double-click EPSON Scan in the Applications folder. ■ Start a scanning application, open the File menu, choose Import or Acquire, and select EPSON Stylus Photo RX595 Series. 26 Scanning a Photo or Document Note: For detailed scanning instructions, or instructions on scanning a photo or document to a memory card or USB storage device, see the on the scanner glass (see page 27). Open the document cover...
Quick Reference Guide
Page 35
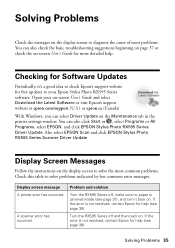
... basic troubleshooting suggestions beginning on page 37 or check the on-screen User's Guide for help (see page 39). Display screen message A printer error has occurred. A scanner error has occurred. Open your Epson Stylus Photo RX595 Series software. Problem and solution Turn the RX595 Series off and then back on. Solving Problems 35 You can select Driver Update on the Maintenance tab in the printer settings window. If the error is not resolved, contact Epson for more detailed help. Checking for free updates to your on-screen User's Guide and select Download the...
... basic troubleshooting suggestions beginning on page 37 or check the on-screen User's Guide for help (see page 39). Display screen message A printer error has occurred. A scanner error has occurred. Open your Epson Stylus Photo RX595 Series software. Problem and solution Turn the RX595 Series off and then back on. Solving Problems 35 You can select Driver Update on the Maintenance tab in the printer settings window. If the error is not resolved, contact Epson for more detailed help. Checking for free updates to your on-screen User's Guide and select Download the...
Quick Reference Guide
Page 38
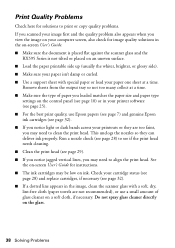
... print quality, use Epson papers (see page 7) and genuine Epson ink cartridges (see page 29). ■ If you notice jagged vertical lines, you may need to clean the print head. Print Quality Problems Check here for solutions to print or copy quality problems. If you scanned your image first and the quality problem also appears when you view the image on your computer screen, also check for instructions. ■ The ink cartridges may be low on ink. Remove sheets from the output tray...
... print quality, use Epson papers (see page 7) and genuine Epson ink cartridges (see page 29). ■ If you notice jagged vertical lines, you may need to clean the print head. Print Quality Problems Check here for solutions to print or copy quality problems. If you scanned your image first and the quality problem also appears when you view the image on your computer screen, also check for instructions. ■ The ink cartridges may be low on ink. Remove sheets from the output tray...
Quick Reference Guide
Page 41
... the RX595 Series. ■ Do not touch the flat white cable inside the RX595 Series or touch any cartridges during printing. ■ Install a new ink cartridge immediately after a thorough flushing, see a doctor immediately. Important Safety Instructions 41 if liquid has entered the product; Leaving cartridges uninstalled can dry out the print head and may be careful not to qualified service personnel under the following conditions: if the power...
... the RX595 Series. ■ Do not touch the flat white cable inside the RX595 Series or touch any cartridges during printing. ■ Install a new ink cartridge immediately after a thorough flushing, see a doctor immediately. Important Safety Instructions 41 if liquid has entered the product; Leaving cartridges uninstalled can dry out the print head and may be careful not to qualified service personnel under the following conditions: if the power...
Quick Reference Guide
Page 42
... label or serial number be removed or should the product fail to be properly maintained or fail to function properly as you . An Epson service technician will not exceed the original retail selling price of the covered printer. This warranty does not cover ribbons, ink cartridges or third party parts, components, or peripheral devices added to the Epson product after its option, exchange or repair the printer without charge...
... label or serial number be removed or should the product fail to be properly maintained or fail to function properly as you . An Epson service technician will not exceed the original retail selling price of the covered printer. This warranty does not cover ribbons, ink cartridges or third party parts, components, or peripheral devices added to the Epson product after its option, exchange or repair the printer without charge...


