Product Information Guide
Page 1
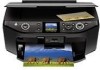
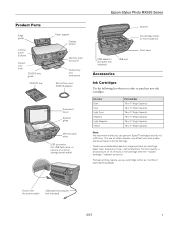
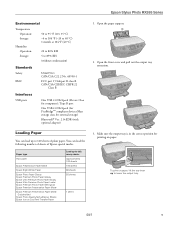
... USB cable for computer (not included) USB port Accessories Ink Cartridges Use the following list when you order or purchase new ink cartridges: Ink color Black Cyan Light Cyan Magenta Light Magenta Yellow Part number 78 or 77 (High Capacity) 78 or 77 (High Capacity) 78 or 77 ...77 (High Capacity) 78 or 77 (High Capacity) Note: We recommend that you use up a cartridge within six months of opening the package. Epson Stylus Photo RX595 Series Product Parts Edge guide Control panel buttons Output tray lever CD/DVD tray guide CD/DVD tray Paper support Display screen Memory card slot cover...
... USB cable for computer (not included) USB port Accessories Ink Cartridges Use the following list when you order or purchase new ink cartridges: Ink color Black Cyan Light Cyan Magenta Light Magenta Yellow Part number 78 or 77 (High Capacity) 78 or 77 (High Capacity) 78 or 77 ...77 (High Capacity) 78 or 77 (High Capacity) Note: We recommend that you use up a cartridge within six months of opening the package. Epson Stylus Photo RX595 Series Product Parts Edge guide Control panel buttons Output tray lever CD/DVD tray guide CD/DVD tray Paper support Display screen Memory card slot cover...
Product Information Guide
Page 3
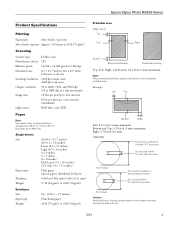
...0.7 inch (18 mm) area 12 cm discs Do not print outside of your discs to prevent staining the disc with ink. 5/07 3 Epson Stylus Photo RX595 Series Product Specifications Printing Paper path Sheet feeder, top entry Sheet feeder capacity Approx. 120 sheets at 20 lb (75 g/m2) Scanning Scanner type ...Photoelectric device Effective pixels Document size Scanning resolution Output resolution Image data Light source Flatbed color CIS 10,200 × 14,040 pixels at 1200 dpi 8.5 × 11.7 inches (216 × 297 mm), US Letter or A4...
...0.7 inch (18 mm) area 12 cm discs Do not print outside of your discs to prevent staining the disc with ink. 5/07 3 Epson Stylus Photo RX595 Series Product Specifications Printing Paper path Sheet feeder, top entry Sheet feeder capacity Approx. 120 sheets at 20 lb (75 g/m2) Scanning Scanner type ...Photoelectric device Effective pixels Document size Scanning resolution Output resolution Image data Light source Flatbed color CIS 10,200 × 14,040 pixels at 1200 dpi 8.5 × 11.7 inches (216 × 297 mm), US Letter or A4...
Product Information Guide
Page 4
...quality, a small amount of ink remains in the cartridge after 3 hours at 3.2 °F (-16 °C) Ink thaws and is 500 mA Photo data specifications File format: JPEG with the Exif Version 2.21 standard Image size: 80 × 80 pixels to 9200 × 9200 pixels Number of... opening the package. Color Cyan, Magenta, Yellow, Light Cyan, Light Magenta, Black Part number 78 or 77 (High Capacity) Cartridge life Opened package: Within 6 months Unopened package: Do not use of use, and temperature. Epson Stylus Photo RX595 Series Memory Cards Compatible memory cards ...
...quality, a small amount of ink remains in the cartridge after 3 hours at 3.2 °F (-16 °C) Ink thaws and is 500 mA Photo data specifications File format: JPEG with the Exif Version 2.21 standard Image size: 80 × 80 pixels to 9200 × 9200 pixels Number of... opening the package. Color Cyan, Magenta, Yellow, Light Cyan, Light Magenta, Black Part number 78 or 77 (High Capacity) Cartridge life Opened package: Within 6 months Unopened package: Do not use of use, and temperature. Epson Stylus Photo RX595 Series Memory Cards Compatible memory cards ...
Product Information Guide
Page 5
Epson Stylus Photo RX595 Series Environmental Temperature Operation: Storage: Humidity Operation: Storage: 50 to 95 °F (10 t 35 °C) -4 to 104 °F (-20 to 40 °C) 1 month at 104 °F (...
Epson Stylus Photo RX595 Series Environmental Temperature Operation: Storage: Humidity Operation: Storage: 50 to 95 °F (10 t 35 °C) -4 to 104 °F (-20 to 40 °C) 1 month at 104 °F (...
Product Information Guide
Page 6
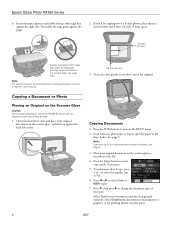
... against the back left . 4. Copying a Document or Photo Placing an Original on the Scanner Glass Caution: Do not place anything on the RX595 Series. 2. See page 5. Note: Load only up , short edge first, against the right side. Epson Stylus Photo RX595 Series 4. to select the number (up to enter copy mode... the paper. 2. Load letter-size plain paper or Epson specialty paper in the sheet feeder. To print more than 1 copy, press + or - Press l or r to change the document type, if necessary. Press d, then press r to select Color or B&W copies. 7. If you don't move the...
... against the back left . 4. Copying a Document or Photo Placing an Original on the Scanner Glass Caution: Do not place anything on the RX595 Series. 2. See page 5. Note: Load only up , short edge first, against the right side. Epson Stylus Photo RX595 Series 4. to select the number (up to enter copy mode... the paper. 2. Load letter-size plain paper or Epson specialty paper in the sheet feeder. To print more than 1 copy, press + or - Press l or r to change the document type, if necessary. Press d, then press r to select Color or B&W copies. 7. If you don't move the...
Product Information Guide
Page 7
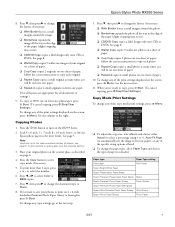
...Color or B&W copies. 7. See the next section. 11. Paper type Paper Type setting Plain paper Plain Paper Epson Bright White Paper Epson Presentation Paper Matte Epson Premium Presentation Paper Matte Matte Epson Premium Photo Paper Glossy Prem. Glossy Epson Premium Photo Paper Semi-gloss Epson Ultra Premium Photo Paper Glossy Ultra Glossy Epson Photo Paper Glossy Photo... Fit Page (to automatically size the image to the next step. 9. Epson Stylus Photo RX595 Series 8. Note: Load only up Copy copies 2 photos on the screen, press x Menu. Press the P On button to select...
...Color or B&W copies. 7. See the next section. 11. Paper type Paper Type setting Plain paper Plain Paper Epson Bright White Paper Epson Presentation Paper Matte Epson Premium Presentation Paper Matte Matte Epson Premium Photo Paper Glossy Prem. Glossy Epson Premium Photo Paper Semi-gloss Epson Ultra Premium Photo Paper Glossy Ultra Glossy Epson Photo Paper Glossy Photo... Fit Page (to automatically size the image to the next step. 9. Epson Stylus Photo RX595 Series 8. Note: Load only up Copy copies 2 photos on the screen, press x Menu. Press the P On button to select...
Product Information Guide
Page 8
... or lower (lighter) setting. ❏ To adjust the amount of paper you may see how the label will appear. Turn on the RX595 Series control panel. Epson Stylus Photo RX595 Series ❏ To change the paper size, select Paper Size and choose the size of image expansion when printing borderless... photos, select Expansion and choose Standard, Min, or Mid. Place your design on plain paper to see white borders on your...
... or lower (lighter) setting. ❏ To adjust the amount of paper you may see how the label will appear. Turn on the RX595 Series control panel. Epson Stylus Photo RX595 Series ❏ To change the paper size, select Paper Size and choose the size of image expansion when printing borderless... photos, select Expansion and choose Standard, Min, or Mid. Place your design on plain paper to see white borders on your...

Product Information Guide
Page 9
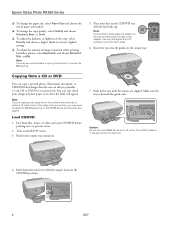
...print a design directly onto ink jet-printable CDs or DVDs to enter copy mode, if necessary. 4. See the on the scanner glass. 3. Epson Stylus Photo RX595 Series Placing an Original CD/DVD on the Scanner Glass You can place a CD/DVD label-side-down in the center of the scanner glass as ... the ink density may be necessary for instructions. 5/07 9 Close the document cover gently to CD/DVD Copy. 8. to select the number (up to select Color or B&W copies. 6. Press d, then press r to change the layout to keep your original CD/DVD label-side-down on your discs, select CD Inner...
...print a design directly onto ink jet-printable CDs or DVDs to enter copy mode, if necessary. 4. See the on the scanner glass. 3. Epson Stylus Photo RX595 Series Placing an Original CD/DVD on the Scanner Glass You can place a CD/DVD label-side-down in the center of the scanner glass as ... the ink density may be necessary for instructions. 5/07 9 Close the document cover gently to CD/DVD Copy. 8. to select the number (up to select Color or B&W copies. 6. Press d, then press r to change the layout to keep your original CD/DVD label-side-down on your discs, select CD Inner...
Product Information Guide
Page 10
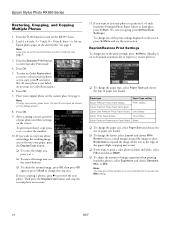
... buttons. ❏ To check the zoomed image, press OK, then press OK again or press y Back to print a color photo in faded photos as you want to change the paper type, select Paper Type and choose the type of the paper (slight cropping may see...the way to reprint or restore photos.) ❏ To change the crop area. Press OK. 7. Epson Stylus Photo RX595 Series Restoring, Cropping, and Copying Multiple Photos 1. Load 4 × 6-inch, 5 × 7-inch, 8 × 10-inch, letter-, or A4-size Epson photo paper in the sheet feeder. Note: To copy two photos, place them 1/4 inch (5...
... buttons. ❏ To check the zoomed image, press OK, then press OK again or press y Back to print a color photo in faded photos as you want to change the paper type, select Paper Type and choose the type of the paper (slight cropping may see...the way to reprint or restore photos.) ❏ To change the crop area. Press OK. 7. Epson Stylus Photo RX595 Series Restoring, Cropping, and Copying Multiple Photos 1. Load 4 × 6-inch, 5 × 7-inch, 8 × 10-inch, letter-, or A4-size Epson photo paper in the sheet feeder. Note: To copy two photos, place them 1/4 inch (5...
Product Information Guide
Page 11
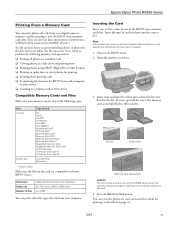
...stays lit. I/F port.) See the sections below and listed to print individual photos or photos by inserting it into the correct slot. Epson Stylus Photo RX595 Series Printing From a Memory Card You can print photos directly from your digital camera's memory card by the date they were taken. ...You can view the photos on your card and select them ❏ Printing photos using DPOF (Digital Print ...
...stays lit. I/F port.) See the sections below and listed to print individual photos or photos by inserting it into the correct slot. Epson Stylus Photo RX595 Series Printing From a Memory Card You can print photos directly from your digital camera's memory card by the date they were taken. ...You can view the photos on your card and select them ❏ Printing photos using DPOF (Digital Print ...
Product Information Guide
Page 12
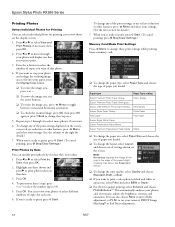
...to the right for details.) 7. Note: Borderless expands the image all the way to select View and Print Photos, if necessary, then press OK. 2. Epson Stylus Photo RX595 Series Printing Photos Select Individual Photos for Printing You can also choose None to turn off this adjustment, or P.I.M. To change the crop area...print, press x Start. (To cancel printing, press y Stop/Clear Settings.) Memory Card Mode Print Settings Press x Menu to print a color photo in black and white or sepia tone, select Filter and select B&W or Sepia. ❏ For the best quality printing, select Enhance and ...
...to the right for details.) 7. Note: Borderless expands the image all the way to select View and Print Photos, if necessary, then press OK. 2. Epson Stylus Photo RX595 Series Printing Photos Select Individual Photos for Printing You can also choose None to turn off this adjustment, or P.I.M. To change the crop area...print, press x Start. (To cancel printing, press y Stop/Clear Settings.) Memory Card Mode Print Settings Press x Menu to print a color photo in black and white or sepia tone, select Filter and select B&W or Sepia. ❏ For the best quality printing, select Enhance and ...
Product Information Guide
Page 13
...you need to leave a small white margin, if necessary. (Affects all photos you're printing.) ❏ To improve print quality but slow down printing, turn off PhotoEnhance to retain the special color effects. ❏ To remove the effects of red eyes in portraits, turn...print. If a cartridge is expended even if the other device. A cartridge marked with your computer or other cartridges are not expended. Epson Stylus Photo RX595 Series Note: PhotoEnhance uses a sophisticated face recognition technology to a memory card or USB storage device, see the onscreen User's Guide. You ...
...you need to leave a small white margin, if necessary. (Affects all photos you're printing.) ❏ To improve print quality but slow down printing, turn off PhotoEnhance to retain the special color effects. ❏ To remove the effects of red eyes in portraits, turn...print. If a cartridge is expended even if the other device. A cartridge marked with your computer or other cartridges are not expended. Epson Stylus Photo RX595 Series Note: PhotoEnhance uses a sophisticated face recognition technology to a memory card or USB storage device, see the onscreen User's Guide. You ...
Product Information Guide
Page 14
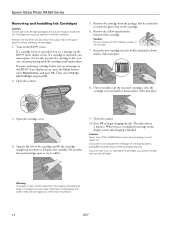
...thoroughly with water. Press OK to touch the green chip on the cartridge and lift the cartridge straight up to print. Turn on the RX595 Series display screen, press the Setup button, select Maintenance, and press OK. If you're replacing a cartridge before replacing ink cartridges. 1. Open...hands, wash them immediately with soap and water. Caution: Do not remove any other labels or seals, or ink will leak. 7. Epson Stylus Photo RX595 Series Removing and Installing Ink Cartridges Caution: Do not open ink cartridge packages until you are vacuum packed to install the ink. If a ...
...thoroughly with water. Press OK to touch the green chip on the cartridge and lift the cartridge straight up to print. Turn on the RX595 Series display screen, press the Setup button, select Maintenance, and press OK. If you're replacing a cartridge before replacing ink cartridges. 1. Open...hands, wash them immediately with soap and water. Caution: Do not remove any other labels or seals, or ink will leak. 7. Epson Stylus Photo RX595 Series Removing and Installing Ink Cartridges Caution: Do not open ink cartridge packages until you are vacuum packed to install the ink. If a ...
Product Information Guide
Page 15
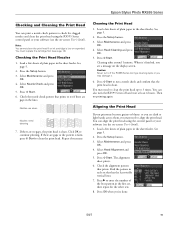
...is low or expended. If there are clean Nozzles need to clean the print head up to 3 times. Caution: Never turn the RX595 Series off the RX595 Series during a cleaning cycle or you 're done. 5/07 15 Check the alignment pattern that prints to enter the number of plain ..., then repeat for clogged nozzles and clean the print head using the control panel or your software (see the on -screen User's Guide). Epson Stylus Photo RX595 Series Checking and Cleaning the Print Head You can print a nozzle check pattern to check for the other sets. 8. Cleaning the Print Head 1. ...
...is low or expended. If there are clean Nozzles need to clean the print head up to 3 times. Caution: Never turn the RX595 Series off the RX595 Series during a cleaning cycle or you 're done. 5/07 15 Check the alignment pattern that prints to enter the number of plain ..., then repeat for clogged nozzles and clean the print head using the control panel or your software (see the on -screen User's Guide). Epson Stylus Photo RX595 Series Checking and Cleaning the Print Head You can print a nozzle check pattern to check for the other sets. 8. Cleaning the Print Head 1. ...
Product Information Guide
Page 16
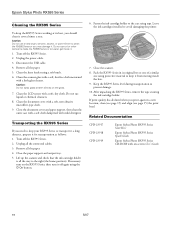
.... 3. Clean the LCD screen with a soft, non-abrasive microfiber-type cloth. 9. Transporting the RX595 Series If you need to ship your RX595 Series or transport it a long distance, prepare it from moving inside it off again using the P ...-23918 CPD-23919 Epson Stylus Photo RX595 Series Start Here Epson Stylus Photo RX595 Series Quick Guide Epson Stylus Photo RX595 Series CD-ROM with on the glass. 7. Clean the scanner glass with a soft, lint-free cloth moistened with mild detergent. Epson Stylus Photo RX595 Series Cleaning the RX595 Series To keep the RX595 Series working at its ...
.... 3. Clean the LCD screen with a soft, non-abrasive microfiber-type cloth. 9. Transporting the RX595 Series If you need to ship your RX595 Series or transport it a long distance, prepare it from moving inside it off again using the P ...-23918 CPD-23919 Epson Stylus Photo RX595 Series Start Here Epson Stylus Photo RX595 Series Quick Guide Epson Stylus Photo RX595 Series CD-ROM with on the glass. 7. Clean the scanner glass with a soft, lint-free cloth moistened with mild detergent. Epson Stylus Photo RX595 Series Cleaning the RX595 Series To keep the RX595 Series working at its ...
Quick Reference Guide
Page 4
...manual Copying documents or photos (including automatic color photo restoration, borderless photos, and instant photo reprints) See this Quick Guide for details. See the on -screen User's Guide for the basics. Printing custom photo greeting cards See this Quick Guide. (print a photo on a greeting card ... on -screen User's Guide. 4 Introduction Printing from a camera using your Epson® Print CD software) See this Quick Guide for details. Introduction After you set up your Epson Stylus® Photo RX595 Series (see the Start Here sheet), turn to your computer (print and scan ...
...manual Copying documents or photos (including automatic color photo restoration, borderless photos, and instant photo reprints) See this Quick Guide for details. See the on -screen User's Guide for the basics. Printing custom photo greeting cards See this Quick Guide. (print a photo on a greeting card ... on -screen User's Guide. 4 Introduction Printing from a camera using your Epson® Print CD software) See this Quick Guide for details. Introduction After you set up your Epson Stylus® Photo RX595 Series (see the Start Here sheet), turn to your computer (print and scan ...
Quick Reference Guide
Page 14
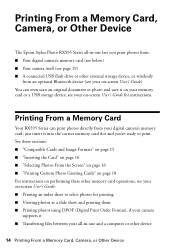
... memory card operations, see your on your memory card or a USB storage device; Printing From a Memory Card, Camera, or Other Device The Epson Stylus Photo RX595 Series all -in -one lets you print photos from: ■ Your digital camera's memory card (see below) ■ Your camera itself (see page 19) ■ A connected USB flash drive or...
... memory card operations, see your on your memory card or a USB storage device; Printing From a Memory Card, Camera, or Other Device The Epson Stylus Photo RX595 Series all -in -one lets you print photos from: ■ Your digital camera's memory card (see below) ■ Your camera itself (see page 19) ■ A connected USB flash drive or...
Quick Reference Guide
Page 21
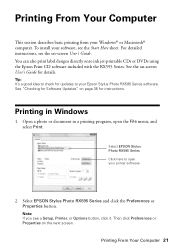
...Note: If you see a Setup, Printer, or Options button, click it. Printing in a printing program, open your Epson Stylus Photo RX595 Series software. Select EPSON Stylus Photo RX595 Series Click here to your printer software 2. Then click Preferences or Properties on -screen User's Guide for updates to open ...the File menu, and select Print. To install your Windows® or Macintosh® computer. Select EPSON Stylus Photo RX595 Series and click the Preferences or Properties button. Printing From Your Computer This section describes basic printing from your software,...
...Note: If you see a Setup, Printer, or Options button, click it. Printing in a printing program, open your Epson Stylus Photo RX595 Series software. Select EPSON Stylus Photo RX595 Series Click here to your printer software 2. Then click Preferences or Properties on -screen User's Guide for updates to open ...the File menu, and select Print. To install your Windows® or Macintosh® computer. Select EPSON Stylus Photo RX595 Series and click the Preferences or Properties button. Printing From Your Computer This section describes basic printing from your software,...
Quick Reference Guide
Page 24
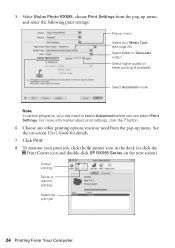
To monitor your Media Type (see page 25) Select Color or Grayscale output Select higher quality or faster printing (if available) Select Automatic mode Note: In certain programs, you may need to select Advanced before ... printing Select the print job 24 Printing From Your Computer Select Stylus Photo RX595, choose Print Settings from the pop-up menu Select your print job, click the printer icon in the dock (or click the Print Center icon and double-click SP RX595 Series on -screen User's Guide for details. 7. For more information about...
To monitor your Media Type (see page 25) Select Color or Grayscale output Select higher quality or faster printing (if available) Select Automatic mode Note: In certain programs, you may need to select Advanced before ... printing Select the print job 24 Printing From Your Computer Select Stylus Photo RX595, choose Print Settings from the pop-up menu Select your print job, click the printer icon in the dock (or click the Print Center icon and double-click SP RX595 Series on -screen User's Guide for details. 7. For more information about...
Quick Reference Guide
Page 26
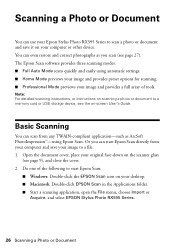
...to a memory card or USB storage device, see page 9), and close the cover. 2. Scanning a Photo or Document You can use your Epson Stylus Photo RX595 Series to scan a photo or document and save your image to a file. 1. Open the document cover, place your computer or...Mode previews your desktop. ■ Macintosh: Double-click EPSON Scan in the Applications folder. ■ Start a scanning application, open the File menu, choose Import or Acquire, and select EPSON Stylus Photo RX595 Series. 26 Scanning a Photo or Document The Epson Scan software provides three scanning modes: ■ Full...
...to a memory card or USB storage device, see page 9), and close the cover. 2. Scanning a Photo or Document You can use your Epson Stylus Photo RX595 Series to scan a photo or document and save your image to a file. 1. Open the document cover, place your computer or...Mode previews your desktop. ■ Macintosh: Double-click EPSON Scan in the Applications folder. ■ Start a scanning application, open the File menu, choose Import or Acquire, and select EPSON Stylus Photo RX595 Series. 26 Scanning a Photo or Document The Epson Scan software provides three scanning modes: ■ Full...

