
Epson Scan ICM Updater v1.20 (PSB.2008.07.001)
Page 1
....07.001 Authorization: TE08-0061 Rev A Total Pages: 1 All Scanners and All-in-One's using Epson Scan Epson Scan ICM updater v.1.20 for Epson Scan-affects all driver versions up to and including 3.4xA Note: Scanners/All-in-One's using ICM color profiles in Epson Scan when Adobe's Color Management Module (CMM) has also been installed on a computer...
....07.001 Authorization: TE08-0061 Rev A Total Pages: 1 All Scanners and All-in-One's using Epson Scan Epson Scan ICM updater v.1.20 for Epson Scan-affects all driver versions up to and including 3.4xA Note: Scanners/All-in-One's using ICM color profiles in Epson Scan when Adobe's Color Management Module (CMM) has also been installed on a computer...

How To Copy and Print Booklet
Page 6
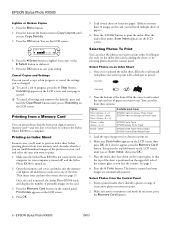
7 Open the scanner lid. 8 Place your photo face down on the glass, in the upper left corner. Move it about 0.1 inch from the top and side edge so the entire photo is scanned. 6
7 Open the scanner lid. 8 Place your photo face down on the glass, in the upper left corner. Move it about 0.1 inch from the top and side edge so the entire photo is scanned. 6

How To Copy and Print Booklet
Page 7
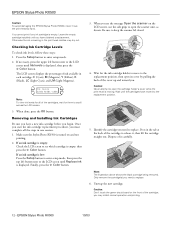
Copy button LCD screen and navigation buttons On button Menu button OK button 11 Press the Copy button. 12 Press the Menu button. Copy Layout 2.BorderFree 7 Wait a minute while it warms up. Copy Layout Color button 13 Press the OK button. 14 Press the green button next to the screen to turn on the RX500. 9 Close the scanner lid. 10 Press the P On button to display BorderFree. You see BorderFree 15 Press the OK button. Press until you see this screen: Copy Menu 1.
Copy button LCD screen and navigation buttons On button Menu button OK button 11 Press the Copy button. 12 Press the Menu button. Copy Layout 2.BorderFree 7 Wait a minute while it warms up. Copy Layout Color button 13 Press the OK button. 14 Press the green button next to the screen to turn on the RX500. 9 Close the scanner lid. 10 Press the P On button to display BorderFree. You see BorderFree 15 Press the OK button. Press until you see this screen: Copy Menu 1.

How To Copy and Print Booklet
Page 16
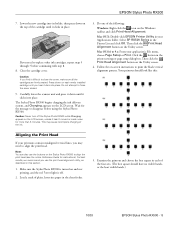
Then press the x Color button. 10 Flip the feeder guard back over the paper. 11 Open the scanner lid and place the index face down on the glass, in the upper left corner. 12 Close the scanner lid. Your photo(s) are scanned and printed. 16
Then press the x Color button. 10 Flip the feeder guard back over the paper. 11 Open the scanner lid and place the index face down on the glass, in the upper left corner. 12 Close the scanner lid. Your photo(s) are scanned and printed. 16

How To Copy and Print Booklet
Page 18
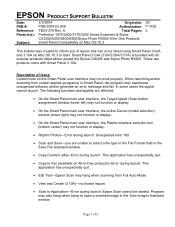
... the Scanning chapter in your scanner software. Then select the Color Restoration check box. (You may have faded photos or negatives, you have to scroll to life using the Color Restoration setting in Smart Panel or EPSON Scan. ❍ In Smart Panel, click the Reprint Photos icon, then click the Color Restoration icon on the screen that...
... the Scanning chapter in your scanner software. Then select the Color Restoration check box. (You may have faded photos or negatives, you have to scroll to life using the Color Restoration setting in Smart Panel or EPSON Scan. ❍ In Smart Panel, click the Reprint Photos icon, then click the Color Restoration icon on the screen that...

Product Brochure
Page 1
... print from your PC Epson Easy Photo Fix™ scanning technology - Handy photo proof sheet lets you choose the images you want to 16 ppm color) - Brilliance that lasts. Quickly restores faded color photos to -card technology - PRINTER, COPIER, SCANNER, CARD READER STYLUS® PHOTO RX500 Your home photo center. Prints a 4" x 6" color photo in card slots - The feature-rich Epson Stylus Photo RX500 all-in transparency adapter...
... print from your PC Epson Easy Photo Fix™ scanning technology - Handy photo proof sheet lets you choose the images you want to 16 ppm color) - Brilliance that lasts. Quickly restores faded color photos to -card technology - PRINTER, COPIER, SCANNER, CARD READER STYLUS® PHOTO RX500 Your home photo center. Prints a 4" x 6" color photo in card slots - The feature-rich Epson Stylus Photo RX500 all-in transparency adapter...
Product Brochure
Page 2
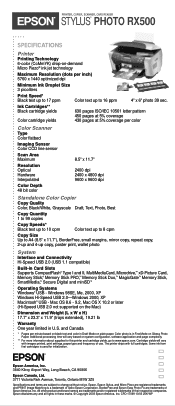
... type and frequency of Seiko Epson Corporation. Some ink from first cartridges is used for this printer and cartridge yields, go to change without notice. All other product and brand names are trademarks of their respective companies. PRINTER, COPIER, SCANNER, CARD READER STYLUS® PHOTO RX500 SPECIFICATIONS Printer Printing Technology 6-color (CcMmYK) drop-on-demand Micro...
... type and frequency of Seiko Epson Corporation. Some ink from first cartridges is used for this printer and cartridge yields, go to change without notice. All other product and brand names are trademarks of their respective companies. PRINTER, COPIER, SCANNER, CARD READER STYLUS® PHOTO RX500 SPECIFICATIONS Printer Printing Technology 6-color (CcMmYK) drop-on-demand Micro...
Product Information Guide
Page 3
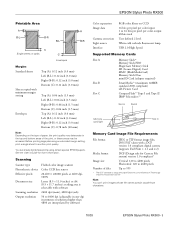
... contain double-byte characters. 10/03 EPSON Stylus Photo RX500 - 3 Before printing large jobs using certain special EPSON papers. Scanning Scanner type Photoelectric device Effective pixels Document size Scanning resolution Output resolution Flatbed color image scanner Color CCD line sensor 20,400 ×... 28,080 pixels at 2400 dpi, 100% Letter (8.5 × 11.0 inches) or A4 (8.5 × 11.7 inches); EPSON Stylus Photo RX500 Printable Area A B-L B-R C Single ...
... contain double-byte characters. 10/03 EPSON Stylus Photo RX500 - 3 Before printing large jobs using certain special EPSON papers. Scanning Scanner type Photoelectric device Effective pixels Document size Scanning resolution Output resolution Flatbed color image scanner Color CCD line sensor 20,400 ×... 28,080 pixels at 2400 dpi, 100% Letter (8.5 × 11.0 inches) or A4 (8.5 × 11.7 inches); EPSON Stylus Photo RX500 Printable Area A B-L B-R C Single ...
Product Information Guide
Page 5
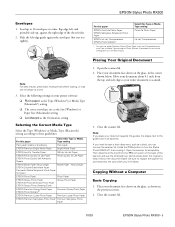
... scanner lid. 10/03 EPSON Stylus Photo RX500 - 5 Then disconnect the cord from the top and side edge so your Type or Media Type setting for Epson EPSON Photo Paper Photo Paper EPSON Glossy Photo Paper EPSON All-Purpose Glossy Photo Paper EPSON Glossy Photo Greeting Cards Glossy Photo Paper EPSON Premium Glossy Photo Paper EPSON Photo Stickers®* Premium Glossy Photo Paper EPSON Premium Luster Photo Paper Premium Luster Photo Paper EPSON Premium Semigloss Photo...
... scanner lid. 10/03 EPSON Stylus Photo RX500 - 5 Then disconnect the cord from the top and side edge so your Type or Media Type setting for Epson EPSON Photo Paper Photo Paper EPSON Glossy Photo Paper EPSON All-Purpose Glossy Photo Paper EPSON Glossy Photo Greeting Cards Glossy Photo Paper EPSON Premium Glossy Photo Paper EPSON Photo Stickers®* Premium Glossy Photo Paper EPSON Premium Luster Photo Paper Premium Luster Photo Paper EPSON Premium Semigloss Photo...
Product Information Guide
Page 8
...6 Prem. EPSON Stylus Photo RX500 Lighten or Darken Copies 1. Select Photos on the control panel. Make sure you want to a computer. EPSON Stylus Photo RX500 10/03 ... and the Stylus Photo RX500 is positioned on the upper left button on the scanner glass, so...Photo Paper EPSON Premium Semigloss Photo Paper EPSON Photo Paper EPSON Glossy Photo Paper EPSON Matte Paper Heavyweight EPSON Double-Sided Matte Paper 3. Place the index sheet face-down on the LCD screen until you want to your computer (or your setting. Press the Menu button. 2. Press the x Color...
...6 Prem. EPSON Stylus Photo RX500 Lighten or Darken Copies 1. Select Photos on the control panel. Make sure you want to a computer. EPSON Stylus Photo RX500 10/03 ... and the Stylus Photo RX500 is positioned on the upper left button on the scanner glass, so...Photo Paper EPSON Premium Semigloss Photo Paper EPSON Photo Paper EPSON Glossy Photo Paper EPSON Matte Paper Heavyweight EPSON Double-Sided Matte Paper 3. Place the index sheet face-down on the LCD screen until you want to your computer (or your setting. Press the Menu button. 2. Press the x Color...

Product Information Guide
Page 10
... 3. Please perform again after a check. The index sheet is not filled in . EPSON Stylus Photo RX500 10/03 Scanner error - - - > See your documentation and call service if necessary. Then press the x Color button. Do you choose which program it right away. The index sheet was not filled... in copy mode. EPSON Stylus Photo RX500 Smart Panel Features Edit Text View and Create Description ...
... 3. Please perform again after a check. The index sheet is not filled in . EPSON Stylus Photo RX500 10/03 Scanner error - - - > See your documentation and call service if necessary. Then press the x Color button. Do you choose which program it right away. The index sheet was not filled... in copy mode. EPSON Stylus Photo RX500 Smart Panel Features Edit Text View and Create Description ...
Product Information Guide
Page 12
...), K (Black), LC (Light Cyan), and LM (Light Magenta). When done, press the OK button. Caution: Never attempt to open the scanner unit, as shown. Unwrap the new cartridge. You cannot print if any ink cartridge is low: Press the Setup button to enter setup mode,... you see which cartridge is displayed. Finally, press the x Color button. 3. EPSON Stylus Photo RX500 10/03 Checking Ink Cartridge Levels To check ink levels, follow these steps: 1. Make sure the Stylus Photo RX500 is displayed, then press the x Color button. Dispose of ink available in one session. 1. If ...
...), K (Black), LC (Light Cyan), and LM (Light Magenta). When done, press the OK button. Caution: Never attempt to open the scanner unit, as shown. Unwrap the new cartridge. You cannot print if any ink cartridge is low: Press the Setup button to enter setup mode,... you see which cartridge is displayed. Finally, press the x Color button. 3. EPSON Stylus Photo RX500 10/03 Checking Ink Cartridge Levels To check ink levels, follow these steps: 1. Make sure the Stylus Photo RX500 is displayed, then press the x Color button. Dispose of ink available in one session. 1. If ...
Product Information Guide
Page 13
.... 3. Caution: Never turn off . 2. Carefully lower the scanner unit and press it down on the LCD screen, unless it clicks into place. Mac OS 8.6 to force the cover closed. 9. Your printout should have no visible bands, or the least visible bands.) 10/03 EPSON Stylus Photo RX500 - 13 error light is turned on -screen instructions...
.... 3. Caution: Never turn off . 2. Carefully lower the scanner unit and press it down on the LCD screen, unless it clicks into place. Mac OS 8.6 to force the cover closed. 9. Your printout should have no visible bands, or the least visible bands.) 10/03 EPSON Stylus Photo RX500 - 13 error light is turned on -screen instructions...
Product Support Bulletin
Page 2
These two products come with all scanner products listed above except the Stylus CX6400 and Stylus Photo RX500. When launching and/or scanning from Full Auto Mode. • View and Create (3.10A)-no known issues • Scan to Fax (available ...when using Smart Panel 3.0xA and 3.10A on All-in-One products)--Error during launch: Epson Scan cannot be started. A Total Pages: Perfection 1670/2400/3170/3200 Series Scanners & Stylus CX3200/5200/5400/6400/Stylus Photo RX500 All-in-One Products Smart Panel Compatibility on the Smart Panel user interface may experience unexpected behavior...
These two products come with all scanner products listed above except the Stylus CX6400 and Stylus Photo RX500. When launching and/or scanning from Full Auto Mode. • View and Create (3.10A)-no known issues • Scan to Fax (available ...when using Smart Panel 3.0xA and 3.10A on All-in-One products)--Error during launch: Epson Scan cannot be started. A Total Pages: Perfection 1670/2400/3170/3200 Series Scanners & Stylus CX3200/5200/5400/6400/Stylus Photo RX500 All-in-One Products Smart Panel Compatibility on the Smart Panel user interface may experience unexpected behavior...

Product Support Bulletin
Page 4
...) only the models supported on OS 10.3. 1. The message typically says: "Cannot use the scanner while copying is displayed and cannot be functional without further modifications. Select your model from the Epson Scan standalone utility. A Total Pages: Epson Stylus Photo RX500, Stylus CX6400 Epson Scan Driver Release v.1.33 for your model. It will extract itself into a folder named...
...) only the models supported on OS 10.3. 1. The message typically says: "Cannot use the scanner while copying is displayed and cannot be functional without further modifications. Select your model from the Epson Scan standalone utility. A Total Pages: Epson Stylus Photo RX500, Stylus CX6400 Epson Scan Driver Release v.1.33 for your model. It will extract itself into a folder named...
Product Support Bulletin
Page 5
...The patch files are fixed when you of the following files listed for your scanner or multi-function device. Open the epson10972 folder. 3. Double-click to extract the installation files. 2. Double-click the Epson Smart Panel patch file icon. Page 1 of issues that may occur when using...using the Save File Assistant in -One Products Subject: Patch for Epson Smart Panel Ver. 3.0xA and 3.10A for Smart Panel v3.10A (Stylus CX6400/Stylus Photo RX500 models only) 1. Double-click to extract the installation files. 2. Epson Smart Panel Patch v3.10P01A for Mac OS 10.3 This bulletin was...
...The patch files are fixed when you of the following files listed for your scanner or multi-function device. Open the epson10972 folder. 3. Double-click to extract the installation files. 2. Double-click the Epson Smart Panel patch file icon. Page 1 of issues that may occur when using...using the Save File Assistant in -One Products Subject: Patch for Epson Smart Panel Ver. 3.0xA and 3.10A for Smart Panel v3.10A (Stylus CX6400/Stylus Photo RX500 models only) 1. Double-click to extract the installation files. 2. Epson Smart Panel Patch v3.10P01A for Mac OS 10.3 This bulletin was...
Product Support Bulletin
Page 7
... utility again. The unit should perform normally without further modifications. File location: The updated scanner driver files: epson10947.sea.hqx (CX6400), epson10950.sea.hqx (SPRX500) and this bulletin are as follows: 1. C Total Pages: 1 Epson Stylus Photo RX500/Stylus CX6400 Problems connecting Epson SPC units to MAC computers using OS X 10.2.7 This bulletin was created to verify that...
... utility again. The unit should perform normally without further modifications. File location: The updated scanner driver files: epson10947.sea.hqx (CX6400), epson10950.sea.hqx (SPRX500) and this bulletin are as follows: 1. C Total Pages: 1 Epson Stylus Photo RX500/Stylus CX6400 Problems connecting Epson SPC units to MAC computers using OS X 10.2.7 This bulletin was created to verify that...

Start Here Card
Page 2
... left and remove the document mat. 2 Hold the film holder so the labelling faces out and insert the tabs in the notches inside the scanner lid. 3 Place the tabs on the left inside the scanner lid. Then place the handle on the right side of the document mat in place. 4 Close the... scanner lid. Remove the instruction sheet covering the scanner glass. 2 Slide the transportation lock to lock it in the notches inside the notch and slide the mat...
... left and remove the document mat. 2 Hold the film holder so the labelling faces out and insert the tabs in the notches inside the scanner lid. 3 Place the tabs on the left inside the scanner lid. Then place the handle on the right side of the document mat in place. 4 Close the... scanner lid. Remove the instruction sheet covering the scanner glass. 2 Slide the transportation lock to lock it in the notches inside the notch and slide the mat...
Start Here Card
Page 3
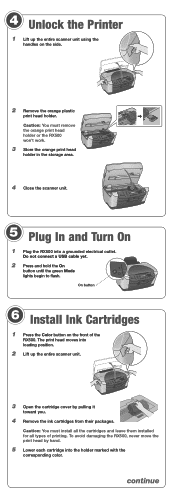
... with the corresponding color. Do not connect a USB cable yet. 2 Press and hold the On button until the green Mode lights begin to flash. Caution: You must remove the orange print head holder or the RX500 won't work. 3 Store the orange print head holder in the storage area. 4 Close the scanner unit. 5 Plug...
... with the corresponding color. Do not connect a USB cable yet. 2 Press and hold the On button until the green Mode lights begin to flash. Caution: You must remove the orange print head holder or the RX500 won't work. 3 Store the orange print head holder in the storage area. 4 Close the scanner unit. 5 Plug...

Start Here Card
Page 4
... it clicks into the two slots on the back of the RX500. 2 Connect the short cable leading from the scanner lid to flip the feeder guard back, your paper may jam. Then close easily, open it in the top of the RX500, between the edge guides and beneath their tabs. Charging takes about... the back of paper. Position the connector as shown here before pushing it and make sure all the ink cartridges are firmly seated. 7 Lower the scanner unit. Then slide the left edge guide against the paper, but not too tightly. 6 Flip the feeder guard back over the stack of the...
... it clicks into the two slots on the back of the RX500. 2 Connect the short cable leading from the scanner lid to flip the feeder guard back, your paper may jam. Then close easily, open it in the top of the RX500, between the edge guides and beneath their tabs. Charging takes about... the back of paper. Position the connector as shown here before pushing it and make sure all the ink cartridges are firmly seated. 7 Lower the scanner unit. Then slide the left edge guide against the paper, but not too tightly. 6 Flip the feeder guard back over the stack of the...


