
User Manual
Page 4
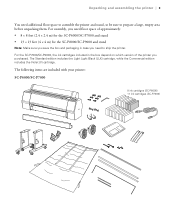
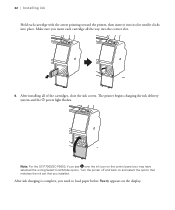
...: • 8 × 8 feet (2.4 × 2.4 m) for the SC-P6000/SC-P7000 and stand • 13 × 13 feet (4 × 4 m) for the SC-P8000/SC-P9000 and stand Note: Make sure you save the box and packaging in the box depend on which version of the printer you need...assemble the printer and stand, so be sure to ship the printer. The Standard edition includes the Light Light Black (LLK) cartridge, while the Commercial edition includes the Violet (V) cartridge. Unpacking and assembling the printer | 3 You need to prepare a large, empty area before unpacking them. For the SC-P7000...
...: • 8 × 8 feet (2.4 × 2.4 m) for the SC-P6000/SC-P7000 and stand • 13 × 13 feet (4 × 4 m) for the SC-P8000/SC-P9000 and stand Note: Make sure you save the box and packaging in the box depend on which version of the printer you need...assemble the printer and stand, so be sure to ship the printer. The Standard edition includes the Light Light Black (LLK) cartridge, while the Commercial edition includes the Violet (V) cartridge. Unpacking and assembling the printer | 3 You need to prepare a large, empty area before unpacking them. For the SC-P7000...
User Manual
Page 5
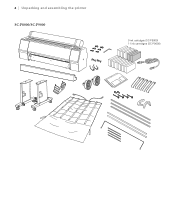
4 | Unpacking and assembling the printer SC-P8000/SC-P9000 9 ink cartidges (SC-P8000) 11 ink cartridges (SC-P9000)
4 | Unpacking and assembling the printer SC-P8000/SC-P9000 9 ink cartidges (SC-P8000) 11 ink cartridges (SC-P9000)
User Manual
Page 30
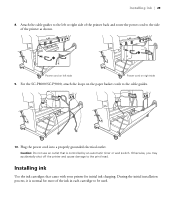
... cord into a properly grounded electrical outlet. Otherwise, you may accidentally shut off the printer and cause damage to the cable guides. 10. For the SC-P8000/SC-P9000, attach the loops on right side 9. During the initial installation process, it is controlled by an automatic timer or wall switch. Attach the... shown. Power cord on left or right side of the printer back and route the power cord to the side of the ink in each cartridge to the left side Power cord on the paper basket cords to the print head. Installing ink Use the ink...
... cord into a properly grounded electrical outlet. Otherwise, you may accidentally shut off the printer and cause damage to the cable guides. 10. For the SC-P8000/SC-P9000, attach the loops on right side 9. During the initial installation process, it is controlled by an automatic timer or wall switch. Attach the... shown. Power cord on left or right side of the printer back and route the power cord to the side of the ink in each cartridge to the left side Power cord on the paper basket cords to the print head. Installing ink Use the ink...

User Manual
Page 31
...Note: For the SC-P7000/SC-P9000, choose the Select ColorMode setting that matches the ink cartridge that was included with your printer. Open both ink covers. Select the language, date/time, and units of cartridges as soon as possible. 1. Caution: Do not open slightly. This setting cannot be changed... once the initial ink charging process begins. 30 | Installing ink The cartridges shipped with your printer are provided mainly to turn on the LCD screen and the ink covers pop open the ink covers until the lock ...
...Note: For the SC-P7000/SC-P9000, choose the Select ColorMode setting that matches the ink cartridge that was included with your printer. Open both ink covers. Select the language, date/time, and units of cartridges as soon as possible. 1. Caution: Do not open slightly. This setting cannot be changed... once the initial ink charging process begins. 30 | Installing ink The cartridges shipped with your printer are provided mainly to turn on the LCD screen and the ink covers pop open the ink covers until the lock ...
User Manual
Page 32
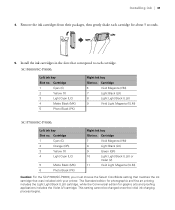
...The Standard edition for photographic and fine art printing includes the Light Light Black (LLK) cartridge, while the Commercial edition for about 5 seconds. 5. SC-P6000/SC-P8000: Left ink bay Slot no . Cartridge 6 Vivid Magenta (VM) 7 Light Black (LK) 8 Light Light Black (LLK)... 9 Vivid Light Magenta (VLM) SC-P7000/SC-P9000: Left ink bay Slot no . Cartridge 1 Cyan (C) 2 Orange (OR) 3 Yellow (Y) 4 ...
...The Standard edition for photographic and fine art printing includes the Light Light Black (LLK) cartridge, while the Commercial edition for about 5 seconds. 5. SC-P6000/SC-P8000: Left ink bay Slot no . Cartridge 6 Vivid Magenta (VM) 7 Light Black (LK) 8 Light Light Black (LLK)... 9 Vivid Light Magenta (VLM) SC-P7000/SC-P9000: Left ink bay Slot no . Cartridge 1 Cyan (C) 2 Orange (OR) 3 Yellow (Y) 4 ...
User Manual
Page 33
...: For the SC-P7000/SC-P9000, if you see over the ink icon on the display. After ink charging is complete, you insert each cartridge with the arrow pointing toward the printer, then insert it into its slot until it clicks into the correct slot. 6. The printer begins charging ...the ink delivery system and the P power light flashes. 32 | Installing ink Hold each cartridge all of the cartridges, close the ink covers. Make sure you need to load paper before Ready appears on the control panel you installed. After installing all the...
...: For the SC-P7000/SC-P9000, if you see over the ink icon on the display. After ink charging is complete, you insert each cartridge with the arrow pointing toward the printer, then insert it into its slot until it clicks into the correct slot. 6. The printer begins charging ...the ink delivery system and the P power light flashes. 32 | Installing ink Hold each cartridge all of the cartridges, close the ink covers. Make sure you need to load paper before Ready appears on the control panel you installed. After installing all the...

User Manual
Page 5
... Settings ...139 Preferences Menu Settings ...140 Administrator Menu Settings ...140 Replacing Ink Cartridges ...142 Checking Cartridge Status with Windows 142 Checking Cartridge Status with OS X 145 Purchase Epson Ink Cartridges...146 Ink Cartridge and Maintenance Box Part Numbers 146 Removing and Installing Ink Cartridges 148 Replacing Maintenance Boxes...151 Switch Black Ink Type ...153 Switching the Black...
... Settings ...139 Preferences Menu Settings ...140 Administrator Menu Settings ...140 Replacing Ink Cartridges ...142 Checking Cartridge Status with Windows 142 Checking Cartridge Status with OS X 145 Purchase Epson Ink Cartridges...146 Ink Cartridge and Maintenance Box Part Numbers 146 Removing and Installing Ink Cartridges 148 Replacing Maintenance Boxes...151 Switch Black Ink Type ...153 Switching the Black...

User Manual
Page 7
... Windows System Requirements ...202 Mac System Requirements ...203 Paper Specifications ...203 Printable Area Specifications ...205 Ink Cartridge Specifications...208 Dimension Specifications ...209 Electrical Specifications ...210 Environmental Specifications ...210 Interface Specifications ...211 Safety and Approvals... Specifications 211 Notices ...212 Important Safety Instructions...212 General Product Safety Instructions 212 Ink Cartridge Safety Instructions 214 FCC Compliance Statement...215 Open Source Software License ...215 Trademarks ...225 Copyright Notice...225...
... Windows System Requirements ...202 Mac System Requirements ...203 Paper Specifications ...203 Printable Area Specifications ...205 Ink Cartridge Specifications...208 Dimension Specifications ...209 Electrical Specifications ...210 Environmental Specifications ...210 Interface Specifications ...211 Safety and Approvals... Specifications 211 Notices ...212 Important Safety Instructions...212 General Product Safety Instructions 212 Ink Cartridge Safety Instructions 214 FCC Compliance Statement...215 Open Source Software License ...215 Trademarks ...225 Copyright Notice...225...
User Manual
Page 10
... inch • Available 150, 300, or 700 ml large-capacity ink cartridges • Optional internal print server offloads print data from an Epson authorized reseller. Printer Features Notations Used in the Documentation Printer Part Locations Printer Features The Epson SureColor P6000/P7000/P8000/P9000 Series printers include these sections to learn more about your...
... inch • Available 150, 300, or 700 ml large-capacity ink cartridges • Optional internal print server offloads print data from an Epson authorized reseller. Printer Features Notations Used in the Documentation Printer Part Locations Printer Features The Epson SureColor P6000/P7000/P8000/P9000 Series printers include these sections to learn more about your...

User Manual
Page 16
check the status message on the LCD screen 6 Optional accessory status (if applicable) : Auto-Take Up Reel (SC-P8000/SC-P9000 only) : SpectroProofer® : Optional Internal Print Server is installed : Optional Internal Print Server is expended : Ink error; 3 Platen gap setting : Standard : Narrow : Wide : Wider : Widest 4 Roll paper margin setting 5 Ink status : Amount of ink remaining in the cartridge : Ink level is low : Ink cartridge is being accessed 7 Photo Black or Matte Black ink selected Press the Black ink ink button to switch cartridge types 16
check the status message on the LCD screen 6 Optional accessory status (if applicable) : Auto-Take Up Reel (SC-P8000/SC-P9000 only) : SpectroProofer® : Optional Internal Print Server is installed : Optional Internal Print Server is expended : Ink error; 3 Platen gap setting : Standard : Narrow : Wide : Wider : Widest 4 Roll paper margin setting 5 Ink status : Amount of ink remaining in the cartridge : Ink level is low : Ink cartridge is being accessed 7 Photo Black or Matte Black ink selected Press the Black ink ink button to switch cartridge types 16
User Manual
Page 103
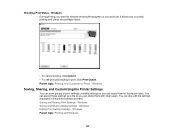
... the Printer Settings You can save groups of print settings or media settings so you see print jobs waiting to control printing and check ink cartridge status. • To cancel printing, click Cancel. • To see this window showing the progress of your print job. Windows Parent topic: Printing with other...
... the Printer Settings You can save groups of print settings or media settings so you see print jobs waiting to control printing and check ink cartridge status. • To cancel printing, click Cancel. • To see this window showing the progress of your print job. Windows Parent topic: Printing with other...
User Manual
Page 142
...best, even after cleaning and aligning the print head. You may also need to epson.com/recycle for proper disposal, please go to replace it. To check your used ink cartridges to Epson for more than six months old, or if your Windows computer. 1. If ...ink is low, and you can check your cartridge status at any time using a utility on the LCD screen, the cartridge is more information. Checking Cartridge Status with Windows Checking Cartridge Status with OS X Purchase Epson Ink Cartridges Removing and Installing Ink Cartridges Replacing Maintenance Boxes Switch Black Ink Type Checking...
...best, even after cleaning and aligning the print head. You may also need to epson.com/recycle for proper disposal, please go to replace it. To check your used ink cartridges to Epson for more than six months old, or if your Windows computer. 1. If ...ink is low, and you can check your cartridge status at any time using a utility on the LCD screen, the cartridge is more information. Checking Cartridge Status with Windows Checking Cartridge Status with OS X Purchase Epson Ink Cartridges Removing and Installing Ink Cartridges Replacing Maintenance Boxes Switch Black Ink Type Checking...

User Manual
Page 143
Replace or reinstall any of the cartridges installed in the Windows taskbar and select Monitoring Preferences. 143 Note: If any ink cartridge indicated on the screen. You see this window: 2. To disable the low ink reminder, right-click the product icon in the product are broken, incompatible with the product model, or improperly installed, Epson Status Monitor will not display an accurate cartridge status. 3.
Replace or reinstall any of the cartridges installed in the Windows taskbar and select Monitoring Preferences. 143 Note: If any ink cartridge indicated on the screen. You see this window: 2. To disable the low ink reminder, right-click the product icon in the product are broken, incompatible with the product model, or improperly installed, Epson Status Monitor will not display an accurate cartridge status. 3.

User Manual
Page 144
To disable promotional offers, deselect the Display Epson Offers checkbox. Parent topic: Replacing Ink Cartridges Related tasks Removing and Installing Ink Cartridges 144 You see this window: 4. Deselect the See Low Ink Reminder alerts checkbox at the bottom of the screen. 5.
To disable promotional offers, deselect the Display Epson Offers checkbox. Parent topic: Replacing Ink Cartridges Related tasks Removing and Installing Ink Cartridges 144 You see this window: 4. Deselect the See Low Ink Reminder alerts checkbox at the bottom of the screen. 5.

User Manual
Page 145
Select EPSON Status Monitor. In the Apple menu or the Dock, select System Preferences. You see a window like this: 3. Do the following as necessary: • To update the ink cartridge status, click Update. 145 Select Utility and select Open Printer Utility. 2. Checking Cartridge Status with OS X You can check your cartridge status using a utility on your product, and select Options & Supplies. Select Print & Fax, Print & Scan, or Printers & Scanners, select your Mac. 1.
Select EPSON Status Monitor. In the Apple menu or the Dock, select System Preferences. You see a window like this: 3. Do the following as necessary: • To update the ink cartridge status, click Update. 145 Select Utility and select Open Printer Utility. 2. Checking Cartridge Status with OS X You can check your cartridge status using a utility on your product, and select Options & Supplies. Select Print & Fax, Print & Scan, or Printers & Scanners, select your Mac. 1.
User Manual
Page 146
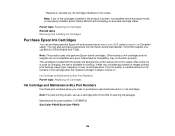
... number: C13T699700 SureColor-P6000/SureColor-P8000 146 sales) or epson.ca (Canadian sales). Note: This product uses only genuine Epson-brand cartridges. For print quality, a variable amount of ink remains in the product is available for resale. Parent topic: Replacing Ink Cartridges Related tasks Removing and Installing Ink Cartridges Purchase Epson Ink Cartridges You can also purchase accessories...
... number: C13T699700 SureColor-P6000/SureColor-P8000 146 sales) or epson.ca (Canadian sales). Note: This product uses only genuine Epson-brand cartridges. For print quality, a variable amount of ink remains in the product is available for resale. Parent topic: Replacing Ink Cartridges Related tasks Removing and Installing Ink Cartridges Purchase Epson Ink Cartridges You can also purchase accessories...

User Manual
Page 148
...Press the open the ink cartridge cover until it unlocks. 148 Open the ink cartridge cover. Do one of the cartridges are completely expended, the corresponding ink cartridge cover unlocks. • If the cartridges are empty. 1. Note: Replace all expended ink cartridges. The ink cartridge cover unlocks. 4. Note: ... press the OK button. Removing and Installing Ink Cartridges Make sure you have your product. 2. You must install new cartridges immediately after removing the old ones. You cannot print if any of the ink cartridges are expended or any of the following if necessary...
...Press the open the ink cartridge cover until it unlocks. 148 Open the ink cartridge cover. Do one of the cartridges are completely expended, the corresponding ink cartridge cover unlocks. • If the cartridges are empty. 1. Note: Replace all expended ink cartridges. The ink cartridge cover unlocks. 4. Note: ... press the OK button. Removing and Installing Ink Cartridges Make sure you have your product. 2. You must install new cartridges immediately after removing the old ones. You cannot print if any of the ink cartridges are expended or any of the following if necessary...

User Manual
Page 149
Do not take the used cartridges carefully. If ink gets into your eyes, flush them immediately with soap and water. Keep ink cartridges out of the reach of used cartridge apart or try to replace. 5. Press in on your mouth, spit it . Pull out the ink cartridge. If ink gets into your skin, wash it thoroughly with water. Warning: If ink gets on the ink cartridge you want to refill it out and see a doctor right away. Note: Dispose of children. 149 The ink cartridge pops out slightly. 6.
Do not take the used cartridges carefully. If ink gets into your eyes, flush them immediately with soap and water. Keep ink cartridges out of the reach of used cartridge apart or try to replace. 5. Press in on your mouth, spit it . Pull out the ink cartridge. If ink gets into your skin, wash it thoroughly with water. Warning: If ink gets on the ink cartridge you want to refill it out and see a doctor right away. Note: Dispose of children. 149 The ink cartridge pops out slightly. 6.

User Manual
Page 150
Insert the new cartridge with the arrow facing up and push it in until it clicks into place. Your product begins charging the ink delivery system. Doing so can ... product during ink charging. 150 Remove the new cartridge from the package. Then gently shake the cartridge for about five seconds. Caution: Do not touch the green chip on the cartridge. 8. Caution: Do not remove and re-insert cartridges more often than necessary. Close the ink cartridge cover and push it in until it clicks...
Insert the new cartridge with the arrow facing up and push it in until it clicks into place. Your product begins charging the ink delivery system. Doing so can ... product during ink charging. 150 Remove the new cartridge from the package. Then gently shake the cartridge for about five seconds. Caution: Do not touch the green chip on the cartridge. 8. Caution: Do not remove and re-insert cartridges more often than necessary. Close the ink cartridge cover and push it in until it clicks...
User Manual
Page 151
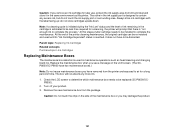
...the maintenance box or you have removed from the package. Parent topic: Replacing Ink Cartridges Related concepts Purchase Epson Ink Cartridges Replacing Maintenance Boxes The maintenance box absorbs ink used until its "Ink Cartridge Expended" status is "not enough ink to complete the process." Caution: Do ... may damage the product. 151 The box will prompt that there is reached. At this stage a fuller cartridge needs to be installed to be replaced (SC-P8000/SCP9000). 2. Check the LCD screen to determine which maintenance box needs to contain any more ink. 1. Always...
...the maintenance box or you have removed from the package. Parent topic: Replacing Ink Cartridges Related concepts Purchase Epson Ink Cartridges Replacing Maintenance Boxes The maintenance box absorbs ink used until its "Ink Cartridge Expended" status is "not enough ink to complete the process." Caution: Do ... may damage the product. 151 The box will prompt that there is reached. At this stage a fuller cartridge needs to be installed to be replaced (SC-P8000/SCP9000). 2. Check the LCD screen to determine which maintenance box needs to contain any more ink. 1. Always...

