
Network Installation Guide
Page 3
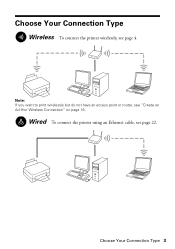
Wired To connect the printer using an Ethernet cable, see "Create an Ad-Hoc Wireless Connection" on page 16. Choose Your Connection Type 3 Note: If you want to print wirelessly but do not have an access point or router, see page 22. Choose Your Connection Type Wireless To connect the printer wirelessly, see page 4.
Wired To connect the printer using an Ethernet cable, see "Create an Ad-Hoc Wireless Connection" on page 16. Choose Your Connection Type 3 Note: If you want to print wirelessly but do not have an access point or router, see page 22. Choose Your Connection Type Wireless To connect the printer wirelessly, see page 4.

Network Installation Guide
Page 16
Important: For Windows® users: If your computer is complete, reconnect your printer this setup method if you want to print wirelessly but do not have an access point or router. See "Connect Wirelessly Using the Setup Wizard" on page 4 or "Wired (Ethernet) Installation" on the ...
Important: For Windows® users: If your computer is complete, reconnect your printer this setup method if you want to print wirelessly but do not have an access point or router. See "Connect Wirelessly Using the Setup Wizard" on page 4 or "Wired (Ethernet) Installation" on the ...
Network Installation Guide
Page 28
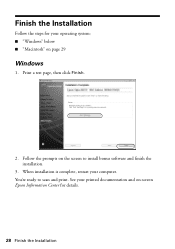
Finish the Installation Follow the steps for details. 28 Finish the Installation You're ready to install bonus software and finish the installation. 3. Print a test page, then click Finish. 2. When installation is complete, restart your operating system: ■ "Windows" below ■ "Macintosh" on page 29 Windows 1. See your printed documentation and on the screen to scan and print. Follow the prompts on -screen Epson Information Center for your computer.
Finish the Installation Follow the steps for details. 28 Finish the Installation You're ready to install bonus software and finish the installation. 3. Print a test page, then click Finish. 2. When installation is complete, restart your operating system: ■ "Windows" below ■ "Macintosh" on page 29 Windows 1. See your printed documentation and on the screen to scan and print. Follow the prompts on -screen Epson Information Center for your computer.

Network Installation Guide
Page 30
4. When you see this screen, click Add Printer. 5. When installation is complete, restart your EPSON TCPIP printer. Follow the prompts on the network. 6. Follow the steps on the right side of the screen to 90 seconds for details. 30 Finish the Installation Note: It may take up to add your computer. You're ready to print a test page, install bonus software, and finish the installation. 7. See your printed documentation and on-screen Epson Information Center for your computer to find the EPSON TCPIP printer on the screen to scan and print.
4. When you see this screen, click Add Printer. 5. When installation is complete, restart your EPSON TCPIP printer. Follow the prompts on the network. 6. Follow the steps on the right side of the screen to 90 seconds for details. 30 Finish the Installation Note: It may take up to add your computer. You're ready to print a test page, install bonus software, and finish the installation. 7. See your printed documentation and on-screen Epson Information Center for your computer to find the EPSON TCPIP printer on the screen to scan and print.
Network Installation Guide
Page 31
...or using . ■ If the printer doesn't connect to your wireless network, the WEP key or WPA passphrase may have been entered incorrectly. Print a Network Status Sheet (see page 34). Troubleshooting If you will also need to know what kind of your router or access point. ■..."Connect Wirelessly Using Advanced Setup" on page 8 for help: ■ "Setup Problems" below ■ "Printing Problems" on page 33 ■ "Scanning Problems" on page 34 This section also explains how to print a Network Status Sheet (see page 34) to confirm that it is set , register the printer's MAC ...
...or using . ■ If the printer doesn't connect to your wireless network, the WEP key or WPA passphrase may have been entered incorrectly. Print a Network Status Sheet (see page 34). Troubleshooting If you will also need to know what kind of your router or access point. ■..."Connect Wirelessly Using Advanced Setup" on page 8 for help: ■ "Setup Problems" below ■ "Printing Problems" on page 33 ■ "Scanning Problems" on page 34 This section also explains how to print a Network Status Sheet (see page 34) to confirm that it is set , register the printer's MAC ...
Network Installation Guide
Page 33
.... ■ When using the printer's control panel. Then remove and reinsert the CD to your wireless network. ■ For wired connections, print a Network Status Sheet (see page 34) and make sure the wireless router or access point is set the IP address manually. Select Yes,... then press OK. Printing Problems Cannot print over the network ■ For wireless connections, print a Network Status Sheet (see page 34). Troubleshooting 33 Cannot communicate on your router, access point, switch, or ...
.... ■ When using the printer's control panel. Then remove and reinsert the CD to your wireless network. ■ For wired connections, print a Network Status Sheet (see page 34) and make sure the wireless router or access point is set the IP address manually. Select Yes,... then press OK. Printing Problems Cannot print over the network ■ For wireless connections, print a Network Status Sheet (see page 34). Troubleshooting 33 Cannot communicate on your router, access point, switch, or ...
Network Installation Guide
Page 34
... Settings. 3. Press the x Start button to your dial-up connection for Internet access, you will see this case, print a Network Status Sheet (see below ), click EPSON Scan Settings > Add > Enter address, and enter the IP address manually. ■ If you have a firewall or...Problems Cannot find the scanner or start Epson Scan ■ If network communication was interrupted while starting Epson Scan, exit Epson Scan, and restart it 's poor, try restarting Epson Scan. If Epson Scan cannot restart, turn the printer off For wireless connections, print a Network Status Sheet (see below ...
... Settings. 3. Press the x Start button to your dial-up connection for Internet access, you will see this case, print a Network Status Sheet (see below ), click EPSON Scan Settings > Add > Enter address, and enter the IP address manually. ■ If you have a firewall or...Problems Cannot find the scanner or start Epson Scan ■ If network communication was interrupted while starting Epson Scan, exit Epson Scan, and restart it 's poor, try restarting Epson Scan. If Epson Scan cannot restart, turn the printer off For wireless connections, print a Network Status Sheet (see below ...

Network Installation Guide
Page 36
CPD-27300R1 Printed in XXXXXX
CPD-27300R1 Printed in XXXXXX

Product Brochure
Page 1
... more • Save time - Simple. share one printer with one 69 Black ink cartridge and three 69 color ink cartridges All-in - Amazing. Features and Benefits • Wi-Fi and Ethernet built in -One Epson Stylus® NX515 Print | Copy | Scan | Photo | Wi-Fi® Smart. make multiple copies (1 - 99) with multiple PCs, wired or...
... more • Save time - Simple. share one printer with one 69 Black ink cartridge and three 69 color ink cartridges All-in - Amazing. Features and Benefits • Wi-Fi and Ethernet built in -One Epson Stylus® NX515 Print | Copy | Scan | Photo | Wi-Fi® Smart. make multiple copies (1 - 99) with multiple PCs, wired or...

Product Brochure
Page 2
... and PhotoEnhance is used for reasons including images printed, print settings, temperature and humidity. Copyright 2009 Epson America, Inc. Actual print times will vary according to media, printed image, display conditions, light intensity, temperature, humidity and atmospheric conditions. CPD-30714 5/09 Epson Stylus NX515 Print | Copy | Scan | Photo | Wi-Fi Specifications Printing Technology 4-color (CMYK) drop-on-demand MicroPiezo® ink...
... and PhotoEnhance is used for reasons including images printed, print settings, temperature and humidity. Copyright 2009 Epson America, Inc. Actual print times will vary according to media, printed image, display conditions, light intensity, temperature, humidity and atmospheric conditions. CPD-30714 5/09 Epson Stylus NX515 Print | Copy | Scan | Photo | Wi-Fi Specifications Printing Technology 4-color (CMYK) drop-on-demand MicroPiezo® ink...
Quick Guide
Page 1
Epson Stylus® NX510 Series Quick Guide Basic Copying, Printing, and Scanning Maintenance Solving Problems
Epson Stylus® NX510 Series Quick Guide Basic Copying, Printing, and Scanning Maintenance Solving Problems
Quick Guide
Page 2
... Placing the Original on the Glass 9 Copying a Document 10 Copying a Photo 11 Restoring and Cropping Photos 12 Copy and Restore Print Settings 13 Printing From a Memory Card 14 Compatible Cards and Image Formats 14 Inserting the Card 15 Selecting Individual Photos for... Printing 16 Selecting All Photos for Printing 17 Printing Photos From an Index Sheet 18 Memory Card Print Settings 20 Printing From Your Computer 21 Printing in Windows 21 Printing With a Macintosh 23 Selecting the Correct Paper Type 28 ...
... Placing the Original on the Glass 9 Copying a Document 10 Copying a Photo 11 Restoring and Cropping Photos 12 Copy and Restore Print Settings 13 Printing From a Memory Card 14 Compatible Cards and Image Formats 14 Inserting the Card 15 Selecting Individual Photos for... Printing 16 Selecting All Photos for Printing 17 Printing Photos From an Index Sheet 18 Memory Card Print Settings 20 Printing From Your Computer 21 Printing in Windows 21 Printing With a Macintosh 23 Selecting the Correct Paper Type 28 ...
Quick Guide
Page 4
... without ever turning on your desktop. Caution: Cautions must be observed to avoid damage to your equipment. Introduction After you have set up your Epson printer as you how to do most of these guidelines as described on the Start Here sheet, turn here to: ■ Make a copy... of a document or photo ■ Print photos from your computer ■ Scan a document or photo and restore or correct the color ■ Perform routine maintenance and solve simple problems This book tells you read the instructions: Warning: Warnings must...
... without ever turning on your desktop. Caution: Cautions must be observed to avoid damage to your equipment. Introduction After you have set up your Epson printer as you how to do most of these guidelines as described on the Start Here sheet, turn here to: ■ Make a copy... of a document or photo ■ Print photos from your computer ■ Scan a document or photo and restore or correct the color ■ Perform routine maintenance and solve simple problems This book tells you read the instructions: Warning: Warnings must...
Quick Guide
Page 5
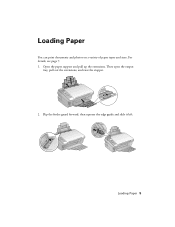
Then open the output tray, pull out the extensions, and raise the stopper. 2. For details, see page 7. 1. Open the paper support and pull up the extensions. Flip the feeder guard forward, then squeeze the edge guide and slide it left. Loading Paper You can print documents and photos on a variety of paper types and sizes. Loading Paper 5
Then open the output tray, pull out the extensions, and raise the stopper. 2. For details, see page 7. 1. Open the paper support and pull up the extensions. Flip the feeder guard forward, then squeeze the edge guide and slide it left. Loading Paper You can print documents and photos on a variety of paper types and sizes. Loading Paper 5
Quick Guide
Page 6
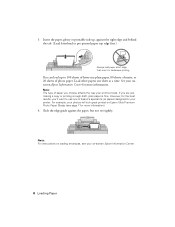
... Center for your photos will look great printed on Epson Ultra Premium Photo Paper Glossy (see your printout looks. 3. Slide the edge guide against the right edge and behind the tab. (Load letterhead or pre-printed paper top edge first.) Always load paper short edge first, even for.... If you choose affects the way your on loading envelopes, see page 7 for landscape printing. You can load up , against the paper, but not too tightly. Note: For instructions on -screen Epson Information Center. 6 Loading Paper Insert the paper, glossy or printable side up to use one...
... Center for your photos will look great printed on Epson Ultra Premium Photo Paper Glossy (see your printout looks. 3. Slide the edge guide against the right edge and behind the tab. (Load letterhead or pre-printed paper top edge first.) Always load paper short edge first, even for.... If you choose affects the way your on loading envelopes, see page 7 for landscape printing. You can load up , against the paper, but not too tightly. Note: For instructions on -screen Epson Information Center. 6 Loading Paper Insert the paper, glossy or printable side up to use one...
Quick Guide
Page 10
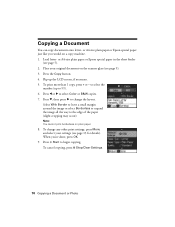
...all the way to begin copying. To cancel copying, press y Stop/Clear Settings. 10 Copying a Document or Photo Flip up to change any other print settings, press Menu and select your original document on plain paper. 8. Press d, then press r to 99). 6. When you would on a copy ...select the number (up the LCD screen, if necessary. 5. Press the Copy button. 4. To change the layout. to select Color or B&W copies. 7. or A4-size plain paper or Epson special paper just like you 're done, press OK. 9. Load letter- Copying a Document You can copy documents onto letter...
...all the way to begin copying. To cancel copying, press y Stop/Clear Settings. 10 Copying a Document or Photo Flip up to change any other print settings, press Menu and select your original document on plain paper. 8. Press d, then press r to 99). 6. When you would on a copy ...select the number (up the LCD screen, if necessary. 5. Press the Copy button. 4. To change the layout. to select Color or B&W copies. 7. or A4-size plain paper or Epson special paper just like you 're done, press OK. 9. Load letter- Copying a Document You can copy documents onto letter...
Quick Guide
Page 11
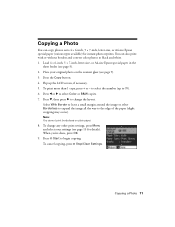
Flip up to begin copying. Copying a Photo You can also print with or without borders and convert color photos to select Color or B&W copies. 7. You can copy photos onto 4 × 6-inch, 5 × 7-inch, letter-size, or A4-size Epson special paper (various types available) for details). Press l or r to black and white. 1. When you're...
Flip up to begin copying. Copying a Photo You can also print with or without borders and convert color photos to select Color or B&W copies. 7. You can copy photos onto 4 × 6-inch, 5 × 7-inch, letter-size, or A4-size Epson special paper (various types available) for details). Press l or r to black and white. 1. When you're...

Quick Guide
Page 12
... cropping your photo: 6. Load 4 × 6-inch, 5 × 7-inch, letter-size, or A4-size Epson special paper. 2. Press the Photo button, then press OK. 4. to fit onto your photo is not faded, ...do not turn on the subject. To change print settings, press Menu and select your settings (see these settings over a preview of your photo, press... OK. 8. You see page 13). After you need to zoom in on Color Restoration.) 5. To turn on Color Restoration, press r, select On, then press OK. (If your paper, press Display/Crop. ■...
... cropping your photo: 6. Load 4 × 6-inch, 5 × 7-inch, letter-size, or A4-size Epson special paper. 2. Press the Photo button, then press OK. 4. to fit onto your photo is not faded, ...do not turn on the subject. To change print settings, press Menu and select your settings (see these settings over a preview of your photo, press... OK. 8. You see page 13). After you need to zoom in on Color Restoration.) 5. To turn on Color Restoration, press r, select On, then press OK. (If your paper, press Display/Crop. ■...
Quick Guide
Page 13
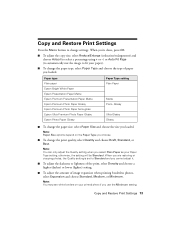
... Minimum. Copy and Restore Print Settings 13 Copy and Restore Print Settings Press the Menu button to change the paper size, select Paper Size and choose the size you loaded. Paper type Plain paper Epson Bright White Paper Epson Presentation Paper Matte Epson Premium Presentation Paper Matte Epson Premium Photo Paper Glossy Epson Premium Photo Paper Semi...
... Minimum. Copy and Restore Print Settings 13 Copy and Restore Print Settings Press the Menu button to change the paper size, select Paper Size and choose the size you loaded. Paper type Plain paper Epson Bright White Paper Epson Presentation Paper Matte Epson Premium Presentation Paper Matte Epson Premium Photo Paper Glossy Epson Premium Photo Paper Semi...
Quick Guide
Page 14
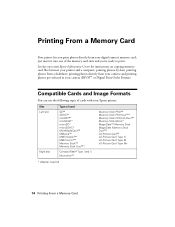
...insert it into one of the memory card slots and you print photos directly from your Epson printer: Slot Left slot Right slot Type of cards with your digital camera's memory card; See the on-screen Epson Information Center for instructions on copying memory card files between ...your camera (DPOF™ or Digital Print Order Format). printing photos by date; and printing photos pre-selected in your printer and a computer; Compatible Cards...
...insert it into one of the memory card slots and you print photos directly from your Epson printer: Slot Left slot Right slot Type of cards with your digital camera's memory card; See the on-screen Epson Information Center for instructions on copying memory card files between ...your camera (DPOF™ or Digital Print Order Format). printing photos by date; and printing photos pre-selected in your printer and a computer; Compatible Cards...


