
Network Installation Guide
Page 3
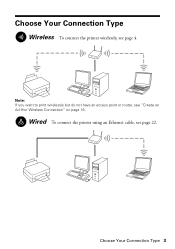
Choose Your Connection Type 3 Note: If you want to print wirelessly but do not have an access point or router, see page 4. Choose Your Connection Type Wireless To connect the printer wirelessly, see "Create an Ad-Hoc Wireless Connection" on page 16. Wired To connect the printer using an Ethernet cable, see page 22.
Choose Your Connection Type 3 Note: If you want to print wirelessly but do not have an access point or router, see page 4. Choose Your Connection Type Wireless To connect the printer wirelessly, see "Create an Ad-Hoc Wireless Connection" on page 16. Wired To connect the printer using an Ethernet cable, see page 22.

Network Installation Guide
Page 16
... computer is complete, reconnect your computer is connected to a network with an Ethernet cable, you need to a network with an Ethernet cable, you want to print wirelessly but do not have an access point or router.
... computer is complete, reconnect your computer is connected to a network with an Ethernet cable, you need to a network with an Ethernet cable, you want to print wirelessly but do not have an access point or router.
Network Installation Guide
Page 28
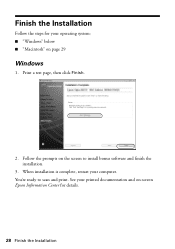
See your printed documentation and on-screen Epson Information Center for your computer. Follow the prompts on page 29 Windows 1. You're ready to install bonus software and finish the installation. 3. When installation is complete, restart your operating system: ■ "Windows" below ■ "Macintosh" on the screen to scan and print. Print a test page, then click Finish. 2. Finish the Installation Follow the steps for details. 28 Finish the Installation
See your printed documentation and on-screen Epson Information Center for your computer. Follow the prompts on page 29 Windows 1. You're ready to install bonus software and finish the installation. 3. When installation is complete, restart your operating system: ■ "Windows" below ■ "Macintosh" on the screen to scan and print. Print a test page, then click Finish. 2. Finish the Installation Follow the steps for details. 28 Finish the Installation

Network Installation Guide
Page 30
Follow the prompts on the right side of the screen to add your computer. See your printed documentation and on-screen Epson Information Center for your computer to print a test page, install bonus software, and finish the installation. 7. 4. When you see this screen, click Add Printer. 5. When installation is complete, restart your EPSON TCPIP printer. Follow the steps on the screen to find the EPSON TCPIP printer on the network. 6. Note: It may take up to scan and print. You're ready to 90 seconds for details. 30 Finish the Installation
Follow the prompts on the right side of the screen to add your computer. See your printed documentation and on-screen Epson Information Center for your computer to print a test page, install bonus software, and finish the installation. 7. 4. When you see this screen, click Add Printer. 5. When installation is complete, restart your EPSON TCPIP printer. Follow the steps on the screen to find the EPSON TCPIP printer on the network. 6. Note: It may take up to scan and print. You're ready to 90 seconds for details. 30 Finish the Installation
Network Installation Guide
Page 31
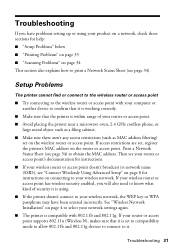
... it is working correctly. ■ Make sure that it is set to compatibility mode to allow 802.11b and 802.11g devices to connect to print a Network Status Sheet (see page 34). If your router or access point supports 802.11n (Wireless N), makes sure that the printer is within range of...'s documentation for instructions. ■ If your wireless router or access point doesn't broadcast its network name (SSID), see page 34) to obtain the MAC address. Print a Network Status Sheet (see "Connect Wirelessly Using Advanced Setup" on page 8 for help: ■ "Setup Problems" below ■...
... it is working correctly. ■ Make sure that it is set to compatibility mode to allow 802.11b and 802.11g devices to connect to print a Network Status Sheet (see page 34). If your router or access point supports 802.11n (Wireless N), makes sure that the printer is within range of...'s documentation for instructions. ■ If your wireless router or access point doesn't broadcast its network name (SSID), see page 34) to obtain the MAC address. Print a Network Status Sheet (see "Connect Wirelessly Using Advanced Setup" on page 8 for help: ■ "Setup Problems" below ■...
Network Installation Guide
Page 33
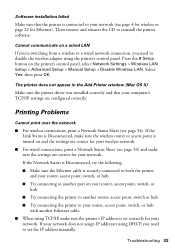
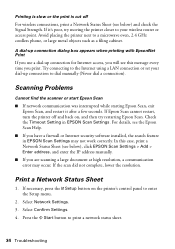
Then remove and reinsert the CD to set correctly for your wireless network. ■ For wired connections, print a Network Status Sheet (see page 34). The printer does not appear in the Add Printer window (Mac OS X) Make sure the printer driver was...Troubleshooting 33 Select Yes, then press OK. Press the F Setup button on and the settings are correct for your network. Printing Problems Cannot print over the network ■ For wireless connections, print a Network Status Sheet (see page 34) and make sure the wireless router or access point is set the IP address manually...
Then remove and reinsert the CD to set correctly for your wireless network. ■ For wired connections, print a Network Status Sheet (see page 34). The printer does not appear in the Add Printer window (Mac OS X) Make sure the printer driver was...Troubleshooting 33 Select Yes, then press OK. Press the F Setup button on and the settings are correct for your network. Printing Problems Cannot print over the network ■ For wireless connections, print a Network Status Sheet (see page 34) and make sure the wireless router or access point is set the IP address manually...
Network Installation Guide
Page 34
... status sheet. 34 Troubleshooting A dial-up connection dialog box appears when printing with EpsonNet Print If you print. Print a Network Status Sheet 1. If Epson Scan cannot restart, turn the printer off For wireless connections, print a Network Status Sheet (see the Epson Scan Help. ■ If you have a firewall or Internet security software installed, the search feature in...
... status sheet. 34 Troubleshooting A dial-up connection dialog box appears when printing with EpsonNet Print If you print. Print a Network Status Sheet 1. If Epson Scan cannot restart, turn the printer off For wireless connections, print a Network Status Sheet (see the Epson Scan Help. ■ If you have a firewall or Internet security software installed, the search feature in...

Network Installation Guide
Page 36
CPD-27300R1 Printed in XXXXXX
CPD-27300R1 Printed in XXXXXX

Product Brochure
Page 1
... - share one printer with one 69 Black ink cartridge and three 69 color ink cartridges red-eye removal, automatic photo restoration, Automatic Photo Correction, and more accurate color • Standard ink set included - individual ink cartridges, available in -One Epson Stylus® NX515 Print | Copy | Scan | Photo | Wi-Fi® Smart. Simple. up to 2x faster...
... - share one printer with one 69 Black ink cartridge and three 69 color ink cartridges red-eye removal, automatic photo restoration, Automatic Photo Correction, and more accurate color • Standard ink set included - individual ink cartridges, available in -One Epson Stylus® NX515 Print | Copy | Scan | Photo | Wi-Fi® Smart. Simple. up to 2x faster...

Product Brochure
Page 2
... priced at $149 or less as of January 2009. 2 Some applications and/or functions, like two-sided printing, may be supported by ISO/IEC 24711 and 24712. Epson Stylus NX515 Print | Copy | Scan | Photo | Wi-Fi Specifications Printing Technology 4-color (CMYK) drop-on-demand MicroPiezo® ink jet technology Nozzle Configuration 128 x 3 Black 128 x 3 Cyan, Magenta, Yellow...
... priced at $149 or less as of January 2009. 2 Some applications and/or functions, like two-sided printing, may be supported by ISO/IEC 24711 and 24712. Epson Stylus NX515 Print | Copy | Scan | Photo | Wi-Fi Specifications Printing Technology 4-color (CMYK) drop-on-demand MicroPiezo® ink jet technology Nozzle Configuration 128 x 3 Black 128 x 3 Cyan, Magenta, Yellow...
Quick Guide
Page 1
Epson Stylus® NX510 Series Quick Guide Basic Copying, Printing, and Scanning Maintenance Solving Problems
Epson Stylus® NX510 Series Quick Guide Basic Copying, Printing, and Scanning Maintenance Solving Problems
Quick Guide
Page 2
... Placing the Original on the Glass 9 Copying a Document 10 Copying a Photo 11 Restoring and Cropping Photos 12 Copy and Restore Print Settings 13 Printing From a Memory Card 14 Compatible Cards and Image Formats 14 Inserting the Card 15 Selecting Individual Photos for... Printing 16 Selecting All Photos for Printing 17 Printing Photos From an Index Sheet 18 Memory Card Print Settings 20 Printing From Your Computer 21 Printing in Windows 21 Printing With a Macintosh 23 Selecting the Correct Paper Type 28 ...
... Placing the Original on the Glass 9 Copying a Document 10 Copying a Photo 11 Restoring and Cropping Photos 12 Copy and Restore Print Settings 13 Printing From a Memory Card 14 Compatible Cards and Image Formats 14 Inserting the Card 15 Selecting Individual Photos for... Printing 16 Selecting All Photos for Printing 17 Printing Photos From an Index Sheet 18 Memory Card Print Settings 20 Printing From Your Computer 21 Printing in Windows 21 Printing With a Macintosh 23 Selecting the Correct Paper Type 28 ...
Quick Guide
Page 4
...Get the basic steps for better copying, scanning, and printing. 4 Introduction Note: Notes contain important information about your equipment. Please follow these things without ever turning on your computer! Introduction After you have set up your Epson printer as you how to do most of these ...Here sheet, turn here to: ■ Make a copy of a document or photo ■ Print photos from your computer ■ Scan a document or photo and restore or correct the color ■ Perform routine maintenance and solve simple problems This book tells you read the instructions: Warning:...
...Get the basic steps for better copying, scanning, and printing. 4 Introduction Note: Notes contain important information about your equipment. Please follow these things without ever turning on your computer! Introduction After you have set up your Epson printer as you how to do most of these ...Here sheet, turn here to: ■ Make a copy of a document or photo ■ Print photos from your computer ■ Scan a document or photo and restore or correct the color ■ Perform routine maintenance and solve simple problems This book tells you read the instructions: Warning:...
Quick Guide
Page 5
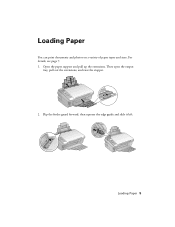
Flip the feeder guard forward, then squeeze the edge guide and slide it left. Loading Paper You can print documents and photos on a variety of paper types and sizes. Open the paper support and pull up the extensions. Then open the output tray, pull out the extensions, and raise the stopper. 2. Loading Paper 5 For details, see page 7. 1.
Flip the feeder guard forward, then squeeze the edge guide and slide it left. Loading Paper You can print documents and photos on a variety of paper types and sizes. Open the paper support and pull up the extensions. Then open the output tray, pull out the extensions, and raise the stopper. 2. Loading Paper 5 For details, see page 7. 1.
Quick Guide
Page 6
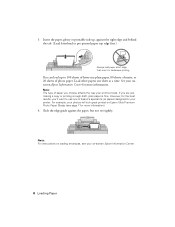
...up , against the paper, but not too tightly. Note: The type of Epson's special ink jet papers designed for more information). 4. 3. Load other papers one of paper you are just making a copy or printing a rough draft, plain paper is fine. Note: For instructions on loading envelopes..., see your photos will look great printed on -screen Epson Information Center. 6 Loading Paper If you choose affects the way your printer. ...
...up , against the paper, but not too tightly. Note: The type of Epson's special ink jet papers designed for more information). 4. 3. Load other papers one of paper you are just making a copy or printing a rough draft, plain paper is fine. Note: For instructions on loading envelopes..., see your photos will look great printed on -screen Epson Information Center. 6 Loading Paper If you choose affects the way your printer. ...
Quick Guide
Page 10
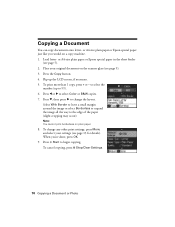
... (see page 13 for details). to select the number (up the LCD screen, if necessary. 5. Note: You cannot print borderless on the scanner glass (see page 5). 2. or A4-size plain paper or Epson special paper just like you 're done, press OK. 9. Press l or r to change any other... print settings, press Menu and select your original document on plain paper. 8. Press d, then press r to select Color or B&W copies. 7. To change the layout. Press x...
... (see page 13 for details). to select the number (up the LCD screen, if necessary. 5. Note: You cannot print borderless on the scanner glass (see page 5). 2. or A4-size plain paper or Epson special paper just like you 're done, press OK. 9. Press l or r to change any other... print settings, press Menu and select your original document on plain paper. 8. Press d, then press r to select Color or B&W copies. 7. To change the layout. Press x...
Quick Guide
Page 11
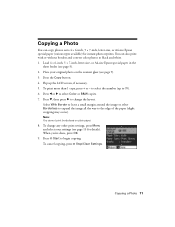
... × 6-inch, 5 × 7-inch, letter-size, or A4-size Epson special paper in the sheet feeder (see page 5). 2. Note: You cannot print borderless on the scanner glass (see page 13 for instant photo reprints. Flip up to select Color or B&W copies. 7. You can copy photos onto 4 × 6-inch,... 5 × 7-inch, letter-size, or A4-size Epson special paper (various types available) for details). Copying a Photo You can also print with or without borders and convert color photos to the edge...
... × 6-inch, 5 × 7-inch, letter-size, or A4-size Epson special paper in the sheet feeder (see page 5). 2. Note: You cannot print borderless on the scanner glass (see page 13 for instant photo reprints. Flip up to select Color or B&W copies. 7. You can copy photos onto 4 × 6-inch,... 5 × 7-inch, letter-size, or A4-size Epson special paper (various types available) for details). Copying a Photo You can also print with or without borders and convert color photos to the edge...

Quick Guide
Page 12
Load 4 × 6-inch, 5 × 7-inch, letter-size, or A4-size Epson special paper. 2. Place your original photo on Color Restoration.) 5. After you 're done, press OK. 9. To change print settings, press Menu and select your settings (see these settings over a preview of your photo: 6. Restoring and ... NX510 Series software on your computer. 1. When you are done cropping your photo. Press x Start to prescan your photo, press OK. 8. To print more than 5 × 7 inches, use the arrow buttons. ■ To check the zoomed image, press OK. to their original brilliance. If...
Load 4 × 6-inch, 5 × 7-inch, letter-size, or A4-size Epson special paper. 2. Place your original photo on Color Restoration.) 5. After you 're done, press OK. 9. To change print settings, press Menu and select your settings (see these settings over a preview of your photo: 6. Restoring and ... NX510 Series software on your computer. 1. When you are done cropping your photo. Press x Start to prescan your photo, press OK. 8. To print more than 5 × 7 inches, use the arrow buttons. ■ To check the zoomed image, press OK. to their original brilliance. If...
Quick Guide
Page 13
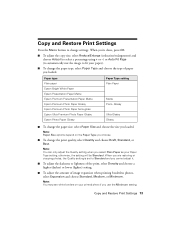
... Press the Menu button to change the print quality, select Quality and choose Draft, Standard, or Best. Paper type Plain paper Epson Bright White Paper Epson Presentation Paper Matte Epson Premium Presentation Paper Matte Epson Premium Photo Paper Glossy Epson Premium Photo Paper Semi-gloss Epson Ultra Premium Photo Paper Glossy Epson Photo Paper Glossy Paper Type setting...
... Press the Menu button to change the print quality, select Quality and choose Draft, Standard, or Best. Paper type Plain paper Epson Bright White Paper Epson Presentation Paper Matte Epson Premium Presentation Paper Matte Epson Premium Photo Paper Glossy Epson Premium Photo Paper Semi-gloss Epson Ultra Premium Photo Paper Glossy Epson Photo Paper Glossy Paper Type setting...
Quick Guide
Page 14
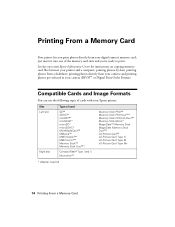
... following types of cards with your Epson printer: Slot Left slot Right slot Type of the memory card slots and you print photos directly from your camera; printing photos from your digital camera's memory card; printing photos by date; and printing photos pre-selected in your printer and... H xD-Picture Card Type M xD-Picture Card Type M+ * Adapter required 14 Printing From a Memory Card Printing From a Memory Card Your printer lets you 're ready to print. See the on-screen Epson Information Center for instructions on copying memory card files between your camera (DPOF™ ...
... following types of cards with your Epson printer: Slot Left slot Right slot Type of the memory card slots and you print photos directly from your camera; printing photos from your digital camera's memory card; printing photos by date; and printing photos pre-selected in your printer and... H xD-Picture Card Type M xD-Picture Card Type M+ * Adapter required 14 Printing From a Memory Card Printing From a Memory Card Your printer lets you 're ready to print. See the on-screen Epson Information Center for instructions on copying memory card files between your camera (DPOF™ ...


