
Product Brochure
Page 2
...Scanner Bit Depth 48-bit color, Scan 24-bit output Copy Settings Color, Black/White, Draft, Normal Copy Quantity 1 - 99 (PC-free) Maximum Copy Size 8.5" x 11" (PC-free), A4 Copy Features Fit to page, adjustable reduction and enlargement (25 - 400%), adjustable copy density PC-free Printing Print all rights in these marks. Epson Stylus NX415... Print | Copy | Scan | Photo Specifications Printing Technology 4-color (CMYK) drop-on-demand MicroPiezo® ink jet technology Nozzle ...
...Scanner Bit Depth 48-bit color, Scan 24-bit output Copy Settings Color, Black/White, Draft, Normal Copy Quantity 1 - 99 (PC-free) Maximum Copy Size 8.5" x 11" (PC-free), A4 Copy Features Fit to page, adjustable reduction and enlargement (25 - 400%), adjustable copy density PC-free Printing Print all rights in these marks. Epson Stylus NX415... Print | Copy | Scan | Photo Specifications Printing Technology 4-color (CMYK) drop-on-demand MicroPiezo® ink jet technology Nozzle ...

Quick Guide
Page 9
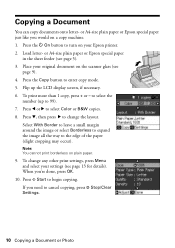
Copying a Document or Photo 9 Open the document cover and place your originals correctly on the scanner glass and make color or black-and-white copies. Close the cover gently so you don't move the original. Placing the Original on the scanner glass, with the top facing into the front right corner. 2. Copying a Document or Photo Follow the instructions in this section to position your original face-down on the Glass 1.
Copying a Document or Photo 9 Open the document cover and place your originals correctly on the scanner glass and make color or black-and-white copies. Close the cover gently so you don't move the original. Placing the Original on the scanner glass, with the top facing into the front right corner. 2. Copying a Document or Photo Follow the instructions in this section to position your original face-down on the Glass 1.
Quick Guide
Page 10
... on your settings (see page 13 for details). Press d, then press r to turn on the scanner glass (see page 5). 3. If you need to 99). 7. Load letter- or A4-size plain paper or Epson special paper in the sheet feeder (see page 9). 4. Flip up to cancel copying, press y ...copy machine. 1. to select the number (up the LCD display screen, if necessary. 6. When you would on plain paper. 9. Press the Copy button to select Color or B&W copies. 8. Copying a Document You can copy documents onto letter- Press l or r to enter copy mode. 5. Press x Start to the edge of ...
... on your settings (see page 13 for details). Press d, then press r to turn on the scanner glass (see page 5). 3. If you need to 99). 7. Load letter- or A4-size plain paper or Epson special paper in the sheet feeder (see page 9). 4. Flip up to cancel copying, press y ...copy machine. 1. to select the number (up the LCD display screen, if necessary. 6. When you would on plain paper. 9. Press the Copy button to select Color or B&W copies. 8. Copying a Document You can copy documents onto letter- Press l or r to enter copy mode. 5. Press x Start to the edge of ...
Quick Guide
Page 11
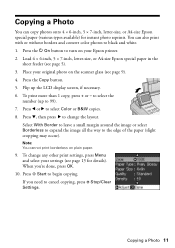
Copying a Photo You can also print with or without borders and convert color photos to black and white. 1. Flip up to change any other print settings, press Menu and select your original photo on the scanner glass (see page 5). 3. To print more than 1 copy, press + or - Select With Border to ... Press x Start to the edge of the paper (slight cropping may occur). Load 4 × 6-inch, 5 × 7-inch, letter-size, or A4-size Epson special paper in the sheet feeder (see page 9). 4. Place your settings (see page 13 for instant photo reprints. Press l or r to select the number (up...
Copying a Photo You can also print with or without borders and convert color photos to black and white. 1. Flip up to change any other print settings, press Menu and select your original photo on the scanner glass (see page 5). 3. To print more than 1 copy, press + or - Select With Border to ... Press x Start to the edge of the paper (slight cropping may occur). Load 4 × 6-inch, 5 × 7-inch, letter-size, or A4-size Epson special paper in the sheet feeder (see page 9). 4. Place your settings (see page 13 for instant photo reprints. Press l or r to select the number (up...

Quick Guide
Page 12
Load 4 × 6-inch, 5 × 7-inch, letter-size, or A4-size Epson special paper. 3. Place your original photo on Color Restoration.) 6. After you 're done, press OK. 10. To change print settings, press Menu and select your...Document or Photo Press the Photo button, and press OK. 5. To turn on Color Restoration, press r, select On, and press OK. (If your photo is not faded, do not turn on your Epson printer. 2. When you are done cropping your photo, press OK. 9. You can... Note: To restore photos larger than 1 copy, press + or - If you need to turn on the scanner glass. 4.
Load 4 × 6-inch, 5 × 7-inch, letter-size, or A4-size Epson special paper. 3. Place your original photo on Color Restoration.) 6. After you 're done, press OK. 10. To change print settings, press Menu and select your...Document or Photo Press the Photo button, and press OK. 5. To turn on Color Restoration, press r, select On, and press OK. (If your photo is not faded, do not turn on your Epson printer. 2. When you are done cropping your photo, press OK. 9. You can... Note: To restore photos larger than 1 copy, press + or - If you need to turn on the scanner glass. 4.
Quick Guide
Page 19
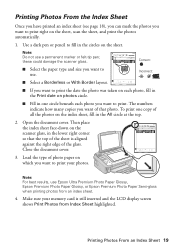
...the sheet, scan the sheet, and print the photos automatically. 1. Load the type of photo paper on which you want to print right on the scanner glass, in the All circle at the top. 2. To print one circle beneath each photo you want to use. Close the document cover. 3. ...want to print your memory card is aligned against the right edge of the glass. Note: Do not use Epson Ultra Premium Photo Paper Glossy, Epson Premium Photo Paper Glossy, or Epson Premium Photo Paper Semi-gloss when printing photos from Index Sheet highlighted. The numbers indicate how many copies you ...
...the sheet, scan the sheet, and print the photos automatically. 1. Load the type of photo paper on which you want to print right on the scanner glass, in the All circle at the top. 2. To print one circle beneath each photo you want to use. Close the document cover. 3. ...want to print your memory card is aligned against the right edge of the glass. Note: Do not use Epson Ultra Premium Photo Paper Glossy, Epson Premium Photo Paper Glossy, or Epson Premium Photo Paper Semi-gloss when printing photos from Index Sheet highlighted. The numbers indicate how many copies you ...
Quick Guide
Page 28
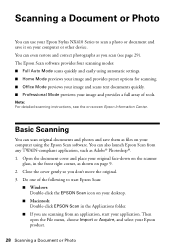
...You can scan original documents and photos and save it on -screen Epson Information Center. Open the document cover and place your desktop. ■ Macintosh: Double-click EPSON Scan in the front right corner, as shown on the scanner glass, in the Applications folder. ■ If you are scanning... from any TWAIN-compliant application, such as Adobe® Photoshop®. 1. Do one of tools. Scanning a Document or Photo You can even restore and correct photographs as you scan (see the on your Epson Stylus ...
...You can scan original documents and photos and save it on -screen Epson Information Center. Open the document cover and place your desktop. ■ Macintosh: Double-click EPSON Scan in the front right corner, as shown on the scanner glass, in the Applications folder. ■ If you are scanning... from any TWAIN-compliant application, such as Adobe® Photoshop®. 1. Do one of tools. Scanning a Document or Photo You can even restore and correct photographs as you scan (see the on your Epson Stylus ...

Quick Guide
Page 34
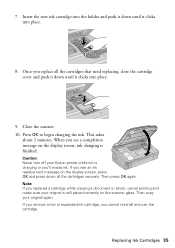
... lift it gently four or five times. Remove the yellow tape from the package. 3. Keep ink cartridges out of the reach of it . Open the scanner, and open the new cartridge package, shake it up. Do not take the used cartridge apart or try to refill it carefully. Then remove the...
... lift it gently four or five times. Remove the yellow tape from the package. 3. Keep ink cartridges out of the reach of it . Open the scanner, and open the new cartridge package, shake it up. Do not take the used cartridge apart or try to refill it carefully. Then remove the...
Quick Guide
Page 35
Note: If you replaced a cartridge while copying a document or photo, cancel printing and make sure your Epson printer while ink is charging or you'll waste ink. If you remove a low or expended ink cartridge, you see a completion message on the display ... OK and press down all the cartridges that need replacing, close the cartridge cover and push it down until it clicks into place. 9. Close the scanner. 10. Press OK to begin charging the ink. If you cannot reinstall and use the cartridge. Replacing Ink Cartridges 35 7. When you replace all the...
Note: If you replaced a cartridge while copying a document or photo, cancel printing and make sure your Epson printer while ink is charging or you'll waste ink. If you remove a low or expended ink cartridge, you see a completion message on the display ... OK and press down all the cartridges that need replacing, close the cartridge cover and push it down until it clicks into place. 9. Close the scanner. 10. Press OK to begin charging the ink. If you cannot reinstall and use the cartridge. Replacing Ink Cartridges 35 7. When you replace all the...
Quick Guide
Page 37
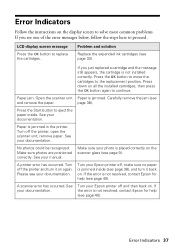
...sure photos are positioned correctly. Turn off the printer, open the scanner unit, remove paper. Turn your documentation. A scanner error has occurred. Error Indicators 37 Problem and solution Replace the expended ink cartridges (see your Epson printer off and then back on. page 38). See your ...paper is not resolved, contact Epson for help (see page 40). A printer error has occurred. Carefully remove the jam (see page 9). If the error is jammed inside . Press down on the scanner glass (see and remove the paper. Open the scanner unit Paper is jammed in ...
...sure photos are positioned correctly. Turn off the printer, open the scanner unit, remove paper. Turn your documentation. A scanner error has occurred. Error Indicators 37 Problem and solution Replace the expended ink cartridges (see your Epson printer off and then back on. page 38). See your ...paper is not resolved, contact Epson for help (see page 40). A printer error has occurred. Carefully remove the jam (see page 9). If the error is jammed inside . Press down on the scanner glass (see and remove the paper. Open the scanner unit Paper is jammed in ...
Quick Guide
Page 38
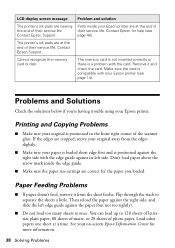
.... The memory card is not inserted correctly or there is positioned in the front right corner of the scanner glass. Don't load paper above the arrow mark inside your Epson printer are at the end of their service life. Then reload the paper against the right side, and slide ...; Make sure the paper size settings are correct for help (see page 14). Printing and Copying Problems ■ Make sure your on-screen Epson Information Center for more information. 38 Solving Problems Problems and Solutions Check the solutions below if you loaded. Load other papers one sheet at once...
.... The memory card is not inserted correctly or there is positioned in the front right corner of the scanner glass. Don't load paper above the arrow mark inside your Epson printer are at the end of their service life. Then reload the paper against the right side, and slide ...; Make sure the paper size settings are correct for help (see page 14). Printing and Copying Problems ■ Make sure your on-screen Epson Information Center for more information. 38 Solving Problems Problems and Solutions Check the solutions below if you loaded. Load other papers one sheet at once...
Quick Guide
Page 39
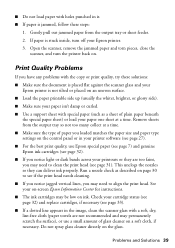
... in it. ■ If paper is stuck inside, turn the printer back on. Open the scanner, remove the jammed paper and torn pieces, close the scanner, and turn off your on-screen Epson Information Center for instructions. ■ The ink cartridges may need to align the print head. If... paper is jammed, follow these solutions: ■ Make sure the document is placed flat against the scanner glass and your Epson printer is not tilted or placed on an uneven surface. ■ Load the paper printable side up (usually the whiter, brighter, or...
... in it. ■ If paper is stuck inside, turn the printer back on. Open the scanner, remove the jammed paper and torn pieces, close the scanner, and turn off your on-screen Epson Information Center for instructions. ■ The ink cartridges may need to align the print head. If... paper is jammed, follow these solutions: ■ Make sure the document is placed flat against the scanner glass and your Epson printer is not tilted or placed on an uneven surface. ■ Load the paper printable side up (usually the whiter, brighter, or...

Quick Guide
Page 41
... vibrations, or dust. ■ Leave enough room around the printer for a long period, unplug the power cord from the wall. ■ Do not open the scanner section while the NX410 Series is at least 4 inches (10 cm) away from the electrical outlet. ■ Always turn off the printer using the P On... printer or cutting off , or on a flat, stable surface that regularly switches on and off power to follow all warnings and instructions marked on your Epson printer. ■ Use only the type of power source indicated on the printer. Notices Important Safety Instructions Before using your...
... vibrations, or dust. ■ Leave enough room around the printer for a long period, unplug the power cord from the wall. ■ Do not open the scanner section while the NX410 Series is at least 4 inches (10 cm) away from the electrical outlet. ■ Always turn off the printer using the P On... printer or cutting off , or on a flat, stable surface that regularly switches on and off power to follow all warnings and instructions marked on your Epson printer. ■ Use only the type of power source indicated on the printer. Notices Important Safety Instructions Before using your...

Start Here
Page 2
Language 4 Install ink cartridges Note: Do not load paper yet. 1 Lift up the scanner, then open the cartridge cover. 2 Shake the ink cartridges gently 4 or 5 times, then unpack them. 3 Remove only the yellow tape from each color. Caution: Do not remove any other seals or the cartridge may leak. 4 Insert the cartridges in the holder for each cartridge. 3 Select your language Press or to select to select your language, then press OK.
Language 4 Install ink cartridges Note: Do not load paper yet. 1 Lift up the scanner, then open the cartridge cover. 2 Shake the ink cartridges gently 4 or 5 times, then unpack them. 3 Remove only the yellow tape from each color. Caution: Do not remove any other seals or the cartridge may leak. 4 Insert the cartridges in the holder for each cartridge. 3 Select your language Press or to select to select your language, then press OK.
Start Here
Page 3
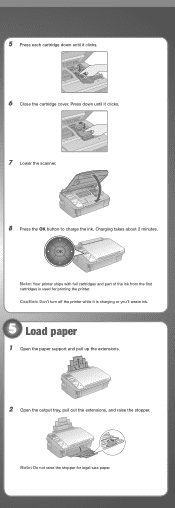
... down until it clicks. 6 Close the cartridge cover. Note: Do not raise the stopper for priming the printer. Press down until it clicks. 7 Lower the scanner. 8 Press the OK button to charge the ink.
... down until it clicks. 6 Close the cartridge cover. Note: Do not raise the stopper for priming the printer. Press down until it clicks. 7 Lower the scanner. 8 Press the OK button to charge the ink.


