
Product Brochure
Page 1
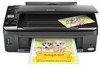
...; Superior image enhancement tools - instant-dry ink for everyday projects - includes one -touch copying and scanning • Replace only the color you need - Features and Benefits • PC-free, borderless photos in different sizes • Truly touchable photos and documents - better... Scan documents to use for smudge, fade and water resistant prints • Unsurpassed print quality - restore color to old, faded photos; get sharp documents and photos with one touch • Save time - All-in-One Epson Stylus® NX215 Print | Copy | Scan | Photo Smart. send as e-mail...
...; Superior image enhancement tools - instant-dry ink for everyday projects - includes one -touch copying and scanning • Replace only the color you need - Features and Benefits • PC-free, borderless photos in different sizes • Truly touchable photos and documents - better... Scan documents to use for smudge, fade and water resistant prints • Unsurpassed print quality - restore color to old, faded photos; get sharp documents and photos with one touch • Save time - All-in-One Epson Stylus® NX215 Print | Copy | Scan | Photo Smart. send as e-mail...

Product Brochure
Page 2
... ICM 37.7 dB Operating: 50 ° to 95 °F, (10 ° to 35 °C) Storage: -4 ° to 104 °F, (-20 ° to 50% of Epson America, Inc. CPD-30717 6/09 Epson Stylus NX215 Print | Copy | Scan | Photo Specifications Printing Technology 4-color (CMYK) drop-on accelerated testing of their respective companies. Actual yields will vary considerably for both...
... ICM 37.7 dB Operating: 50 ° to 95 °F, (10 ° to 35 °C) Storage: -4 ° to 104 °F, (-20 ° to 50% of Epson America, Inc. CPD-30717 6/09 Epson Stylus NX215 Print | Copy | Scan | Photo Specifications Printing Technology 4-color (CMYK) drop-on accelerated testing of their respective companies. Actual yields will vary considerably for both...
Quick Guide
Page 1
Epson Stylus® NX210 Series Quick Guide Basic Copying, Printing, and Scanning Maintenance Solving Problems
Epson Stylus® NX210 Series Quick Guide Basic Copying, Printing, and Scanning Maintenance Solving Problems

Quick Guide
Page 2
... 24 Scanning a Document or Photo 25 Quick Scanning With the Scan Button 25 Custom Scanning With Epson Scan Software 26 Restoring and Correcting Photos 27 Maintaining Your Printer 28 Checking the Print Head Nozzles 28 Cleaning the Print Head 29 Checking Ink Levels 30 Purchasing Epson Ink Cartridges 30 Replacing Ink Cartridges 31 2 Contents
... 24 Scanning a Document or Photo 25 Quick Scanning With the Scan Button 25 Custom Scanning With Epson Scan Software 26 Restoring and Correcting Photos 27 Maintaining Your Printer 28 Checking the Print Head Nozzles 28 Cleaning the Print Head 29 Checking Ink Levels 30 Purchasing Epson Ink Cartridges 30 Replacing Ink Cartridges 31 2 Contents

Quick Guide
Page 4
Note: Notes contain important information about your equipment. Tip: Tips contain hints for printing from your computer ■ Scan a document or photo and restore or correct the color, if necessary ■ Perform routine maintenance and solve simple problems This book tells you read the instructions: Warning: ... printer. Please follow these things without ever turning on your desktop. For additional instructions, see the on-screen Epson Information Center (which includes your user's guide) by double-clicking its icon on your computer! Introduction After you have set up your...
Note: Notes contain important information about your equipment. Tip: Tips contain hints for printing from your computer ■ Scan a document or photo and restore or correct the color, if necessary ■ Perform routine maintenance and solve simple problems This book tells you read the instructions: Warning: ... printer. Please follow these things without ever turning on your desktop. For additional instructions, see the on-screen Epson Information Center (which includes your user's guide) by double-clicking its icon on your computer! Introduction After you have set up your...

Quick Guide
Page 5
Flip the feeder guard forward, then squeeze the edge guide and slide it left. Loading Paper You can print documents and photos on a variety of paper types and sizes. For details, see page 7. 1. Loading Paper 5 Open the paper support and pull up the extensions. Then open the output tray, pull out the extensions, and raise the stopper. 2.
Flip the feeder guard forward, then squeeze the edge guide and slide it left. Loading Paper You can print documents and photos on a variety of paper types and sizes. For details, see page 7. 1. Loading Paper 5 Open the paper support and pull up the extensions. Then open the output tray, pull out the extensions, and raise the stopper. 2.

Quick Guide
Page 6
... more information. Slide the edge guide against the right edge and behind the tab. (Load letterhead or pre-printed paper top edge first.) Always load paper short edge first, even for your on Epson Ultra Premium Photo Paper Glossy (see your printer. 3. You can load up , against the paper, but not too... sheets of letter-size plain paper, 80 sheets of matte, or 20 sheets of paper you choose affects the way your photos will look great printed on -screen Epson Information Center. 6 Loading Paper Note: The type of photo paper.
... more information. Slide the edge guide against the right edge and behind the tab. (Load letterhead or pre-printed paper top edge first.) Always load paper short edge first, even for your on Epson Ultra Premium Photo Paper Glossy (see your printer. 3. You can load up , against the paper, but not too... sheets of letter-size plain paper, 80 sheets of matte, or 20 sheets of paper you choose affects the way your photos will look great printed on -screen Epson Information Center. 6 Loading Paper Note: The type of photo paper.

Quick Guide
Page 10
...a Document or Photo Change copy size Select paper size and type Start copying Place your original document on your paper). To print more than 1 copy, press + or - Press x Start to select Color or B&W copies. 7. To cancel copying, press y Stop/Clear Settings. Load letter- Press the Copy button to 99... machine. 1. Copying a Document You can press l or r to select Auto (to automatically size the image to fit your Epson printer. 2. or A4-size plain paper or Epson special paper just like you would on plain paper, hold down x Start until the P On light starts flashing. Or you ...
...a Document or Photo Change copy size Select paper size and type Start copying Place your original document on your paper). To print more than 1 copy, press + or - Press x Start to select Color or B&W copies. 7. To cancel copying, press y Stop/Clear Settings. Load letter- Press the Copy button to 99... machine. 1. Copying a Document You can press l or r to select Auto (to automatically size the image to fit your Epson printer. 2. or A4-size plain paper or Epson special paper just like you would on plain paper, hold down x Start until the P On light starts flashing. Or you ...

Quick Guide
Page 11
...the Copy button again. 8. Press the Copy button to fit your Epson printer. 2. To print more than 1 copy, press + or - To cancel copying, press y Stop/Clear Settings. Press the paper size button, if necessary, to select Color or B&W copies. 7. Select copy mode Change copy size Select ...to begin copying. Press x Start to 99). 6. Copying a Photo You can also convert color photos to turn on the scanner glass (see page 5). 3. You can copy photos onto 4 × 6-inch Epson photo paper (various types available) for instant photo reprints. Press the P On button to...
...the Copy button again. 8. Press the Copy button to fit your Epson printer. 2. To print more than 1 copy, press + or - To cancel copying, press y Stop/Clear Settings. Press the paper size button, if necessary, to select Color or B&W copies. 7. Select copy mode Change copy size Select ...to begin copying. Press x Start to 99). 6. Copying a Photo You can also convert color photos to turn on the scanner glass (see page 5). 3. You can copy photos onto 4 × 6-inch Epson photo paper (various types available) for instant photo reprints. Press the P On button to...

Quick Guide
Page 12
... a Memory Card just insert it into the memory card slot and you print photos directly from your digital camera's memory card; Compatible Cards and Image Formats You can use the following types of cards with your Epson printer: SD™ SDHC™ miniSD™* miniSDHC* microSD* microSDHC* ... version 1.0 or 2.0 compliant** JPEG Supports Exif version 2.21 80 × 80 pixels to 9200 × 9200 pixels Up to print. Printing From a Memory Card Your Epson printer lets you 're ready to 999 * Adapter required ** DCF is the "Design rule for instructions on copying memory card files ...
... a Memory Card just insert it into the memory card slot and you print photos directly from your digital camera's memory card; Compatible Cards and Image Formats You can use the following types of cards with your Epson printer: SD™ SDHC™ miniSD™* miniSDHC* microSD* microSDHC* ... version 1.0 or 2.0 compliant** JPEG Supports Exif version 2.21 80 × 80 pixels to 9200 × 9200 pixels Up to print. Printing From a Memory Card Your Epson printer lets you 're ready to 999 * Adapter required ** DCF is the "Design rule for instructions on copying memory card files ...

Quick Guide
Page 13
Now you can: ■ View your photos on the LCD display screen and print them (see page 14) ■ Print an index sheet so you can select which photos to print (see a confirmation message, remove the card. ■ If your printer is running Windows, click the or icon on the taskbar and select Safely... printer while the memory card access light is not flashing, then pull the card straight out of its slot. Inserting the Card 13 Insert your Epson printer is turned on the card. it won't go in all the way.
Now you can: ■ View your photos on the LCD display screen and print them (see page 14) ■ Print an index sheet so you can select which photos to print (see a confirmation message, remove the card. ■ If your printer is running Windows, click the or icon on the taskbar and select Safely... printer while the memory card access light is not flashing, then pull the card straight out of its slot. Inserting the Card 13 Insert your Epson printer is turned on the card. it won't go in all the way.

Quick Guide
Page 14
... the LCD Screen You can select individual photos for printing as you want. 6. Press the Print photos button. Press the paper size button, if necessary, to print. 4. You see page 7). 2. see this screen: 3. Repeat steps 3 and 4 to print, press x Start. Press l or r to move through ...your photos and display one that photo. 5. To cancel printing, press y Stop/Clear Settings. 14 Printing From a Memory Card When you want of 4 × 6-inch Epson photo paper (various types available; Paper size button 7. button to select the number of copies you...
... the LCD Screen You can select individual photos for printing as you want. 6. Press the Print photos button. Press the paper size button, if necessary, to print. 4. You see page 7). 2. see this screen: 3. Repeat steps 3 and 4 to print, press x Start. Press l or r to move through ...your photos and display one that photo. 5. To cancel printing, press y Stop/Clear Settings. 14 Printing From a Memory Card When you want of 4 × 6-inch Epson photo paper (various types available; Paper size button 7. button to select the number of copies you...

Quick Guide
Page 15
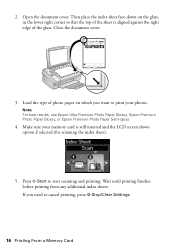
...The most recent photos are printed on the sheet. Use a dark pen or pencil to fill in the All circle at the top. Printing an Index Sheet 1. or A4-size paper (see page 13). 3. Printing Photos From an Index Sheet 15 Your Epson printer automatically prints them on the sheet, ...scan the sheet, and print the photos automatically. 1. Incorrect: ■ Select a ...
...The most recent photos are printed on the sheet. Use a dark pen or pencil to fill in the All circle at the top. Printing an Index Sheet 1. or A4-size paper (see page 13). 3. Printing Photos From an Index Sheet 15 Your Epson printer automatically prints them on the sheet, ...scan the sheet, and print the photos automatically. 1. Incorrect: ■ Select a ...
Quick Guide
Page 16
... inserted and the LCD screen shows option 2 selected (for scanning the index sheet). 5. Make sure your photos. Note: For best results, use Epson Ultra Premium Photo Paper Glossy, Epson Premium Photo Paper Glossy, or Epson Premium Photo Paper Semi-gloss. 4. Open the document cover. Wait until printing finishes before printing from any additional index sheets.
... inserted and the LCD screen shows option 2 selected (for scanning the index sheet). 5. Make sure your photos. Note: For best results, use Epson Ultra Premium Photo Paper Glossy, Epson Premium Photo Paper Glossy, or Epson Premium Photo Paper Semi-gloss. 4. Open the document cover. Wait until printing finishes before printing from any additional index sheets.

Quick Guide
Page 17
... or Properties button. (If you 've installed your printer software and connected your Epson printer to your computer as described on your Windows® or Macintosh® computer. For detailed instructions on printing, see a Setup, Printer, or Options button, click it. You see page 34... for printing a photo or document stored on the Start Here sheet. Printing in a Windows program. 2. Open the File menu and select Print. Tip: It's a good idea to check for updates to open your Epson printer's software (see a window like this one:...
... or Properties button. (If you 've installed your printer software and connected your Epson printer to your computer as described on your Windows® or Macintosh® computer. For detailed instructions on printing, see a Setup, Printer, or Options button, click it. You see page 34... for printing a photo or document stored on the Start Here sheet. Printing in a Windows program. 2. Open the File menu and select Print. Tip: It's a good idea to check for updates to open your Epson printer's software (see a window like this one:...

Quick Guide
Page 18
...If you want to the most common settings, click the Shortcuts tab and select one of the presets. You can create your printout, or print double-sided, click the Page Layout tab and select settings as necessary. 6. Click OK to save your document Orientation Note: For quick ...own presets by clicking the Save Settings button on -screen Epson Information Center. 7. Select the type of document you are using (see your on the Advanced tab. 5. Note: For more printing options, click the Advanced tab. 4. For more information about print settings, click Help or see page 24 for pictures)...
...If you want to the most common settings, click the Shortcuts tab and select one of the presets. You can create your printout, or print double-sided, click the Page Layout tab and select settings as necessary. 6. Click OK to save your document Orientation Note: For quick ...own presets by clicking the Save Settings button on -screen Epson Information Center. 7. Select the type of document you are using (see your on the Advanced tab. 5. Note: For more printing options, click the Advanced tab. 4. For more information about print settings, click Help or see page 24 for pictures)...

Quick Guide
Page 19
Click OK or Print to expand 4. This window appears and shows the progress of your Epson printer as the Printer setting. Select your print job. Select your Mac OS® operating system. Cancel printing Printing With a Macintosh See the section below for your Epson printer Click to start printing. Click the arrow to expand the Print window, if necessary. Mac OS X 10.5 1. Open the File menu and select Print. 3. Printing With a Macintosh 19 Open a photo or document in an application. 2. 8.
Click OK or Print to expand 4. This window appears and shows the progress of your Epson printer as the Printer setting. Select your print job. Select your Mac OS® operating system. Cancel printing Printing With a Macintosh See the section below for your Epson printer Click to start printing. Click the arrow to expand the Print window, if necessary. Mac OS X 10.5 1. Open the File menu and select Print. 3. Printing With a Macintosh 19 Open a photo or document in an application. 2. 8.
Quick Guide
Page 20
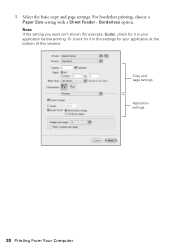
Note: If the setting you want isn't shown (for example, Scale), check for your application before printing. Borderless option. Copy and page settings Application settings 20 Printing From Your Computer 5. Or check for it in the settings for it in your application at the bottom of this window. Select the basic copy and page settings. For borderless printing, choose a Paper Size setting with a Sheet Feeder -
Note: If the setting you want isn't shown (for example, Scale), check for your application before printing. Borderless option. Copy and page settings Application settings 20 Printing From Your Computer 5. Or check for it in the settings for it in your application at the bottom of this window. Select the basic copy and page settings. For borderless printing, choose a Paper Size setting with a Sheet Feeder -

Quick Guide
Page 21
Click Print. Note: For more information on -screen Epson Information Center for details. 8. 6. See the on advanced settings click ?. 9. Printing With a Macintosh 21 Click the Advanced button to change additional settings. Choose any other printing options you may need from the pop-up menu. Choose Print Settings from the pop-up menu, and select the following print settings: Choose Print Settings Select your Media Type (see page 24) Select Color or Black/Grayscale Select higher quality or faster printing (if available) 7.
Click Print. Note: For more information on -screen Epson Information Center for details. 8. 6. See the on advanced settings click ?. 9. Printing With a Macintosh 21 Click the Advanced button to change additional settings. Choose any other printing options you may need from the pop-up menu. Choose Print Settings from the pop-up menu, and select the following print settings: Choose Print Settings Select your Media Type (see page 24) Select Color or Black/Grayscale Select higher quality or faster printing (if available) 7.

Quick Guide
Page 22
To monitor your document or image orientation For borderless printing, choose a Paper Size setting with a Sheet Feeder - Open a photo or document in the dock. 10. Select the following settings: Select your Epson printer Select your Paper Size Select your print job, click the printer icon in an application. 2. Borderless option. 3. Cancel printing Pause or resume printing Select the print job Mac OS X 10.3 to close the Page Setup window. 22 Printing From Your Computer Open the File menu and select Page Setup. Click OK to 10.4 1.
To monitor your document or image orientation For borderless printing, choose a Paper Size setting with a Sheet Feeder - Open a photo or document in the dock. 10. Select the following settings: Select your Epson printer Select your Paper Size Select your print job, click the printer icon in an application. 2. Borderless option. 3. Cancel printing Pause or resume printing Select the print job Mac OS X 10.3 to close the Page Setup window. 22 Printing From Your Computer Open the File menu and select Page Setup. Click OK to 10.4 1.


