Users Manual
Page 7
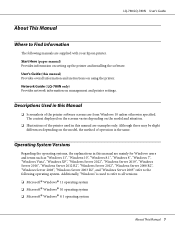
... Epson printer. The content displayed on the screens varies depending on the model and situation. ❏ Illustrations of operation is used in this manual are examples only. LQ-780/LQ-780N User's Guide About This Manual Where to Find Information The following operating system. Network Guide ( LQ-780N only) Provides network information on setting up the printer and installing the software. User's Guide (this manual are mainly for Windows users and terms such as "Windows 11", "Windows 10", "Windows 8.1", "Windows 8", "Windows 7", "Windows Vista", "Windows XP", "Windows Server...
... Epson printer. The content displayed on the screens varies depending on the model and situation. ❏ Illustrations of operation is used in this manual are examples only. LQ-780/LQ-780N User's Guide About This Manual Where to Find Information The following operating system. Network Guide ( LQ-780N only) Provides network information on setting up the printer and installing the software. User's Guide (this manual are mainly for Windows users and terms such as "Windows 11", "Windows 10", "Windows 8.1", "Windows 8", "Windows 7", "Windows Vista", "Windows XP", "Windows Server...

Users Manual
Page 14
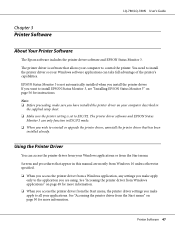
... the paper-feeding method you want the printer to manually feed sheets one-by-one into the printer. Use this when replacing the ribbon cartridge or removing jammed paper. Allows you are done. Turn the printer on or off edge 4 edge guide 5 paper support 6 sheet guide 7 paper release lever 8 control panel Open this to cut sheets. Install these to prevent paper from falling when manually feeding vertical single cut paper for continuous paper. The printer's operation panel. Chapter 1 Printer Basics Printer Parts LQ-780/LQ-780N User's Guide 1 printer cover 2 power switch 3 tear...
... the paper-feeding method you want the printer to manually feed sheets one-by-one into the printer. Use this when replacing the ribbon cartridge or removing jammed paper. Allows you are done. Turn the printer on or off edge 4 edge guide 5 paper support 6 sheet guide 7 paper release lever 8 control panel Open this to cut sheets. Install these to prevent paper from falling when manually feeding vertical single cut paper for continuous paper. The printer's operation panel. Chapter 1 Printer Basics Printer Parts LQ-780/LQ-780N User's Guide 1 printer cover 2 power switch 3 tear...

Users Manual
Page 20
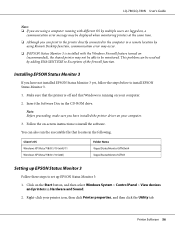
... Off (0), Auto, Parallel, USB, Network*3 10 seconds, 30 seconds Off, On Printer Basics 20 Default Setting mode The following table lists the default settings and the options you can often set these functions through your software or printer driver, you can select in detail after the table. LQ-780/LQ-780N User's Guide Roman Sans Serif = on page 25. While you may sometimes need to change a default setting from the printer's control panel using the Default Setting mode. Item Page length for...
... Off (0), Auto, Parallel, USB, Network*3 10 seconds, 30 seconds Off, On Printer Basics 20 Default Setting mode The following table lists the default settings and the options you can often set these functions through your software or printer driver, you can select in detail after the table. LQ-780/LQ-780N User's Guide Roman Sans Serif = on page 25. While you may sometimes need to change a default setting from the printer's control panel using the Default Setting mode. Item Page length for...

Users Manual
Page 25
... language for each time the printer ejects a printed sheet. 1. Select On when printing on copy paper.When Off is low when printing on page 52. The printer enters the Default Setting mode and prints a message prompting you are using. This mode can be set printing density. Disable IPsec/IP Filtering You can select an appropriate Ethernet speed and duplex setting. Press and hold the Menu (o and d) buttons until the Font lights start flashing. LQ-780/LQ-780N User's Guide Low-noise mode When this mode is set...
... language for each time the printer ejects a printed sheet. 1. Select On when printing on copy paper.When Off is low when printing on page 52. The printer enters the Default Setting mode and prints a message prompting you are using. This mode can be set printing density. Disable IPsec/IP Filtering You can select an appropriate Ethernet speed and duplex setting. Press and hold the Menu (o and d) buttons until the Font lights start flashing. LQ-780/LQ-780N User's Guide Low-noise mode When this mode is set...

Users Manual
Page 39
... printed sheet, press the Load/Eject button. You can load continuous multipart forms in the Default Setting mode. The printer automatically advances the paper and resumes printing. Caution: Use only carbonless multipart forms. When using multipart forms with a line of glue at the top of a multipart form can adjust its position properly, increase the Manual feed wait time in the same way as you are printing a multiple-page document, remove the printed sheet and insert a new sheet...
... printed sheet, press the Load/Eject button. You can load continuous multipart forms in the Default Setting mode. The printer automatically advances the paper and resumes printing. Caution: Use only carbonless multipart forms. When using multipart forms with a line of glue at the top of a multipart form can adjust its position properly, increase the Manual feed wait time in the same way as you are printing a multiple-page document, remove the printed sheet and insert a new sheet...
Users Manual
Page 47
LQ-780/LQ-780N User's Guide Chapter 3 Printer Software About Your Printer Software The Epson software includes the printer driver software and EPSON Status Monitor 3. EPSON Status Monitor 3 is set to ESC/P2. The printer driver is software that has been installed already. You need to install the printer driver so your Windows software applications can access the printer driver from your Windows applications or from a Windows application, any settings you make sure you have installed the printer driver on page 50 for instructions. The printer driver software and EPSON Status Monitor 3...
LQ-780/LQ-780N User's Guide Chapter 3 Printer Software About Your Printer Software The Epson software includes the printer driver software and EPSON Status Monitor 3. EPSON Status Monitor 3 is set to ESC/P2. The printer driver is software that has been installed already. You need to install the printer driver so your Windows software applications can access the printer driver from your Windows applications or from a Windows application, any settings you make sure you have installed the printer driver on page 50 for instructions. The printer driver software and EPSON Status Monitor 3...
Users Manual
Page 56
.... LQ-780/LQ-780N User's Guide Note: ❏ If you are logged on, a communication error message may be displayed when monitoring printers at the same time. ❏ Although you can also run the executable file that Windows is installed with different OS by multiple users are using Remote Desktop function, communication error may occur. ❏ If EPSON Status Monitor 3 is running with the Windows Firewall feature turned on -screen instructions to set up EPSON Status...
.... LQ-780/LQ-780N User's Guide Note: ❏ If you are logged on, a communication error message may be displayed when monitoring printers at the same time. ❏ Although you can also run the executable file that Windows is installed with different OS by multiple users are using Remote Desktop function, communication error may occur. ❏ If EPSON Status Monitor 3 is running with the Windows Firewall feature turned on -screen instructions to set up EPSON Status...
Users Manual
Page 62
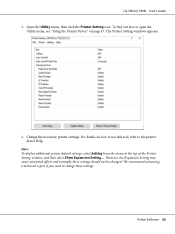
... the printer driver Help. However, the Expansion Setting may cause unwanted effects and normally these settings. Printer Software 62 For details on page 47. Note: To display additional printer default settings, select Setting from the menu at the top of the Printer Setting window, and then select Show Expansion Setting.... LQ-780/LQ-780N User's Guide 1. To find out how to open the Utility menu, see "Using the Printer Driver" on how to use this tool, refer to change these settings...
... the printer driver Help. However, the Expansion Setting may cause unwanted effects and normally these settings. Printer Software 62 For details on page 47. Note: To display additional printer default settings, select Setting from the menu at the top of the Printer Setting window, and then select Show Expansion Setting.... LQ-780/LQ-780N User's Guide 1. To find out how to open the Utility menu, see "Using the Printer Driver" on how to use this tool, refer to change these settings...
Users Manual
Page 69
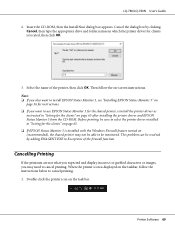
.../LQ-780N User's Guide 2. Select the name of the firewall function. Before printing, be able to use EPSON Status Monitor 3 for the shared printer, reinstall the printer driver as instructed in which the printer driver for clients is located, then click OK. 3. Printer Software 69 Cancel the dialog box by adding ENAGENT.EXE to Exceptions of the printer, then click OK. Note: ❏ If you also want to install EPSON Status...
.../LQ-780N User's Guide 2. Select the name of the firewall function. Before printing, be able to use EPSON Status Monitor 3 for the shared printer, reinstall the printer driver as instructed in which the printer driver for clients is located, then click OK. 3. Printer Software 69 Cancel the dialog box by adding ENAGENT.EXE to Exceptions of the printer, then click OK. Note: ❏ If you also want to install EPSON Status...

Users Manual
Page 73
... "Loading Continuous Paper" on page 31 or "Loading Single Sheets" on page 37 for the paper source you cannot fix your problem using the lights on the control panel. If paper from another paper source is set to diagnose and fix the problem. LQ-780/LQ-780N User's Guide Chapter 4 Troubleshooting Checking the Printer Status Using the Error Indicators You can identify many common printer problems using this table, see "Problems and Solutions" on page 74. Printer cover is open. The printer resumes printing status automatically. Then press the Pause button;
... "Loading Continuous Paper" on page 31 or "Loading Single Sheets" on page 37 for the paper source you cannot fix your problem using the lights on the control panel. If paper from another paper source is set to diagnose and fix the problem. LQ-780/LQ-780N User's Guide Chapter 4 Troubleshooting Checking the Printer Status Using the Error Indicators You can identify many common printer problems using this table, see "Problems and Solutions" on page 74. Printer cover is open. The printer resumes printing status automatically. Then press the Pause button;

Users Manual
Page 76
... connected directly to do Troubleshooting 76 Your software is hung up for your computer without these devices. Make sure that are stuck. See "Correcting USB Problems" on page 81 for a while. If necessary, install or reinstall the printer driver software as described in the Network Guide. LQ-780/LQ-780N User's Guide The printer is connected correctly, run a self test as described in "Printing a Self Test" on page 90. When you use a printer changer, printer buffer, or a extension cable...
... connected directly to do Troubleshooting 76 Your software is hung up for your computer without these devices. Make sure that are stuck. See "Correcting USB Problems" on page 81 for a while. If necessary, install or reinstall the printer driver software as described in the Network Guide. LQ-780/LQ-780N User's Guide The printer is connected correctly, run a self test as described in "Printing a Self Test" on page 90. When you use a printer changer, printer buffer, or a extension cable...
Users Manual
Page 77
... "Replacing the Ribbon Cartridge" on the auto line feed setting using the printer's Default Setting mode so that the printer automatically adds a line feed code to have the print head replaced. The printout has extra blank lines between lines of the printer must be checked when the print head is printed on page 25. Turn on page 99. LQ-780/LQ-780N User's Guide The paper is pale. Replace the ribbon cartridge as described in "Replacing the Ribbon Cartridge" on page 99. Replace the ribbon cartridge as described in "Replacing the Ribbon Cartridge" on page 99...
... "Replacing the Ribbon Cartridge" on the auto line feed setting using the printer's Default Setting mode so that the printer automatically adds a line feed code to have the print head replaced. The printout has extra blank lines between lines of the printer must be checked when the print head is printed on page 25. Turn on page 99. LQ-780/LQ-780N User's Guide The paper is pale. Replace the ribbon cartridge as described in "Replacing the Ribbon Cartridge" on page 99. Replace the ribbon cartridge as described in "Replacing the Ribbon Cartridge" on page 99...

Users Manual
Page 78
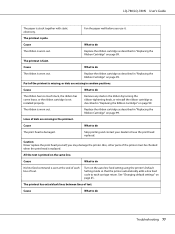
.... Turn off the auto line feed setting in the supplied setup sheet. If necessary, install or reinstall the printer driver software as described in the printer's Default Setting mode. Vertical printed lines are using the Default Setting mode or the control panel buttons. Troubleshooting 78 See "Electronic" on page 109 and your application before printing. Use the printer's bidirectional adjustment mode to do Bidirectional printing, which is the printer's standard printing mode, is out of text, because the printer's auto line feed setting is incorrect. The printer prints...
.... Turn off the auto line feed setting in the supplied setup sheet. If necessary, install or reinstall the printer driver software as described in the printer's Default Setting mode. Vertical printed lines are using the Default Setting mode or the control panel buttons. Troubleshooting 78 See "Electronic" on page 109 and your application before printing. Use the printer's bidirectional adjustment mode to do Bidirectional printing, which is the printer's standard printing mode, is out of text, because the printer's auto line feed setting is incorrect. The printer prints...

Users Manual
Page 81
... printed page and press the Load/Eject button to the computer's USB port. See "Paper" on page 113 for information on page 82. You may not match the size of your paper is within the specified range. The paper size setting in your printer does not work correctly with a USB connection, read the information in "Clearing a Paper Jam" on the continuous paper specification. Clear the paper jam as described in this section. Correcting USB Problems If you are using . Paper...
... printed page and press the Load/Eject button to the computer's USB port. See "Paper" on page 113 for information on page 82. You may not match the size of your paper is within the specified range. The paper size setting in your printer does not work correctly with a USB connection, read the information in "Clearing a Paper Jam" on the continuous paper specification. Clear the paper jam as described in this section. Correcting USB Problems If you are using . Paper...

Users Manual
Page 88
... this problem. Make sure paper is loaded and the printer is turned off the printer, open the printer cover, and remove any remaining pieces of paper. 8. Caution: Whenever you need three sheets of A3 size single sheet paper or 12 inch (recommended) continuous paper. ❏ If you use the printer's bidirectional adjustment mode to perform bidirectional adjustment. 1. Troubleshooting 88 Close the printer cover. Note: ❏ To print the alignment patterns, you need to the appropriate position. 10. LQ-780/LQ-780N User's Guide 6. Turn off...
... this problem. Make sure paper is loaded and the printer is turned off the printer, open the printer cover, and remove any remaining pieces of paper. 8. Caution: Whenever you need three sheets of A3 size single sheet paper or 12 inch (recommended) continuous paper. ❏ If you use the printer's bidirectional adjustment mode to perform bidirectional adjustment. 1. Troubleshooting 88 Close the printer cover. Note: ❏ To print the alignment patterns, you need to the appropriate position. 10. LQ-780/LQ-780N User's Guide 6. Turn off...

Notices and Warranty
Page 2
... free from defects in the United States, Canada, or Puerto Rico. What This Warranty Does Not Cover: 1. any resulting damage will be new or refurbished to Epson within five (5) working days of receipt of user-level maintenance as consumables in the User's Guide. Any damage caused by Epson. 6. For warranty service, you . An Epson service technician will direct you to send your User's Guide for securely packaging the defective unit...
... free from defects in the United States, Canada, or Puerto Rico. What This Warranty Does Not Cover: 1. any resulting damage will be new or refurbished to Epson within five (5) working days of receipt of user-level maintenance as consumables in the User's Guide. Any damage caused by Epson. 6. For warranty service, you . An Epson service technician will direct you to send your User's Guide for securely packaging the defective unit...

Network Guide
Page 21
... Add printer, and then select The printer that was previously set as the print server, and share the printer. Related Information & "SSL/TLS Communication with the DNS server, you can configure these settings using the printer driver and functions of the operating system. ❏ Installing the printer driver ❏ Making the print queue to a computer ❏ Setting the port to a network Setting of the driver, and making the print queue are displayed when accessing Web Config via HTTPS. Install the printer driver for network printing...
... Add printer, and then select The printer that was previously set as the print server, and share the printer. Related Information & "SSL/TLS Communication with the DNS server, you can configure these settings using the printer driver and functions of the operating system. ❏ Installing the printer driver ❏ Making the print queue to a computer ❏ Setting the port to a network Setting of the driver, and making the print queue are displayed when accessing Web Config via HTTPS. Install the printer driver for network printing...

Network Guide
Page 23
... Control Panel > View devices and printers on -screen instructions. B Open the printer properties screen. The location of the folder may change depending on your operating system. 32 bit version of Windows: WINX86 64 bit version of Windows: WINX64 G Follow the on the print server. 23 Windows Check if the correct port is not installed: Click Have Disc and then insert the software disc supplied with the printer. Network Guide Function Settings F Set the printer driver...
... Control Panel > View devices and printers on -screen instructions. B Open the printer properties screen. The location of the folder may change depending on your operating system. 32 bit version of Windows: WINX86 64 bit version of Windows: WINX64 G Follow the on the print server. 23 Windows Check if the correct port is not installed: Click Have Disc and then insert the software disc supplied with the printer. Network Guide Function Settings F Set the printer driver...

Network Guide
Page 24
... Connection For peer to peer connection (direct printing), the printer driver must be installed on page 24 Using the Shared Printer The administrator needs to inform the clients of Windows for clients, and then click OK. Network Guide Function Settings B Right-click the printer icon (print queue) that you want to use Devices and Printers to add the shared printer. C Click Additional Drivers. Related Information & "Using the Shared Printer" on each client computer. B Double-click the printer...
... Connection For peer to peer connection (direct printing), the printer driver must be installed on page 24 Using the Shared Printer The administrator needs to inform the clients of Windows for clients, and then click OK. Network Guide Function Settings B Right-click the printer icon (print queue) that you want to use Devices and Printers to add the shared printer. C Click Additional Drivers. Related Information & "Using the Shared Printer" on each client computer. B Double-click the printer...
Network Guide
Page 58
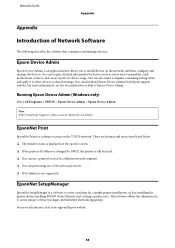
... Running Epson Device Admin (Windows only) Select All Programs > EPSON > Epson Device Admin > Epson Device Admin. For more information, see the documentation or help of alerts, and create reports for a simple printer installation, such as status and consumables, send notifications of Epson Device Admin. Note: If the firewall alert appears, allow access for Epson Device Admin. EpsonNet Print EpsonNet Print is an application that configures and manages devices. You can download Epson Device Admin from Epson support website...
... Running Epson Device Admin (Windows only) Select All Programs > EPSON > Epson Device Admin > Epson Device Admin. For more information, see the documentation or help of alerts, and create reports for a simple printer installation, such as status and consumables, send notifications of Epson Device Admin. Note: If the firewall alert appears, allow access for Epson Device Admin. EpsonNet Print EpsonNet Print is an application that configures and manages devices. You can download Epson Device Admin from Epson support website...


