Technical Brief (Impact Printers)
Page 2
...allows you to achieve zero tear-off the printed document or form without wasting a sheet.) Available in a single pass of EPSON's impact printers have optional tractor units available. The following chart explains the best use for the push tractor, pull tractor, and push/pull... prints with 360 dpi in front and rear paper paths. Tractor paper paths: EPSON impact printers all of the print head and enhances printing with Windows applications. EPSON 24-pin impact printers utilize ESC/P 2, which includes these additional features: el Proportionally-spaced scalab fonts Enhanced...
...allows you to achieve zero tear-off the printed document or form without wasting a sheet.) Available in a single pass of EPSON's impact printers have optional tractor units available. The following chart explains the best use for the push tractor, pull tractor, and push/pull... prints with 360 dpi in front and rear paper paths. Tractor paper paths: EPSON impact printers all of the print head and enhances printing with Windows applications. EPSON 24-pin impact printers utilize ESC/P 2, which includes these additional features: el Proportionally-spaced scalab fonts Enhanced...

Technical Brief (Impact Printers)
Page 6
...the wear and tear on the print head EPSON Sales Training EPSON is a registered trademark of Seiko Epson Corporation. 1/00 Other trademarks are the property of the ribbon, the printer can jam or damage the print head Protects and extends the life of ...EPSON brand ribbons are superior to sell with smaller ribbon on the motor, which can achieve faster print speeds. The design used in a mylar film Made of the highest grade ABS plastic Offers the highest print quality for dot matrix printers Ultra Letter Quality Keeps the cartridge from warping during times of the print head...
...the wear and tear on the print head EPSON Sales Training EPSON is a registered trademark of Seiko Epson Corporation. 1/00 Other trademarks are the property of the ribbon, the printer can jam or damage the print head Protects and extends the life of ...EPSON brand ribbons are superior to sell with smaller ribbon on the motor, which can achieve faster print speeds. The design used in a mylar film Made of the highest grade ABS plastic Offers the highest print quality for dot matrix printers Ultra Letter Quality Keeps the cartridge from warping during times of the print head...
Technical Brief (Impact Printers)
Page 7
... can print before it is much less accurate than Total Print Volume. LL Reliability-Off-carriage motor assembly Most EPSON impact printers use an off -carriage motor allows the print head to r EPSON Sales Training EPSON is less wear and tear on the motor for reliability in Total Print Volume, and are more quickly because... Print Volume vs. L L The off -carriage motor assembly, versus the on printing conditions, and is not carrying the extra motor weight. Mean Time Between Failures EPSON impact printers are also rated in competitive...
... can print before it is much less accurate than Total Print Volume. LL Reliability-Off-carriage motor assembly Most EPSON impact printers use an off -carriage motor allows the print head to r EPSON Sales Training EPSON is less wear and tear on the motor for reliability in Total Print Volume, and are more quickly because... Print Volume vs. L L The off -carriage motor assembly, versus the on printing conditions, and is not carrying the extra motor weight. Mean Time Between Failures EPSON impact printers are also rated in competitive...
Product Information Guide
Page 1
... paper Printer Specifications Printing Printing method 24-pin impact dot matrix Printing speed 10 draft 220 10 LCI 73 12 draft 264 12 LQ 88 Printing direction Bi-directional with paper tension unit Single-bin or dual-bin cut sheet feeder (optional) Pull tractor (optional) Paper width Type of paper La-650 LQ-950 LQ-1050 Smgle...
... paper Printer Specifications Printing Printing method 24-pin impact dot matrix Printing speed 10 draft 220 10 LCI 73 12 draft 264 12 LQ 88 Printing direction Bi-directional with paper tension unit Single-bin or dual-bin cut sheet feeder (optional) Pull tractor (optional) Paper width Type of paper La-650 LQ-950 LQ-1050 Smgle...
Product Support Bulletin(s)
Page 12
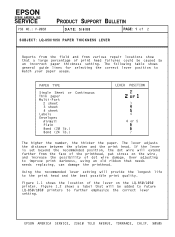
... the distance between the platen and the print head. Over adjusting to match your paper usage. Figure 1.1 shows the location of the lever on the wire, and increase the possibility of the printhead, put stress on the LQ-850/1050 printer. EPSON EPSON AMERICA, INC. PAPER TYPE Single Sheet or ...the recommended lever setting will be caused by an incorrect paper thickness setting. EPSON AMERICA SERVICE, 23610 TELO AVENUE, TORRANCE, CALIF. 90505 If the lever is set beyond the recommended position, the dot wire will extend further from various repair locations show that will provide the ...
... the distance between the platen and the print head. Over adjusting to match your paper usage. Figure 1.1 shows the location of the lever on the wire, and increase the possibility of the printhead, put stress on the LQ-850/1050 printer. EPSON EPSON AMERICA, INC. PAPER TYPE Single Sheet or ...the recommended lever setting will be caused by an incorrect paper thickness setting. EPSON AMERICA SERVICE, 23610 TELO AVENUE, TORRANCE, CALIF. 90505 If the lever is set beyond the recommended position, the dot wire will extend further from various repair locations show that will provide the ...
User Manual
Page 6
Chapter 4 Software and Graphics Software 4-2 Choosing from a menu 4-2 A quick test 4-3 Computer-printer communication 4-3 Word processors 4-4 Spreadsheets 4-6 Graphics programs 4-7 Graphics 4-8 The print head 4-9 Graphic command 4-12 Column reservation numbers 4-13 First graphics program 4-14 Using hand-calculated... RAM 4-27 Letter Quality characters 4-28 Chapter 5 Maintenance Replacing the Ribbon 5-2 Transporting the Printer 5-4 Cleaning the Printer 5-6 Chapter 6 Troubleshooting Troubleshooting 6-2 Problems and solutions 6-2 Data dump mode 6-5 Contents
Chapter 4 Software and Graphics Software 4-2 Choosing from a menu 4-2 A quick test 4-3 Computer-printer communication 4-3 Word processors 4-4 Spreadsheets 4-6 Graphics programs 4-7 Graphics 4-8 The print head 4-9 Graphic command 4-12 Column reservation numbers 4-13 First graphics program 4-14 Using hand-calculated... RAM 4-27 Letter Quality characters 4-28 Chapter 5 Maintenance Replacing the Ribbon 5-2 Transporting the Printer 5-4 Cleaning the Printer 5-6 Chapter 6 Troubleshooting Troubleshooting 6-2 Problems and solutions 6-2 Data dump mode 6-5 Contents

User Manual
Page 16
then use the enclosed cross-head screwdriver to transport your printer. These protective items must be removed before you ever need to unscrew and remove the two transport locking brackets. 1-3 After removing these steps: 1. To remove the packing materials, follow these items, store them with the other packaging material in case you turn on the printer. Unpacking the Printer Removing the protective materials The printer is protected during shipping by two brackets, two locking tabs, and a print head protector. Remove the printer cover;
then use the enclosed cross-head screwdriver to transport your printer. These protective items must be removed before you ever need to unscrew and remove the two transport locking brackets. 1-3 After removing these steps: 1. To remove the packing materials, follow these items, store them with the other packaging material in case you turn on the printer. Unpacking the Printer Removing the protective materials The printer is protected during shipping by two brackets, two locking tabs, and a print head protector. Remove the printer cover;

User Manual
Page 17
Unpacking the Printer 2. Then, remove the left and right locking tabs. Be sure to the middle of the printer. Remove the print head protector. 3 Slide the print head to remove all protective materials before you turn on the printer. 1-4
Unpacking the Printer 2. Then, remove the left and right locking tabs. Be sure to the middle of the printer. Remove the print head protector. 3 Slide the print head to remove all protective materials before you turn on the printer. 1-4
User Manual
Page 20
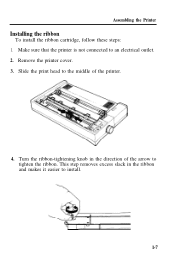
Slide the print head to the middle of the arrow to tighten the ribbon. This step removes excess slack in the direction of the printer. 4. Turn the ribbon-tightening knob in the ribbon and makes it easier to an electrical outlet. 2. Remove the printer cover. 3. Assembling the Printer Installing the ribbon To install the ribbon cartridge, follow these steps: 1. Make sure that the printer is not connected to install. 1-7
Slide the print head to the middle of the arrow to tighten the ribbon. This step removes excess slack in the direction of the printer. 4. Turn the ribbon-tightening knob in the ribbon and makes it easier to an electrical outlet. 2. Remove the printer cover. 3. Assembling the Printer Installing the ribbon To install the ribbon cartridge, follow these steps: 1. Make sure that the printer is not connected to install. 1-7

User Manual
Page 21
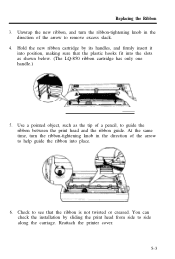
Assembling the Printer 5. At the same time turn the ribbon-tightening knob in the direction of a pencil, to help feed the ribbon into the slots inside the printer. 6. Hold the ribbon cartridge by its black, fin-like handles with the exposed ribbon away from you. (The LQ-850 ribbon cartridge has only one handle.) Push the cartridge firmly into position, making sure that the black plastic hooks fit into place. 1-8 Use a pointed object, such as the tip of the arrow to guide the ribbon between the print head and the ribbon guide.
Assembling the Printer 5. At the same time turn the ribbon-tightening knob in the direction of a pencil, to help feed the ribbon into the slots inside the printer. 6. Hold the ribbon cartridge by its black, fin-like handles with the exposed ribbon away from you. (The LQ-850 ribbon cartridge has only one handle.) Push the cartridge firmly into position, making sure that the black plastic hooks fit into place. 1-8 Use a pointed object, such as the tip of the arrow to guide the ribbon between the print head and the ribbon guide.
User Manual
Page 24
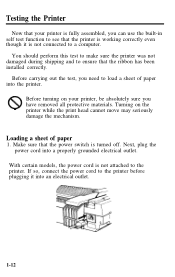
Before turning on the printer while the print head cannot move may seriously damage the mechanism. Make sure that the ribbon has been installed correctly. Turning on your printer is fully assembled, you can use the built-in self test function to see that the printer is working correctly even though it into ...an electrical outlet. 1-12 With certain models, the power cord is turned off. If so, connect the power cord to the printer before plugging it is not connected to ensure that the power switch is not attached to load a sheet of paper 1. Loading a sheet of paper...
Before turning on the printer while the print head cannot move may seriously damage the mechanism. Make sure that the ribbon has been installed correctly. Turning on your printer is fully assembled, you can use the built-in self test function to see that the printer is working correctly even though it into ...an electrical outlet. 1-12 With certain models, the power cord is turned off. If so, connect the power cord to the printer before plugging it is not connected to ensure that the power switch is not attached to load a sheet of paper 1. Loading a sheet of paper...

User Manual
Page 48
...types, including multi-part forms and labels. You can be set to position 2 on the scale. These positions are identified by a scale on the printer frame next to the lever. If you need to adjust the paper thickness setting. Before changing the paper thickness setting, first make sure the power... the lever should always be set to one of paper, the LQ printer is off and then open the printer cover. Printing on Special Paper In addition to using the printer just before opening the printer cover, be careful not to touch the print head because it may be hot. 2-16 The paper thickness lever To...
...types, including multi-part forms and labels. You can be set to position 2 on the scale. These positions are identified by a scale on the printer frame next to the lever. If you need to adjust the paper thickness setting. Before changing the paper thickness setting, first make sure the power... the lever should always be set to one of paper, the LQ printer is off and then open the printer cover. Printing on Special Paper In addition to using the printer just before opening the printer cover, be careful not to touch the print head because it may be hot. 2-16 The paper thickness lever To...

User Manual
Page 77
Software 4-2 Choosing from a menu 4-2 A quick test 4-3 Computer-printer communications 4-3 Word processors 4-4 Spreadsheets 4-6 Graphics programs 4-7 Graphics 4-8 The print head 4-9 The graphics command 4-12 Column reservation numbers 4-13 A simple ...graphics program 4-14 Using hand-calculated data to print graphics 4-14 Individual graphics options commands 4-18 The reassigning command 4-19 User-Defined Characters 4-20 Designing your characters 4-20 Sending information to the LQ...
Software 4-2 Choosing from a menu 4-2 A quick test 4-3 Computer-printer communications 4-3 Word processors 4-4 Spreadsheets 4-6 Graphics programs 4-7 Graphics 4-8 The print head 4-9 The graphics command 4-12 Column reservation numbers 4-13 A simple ...graphics program 4-14 Using hand-calculated data to print graphics 4-14 Individual graphics options commands 4-18 The reassigning command 4-19 User-Defined Characters 4-20 Designing your characters 4-20 Sending information to the LQ...
User Manual
Page 85
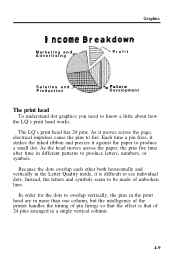
...to produce a small dot. As it against the paper to fire. The LQ's print head has 24 pins. Each time a pin fires, it strikes the inked ribbon and presses it moves across the paper, the pins fire time after time in more than one column, but the intelligence of the printer handles the timing... of unbroken lines. Because the dots overlap each other...
...to produce a small dot. As it against the paper to fire. The LQ's print head has 24 pins. Each time a pin fires, it strikes the inked ribbon and presses it moves across the paper, the pins fire time after time in more than one column, but the intelligence of the printer handles the timing... of unbroken lines. Because the dots overlap each other...
User Manual
Page 86
... LQ's print head is made up to 180 dots per inch horizontally and 180 dots vertically. Triple-density prints up of many as 360 dot positions per inch horizontally. At each column it prints. The LQ also forms its communication with patterns of dots, as many small dots. This means that the printer ... densities, but for each position. 4-10 Graphics Dot patterns The LQ's print head is able to print graphics as well as text because graphic images are formed on the LQ about which of its 24 pins to fire. Since the LQ uses 8-bit bytes of information in newspapers and magazines...
... LQ's print head is made up to 180 dots per inch horizontally and 180 dots vertically. Triple-density prints up of many as 360 dot positions per inch horizontally. At each column it prints. The LQ also forms its communication with patterns of dots, as many small dots. This means that the printer ... densities, but for each position. 4-10 Graphics Dot patterns The LQ's print head is able to print graphics as well as text because graphic images are formed on the LQ about which of its 24 pins to fire. Since the LQ uses 8-bit bytes of information in newspapers and magazines...

User Manual
Page 108
... print head may be hot. Remove the old ribbon by grasping the black fin-like handles (only one on the LQ-850) and lifting the ribbon straight up and out of the printer. 5-2 Let it cool before attempting to the printer and remove the printer cover. Use the following Epson replacement ribbons: Printer LQ-850 LQ-950 LQ-1050 Standard ribbon...
... print head may be hot. Remove the old ribbon by grasping the black fin-like handles (only one on the LQ-850) and lifting the ribbon straight up and out of the printer. 5-2 Let it cool before attempting to the printer and remove the printer cover. Use the following Epson replacement ribbons: Printer LQ-850 LQ-950 LQ-1050 Standard ribbon...
User Manual
Page 109
... the plastic hooks fit into place. 6. Use a pointed object, such as shown below. (The LQ-850 ribbon cartridge has only one handle.) 5. Reattach the printer cover. 5-3 Replacing the Ribbon 3. Check to guide the ribbon between the print head and the ribbon guide. At the same time, turn the ribbon-tightening knob in the... the ribbon into the slots as the tip of the arrow to side along the carriage. Hold the new ribbon cartridge by sliding the print head from side to remove excess slack. 4.
... the plastic hooks fit into place. 6. Use a pointed object, such as shown below. (The LQ-850 ribbon cartridge has only one handle.) 5. Reattach the printer cover. 5-3 Replacing the Ribbon 3. Check to guide the ribbon between the print head and the ribbon guide. At the same time, turn the ribbon-tightening knob in the... the ribbon into the slots as the tip of the arrow to side along the carriage. Hold the new ribbon cartridge by sliding the print head from side to remove excess slack. 4.
User Manual
Page 110
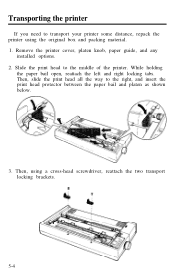
Then, slide the print head all the way to transport your printer some distance, repack the printer using a cross-head screwdriver, reattach the two transport locking brackets. 5-4 Transporting the printer If you need to the right, and insert the print head protector between the paper bail and platen as shown below. 3. Slide the print head to the middle of the printer. While holding the paper bail open, reattach the left and right locking tabs. Then, using the original box and packing material. 1. Remove the printer cover, platen knob, paper guide, and any installed options. 2.
Then, slide the print head all the way to transport your printer some distance, repack the printer using a cross-head screwdriver, reattach the two transport locking brackets. 5-4 Transporting the printer If you need to the right, and insert the print head protector between the paper bail and platen as shown below. 3. Slide the print head to the middle of the printer. While holding the paper bail open, reattach the left and right locking tabs. Then, using the original box and packing material. 1. Remove the printer cover, platen knob, paper guide, and any installed options. 2.
User Manual
Page 112
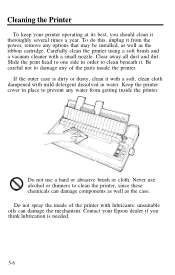
...in water. Be careful not to prevent any water from the power, remove any of the printer with a small nozzle. To do this, unplug it from getting inside the printer. Slide the print head to one side in place to damage any options that may be installed, as well as the...the inside of the parts inside the printer. Never use a hard or abrasive brush or cloth. Keep the printer cover in order to clean the printer, since these chemicals can damage the mechanism. Clear away all dust and dirt. Cleaning the Printer To keep your Epson dealer if you should clean it ...
...in water. Be careful not to prevent any water from the power, remove any of the printer with a small nozzle. To do this, unplug it from getting inside the printer. Slide the print head to one side in place to damage any options that may be installed, as well as the...the inside of the parts inside the printer. Never use a hard or abrasive brush or cloth. Keep the printer cover in order to clean the printer, since these chemicals can damage the mechanism. Clear away all dust and dirt. Cleaning the Printer To keep your Epson dealer if you should clean it ...
User Manual
Page 114
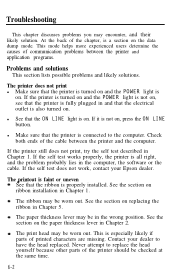
... dump mode. The ribbon may be worn out. The print head may be worn out. If the printer is turned on and the POWER light is not on . Check both ends of communication problems between the printer and the computer. See the section on ribbon installation in and...Chapter 5. The paper thickness lever may encounter, and their likely solution. Contact your Epson dealer. Never attempt to have the head replaced. If the self test works properly, the printer is properly installed. If the printer still does not print, try the self test described in the computer, the software...
... dump mode. The ribbon may be worn out. The print head may be worn out. If the printer is turned on and the POWER light is not on . Check both ends of communication problems between the printer and the computer. See the section on ribbon installation in and...Chapter 5. The paper thickness lever may encounter, and their likely solution. Contact your Epson dealer. Never attempt to have the head replaced. If the self test works properly, the printer is properly installed. If the printer still does not print, try the self test described in the computer, the software...


