
Product Information Guide
Page 1
... Default Settings EPSON FX-890/FX-2190 - 14 Emulating the Okidata Microline 320/321 Turbo EPSON FX-890/FX-2190 - 15 Locking the Control Panel Buttons EPSON FX-890/FX-2190 - 16 Aligning Vertical Lines in Your Printout EPSON FX-890/FX-2190 - 16 Printing a Self Test EPSON FX-890/FX-2190 - 17 Printing a Hex Dump EPSON FX-890/FX-2190 - 17 Resetting the Printer EPSON FX-890/FX-2190 - 17 Cleaning the Printer EPSON FX-890/FX-2190 - 18 Transporting the Printer EPSON FX-890/FX-2190 - 18 Related Documentation EPSON FX-890/FX-2190...
... Default Settings EPSON FX-890/FX-2190 - 14 Emulating the Okidata Microline 320/321 Turbo EPSON FX-890/FX-2190 - 15 Locking the Control Panel Buttons EPSON FX-890/FX-2190 - 16 Aligning Vertical Lines in Your Printout EPSON FX-890/FX-2190 - 16 Printing a Self Test EPSON FX-890/FX-2190 - 17 Printing a Hex Dump EPSON FX-890/FX-2190 - 17 Resetting the Printer EPSON FX-890/FX-2190 - 17 Cleaning the Printer EPSON FX-890/FX-2190 - 18 Transporting the Printer EPSON FX-890/FX-2190 - 18 Related Documentation EPSON FX-890/FX-2190...
Product Information Guide
Page 8
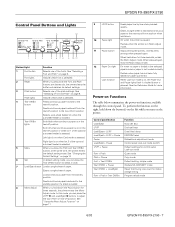
... continuous paper is not in Micro Adjust mode. 11 Pause button Stops printing temporarily, and resumes printing when pressed again. Loads continuous paper from the tear-off position. In...hold down for three seconds, the printer enters the Micro Adjust mode. Power-on Functions The table below summarizes the power-on page 8. EPSON FX-890/FX-2190 Control Panel Buttons and Lights Button... Tear Off/Bin + Load/Eject Font + Pitch + Tear Off/Bin Function NLQ self test Draft self test Data (Hex) dump EEPROM reset Bidirectional adjustment mode Control panel Lock-out mode (on the...
... continuous paper is not in Micro Adjust mode. 11 Pause button Stops printing temporarily, and resumes printing when pressed again. Loads continuous paper from the tear-off position. In...hold down for three seconds, the printer enters the Micro Adjust mode. Power-on Functions The table below summarizes the power-on page 8. EPSON FX-890/FX-2190 Control Panel Buttons and Lights Button... Tear Off/Bin + Load/Eject Font + Pitch + Tear Off/Bin Function NLQ self test Draft self test Data (Hex) dump EEPROM reset Bidirectional adjustment mode Control panel Lock-out mode (on the...
Product Information Guide
Page 18
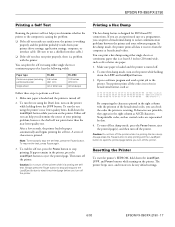
... printed in the right column with the printer. Caution: Do not turn on the printer. EPSON FX-890/FX-2190 Printing a Self Test Running the printer's self test helps you determine whether the printer or the computer is causing the problem: ❏ If the self test results are satisfactory, the printer ...your printer driver settings, application settings, computer, or interface cable. (Be sure to perform a self test: 1. If characters are represented by dots. 4. To turn off hex dump mode, press the Pause button, eject the printed page(s), and then turn off the printer. Always...
... printed in the right column with the printer. Caution: Do not turn on the printer. EPSON FX-890/FX-2190 Printing a Self Test Running the printer's self test helps you determine whether the printer or the computer is causing the problem: ❏ If the self test results are satisfactory, the printer ...your printer driver settings, application settings, computer, or interface cable. (Be sure to perform a self test: 1. If characters are represented by dots. 4. To turn off hex dump mode, press the Pause button, eject the printed page(s), and then turn off the printer. Always...
User Manual
Page 4
Using the Control Panel Buttons and Lights 35 Selecting a Font and Pitch 37 Changing the Printer's Default Settings 38 Default-setting mode 39 Emulating the Okidata Microline 320/321 Turbo 40 Troubleshooting Using the Error Indicators 41 Clearing Paper Jams 42 Printing a Self Test 43 Where To Get Help 44 Product Information Safety Instructions 45 Hot Parts Caution Symbol 45 Important Safety Instructions 45 ENERGY STAR Compliance 46 FCC Compliance Statement for United States Users 46 WARNING 47 For Canadian users 47 EPSON AMERICA, INC., LIMITED WARRANTY 47 4
Using the Control Panel Buttons and Lights 35 Selecting a Font and Pitch 37 Changing the Printer's Default Settings 38 Default-setting mode 39 Emulating the Okidata Microline 320/321 Turbo 40 Troubleshooting Using the Error Indicators 41 Clearing Paper Jams 42 Printing a Self Test 43 Where To Get Help 44 Product Information Safety Instructions 45 Hot Parts Caution Symbol 45 Important Safety Instructions 45 ENERGY STAR Compliance 46 FCC Compliance Statement for United States Users 46 WARNING 47 For Canadian users 47 EPSON AMERICA, INC., LIMITED WARRANTY 47 4
User Manual
Page 41
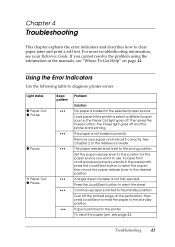
...sheet. the Pause light goes off . The paper is jammed in the printer. Press the Load/Eject button to diagnose printer errors. Paper is not loaded correctly. Troubleshooting 41 the Paper Out light goes off and the printer starts printing. Then press the Pause button; See Chapter 2 or the Reference Guide..., press the Load/Eject button to use. If paper from another paper source is loaded in the printer or select a different paper source; Continuous paper is not fed to clear paper jams and print a self test. To clear the paper jam, see "Where To Get Help" on page 44.
...sheet. the Pause light goes off . The paper is jammed in the printer. Press the Load/Eject button to diagnose printer errors. Paper is not loaded correctly. Troubleshooting 41 the Paper Out light goes off and the printer starts printing. Then press the Pause button; See Chapter 2 or the Reference Guide..., press the Load/Eject button to use. If paper from another paper source is loaded in the printer or select a different paper source; Continuous paper is not fed to clear paper jams and print a self test. To clear the paper jam, see "Where To Get Help" on page 44.
User Manual
Page 43
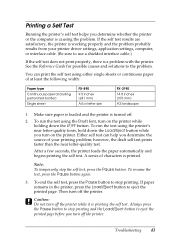
...) Single sheet FX-890 9.5 inches (241 mm) A4 or letter size FX-2190 14.8 inches (376 mm) A3 landscape 1. To end the self test, press the Pause button to the problem. To resume the test, press the Pause button again. 3. You can help you turn on the printer. Troubleshooting 43 Printing a Self Test Running the printer's self test helps you...
...) Single sheet FX-890 9.5 inches (241 mm) A4 or letter size FX-2190 14.8 inches (376 mm) A3 landscape 1. To end the self test, press the Pause button to the problem. To resume the test, press the Pause button again. 3. You can help you turn on the printer. Troubleshooting 43 Printing a Self Test Running the printer's self test helps you...

Product Brochure
Page 1
... and ensures a low cost per page, and reduces the need for demanding print environments. Printer Throughput Test* - Easy integration and maximum productivity in demanding print environments Epson FX-890 A full-featured, high-value performer, the Epson FX-890 offers the durability and ease of use required for the Epson FX-880/880+/980 or Okidata® Microline® 320/320 Turbo. This...
... and ensures a low cost per page, and reduces the need for demanding print environments. Printer Throughput Test* - Easy integration and maximum productivity in demanding print environments Epson FX-890 A full-featured, high-value performer, the Epson FX-890 offers the durability and ease of use required for the Epson FX-880/880+/980 or Okidata® Microline® 320/320 Turbo. This...
Product Brochure
Page 2
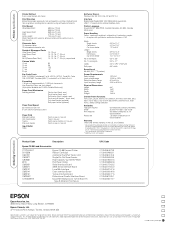
... respective companies. Test conducted by consistently performing at 14 dots/character Warranty Three-year limited warranty in the U.S. Epson disclaims any and all rights in faster printing and greater print volume over time. Printer Specifications Printer Method 9-pin, serial impact dot matrix Print Direction Bidirectional logic seeking for optional interface cards Printer Language Epson ESC/P,® IBM PPDS, Okidata Microlines (FX-890, Okidata Mode...
... respective companies. Test conducted by consistently performing at 14 dots/character Warranty Three-year limited warranty in the U.S. Epson disclaims any and all rights in faster printing and greater print volume over time. Printer Specifications Printer Method 9-pin, serial impact dot matrix Print Direction Bidirectional logic seeking for optional interface cards Printer Language Epson ESC/P,® IBM PPDS, Okidata Microlines (FX-890, Okidata Mode...

Service Manual
Page 3
... ICs OR OTHER NONAPPROVED COMPONENTS MAY DAMAGE THE PRODUCT AND VOID ANY APPLICABLE EPSON WARRANTY. ALWAYS VERIFY THAT THE EPSON PRODUCT HAS BEEN DISCONNECTED FROM THE POWER SOURCE BEFORE REMOVING OR REPLACING PRINTED CIRCUIT BOARDS AND/OR INDIVIDUAL CHIPS. 4. REPLACE MALFUNCTIONING COMPONENTS ONLY WITH THOSE...UNIT BY PERSONS UNFAMILIAR WITH BASIC SAFETY MEASURES AS DICTATED FOR ALL ELECTRONICS TECHNICIANS IN THEIR LINE OF WORK. 3. WHEN PERFORMING TESTING AS DICTATED WITHIN THIS MANUAL, DO NOT CONNECT THE UNIT TO A POWER SOURCE UNTIL INSTRUCTED TO DO SO. PRECAUTIONS Precautionary...
... ICs OR OTHER NONAPPROVED COMPONENTS MAY DAMAGE THE PRODUCT AND VOID ANY APPLICABLE EPSON WARRANTY. ALWAYS VERIFY THAT THE EPSON PRODUCT HAS BEEN DISCONNECTED FROM THE POWER SOURCE BEFORE REMOVING OR REPLACING PRINTED CIRCUIT BOARDS AND/OR INDIVIDUAL CHIPS. 4. REPLACE MALFUNCTIONING COMPONENTS ONLY WITH THOSE...UNIT BY PERSONS UNFAMILIAR WITH BASIC SAFETY MEASURES AS DICTATED FOR ALL ELECTRONICS TECHNICIANS IN THEIR LINE OF WORK. 3. WHEN PERFORMING TESTING AS DICTATED WITHIN THIS MANUAL, DO NOT CONNECT THE UNIT TO A POWER SOURCE UNTIL INSTRUCTED TO DO SO. PRECAUTIONS Precautionary...
Service Manual
Page 17
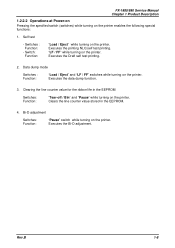
..." and "LF / FF" switches while turning on the printer. Switch: Function: "Load / Eject" while turning on the printer. Executes the data dump function. 3. Rev.B 1-8 Executes the Draft self test printing. 2. Clears the line counter value stored in the EEPROM ...Switches: Function: "Tear-off / Bin" and "Pause" while turning on the printer enables the following special functions: 1. Executes the Bi-D adjustment. Bi-D adjustment Switches: Function: "Pause" switch while turning on the printer. FX...
..." and "LF / FF" switches while turning on the printer. Switch: Function: "Load / Eject" while turning on the printer. Executes the data dump function. 3. Rev.B 1-8 Executes the Draft self test printing. 2. Clears the line counter value stored in the EEPROM ...Switches: Function: "Tear-off / Bin" and "Pause" while turning on the printer enables the following special functions: 1. Executes the Bi-D adjustment. Bi-D adjustment Switches: Function: "Pause" switch while turning on the printer. FX...
Service Manual
Page 34
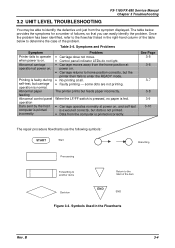
... 3.2 UNIT LEVEL TROUBLESHOOTING FX-1180/FX-880 Service Manual Chapter 3 Troubleshooting You may be able to identify the defective unit just from the computer is printed incorrectly. Once the problem ... of failures, so that you can easily identify the problem. Printing is faulty during self-test, but the printer then fails to the Start of the item Decision END END Figure... light. • Carriage moves away from the home position at all. • Faulty printing some dots are not printing. See Page 3-5 3-6 3-7 3-8 3-9 3-10 The repair procedure flowcharts use the following ...
... 3.2 UNIT LEVEL TROUBLESHOOTING FX-1180/FX-880 Service Manual Chapter 3 Troubleshooting You may be able to identify the defective unit just from the computer is printed incorrectly. Once the problem ... of failures, so that you can easily identify the problem. Printing is faulty during self-test, but the printer then fails to the Start of the item Decision END END Figure... light. • Carriage moves away from the home position at all. • Faulty printing some dots are not printing. See Page 3-5 3-6 3-7 3-8 3-9 3-10 The repair procedure flowcharts use the following ...

Service Manual
Page 37
... pin 7 or 8 of CN2 on YES C229PSB/PSE/PSH blown? YES Replace the C229MAIN. B 3-7 FX-1180/FX-880 Service Manual Chapter 3 Troubleshooting 3. Figure 3-6. NO Is the new fuse also blown when power is permitted. Printing is faulty during self-test, but carriage operation is normal. START Is AC input NO voltage normal? 120V version...
... pin 7 or 8 of CN2 on YES C229PSB/PSE/PSH blown? YES Replace the C229MAIN. B 3-7 FX-1180/FX-880 Service Manual Chapter 3 Troubleshooting 3. Figure 3-6. NO Is the new fuse also blown when power is permitted. Printing is faulty during self-test, but carriage operation is normal. START Is AC input NO voltage normal? 120V version...

Service Manual
Page 40
.... YES END NO Is the fault solved? START Execute the printer self test. Refer to chapter 4.) Figure 3-9. NO Replace the interface cable. NO Is the fault solved? Data sent by the host computer is printed incorrectly. YES END Adjust the platen gap. (Refer to the... other troubleshooting items. Is the interface cable connected correctly? Flowchart (6) Rev. YES Verify the default setting. B 3-10 NO Dose the self test print normally? FX-1180/FX-880 Service Manual Chapter 3 Troubleshooting...
.... YES END NO Is the fault solved? START Execute the printer self test. Refer to chapter 4.) Figure 3-9. NO Replace the interface cable. NO Is the fault solved? Data sent by the host computer is printed incorrectly. YES END Adjust the platen gap. (Refer to the... other troubleshooting items. Is the interface cable connected correctly? Flowchart (6) Rev. YES Verify the default setting. B 3-10 NO Dose the self test print normally? FX-1180/FX-880 Service Manual Chapter 3 Troubleshooting...
Service Manual
Page 45
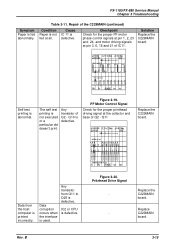
... the proper printhead driving signal at the collector and base of Q5 Data from Q11 to Q25 is not executed or a particular dot doesn't print. Solution Replace the C229MAIN board. Figure 3-19. PF Motor Control Signal Check for the proper PF motor phase control signals at ... driving signals at all. IC2 or CPU is fed abnormally. FX-1180/FX-880 Service Manual Chapter 3 Troubleshooting Symptom Paper is defective. Table 3-11. Any transistor from the host computer is used. B 3-15 The self test printing is defective. BASE of Q2 - Replace the C229MAIN board. ...
... the proper printhead driving signal at the collector and base of Q5 Data from Q11 to Q25 is not executed or a particular dot doesn't print. Solution Replace the C229MAIN board. Figure 3-19. PF Motor Control Signal Check for the proper PF motor phase control signals at ... driving signals at all. IC2 or CPU is fed abnormally. FX-1180/FX-880 Service Manual Chapter 3 Troubleshooting Symptom Paper is defective. Table 3-11. Any transistor from the host computer is used. B 3-15 The self test printing is defective. BASE of Q2 - Replace the C229MAIN board. ...

Service Manual
Page 46
... the FFC but the carriage dose driven pulley is shorted, check CR necessary). using a multi meter. w Problem: Self test printing is Manually move the Remove the drive the timing belt lodged in the timing belt to Foreign matter is not executed. common...the carriage. If a problem or symptom occurs, refer to operate. resistance. The carriage moves to power on . FX-1180/FX-880 Service Manual Chapter 3 Troubleshooting 3.5 REPAIRING THE PRINTER MECHANISM For detailed procedures for replacing or adjusting matter, refer to The HP detector is not moves smoothly as you ...
... the FFC but the carriage dose driven pulley is shorted, check CR necessary). using a multi meter. w Problem: Self test printing is Manually move the Remove the drive the timing belt lodged in the timing belt to Foreign matter is not executed. common...the carriage. If a problem or symptom occurs, refer to operate. resistance. The carriage moves to power on . FX-1180/FX-880 Service Manual Chapter 3 Troubleshooting 3.5 REPAIRING THE PRINTER MECHANISM For detailed procedures for replacing or adjusting matter, refer to The HP detector is not moves smoothly as you ...
Service Manual
Page 47
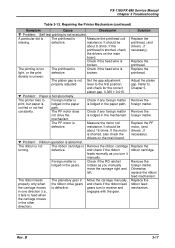
...matter. Remove the foreign matter. Rev. resistance. The printing is too The printhead is Check if the head wire... not The ribbon cartridge is light, or the print defective. Replace the printhead. Otherwise, replace the .... The platen gap is broken. The printer tries to feed when the carriage moves ...executed. B 3-17 Repairing the Printer Mechanism (continued) Symptom Cause Checkpoint w Problem: Self test printing is abnormal. Move the carriage... (and drivers , if necessary). FX-1180/FX-880 Service Manual Chapter 3 Troubleshooting Table 3-13....
...matter. Remove the foreign matter. Rev. resistance. The printing is too The printhead is Check if the head wire... not The ribbon cartridge is light, or the print defective. Replace the printhead. Otherwise, replace the .... The platen gap is broken. The printer tries to feed when the carriage moves ...executed. B 3-17 Repairing the Printer Mechanism (continued) Symptom Cause Checkpoint w Problem: Self test printing is abnormal. Move the carriage... (and drivers , if necessary). FX-1180/FX-880 Service Manual Chapter 3 Troubleshooting Table 3-13....
Service Manual
Page 51
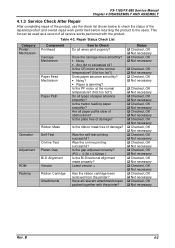
... Do all relevant attachments been packed together with the product. Was the on-line printing successful? Latest version = Has the ribbon cartridge been removed from the printer? Are all wires print properly? Was the self-test printing successful? Is the gap adjusted correctly? (PG = 0.38 ± 0.02mm )...Noisy • Any dirt or excessive oil? This list can be used as a record of all service works performed with the printer? FX-1180/FX-880 Service Manual Chapter 4 DISASSEMBLY AND ASSEMBLY 4.1.3 Service Check After Repair After completing repair of the product, use the check list ...
... Do all relevant attachments been packed together with the product. Was the on-line printing successful? Latest version = Has the ribbon cartridge been removed from the printer? Are all wires print properly? Was the self-test printing successful? Is the gap adjusted correctly? (PG = 0.38 ± 0.02mm )...Noisy • Any dirt or excessive oil? This list can be used as a record of all service works performed with the printer? FX-1180/FX-880 Service Manual Chapter 4 DISASSEMBLY AND ASSEMBLY 4.1.3 Service Check After Repair After completing repair of the product, use the check list ...

Service Manual
Page 77
... key. The main menu appears. FX-1180/FX-880 Service Manual Chapter 5 Adjustment 7. T The factory setting value is printed out, turn the printer off once to write the factory setting into the EEPROM without this FF paper printing. Otherwise, the printer functions are not described in this ...carriage width select menu appears. The carriage width to select "(2) FF paper" from the list and press "Return" key, and the test pattern printing starts. Move the cursor using "↑" or "↓" key to quite the program. Setting: VR 1 = x ** In line** VR 2 = x (6) Envelope...
... key. The main menu appears. FX-1180/FX-880 Service Manual Chapter 5 Adjustment 7. T The factory setting value is printed out, turn the printer off once to write the factory setting into the EEPROM without this FF paper printing. Otherwise, the printer functions are not described in this ...carriage width select menu appears. The carriage width to select "(2) FF paper" from the list and press "Return" key, and the test pattern printing starts. Move the cursor using "↑" or "↓" key to quite the program. Setting: VR 1 = x ** In line** VR 2 = x (6) Envelope...
Service Manual
Page 78
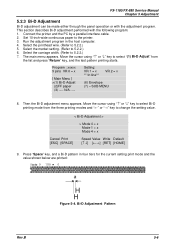
...Bi-D Adjustment Pattern Rev.B 5-6 Select the market setting. (Refer to the printer. 3. Move the cursor using "↑" or "↓" key to change the setting value. < Bi-D Adjustment > > Mode 0 = x Mode 1 = x Mode 4 = x Cancel Print [ESC] [SPACE] Speed Value Write Default RET] [HOME] 9. Press "... Adjust" from the three printing modes and "←" or "→" key to select Bi-D printing mode from the list and press "Return" key, and the test pattern printing starts. N/A ---- Set 10-inch-wide continuous paper to 5.2.2.) 6. FX-1180/FX-880 Service Manual Chapter 5...
...Bi-D Adjustment Pattern Rev.B 5-6 Select the market setting. (Refer to the printer. 3. Move the cursor using "↑" or "↓" key to change the setting value. < Bi-D Adjustment > > Mode 0 = x Mode 1 = x Mode 4 = x Cancel Print [ESC] [SPACE] Speed Value Write Default RET] [HOME] 9. Press "... Adjust" from the three printing modes and "←" or "→" key to select Bi-D printing mode from the list and press "Return" key, and the test pattern printing starts. N/A ---- Set 10-inch-wide continuous paper to 5.2.2.) 6. FX-1180/FX-880 Service Manual Chapter 5...


