User Manual
Page 4
Using the Control Panel Buttons and Lights 35 Selecting a Font and Pitch 37 Changing the Printer's Default Settings 38 Default-setting mode 39 Emulating the Okidata Microline 320/321 Turbo 40 Troubleshooting Using the Error Indicators 41 Clearing Paper Jams 42 Printing a Self Test 43 Where To Get Help 44 Product Information Safety Instructions 45 Hot Parts Caution Symbol 45 Important Safety Instructions 45 ENERGY STAR Compliance 46 FCC Compliance Statement for United States Users 46 WARNING 47 For Canadian users 47 EPSON AMERICA, INC., LIMITED WARRANTY 47 4
Using the Control Panel Buttons and Lights 35 Selecting a Font and Pitch 37 Changing the Printer's Default Settings 38 Default-setting mode 39 Emulating the Okidata Microline 320/321 Turbo 40 Troubleshooting Using the Error Indicators 41 Clearing Paper Jams 42 Printing a Self Test 43 Where To Get Help 44 Product Information Safety Instructions 45 Hot Parts Caution Symbol 45 Important Safety Instructions 45 ENERGY STAR Compliance 46 FCC Compliance Statement for United States Users 46 WARNING 47 For Canadian users 47 EPSON AMERICA, INC., LIMITED WARRANTY 47 4
User Manual
Page 5
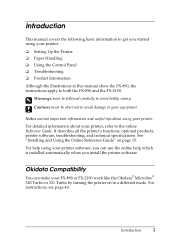
... online Reference Guide. See "Installing and Using the Online Reference Guide" on in this manual show the FX-890, the instructions apply to both the FX-890 and the FX-2190. It describes all the printer's functions, optional products, printer software, troubleshooting, and technical specifications. Notes contain important information and useful tips about your equipment. Introduction This manual...
... online Reference Guide. See "Installing and Using the Online Reference Guide" on in this manual show the FX-890, the instructions apply to both the FX-890 and the FX-2190. It describes all the printer's functions, optional products, printer software, troubleshooting, and technical specifications. Notes contain important information and useful tips about your equipment. Introduction This manual...
User Manual
Page 41
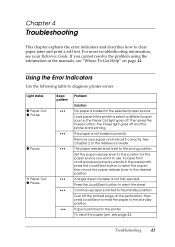
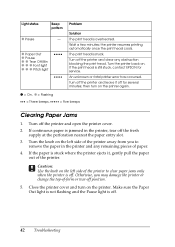
Remove your Reference Guide. Continuous paper is jammed in the printer. Paper is not fed to the standby position. For more troubleshooting information, see your paper and reload it correctly. Load paper in the manuals, see page 42. If paper from another paper source is loaded...To clear the paper jam, see "Where To Get Help" on page 44. Troubleshooting 41 Set the paper release lever to the position for the paper source you cannot resolve the problem using the information in the printer or select a different paper source; Press the Load/Eject button to the standby ...
Remove your Reference Guide. Continuous paper is jammed in the printer. Paper is not fed to the standby position. For more troubleshooting information, see your paper and reload it correctly. Load paper in the manuals, see page 42. If paper from another paper source is loaded...To clear the paper jam, see "Where To Get Help" on page 44. Troubleshooting 41 Set the paper release lever to the position for the paper source you cannot resolve the problem using the information in the printer or select a different paper source; Press the Load/Eject button to the standby ...
User Manual
Page 42
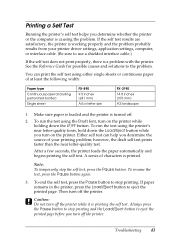
...-form or tear-off . 42 Troubleshooting Turn off the printer and clear any remaining pieces of the printer. c Caution: Use the knob on . O Paper Out O Pause O O Tear Off/Bin O O O Font light O O O Pitch light Problem Solution The print head is still stuck, contact EPSON for several minutes; Turn off the printer and leave it , gently pull...
...-form or tear-off . 42 Troubleshooting Turn off the printer and clear any remaining pieces of the printer. c Caution: Use the knob on . O Paper Out O Pause O O Tear Off/Bin O O O Font light O O O Pitch light Problem Solution The print head is still stuck, contact EPSON for several minutes; Turn off the printer and leave it , gently pull...
User Manual
Page 43
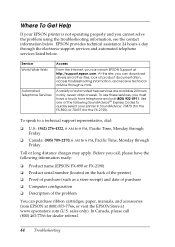
...Load/Eject button to the problem. If paper remains in the printer, press the Load/Eject button to stop printing. Then turn off the printer. Troubleshooting 43 Either self test can print the self test using the printer's near letter-quality test. Always press the Pause button to...following width: Paper type Continuous paper (including perforated border) Single sheet FX-890 9.5 inches (241 mm) A4 or letter size FX-2190 14.8 inches (376 mm) A3 landscape 1. If the self test results are satisfactory, the printer is causing the problem. To run the test using either single ...
...Load/Eject button to the problem. If paper remains in the printer, press the Load/Eject button to stop printing. Then turn off the printer. Troubleshooting 43 Either self test can print the self test using the printer's near letter-quality test. Always press the Pause button to...following width: Paper type Continuous paper (including perforated border) Single sheet FX-890 9.5 inches (241 mm) A4 or letter size FX-2190 14.8 inches (376 mm) A3 landscape 1. If the self test results are satisfactory, the printer is causing the problem. To run the test using either single ...
User Manual
Page 44
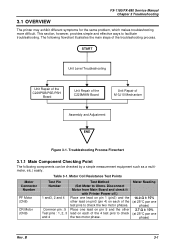
Where To Get Help If your printer in SoundAdvice: 70470 (for the FX-890) or 70475 (for dealer referral. 44 Troubleshooting Service World Wide Web Automated Telephone Services Access From the Internet, you can reach EPSON Support at product documentation, access troubleshooting information, and receive technical advice through e-mail. At this site, you call, please have a touch...
Where To Get Help If your printer in SoundAdvice: 70470 (for the FX-890) or 70475 (for dealer referral. 44 Troubleshooting Service World Wide Web Automated Telephone Services Access From the Internet, you can reach EPSON Support at product documentation, access troubleshooting information, and receive technical advice through e-mail. At this site, you call, please have a touch...

Service Manual
Page 7
... Component Checking Point 3-1 3.1.2 Error...3-3 3.2 UNIT LEVEL TROUBLESHOOTING 3-4 3.3 UNIT REPAIRING OF THE POWER SUPPLY BOARD 3-11 3.4 UNIT REPAIRING OF THE MAIN BOARD 3-13 3.5 REPAIRING THE PRINTER MECHANISM 3-16 DISASSEMBLY AND ASSEMBLY 4.1 OVERVIEW 4-1 4.1.1 Disassembly Precautions 4-1 4.1.2 Tools and Instruments...Board Removal 4-9 4.2.6 C229PSB/PSE/PSH Board Removal 4-11 4.2.7 ROM Removal 4-12 4.2.8 Platen Removal 4-13 4.2.9 Printer Mechanism Removal 4-14 4.2.10 Printer Mechanism Disassembly 4-15 4.2.10.1 CR Motor Removal 4-15 4.2.10.2 PF Motor Removal 4-16 4.2.10.3 PF Gear...
... Component Checking Point 3-1 3.1.2 Error...3-3 3.2 UNIT LEVEL TROUBLESHOOTING 3-4 3.3 UNIT REPAIRING OF THE POWER SUPPLY BOARD 3-11 3.4 UNIT REPAIRING OF THE MAIN BOARD 3-13 3.5 REPAIRING THE PRINTER MECHANISM 3-16 DISASSEMBLY AND ASSEMBLY 4.1 OVERVIEW 4-1 4.1.1 Disassembly Precautions 4-1 4.1.2 Tools and Instruments...Board Removal 4-9 4.2.6 C229PSB/PSE/PSH Board Removal 4-11 4.2.7 ROM Removal 4-12 4.2.8 Platen Removal 4-13 4.2.9 Printer Mechanism Removal 4-14 4.2.10 Printer Mechanism Disassembly 4-15 4.2.10.1 CR Motor Removal 4-15 4.2.10.2 PF Motor Removal 4-16 4.2.10.3 PF Gear...
Service Manual
Page 31
... Ohms. Disconnect Motor from Main Board and check it with Printer Power off.) Place one lead on pin 1 (pin2) and the other lead on each of the troubleshooting process. Place one phase) Rev. B 3-1 Troubleshooting Process Flowchart 3.1.1 Main Component Checking Point The following flowchart illustrates... Table 3-1. The following components can be checked by a simple measurement equipment such as a multimeter, etc.) easily. 3.1 OVERVIEW FX-1180/FX-880 Service Manual Chapter 3 Troubleshooting The printer may exhibit different symptoms for the same problem, which makes...
... Ohms. Disconnect Motor from Main Board and check it with Printer Power off.) Place one lead on pin 1 (pin2) and the other lead on each of the troubleshooting process. Place one phase) Rev. B 3-1 Troubleshooting Process Flowchart 3.1.1 Main Component Checking Point The following flowchart illustrates... Table 3-1. The following components can be checked by a simple measurement equipment such as a multimeter, etc.) easily. 3.1 OVERVIEW FX-1180/FX-880 Service Manual Chapter 3 Troubleshooting The printer may exhibit different symptoms for the same problem, which makes...
Service Manual
Page 32
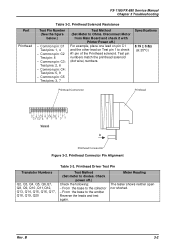
... Test Pin Test Method (Set meter to the emitter Reverse the leads and test again. Test pin numbers match the printhead solenoid (dot wire) numbers. FX-1180/FX-880 Service Manual Chapter 3 Troubleshooting Part Printhead Table 3-2. B 3-2 Printhead Connector Pin Alignment Transistor Numbers Q2, Q3, Q4, Q5, Q6,Q7, Q8, Q9, Q10 ,Q11,Q12, ...: C4: Test pins: 5, 9 − Common pin :C5 Test pins: 3, 7 Test Method (Set Meter to Ohms. Disconnect Motor from Main Board and check it with Printer Power off .) Check the following: − From the base to the collector − From the base to diodes.
... Test Pin Test Method (Set meter to the emitter Reverse the leads and test again. Test pin numbers match the printhead solenoid (dot wire) numbers. FX-1180/FX-880 Service Manual Chapter 3 Troubleshooting Part Printhead Table 3-2. B 3-2 Printhead Connector Pin Alignment Transistor Numbers Q2, Q3, Q4, Q5, Q6,Q7, Q8, Q9, Q10 ,Q11,Q12, ...: C4: Test pins: 5, 9 − Common pin :C5 Test pins: 3, 7 Test Method (Set Meter to Ohms. Disconnect Motor from Main Board and check it with Printer Power off .) Check the following: − From the base to the collector − From the base to diodes.
Service Manual
Page 33
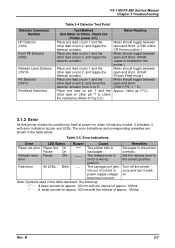
... on , when it finds any trouble, it indicates it back on pin 2, and toggle the detector actuator. B 3-3 FX-1180/FX-880 Service Manual Chapter 3 Troubleshooting Detector Connector Number HP Detector (CN4) Front PE Detector (CN6) Release Lever Detector (CN10) PG Detector (CN11) Printhead... thermistor Table 3-4 Detector Test Point Test Method (Set Meter to Ohms. Check the Printer power off the printer once ...
... on , when it finds any trouble, it indicates it back on pin 2, and toggle the detector actuator. B 3-3 FX-1180/FX-880 Service Manual Chapter 3 Troubleshooting Detector Connector Number HP Detector (CN4) Front PE Detector (CN6) Release Lever Detector (CN10) PG Detector (CN11) Printhead... thermistor Table 3-4 Detector Test Point Test Method (Set Meter to Ohms. Check the Printer power off the printer once ...
Service Manual
Page 34
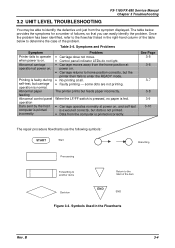
...printed. • Data from the home position at power on . The printer prints but carriage operation is printed incorrectly Problem • Carriage dose not... on, and self-test is executed correctly, but the printer then fails to identify the defective unit just from the ... you can easily identify the problem. Symptoms and Problems Symptom Printer fails to operate when power is printed incorrectly. Table 3-6. ..., but feeds paper incorrectly. 3.2 UNIT LEVEL TROUBLESHOOTING FX-1180/FX-880 Service Manual Chapter 3 Troubleshooting You may be able to enter the READY mode. ...
...printed. • Data from the home position at power on . The printer prints but carriage operation is printed incorrectly Problem • Carriage dose not... on, and self-test is executed correctly, but the printer then fails to identify the defective unit just from the ... you can easily identify the problem. Symptoms and Problems Symptom Printer fails to operate when power is printed incorrectly. Table 3-6. ..., but feeds paper incorrectly. 3.2 UNIT LEVEL TROUBLESHOOTING FX-1180/FX-880 Service Manual Chapter 3 Troubleshooting You may be able to enter the READY mode. ...

Service Manual
Page 35
... the +5V line at pin 7 or 8 of CN2 on C229PSB/PSE/PSH. YES Replace the C229MAIN. 1. START FX-1180/FX-880 Service Manual Chapter 3 Troubleshooting Is AC input NO voltage normal? 120V version: 85 - 138V 230V version: 187 - 276V Universal Version: 85 -... 276V YES Use the correct AC input voltage. Are the fuses F1 on again? No fluctuation from AC voltage range is turned on YES C229PSB/PSE/PSH blown? Replace the applied unit. Printer...
... the +5V line at pin 7 or 8 of CN2 on C229PSB/PSE/PSH. YES Replace the C229MAIN. 1. START FX-1180/FX-880 Service Manual Chapter 3 Troubleshooting Is AC input NO voltage normal? 120V version: 85 - 138V 230V version: 187 - 276V Universal Version: 85 -... 276V YES Use the correct AC input voltage. Are the fuses F1 on again? No fluctuation from AC voltage range is turned on YES C229PSB/PSE/PSH blown? Replace the applied unit. Printer...
Service Manual
Page 36
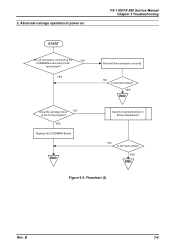
Abnormal carriage operation at power on. YES Replace the C229MAIN Board. NO Is the fault solved? END Reinsert the connectors correctly. Flowchart (2) Rev. YES Dose the carriage move NO to the home position? YES END Figure 3-5. 2. YES END See the troubleshooting for Printer Mechanism. B 3-6 FX-1180/FX-880 Service Manual Chapter 3 Troubleshooting START Are all connectors connecting the NO C229MAIN board and printer mechanism? NO Is the fault solved?
Abnormal carriage operation at power on. YES Replace the C229MAIN Board. NO Is the fault solved? END Reinsert the connectors correctly. Flowchart (2) Rev. YES Dose the carriage move NO to the home position? YES END Figure 3-5. 2. YES END See the troubleshooting for Printer Mechanism. B 3-6 FX-1180/FX-880 Service Manual Chapter 3 Troubleshooting START Are all connectors connecting the NO C229MAIN board and printer mechanism? NO Is the fault solved?

Service Manual
Page 38
Abnormal paper feeding FX-1180/FX-880 Service Manual Chapter 3 Troubleshooting START Is the paper loaded NO correctly? Is the connector CN5 or CN6 connected correctly? Is the fault NO solved? NO Reinsert the connector CN5 ...or CN6 correctly. YES END Dose the platen knob rotate NO smoothly when it is turned manually at power off? Refer to the troubleshooting of Printer Mechanism. YES Replace the C229MAIN board. YES NO Is the fault solved? Is the fault solved? YES NO Refer to the...
Abnormal paper feeding FX-1180/FX-880 Service Manual Chapter 3 Troubleshooting START Is the paper loaded NO correctly? Is the connector CN5 or CN6 connected correctly? Is the fault NO solved? NO Reinsert the connector CN5 ...or CN6 correctly. YES END Dose the platen knob rotate NO smoothly when it is turned manually at power off? Refer to the troubleshooting of Printer Mechanism. YES Replace the C229MAIN board. YES NO Is the fault solved? Is the fault solved? YES NO Refer to the...

Service Manual
Page 40
... the C229MAIN board. YES END NO Is the fault solved? YES END Adjust the platen gap. (Refer to a position with a higher number. START Execute the printer self test. Refer to the other troubleshooting items. Is the interface cable connected correctly? B 3-10 Data sent by the host computer is printed incorrectly...
... the C229MAIN board. YES END NO Is the fault solved? YES END Adjust the platen gap. (Refer to a position with a higher number. START Execute the printer self test. Refer to the other troubleshooting items. Is the interface cable connected correctly? B 3-10 Data sent by the host computer is printed incorrectly...

Service Manual
Page 41
... is defective. B Figure 3-11. Table 3-7. Condition +35V line is blown. Figure 3-10. Repair of the C229PSB/PSE/PSH Symptom The printer dose not operate at the drain of Q2 or Q3. Replace the C229PSB/ PSE/PSH board. Replace the C229PSB/ PSE/PSH board. Cause ...multimeter. Collector of each component. Drain of Q1 Check for servicers who perform only board replacement can ignore this section. FX-1180/FX-880 Service Manual Chapter 3 Troubleshooting 3.3 UNIT REPAIRING OF THE POWER SUPPLY BOARD This section is not blown. Servicers who repair to evaluate the operation of...
... is defective. B Figure 3-11. Table 3-7. Condition +35V line is blown. Figure 3-10. Repair of the C229PSB/PSE/PSH Symptom The printer dose not operate at the drain of Q2 or Q3. Replace the C229PSB/ PSE/PSH board. Replace the C229PSB/ PSE/PSH board. Cause ...multimeter. Collector of each component. Drain of Q1 Check for servicers who perform only board replacement can ignore this section. FX-1180/FX-880 Service Manual Chapter 3 Troubleshooting 3.3 UNIT REPAIRING OF THE POWER SUPPLY BOARD This section is not blown. Servicers who repair to evaluate the operation of...

Service Manual
Page 42
.../PSH board. +5V line is defective. Rev. Repair of IC51. Output of IC51. Table 3-8. defective. Replace the C229PSB/ PSE/PSH board. FX-1180/FX-880 Service Manual Chapter 3 Troubleshooting Symptom The printer dose not operate at pin 5 or 7 of PC1. Cause PC1 is defective. Waveform of PC1 Regulator IC Check for the proper waveform...
.../PSH board. +5V line is defective. Rev. Repair of IC51. Output of IC51. Table 3-8. defective. Replace the C229PSB/ PSE/PSH board. FX-1180/FX-880 Service Manual Chapter 3 Troubleshooting Symptom The printer dose not operate at pin 5 or 7 of PC1. Cause PC1 is defective. Waveform of PC1 Regulator IC Check for the proper waveform...

Service Manual
Page 43
FX-1180/FX-880 Service Manual Chapter 3 Troubleshooting 3.4 UNIT REPAIRING OF THE MAIN BOARD This section is not operational. Cause The reset circuit is necessary only for the proper signal at all. B Figure 3-.... Table 3-9. Checkpoint Check for the proper voltage waveforms output from the +5VDC line (IC1, pin 3) and for Program ROM 3-13 The table below lets you troubleshoot problems with printer power on. Chip Select Signal for the reset signal (IC1, pin 1) with the main board (C229MAIN). Rev. Repair of the C229MAIN Symptom The...
FX-1180/FX-880 Service Manual Chapter 3 Troubleshooting 3.4 UNIT REPAIRING OF THE MAIN BOARD This section is not operational. Cause The reset circuit is necessary only for the proper signal at all. B Figure 3-.... Table 3-9. Checkpoint Check for the proper voltage waveforms output from the +5VDC line (IC1, pin 3) and for Program ROM 3-13 The table below lets you troubleshoot problems with printer power on. Chip Select Signal for the reset signal (IC1, pin 1) with the main board (C229MAIN). Rev. Repair of the C229MAIN Symptom The...

Service Manual
Page 44
... CPU dose not operate. IC8 is defective. CR Motor Control Signal Rev. Replace the C229MAIN board. Cause The CPU is defective. Figure 3-17. Table 3-10. FX-1180/FX-880 Service Manual Chapter 3 Troubleshooting Symptom The printer dose not operate at pin 1, 8, 11 and 18 of IC8.
... CPU dose not operate. IC8 is defective. CR Motor Control Signal Rev. Replace the C229MAIN board. Cause The CPU is defective. Figure 3-17. Table 3-10. FX-1180/FX-880 Service Manual Chapter 3 Troubleshooting Symptom The printer dose not operate at pin 1, 8, 11 and 18 of IC8.

Service Manual
Page 46
FX-1180/FX-880 Service Manual Chapter 3 Troubleshooting 3.5 REPAIRING THE PRINTER MECHANISM For detailed procedures for replacing or adjusting matter, refer to The HP detector is Check the HP detector Replace the HP the left slightly, ... carriage moves, The printhead FFC Check whether FFC is Connect the FFC but the carriage dose driven pulley is shorted, check CR necessary). Repairing the Printer Mechanism Symptom Cause Checkpoint Solution w Problem: The CR motor fails to the following tables and find out other potential causes. smooth. w Problem: Self test printing...
FX-1180/FX-880 Service Manual Chapter 3 Troubleshooting 3.5 REPAIRING THE PRINTER MECHANISM For detailed procedures for replacing or adjusting matter, refer to The HP detector is Check the HP detector Replace the HP the left slightly, ... carriage moves, The printhead FFC Check whether FFC is Connect the FFC but the carriage dose driven pulley is shorted, check CR necessary). Repairing the Printer Mechanism Symptom Cause Checkpoint Solution w Problem: The CR motor fails to the following tables and find out other potential causes. smooth. w Problem: Self test printing...


