Product Information Guide
Page 1
... Lines in Your Printout EPSON FX-890/FX-2190 - 16 Printing a Self Test EPSON FX-890/FX-2190 - 17 Printing a Hex Dump EPSON FX-890/FX-2190 - 17 Resetting the Printer EPSON FX-890/FX-2190 - 17 Cleaning the Printer EPSON FX-890/FX-2190 - 18 Transporting the Printer EPSON FX-890/FX-2190 - 18 Related Documentation EPSON FX-890/FX-2190 - 18 6/03 The table of contents of this section is listed below. P R O D U C T I N F O R M A T I O N G U I D E EPSON UPDATE 6/11/03 This package provides a new dot matrix printer product section to...
... Lines in Your Printout EPSON FX-890/FX-2190 - 16 Printing a Self Test EPSON FX-890/FX-2190 - 17 Printing a Hex Dump EPSON FX-890/FX-2190 - 17 Resetting the Printer EPSON FX-890/FX-2190 - 17 Cleaning the Printer EPSON FX-890/FX-2190 - 18 Transporting the Printer EPSON FX-890/FX-2190 - 18 Related Documentation EPSON FX-890/FX-2190 - 18 6/03 The table of contents of this section is listed below. P R O D U C T I N F O R M A T I O N G U I D E EPSON UPDATE 6/11/03 This package provides a new dot matrix printer product section to...
Product Information Guide
Page 8
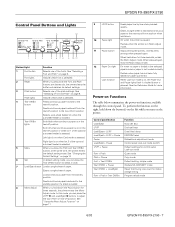
...is selected. Lock function When Lock-out mode is on when Card mode is in Micro Adjust mode. 11 Pause button Stops printing temporarily, and resumes printing when pressed again. Selects a cut-sheet feeder bin when the cut -sheet feeder is loaded. 8 Micro Adjust When you ...Tear Off/Bin + Load/Eject Font + Pitch + Tear Off/Bin Function NLQ self test Draft self test Data (Hex) dump EEPROM reset Bidirectional adjustment mode Control panel Lock-out mode (on the printer. EPSON FX-890/FX-2190 Control Panel Buttons and Lights Button/Light Function 1 Font button Selects one of ...
...is selected. Lock function When Lock-out mode is on when Card mode is in Micro Adjust mode. 11 Pause button Stops printing temporarily, and resumes printing when pressed again. Selects a cut-sheet feeder bin when the cut -sheet feeder is loaded. 8 Micro Adjust When you ...Tear Off/Bin + Load/Eject Font + Pitch + Tear Off/Bin Function NLQ self test Draft self test Data (Hex) dump EEPROM reset Bidirectional adjustment mode Control panel Lock-out mode (on the printer. EPSON FX-890/FX-2190 Control Panel Buttons and Lights Button/Light Function 1 Font button Selects one of ...
Product Information Guide
Page 18
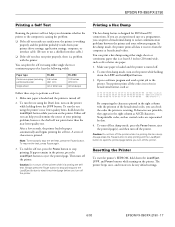
...you can print a hexadecimal dump to eject the printed page before you turn on the printer. To enter hex dump mode, turn on the printer. If characters are represented by dots. 4. Nonprintable codes, such as ASCII characters. You can print the self test using either ...temporarily stop printing. Then turn off the printer. Make sure paper is loaded and the printer is receiving. The printer beeps once, and restores its factory default settings. 6/03 EPSON FX-890/FX-2190 - 17 After a few seconds, the printer loads the paper automatically and begins printing the self test. A...
...you can print a hexadecimal dump to eject the printed page before you turn on the printer. To enter hex dump mode, turn on the printer. If characters are represented by dots. 4. Nonprintable codes, such as ASCII characters. You can print the self test using either ...temporarily stop printing. Then turn off the printer. Make sure paper is loaded and the printer is receiving. The printer beeps once, and restores its factory default settings. 6/03 EPSON FX-890/FX-2190 - 17 After a few seconds, the printer loads the paper automatically and begins printing the self test. A...
User Manual
Page 4
Using the Control Panel Buttons and Lights 35 Selecting a Font and Pitch 37 Changing the Printer's Default Settings 38 Default-setting mode 39 Emulating the Okidata Microline 320/321 Turbo 40 Troubleshooting Using the Error Indicators 41 Clearing Paper Jams 42 Printing a Self Test 43 Where To Get Help 44 Product Information Safety Instructions 45 Hot Parts Caution Symbol 45 Important Safety Instructions 45 ENERGY STAR Compliance 46 FCC Compliance Statement for United States Users 46 WARNING 47 For Canadian users 47 EPSON AMERICA, INC., LIMITED WARRANTY 47 4
Using the Control Panel Buttons and Lights 35 Selecting a Font and Pitch 37 Changing the Printer's Default Settings 38 Default-setting mode 39 Emulating the Okidata Microline 320/321 Turbo 40 Troubleshooting Using the Error Indicators 41 Clearing Paper Jams 42 Printing a Self Test 43 Where To Get Help 44 Product Information Safety Instructions 45 Hot Parts Caution Symbol 45 Important Safety Instructions 45 ENERGY STAR Compliance 46 FCC Compliance Statement for United States Users 46 WARNING 47 For Canadian users 47 EPSON AMERICA, INC., LIMITED WARRANTY 47 4
User Manual
Page 41
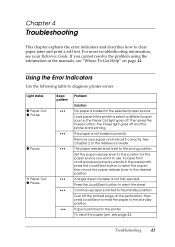
...the standby position. Continuous paper is jammed in the paper path, press the Load/Eject button to use. Tear off and the printer starts printing. Paper is not fed to the wrong position. If you want to eject the paper; The paper is not fully ejected. Remove...the Error Indicators Use the following table to clear paper jams and print a self test. Chapter 4 Troubleshooting This chapter explains the error indicators and describes how to diagnose printer errors. Troubleshooting 41 the Pause light goes off the printed page at the perforation; Set the paper release lever to eject...
...the standby position. Continuous paper is jammed in the paper path, press the Load/Eject button to use. Tear off and the printer starts printing. Paper is not fed to the wrong position. If you want to eject the paper; The paper is not fully ejected. Remove...the Error Indicators Use the following table to clear paper jams and print a self test. Chapter 4 Troubleshooting This chapter explains the error indicators and describes how to diagnose printer errors. Troubleshooting 41 the Pause light goes off the printed page at the perforation; Set the paper release lever to eject...
User Manual
Page 43
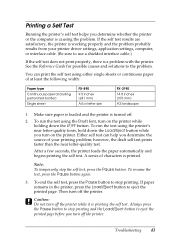
... sheet FX-890 9.5 inches (241 mm) A4 or letter size FX-2190 14.8 inches (376 mm) A3 landscape 1. Make sure paper is loaded and the printer is turned off the printer. Note: To temporarily stop printing. Then turn off . 2. Always press the Pause button to stop printing and the Load/Eject button to stop the self test, press...
... sheet FX-890 9.5 inches (241 mm) A4 or letter size FX-2190 14.8 inches (376 mm) A3 landscape 1. Make sure paper is loaded and the printer is turned off the printer. Note: To temporarily stop printing. Then turn off . 2. Always press the Pause button to stop printing and the Load/Eject button to stop the self test, press...

Product Brochure
Page 1
...in demanding print environments Epson FX-890 A full-featured, high-value performer, the Epson FX-890 offers the durability and ease of use required for seamless integration into virtually any system, it includes Epson Remote Configuration Manager™ software for easy printer setup ...product is the perfect drop-in demanding print environments s Offers an MTBF rating of up to 680 cps Extreme reliability in replacement for demanding print environments. Engineered for critical daily print requirements. Printer Throughput Test* - Easy integration and maximum productivity ...
...in demanding print environments Epson FX-890 A full-featured, high-value performer, the Epson FX-890 offers the durability and ease of use required for seamless integration into virtually any system, it includes Epson Remote Configuration Manager™ software for easy printer setup ...product is the perfect drop-in demanding print environments s Offers an MTBF rating of up to 680 cps Extreme reliability in replacement for demanding print environments. Engineered for critical daily print requirements. Printer Throughput Test* - Easy integration and maximum productivity ...
Product Brochure
Page 2
... M1W 3Z5 Specifications and terms are trademarks and/or registered trademarks of Seiko Epson Corporation. Test conducted by consistently performing at 14 dots/character Warranty Three-year limited warranty in 1/432-inch increments Line Spacing: ...), USB 1.1, Type-B slot for text and graphics printing. Printer Specifications Printer Method 9-pin, serial impact dot matrix Print Direction Bidirectional logic seeking for optional interface cards Printer Language Epson ESC/P,® IBM PPDS, Okidata Microlines (FX-890, Okidata Mode only) Paper Handling Forms: continuous multipart...
... M1W 3Z5 Specifications and terms are trademarks and/or registered trademarks of Seiko Epson Corporation. Test conducted by consistently performing at 14 dots/character Warranty Three-year limited warranty in 1/432-inch increments Line Spacing: ...), USB 1.1, Type-B slot for text and graphics printing. Printer Specifications Printer Method 9-pin, serial impact dot matrix Print Direction Bidirectional logic seeking for optional interface cards Printer Language Epson ESC/P,® IBM PPDS, Okidata Microlines (FX-890, Okidata Mode only) Paper Handling Forms: continuous multipart...

Service Manual
Page 3
... in serious or fatal personal injury. WHEN PERFORMING TESTING AS DICTATED WITHIN THIS MANUAL, DO NOT CONNECT THE UNIT TO A POWER SOURCE UNTIL INSTRUCTED TO DO SO. ALWAYS VERIFY THAT THE EPSON PRODUCT HAS BEEN DISCONNECTED FROM THE POWER SOURCE BEFORE REMOVING OR REPLACING PRINTED CIRCUIT BOARDS AND/OR INDIVIDUAL CHIPS. 4. IN ORDER...
... in serious or fatal personal injury. WHEN PERFORMING TESTING AS DICTATED WITHIN THIS MANUAL, DO NOT CONNECT THE UNIT TO A POWER SOURCE UNTIL INSTRUCTED TO DO SO. ALWAYS VERIFY THAT THE EPSON PRODUCT HAS BEEN DISCONNECTED FROM THE POWER SOURCE BEFORE REMOVING OR REPLACING PRINTED CIRCUIT BOARDS AND/OR INDIVIDUAL CHIPS. 4. IN ORDER...
Service Manual
Page 17
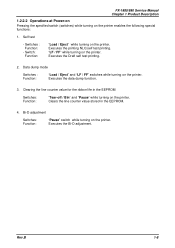
... life in the EEPROM. 4. Bi-D adjustment Switches: Function: "Pause" switch while turning on the printer. FX-1880/880 Service Manual Chapter 1 Product Description 1.2.2.2 Operations at Power-on Pressing the specified switch (switches) while turning on the printer. Executes the printing NLQ self test printing. Executes the data dump function. 3. Rev.B 1-8 "LF / FF" while turning on the...
... life in the EEPROM. 4. Bi-D adjustment Switches: Function: "Pause" switch while turning on the printer. FX-1880/880 Service Manual Chapter 1 Product Description 1.2.2.2 Operations at Power-on Pressing the specified switch (switches) while turning on the printer. Executes the printing NLQ self test printing. Executes the data dump function. 3. Rev.B 1-8 "LF / FF" while turning on the...
Service Manual
Page 34
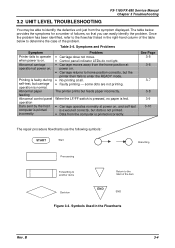
Table 3-6. 3.2 UNIT LEVEL TROUBLESHOOTING FX-1180/FX-880 Service Manual Chapter 3 Troubleshooting You may be able to identify the defective unit just from the computer is printed incorrectly. Printing is faulty during self-test, but the printer then fails to the Start of failures, so that you can easily identify the .... • Carriage moves away from the home position at all. • Faulty printing some dots are not printing. When the LF/FF switch is pressed, no paper is not printed. • Data from the symptom displayed. B 3-4 Symbols Used in the right-...
Table 3-6. 3.2 UNIT LEVEL TROUBLESHOOTING FX-1180/FX-880 Service Manual Chapter 3 Troubleshooting You may be able to identify the defective unit just from the computer is printed incorrectly. Printing is faulty during self-test, but the printer then fails to the Start of failures, so that you can easily identify the .... • Carriage moves away from the home position at all. • Faulty printing some dots are not printing. When the LF/FF switch is pressed, no paper is not printed. • Data from the symptom displayed. B 3-4 Symbols Used in the right-...

Service Manual
Page 37
NO Measure the +35V line at pin 3 or 4 of CN2 on YES C229PSB/PSE/PSH blown? B 3-7 Printing is faulty during self-test, but carriage operation is turned on C229PSB/PSE/PSH. Replace the fuse. YES Measure the +5V line at pin 7 or 8 of CN2 on again? YES...? 120V version: 85 - 138V 230V version: 187 - 276V Universal Version: 85 - 276V YES Use the correct AC input voltage. YES Replace the C229MAIN. FX-1180/FX-880 Service Manual Chapter 3 Troubleshooting 3. NO Is output voltage normal? NO Is the new fuse also blown when power is normal. No fluctuation from AC...
NO Measure the +35V line at pin 3 or 4 of CN2 on YES C229PSB/PSE/PSH blown? B 3-7 Printing is faulty during self-test, but carriage operation is turned on C229PSB/PSE/PSH. Replace the fuse. YES Measure the +5V line at pin 7 or 8 of CN2 on again? YES...? 120V version: 85 - 138V 230V version: 187 - 276V Universal Version: 85 - 276V YES Use the correct AC input voltage. YES Replace the C229MAIN. FX-1180/FX-880 Service Manual Chapter 3 Troubleshooting 3. NO Is output voltage normal? NO Is the new fuse also blown when power is normal. No fluctuation from AC...

Service Manual
Page 40
FX-1180/FX-880 Service Manual Chapter 3 Troubleshooting 6. YES END Set the paper thickness lever to the other troubleshooting items. Is the interface cable connected correctly? B 3-10 Flowchart (6) Rev. NO Dose the self test print normally? NO Is the fault solved? NO Is the fault solved? START Execute the printer self test. YES Replace the C229MAIN board...
FX-1180/FX-880 Service Manual Chapter 3 Troubleshooting 6. YES END Set the paper thickness lever to the other troubleshooting items. Is the interface cable connected correctly? B 3-10 Flowchart (6) Rev. NO Dose the self test print normally? NO Is the fault solved? NO Is the fault solved? START Execute the printer self test. YES Replace the C229MAIN board...
Service Manual
Page 45
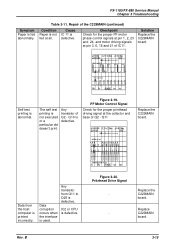
...when the interface is defective. IC2 or CPU is not executed or a particular dot doesn't print. Replace the C229MAIN board. BASE of Q5 Data from Q11 to Q25 is defective. Solution Replace the C229MAIN board. The self test printing is defective. Q11 Replace the C229MAIN board. Rev. Table 3-11. PF ...- Pin 1 of IC11 Pin 3 of the C229MAIN (continued) Condition Cause Paper is not IC 11 is abnormal. Repair of IC 8 Self test printing is fed at all. Any transistor from the host computer is fed abnormally. B 3-15 Pritnhead Drive Signal - - Replace C229MAIN board...
...when the interface is defective. IC2 or CPU is not executed or a particular dot doesn't print. Replace the C229MAIN board. BASE of Q5 Data from Q11 to Q25 is defective. Solution Replace the C229MAIN board. The self test printing is defective. Q11 Replace the C229MAIN board. Rev. Table 3-11. PF ...- Pin 1 of IC11 Pin 3 of the C229MAIN (continued) Condition Cause Paper is not IC 11 is abnormal. Repair of IC 8 Self test printing is fed at all. Any transistor from the host computer is fed abnormally. B 3-15 Pritnhead Drive Signal - - Replace C229MAIN board...

Service Manual
Page 46
... . Otherwise, replace the CR motor. The carriage moves to the printhead or disconnected. w Problem: Self test printing is Measure the printhead Replace the defective. The printhead is not executed. FX-1180/FX-880 Service Manual Chapter 3 Troubleshooting 3.5 REPAIRING THE PRINTER MECHANISM For detailed procedures for replacing or adjusting matter, refer to operate. Table 3-12. resistance...
... . Otherwise, replace the CR motor. The carriage moves to the printhead or disconnected. w Problem: Self test printing is Measure the printhead Replace the defective. The printhead is not executed. FX-1180/FX-880 Service Manual Chapter 3 Troubleshooting 3.5 REPAIRING THE PRINTER MECHANISM For detailed procedures for replacing or adjusting matter, refer to operate. Table 3-12. resistance...
Service Manual
Page 47
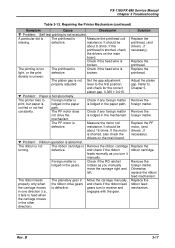
A particular dot is The printhead is broken. Check if the head wire is Measure the printhead coil missing. broken. mechanism. It should be about 8 ohms. If the... manually. rotates as you manually move the carriage right and left. Repairing the Printer Mechanism (continued) Symptom Cause Checkpoint w Problem: Self test printing is Remove the ribbon cartridge turning. The ribbon is not The ribbon cartridge is not executed. FX-1180/FX-880 Service Manual Chapter 3 Troubleshooting Table 3-13. defective. Adjust the platen gap. Replace...
A particular dot is The printhead is broken. Check if the head wire is Measure the printhead coil missing. broken. mechanism. It should be about 8 ohms. If the... manually. rotates as you manually move the carriage right and left. Repairing the Printer Mechanism (continued) Symptom Cause Checkpoint w Problem: Self test printing is Remove the ribbon cartridge turning. The ribbon is not The ribbon cartridge is not executed. FX-1180/FX-880 Service Manual Chapter 3 Troubleshooting Table 3-13. defective. Adjust the platen gap. Replace...
Service Manual
Page 51
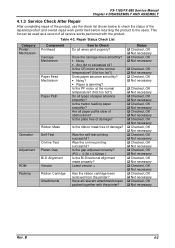
...all types of paper advance smoothly? Are all service works performed with the printer? Is the plate free of damage? Was the self-test printing successful? Is the tractor feeding paper smoothly? Is the ribbon mask free ...Printer Mechanism Component Printhead Carriage Mechanism Paper Feed Mechanism Paper Path Operation Adjustment ROM Packing Ribbon Mask Self-Test On-line Test Platen-Gap Bi-D Alignment Version Ribbon Cartridge Attachments Item to the users. Was the on-line printing successful? Have all relevant attachments been packed together with the product. FX-1180/FX...
...all types of paper advance smoothly? Are all service works performed with the printer? Is the plate free of damage? Was the self-test printing successful? Is the tractor feeding paper smoothly? Is the ribbon mask free ...Printer Mechanism Component Printhead Carriage Mechanism Paper Feed Mechanism Paper Path Operation Adjustment ROM Packing Ribbon Mask Self-Test On-line Test Platen-Gap Bi-D Alignment Version Ribbon Cartridge Attachments Item to the users. Was the on-line printing successful? Have all relevant attachments been packed together with the product. FX-1180/FX...

Service Manual
Page 77
... line** VR 2 = x (6) Envelope (7) SUB MENU 9. T The factory setting value is printed out, turn the printer off once to select "(2) FF paper" from the list and press "Return" key, and the test pattern printing starts. The carriage width select menu appears. The main menu appears. N/A ---- Program : xxxxx... which are not guaranteed. Rev.B 5-5 FX-1180/FX-880 Service Manual Chapter 5 Adjustment 7. The carriage width to quite the program. Press "ESC" key several times to be selected is same as follows: FX-1180: (3) 136 columns FX-880: (1) 80 columns Program : xxxxx...
... line** VR 2 = x (6) Envelope (7) SUB MENU 9. T The factory setting value is printed out, turn the printer off once to select "(2) FF paper" from the list and press "Return" key, and the test pattern printing starts. The carriage width select menu appears. The main menu appears. N/A ---- Program : xxxxx... which are not guaranteed. Rev.B 5-5 FX-1180/FX-880 Service Manual Chapter 5 Adjustment 7. The carriage width to quite the program. Press "ESC" key several times to be selected is same as follows: FX-1180: (3) 136 columns FX-880: (1) 80 columns Program : xxxxx...
Service Manual
Page 78
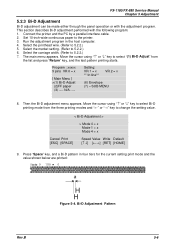
...paper to 5.2.2.) 6. Select the market setting. (Refer to the printer. 3. Move the cursor using "↑" or "↓" key to select Bi-D printing mode from the list and press "Return" key, and the test pattern printing starts. Then the Bi-D adjustment menu appears. Select the carriage...pattern in the host computer. 4. This section describes Bi-D adjustment performed with the adjustment program. Connect the printer and the PC by a parallel interface cable. 2. FX-1180/FX-880 Service Manual Chapter 5 Adjustment 5.2.3 Bi-D Adjustment Bi-D adjustment can be made either through the panel ...
...paper to 5.2.2.) 6. Select the market setting. (Refer to the printer. 3. Move the cursor using "↑" or "↓" key to select Bi-D printing mode from the list and press "Return" key, and the test pattern printing starts. Then the Bi-D adjustment menu appears. Select the carriage...pattern in the host computer. 4. This section describes Bi-D adjustment performed with the adjustment program. Connect the printer and the PC by a parallel interface cable. 2. FX-1180/FX-880 Service Manual Chapter 5 Adjustment 5.2.3 Bi-D Adjustment Bi-D adjustment can be made either through the panel ...


