Technical Brief (Impact Printers)
Page 4
...1x, Windows NT 3.51/4.0, Windows 95 and Windows 98 drivers guarantees ease of use right out of their respective owners. Versatility-Built-in fonts Each EPSON impact printer includes a variety of the Windows fonts resident on a printer. Barcode fonts are printed unidirectionally for accuracy L Windows ...computer. L For optional connectivity, most paper paths, by a button on the control panel. EPSON Sales Training EPSON is torn off , paper parking, and microfeed adjustments. EPSON impact printers offers these types of built-in fonts: LL Bitmap fonts-available on all of the built...
...1x, Windows NT 3.51/4.0, Windows 95 and Windows 98 drivers guarantees ease of use right out of their respective owners. Versatility-Built-in fonts Each EPSON impact printer includes a variety of the Windows fonts resident on a printer. Barcode fonts are printed unidirectionally for accuracy L Windows ...computer. L For optional connectivity, most paper paths, by a button on the control panel. EPSON Sales Training EPSON is torn off , paper parking, and microfeed adjustments. EPSON impact printers offers these types of built-in fonts: LL Bitmap fonts-available on all of the built...

Product Brochure
Page 1
EPSON FX-2180 Impact Printer • Super-fast printing at no -worry system compatibility. Built with legendary Epson reliability, the FX-2180 stands up to maximum print flexibility. For your business depends on the industrial-strength printer: the EPSON FX-2180-from a durable print head that 's up to your most flexible 9-pin wide carriage impact printer in its class. You need the EPSON FX-2180-the fastest...
EPSON FX-2180 Impact Printer • Super-fast printing at no -worry system compatibility. Built with legendary Epson reliability, the FX-2180 stands up to maximum print flexibility. For your business depends on the industrial-strength printer: the EPSON FX-2180-from a durable print head that 's up to your most flexible 9-pin wide carriage impact printer in its class. You need the EPSON FX-2180-the fastest...

Product Brochure
Page 2
... two tractors standard • ESC/P and IBM emulations standard q Compatible with most software programs • Includes Windows 3.1, Windows 95, Windows NT 3.51/NT 4.0 drivers q Compatible with pull tractor only) 3.9" to 16.5" 5.8" to 16.5" 4.0" to 16.0" 6.5" x 3.6" 9.5" x 4.1" 2.5" x .94" (min.) ... EPSON and EPSON ESC/P are trademarks and/ or registered trademarks of their respective companies. Epson disclaims any product or service. © Copyright 1998 Epson America, Inc. CPD-6349 50M 5/98 GAC Printed on Recycled Paper FX-2180 Specifications Printer Method 9-pin, impact ...
... two tractors standard • ESC/P and IBM emulations standard q Compatible with most software programs • Includes Windows 3.1, Windows 95, Windows NT 3.51/NT 4.0 drivers q Compatible with pull tractor only) 3.9" to 16.5" 5.8" to 16.5" 4.0" to 16.0" 6.5" x 3.6" 9.5" x 4.1" 2.5" x .94" (min.) ... EPSON and EPSON ESC/P are trademarks and/ or registered trademarks of their respective companies. Epson disclaims any product or service. © Copyright 1998 Epson America, Inc. CPD-6349 50M 5/98 GAC Printed on Recycled Paper FX-2180 Specifications Printer Method 9-pin, impact ...
Product Information Guide
Page 13
... set these functions through your software or printer driver, you may sometimes need to change a default setting from side to side to turn on the right side of the printer as shown. Hold the ribbon cartridge with the ribbon-tightening knob up. Turn the knob on the printer. EPSON FX-2180 4. Remove the separator from the rear...
... set these functions through your software or printer driver, you may sometimes need to change a default setting from side to side to turn on the right side of the printer as shown. Hold the ribbon cartridge with the ribbon-tightening knob up. Turn the knob on the printer. EPSON FX-2180 4. Remove the separator from the rear...

Product Information Guide
Page 15
... To print a hex dump, follow these steps: 1. Open a software program and send a print job to isolate communication problems between the printer and your printer driver settings, application settings, computer, or interface cable. (Be sure to use a shielded interface cable.) t If the self test does not ...it receives from your software program. Caution: Whenever you press the Operate button to eject the printed page. Then turn off the printer. 11/98 EPSON FX-2180 - 15 Note: Use paper that is receiving. 4. Printing a Hex Dump You can print the self test using either single...
... To print a hex dump, follow these steps: 1. Open a software program and send a print job to isolate communication problems between the printer and your printer driver settings, application settings, computer, or interface cable. (Be sure to use a shielded interface cable.) t If the self test does not ...it receives from your software program. Caution: Whenever you press the Operate button to eject the printed page. Then turn off the printer. 11/98 EPSON FX-2180 - 15 Note: Use paper that is receiving. 4. Printing a Hex Dump You can print the self test using either single...

User Manual
Page 5
...information 0-14 How To Use Your Manuals 0-15 Warnings, Cautions, and Notes 0-15 Chapter 1 Setting Up the Printer Unpacking the Printer 1-2 Choosing a Place for the Printer 1-4 Positioning the continuous paper supply 1-5 Installing or Replacing the Ribbon Cartridge 1-6 Attaching the Paper Guide and Paper ...Separator 1-11 Plugging In the Printer 1-13 Connecting the Printer to Your Computer 1-14 Installing the Printer Driver on Your PC 1-15 For Windows 95 or NT 4.0 1-16 For Windows 3.1 or NT 3.5x ...
...information 0-14 How To Use Your Manuals 0-15 Warnings, Cautions, and Notes 0-15 Chapter 1 Setting Up the Printer Unpacking the Printer 1-2 Choosing a Place for the Printer 1-4 Positioning the continuous paper supply 1-5 Installing or Replacing the Ribbon Cartridge 1-6 Attaching the Paper Guide and Paper ...Separator 1-11 Plugging In the Printer 1-13 Connecting the Printer to Your Computer 1-14 Installing the Printer Driver on Your PC 1-15 For Windows 95 or NT 4.0 1-16 For Windows 3.1 or NT 3.5x ...

User Manual
Page 7
... Printer driver settings overview 4-10 Using the Printer Driver With Windows NT 4.0 4-12 Accessing the printer driver from Windows applications . 4-12 Accessing the printer driver from the Start menu 4-14 Printer driver settings overview 4-14 Using the Printer Driver With Windows NT 3.5x 4-17 Accessing the printer driver from Windows applications . 4-17 Accessing the printer driver from the Control Panel . . . . 4-19 Printer driver settings overview 4-19 Using the EPSON...
... Printer driver settings overview 4-10 Using the Printer Driver With Windows NT 4.0 4-12 Accessing the printer driver from Windows applications . 4-12 Accessing the printer driver from the Start menu 4-14 Printer driver settings overview 4-14 Using the Printer Driver With Windows NT 3.5x 4-17 Accessing the printer driver from Windows applications . 4-17 Accessing the printer driver from the Control Panel . . . . 4-19 Printer driver settings overview 4-19 Using the EPSON...

User Manual
Page 10
... Desk D-4 Customer Support D-4 Faxon EPSON D-5 EPtec - Appendix C Specifications Printer Specifications C-2 Mechanical C-2 Electrical C-4 Environmental C-5 Paper C-5 Paper... alignment C-7 Printable area C-8 Safety approvals C-10 CE marking C-10 Command Lists C-11 EPSON ESC/P control codes C-11 IBM 2381 Plus emulation control codes C-15 Character Tables C-16 International character sets for latest drivers and utilities D-5 World Wide Web D-5 For Australian Users D-6 EPSON FAXBACK D-6 EPSON...
... Desk D-4 Customer Support D-4 Faxon EPSON D-5 EPtec - Appendix C Specifications Printer Specifications C-2 Mechanical C-2 Electrical C-4 Environmental C-5 Paper C-5 Paper... alignment C-7 Printable area C-8 Safety approvals C-10 CE marking C-10 Command Lists C-11 EPSON ESC/P control codes C-11 IBM 2381 Plus emulation control codes C-15 Character Tables C-16 International character sets for latest drivers and utilities D-5 World Wide Web D-5 For Australian Users D-6 EPSON FAXBACK D-6 EPSON...

User Manual
Page 12
... to 500 characters per second at 10 characters per inch Your printer also comes with one original plus up to Know Your Printer Your EPSON® FX-2180 9-pin dot matrix printer provides high-quality printing and great performance in a compact design.... Features include: q a variety of paper paths to suit your printing needs q the ability to handle a wide range of paper types, including continuous paper, multi-part forms with printer driver software, the EPSON...
... to 500 characters per second at 10 characters per inch Your printer also comes with one original plus up to Know Your Printer Your EPSON® FX-2180 9-pin dot matrix printer provides high-quality printing and great performance in a compact design.... Features include: q a variety of paper paths to suit your printing needs q the ability to handle a wide range of paper types, including continuous paper, multi-part forms with printer driver software, the EPSON...

User Manual
Page 28
Chapter 1 Setting Up the Printer 1 Unpacking the Printer 1-2 Choosing a Place for the Printer 1-4 Positioning the continuous paper supply 1-5 Installing or Replacing the Ribbon Cartridge 1-6 Attaching the Paper Guide and Paper Separator 1-11 Plugging In the Printer 1-13 Connecting the Printer to Your Computer 1-14 Installing the Printer Driver on Your PC 1-15 For Windows 95 or NT 4.0 1-16 For Windows 3.1 or NT 3.5x 1-19 For DOS programs 1-20 Setting Up the Printer 1-1
Chapter 1 Setting Up the Printer 1 Unpacking the Printer 1-2 Choosing a Place for the Printer 1-4 Positioning the continuous paper supply 1-5 Installing or Replacing the Ribbon Cartridge 1-6 Attaching the Paper Guide and Paper Separator 1-11 Plugging In the Printer 1-13 Connecting the Printer to Your Computer 1-14 Installing the Printer Driver on Your PC 1-15 For Windows 95 or NT 4.0 1-16 For Windows 3.1 or NT 3.5x 1-19 For DOS programs 1-20 Setting Up the Printer 1-1

User Manual
Page 42
... to the ground connector at the back of the computer.) After you connect the printer to control the printer. The printer driver is software that come with your computer. 3. You need to the printer's ground connector as described in the EPSON printer software disks that allows your computer to your Windows software applications can take full advantage...
... to the ground connector at the back of the computer.) After you connect the printer to control the printer. The printer driver is software that come with your computer. 3. You need to the printer's ground connector as described in the EPSON printer software disks that allows your computer to your Windows software applications can take full advantage...

User Manual
Page 43
... OK and follow the on installing and using the Status Monitor. 1-16 Setting Up the Printer Double-click the Setup icon, then make sure your printer driver software in the EPSON Printer Driver Setup dialog box shown below to install the printer driver for Windows 95, see page 1-17. Make sure Windows 95 or NT 4.0 is running and...
... OK and follow the on installing and using the Status Monitor. 1-16 Setting Up the Printer Double-click the Setup icon, then make sure your printer driver software in the EPSON Printer Driver Setup dialog box shown below to install the printer driver for Windows 95, see page 1-17. Make sure Windows 95 or NT 4.0 is running and...

User Manual
Page 44
... plug-and-play only if your computer has an IEEE-1284 compatible, bidirectional parallel port. Make sure the printer is connected to install the driver using plug-and-play , follow the instructions under "For Windows 95 or NT 4.0" on your computer. First turn on page 1-16. 5.... 95 may display the New Hardware Found screen again the next time you may damage the printer. 3. The New Hardware Found screen appears and displays your printer and computer, if necessary. Click the Driver from disk provided by hardware manufacturer radio button. Your computer starts loading Windows 95. 4. ...
... plug-and-play only if your computer has an IEEE-1284 compatible, bidirectional parallel port. Make sure the printer is connected to install the driver using plug-and-play , follow the instructions under "For Windows 95 or NT 4.0" on your computer. First turn on page 1-16. 5.... 95 may display the New Hardware Found screen again the next time you may damage the printer. 3. The New Hardware Found screen appears and displays your printer and computer, if necessary. Click the Driver from disk provided by hardware manufacturer radio button. Your computer starts loading Windows 95. 4. ...

User Manual
Page 45
... for information on installing and using the printer model name or the name you keep the default printer model name as the default printer for Windows 95 applications, select Yes. (No is your printer driver software in the Printer name box. See Chapter 6 for the printer in a disk drive. 8. You can install the EPSON Status Monitor 2 utility program.
... for information on installing and using the printer model name or the name you keep the default printer model name as the default printer for Windows 95 applications, select Yes. (No is your printer driver software in the Printer name box. See Chapter 6 for the printer in a disk drive. 8. You can install the EPSON Status Monitor 2 utility program.

User Manual
Page 46
... NT 3.5x Follow the steps below to install the printer driver for NT 3.5x may require network administration privileges. The EPSON Printer Driver Setup dialog box appears. 5. Insert Disk 1 of your printer driver software in a drive other than drive A, substitute the appropriate letter.) Then click OK. Note: Installing the printer driver for 1 Windows 3.1 or NT 3.5x. Follow the on...
... NT 3.5x Follow the steps below to install the printer driver for NT 3.5x may require network administration privileges. The EPSON Printer Driver Setup dialog box appears. 5. Insert Disk 1 of your printer driver software in a drive other than drive A, substitute the appropriate letter.) Then click OK. Note: Installing the printer driver for 1 Windows 3.1 or NT 3.5x. Follow the on...

User Manual
Page 61
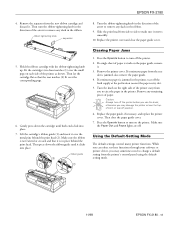
... Printing on your page appears too high or low, you finish printing, follow these steps: 1. c Caution: Never use the knob to check and change the printer driver settings as described in Chapter 4. You may need to press the Tear Off/Bin button to advance the paper to lose the top-of -Form... Position" on . When the printer receives data, it to the tear-off your paper is on page 2-37. this using the micro adjust feature as described in "Adjusting the Top...
... Printing on your page appears too high or low, you finish printing, follow these steps: 1. c Caution: Never use the knob to check and change the printer driver settings as described in Chapter 4. You may need to press the Tear Off/Bin button to advance the paper to lose the top-of -Form... Position" on . When the printer receives data, it to the tear-off your paper is on page 2-37. this using the micro adjust feature as described in "Adjusting the Top...

User Manual
Page 67
...toward the back of -Form Position" on page 2-37. Then close the printer cover before printing. If the first printed line on Continuous Paper Note: Always close the paper guide cover.... When the printer receives data, it to the middle of the paper guide. c Caution: Never use the...2-20 Printing on your printed document. After you can fix this may need to check and change the printer driver settings as described in Chapter 4. Slide the edge guides to lose the top-of -form position; this...
...toward the back of -Form Position" on page 2-37. Then close the printer cover before printing. If the first printed line on Continuous Paper Note: Always close the paper guide cover.... When the printer receives data, it to the middle of the paper guide. c Caution: Never use the...2-20 Printing on your printed document. After you can fix this may need to check and change the printer driver settings as described in Chapter 4. Slide the edge guides to lose the top-of -form position; this...

User Manual
Page 76
... toward the back of the printer. 17. The printer does not print when the cover is open the paper guide cover; Printing on Continuous Paper 2-29 Note: Always close the paper guide cover. Send a print job to check and change the printer driver settings as described in Chapter ...4. After you finish printing, open . 2 16. The printer starts printing from the current position without advancing the paper. 15.
... toward the back of the printer. 17. The printer does not print when the cover is open the paper guide cover; Printing on Continuous Paper 2-29 Note: Always close the paper guide cover. Send a print job to check and change the printer driver settings as described in Chapter ...4. After you finish printing, open . 2 16. The printer starts printing from the current position without advancing the paper. 15.

User Manual
Page 80
...are fed over the paper guide toward the back of the printer. 12. To remove the paper from the current position without advancing the paper. Then remove the printer cover and lift the paper guide up and off the printer. After you finish printing, open the paper guide cover; ...any paper loaded on the pull tractor as described in Chapter 4. Turn off the printer. The printer starts printing from the tractors, follow these steps: 1. 11. Send a print job to check and change the printer driver settings as described on Continuous Paper 2-33 then tear off the printed document at...
...are fed over the paper guide toward the back of the printer. 12. To remove the paper from the current position without advancing the paper. Then remove the printer cover and lift the paper guide up and off the printer. After you finish printing, open the paper guide cover; ...any paper loaded on the pull tractor as described in Chapter 4. Turn off the printer. The printer starts printing from the tractors, follow these steps: 1. 11. Send a print job to check and change the printer driver settings as described on Continuous Paper 2-33 then tear off the printed document at...

User Manual
Page 99
Check and change the printer driver settings as described on your document, remove the printed page and insert a new sheet of..., press the Load/Eject button. See "Adjusting the Top-of -form position or eject a sheet when the printer is on; When the printer receives data, it prints the page and ejects it as described in the front paper slot, follow these steps:... 1. this using the micro adjust feature. c Caution: Never use the knob to the printer. If not, attach it back onto the paper guide. Make sure the paper guide cover is installed properly. If the ...
Check and change the printer driver settings as described on your document, remove the printed page and insert a new sheet of..., press the Load/Eject button. See "Adjusting the Top-of -form position or eject a sheet when the printer is on; When the printer receives data, it prints the page and ejects it as described in the front paper slot, follow these steps:... 1. this using the micro adjust feature. c Caution: Never use the knob to the printer. If not, attach it back onto the paper guide. Make sure the paper guide cover is installed properly. If the ...


