
Technical Brief (Impact Printers)
Page 5
Simplifies setup when installing multiple printers-just make the necessary changes in the software utility, and download the settings to host computer connection. Technical Brief-Multimedia projectors Page 5 Versatility-Computer-based set-up EPSON Remote! Start UP Utility Ver. 1.22 Copyright (C) SEIKO EPSON CORP. 1992 Printer: FX-2180 Mode: ESC/P Port: LPT1 Font : Roman Pitch : 10CPI Print Quality...
Simplifies setup when installing multiple printers-just make the necessary changes in the software utility, and download the settings to host computer connection. Technical Brief-Multimedia projectors Page 5 Versatility-Computer-based set-up EPSON Remote! Start UP Utility Ver. 1.22 Copyright (C) SEIKO EPSON CORP. 1992 Printer: FX-2180 Mode: ESC/P Port: LPT1 Font : Roman Pitch : 10CPI Print Quality...

Product Information Guide
Page 1
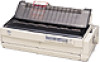
...install one of ordinary single-sheet paper in your printer with 8.5-inch roll paper like that used with a push tractor is especially useful for printing on continuous pre-printed forms, multi-part forms, and labels, and for printing high-quality graphics. Optional Interface Cards You can load up to use your printer. EPSON FX-2180... paper guide cover printer cover rear edge guides paper guide paper separator paper release lever User Replaceable Part Ribbon cartridge ...
...install one of ordinary single-sheet paper in your printer with 8.5-inch roll paper like that used with a push tractor is especially useful for printing on continuous pre-printed forms, multi-part forms, and labels, and for printing high-quality graphics. Optional Interface Cards You can load up to use your printer. EPSON FX-2180... paper guide cover printer cover rear edge guides paper guide paper separator paper release lever User Replaceable Part Ribbon cartridge ...

Product Information Guide
Page 5
...selected. Pitch Lights Indicate what font size is 8 inches (203.2 mm). t n o when bin 2 of the optional cut -sheet feeder is installed. t Ejects a single sheet or advances continuous paper to the next top-of -form and tearoff positions using the down . Load/Eject Button t ...Enters the card mode to print on o = off position to the tear-off position. t n n when the printer is in the tear-off position. Pause Light t On when the printer is selected. EPSON FX-2180 Roll paper: A B B printable area A A The minimum top and bottom margins are 0.12 inch (3 mm). ...
...selected. Pitch Lights Indicate what font size is 8 inches (203.2 mm). t n o when bin 2 of the optional cut -sheet feeder is installed. t Ejects a single sheet or advances continuous paper to the next top-of -form and tearoff positions using the down . Load/Eject Button t ...Enters the card mode to print on o = off position to the tear-off position. t n n when the printer is in the tear-off position. Pause Light t On when the printer is selected. EPSON FX-2180 Roll paper: A B B printable area A A The minimum top and bottom margins are 0.12 inch (3 mm). ...

Product Information Guide
Page 7
...you can remove the tractor from the front or bottom slot. 11/98 EPSON FX-2180 - 7 The top-of-form position is almost straight, which reduces the chance of single-sheet or continuous paper. This allows you to use a printer stand with an opening large enough so that the paper can feed through ...form position. the front push tractor cannot feed this type of form. the printer cannot feed this type of form from the front push position and install it in the pull position, or you plan to use the printer's tearoff edge to use the tear-off printed sheets of continuous paper at ...
...you can remove the tractor from the front or bottom slot. 11/98 EPSON FX-2180 - 7 The top-of-form position is almost straight, which reduces the chance of single-sheet or continuous paper. This allows you to use a printer stand with an opening large enough so that the paper can feed through ...form position. the front push tractor cannot feed this type of form. the printer cannot feed this type of form from the front push position and install it in the pull position, or you plan to use the printer's tearoff edge to use the tear-off printed sheets of continuous paper at ...

Product Information Guide
Page 8
EPSON FX-2180 Paper Path Rear push tractor and pull tractor Rear paper slot Description To use the rear push tractor with seven parts (one type of the printer in the pull position. Use the front slot for ordinary single sheets, single-sheet multipart forms, postcards, or envelopes. ... gluing only at the side. EPSON FX-2180 11/98 Note: Always load multi-part forms with the pull tractor, you need to load paper from the tractor installed on Single Sheets When continuous paper is in the pull position, you want the printer to purchase the optional pull tractor...
EPSON FX-2180 Paper Path Rear push tractor and pull tractor Rear paper slot Description To use the rear push tractor with seven parts (one type of the printer in the pull position. Use the front slot for ordinary single sheets, single-sheet multipart forms, postcards, or envelopes. ... gluing only at the side. EPSON FX-2180 11/98 Note: Always load multi-part forms with the pull tractor, you need to load paper from the tractor installed on Single Sheets When continuous paper is in the pull position, you want the printer to purchase the optional pull tractor...

Product Information Guide
Page 10
... the Printed Document From a Push Tractor 1. Hold down the LF/FF button to eject it . EPSON FX-2180 4. Make sure the paper release lever is installed in the top or front paper guide. 4. If you are using the printer's tear-off or top-of continuous labels at the perforation nearest the paper entry slot. Follow...
... the Printed Document From a Push Tractor 1. Hold down the LF/FF button to eject it . EPSON FX-2180 4. Make sure the paper release lever is installed in the top or front paper guide. 4. If you are using the printer's tear-off or top-of continuous labels at the perforation nearest the paper entry slot. Follow...
Product Information Guide
Page 12
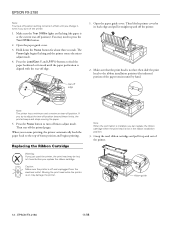
... print head to turn off the printer. 1. Grasp the used the printer, the print head may damage the printer. EPSON FX-2180 11/98 Open the paper guide cover. 3. Note: The printer has a minimum and a maximum tear-off and unplugged from the electrical outlet. Press the Pause button to the ribbon installation position (the indented portion of -form...
... print head to turn off the printer. 1. Grasp the used the printer, the print head may damage the printer. EPSON FX-2180 11/98 Open the paper guide cover. 3. Note: The printer has a minimum and a maximum tear-off and unplugged from the electrical outlet. Press the Pause button to the ribbon installation position (the indented portion of -form...

Product Information Guide
Page 16
... Documentation 4008467 4008466 4008465 TM-FX2180 PL-FX2180 EPSON FX-2180 User's Guide EPSON FX-2180 Quick Reference Guide EPSON FX-2180 Unpacking sheet EPSON FX-2180 Service Manual EPSON FX-2180 Parts Price List Transporting the Printer If you need to remove the ribbon cartridge. 4. EPSON FX-2180 11/98 If a pull tractor or an optional cut-sheet feeder is installed, remove it using the screwdriver that comes with...
... Documentation 4008467 4008466 4008465 TM-FX2180 PL-FX2180 EPSON FX-2180 User's Guide EPSON FX-2180 Quick Reference Guide EPSON FX-2180 Unpacking sheet EPSON FX-2180 Service Manual EPSON FX-2180 Parts Price List Transporting the Printer If you need to remove the ribbon cartridge. 4. EPSON FX-2180 11/98 If a pull tractor or an optional cut-sheet feeder is installed, remove it using the screwdriver that comes with...

User Manual
Page 2
...not expressly approved by the manufacturer could void the user's authority to Part 15 of EPSON EUROPE B.V. Cet appareil numérique de la classe B respecte toutes les exigences ... which the receiver is no guarantee that the Product: Product Name: Dot Matrix Printer Type Name: FX-2180 Model: P920B Conforms to radio or television reception. It is encouraged to try ...-shielded equipment interface cable to which can radiate radio frequency energy and, if not installed and used in a residential installation. This equipment generates, uses, and can be determined by the FCC for a ...
...not expressly approved by the manufacturer could void the user's authority to Part 15 of EPSON EUROPE B.V. Cet appareil numérique de la classe B respecte toutes les exigences ... which the receiver is no guarantee that the Product: Product Name: Dot Matrix Printer Type Name: FX-2180 Model: P920B Conforms to radio or television reception. It is encouraged to try ...-shielded equipment interface cable to which can radiate radio frequency energy and, if not installed and used in a residential installation. This equipment generates, uses, and can be determined by the FCC for a ...

User Manual
Page 4
... to the next cut -sheet feeder is selected. • n n when the printer is loaded. • Loads continuous paper from line. • Ejects a single sheet the tear-off position to the top-of this button is installed. • Enters the card mode to print on and off position. See Chapter ...2. Operate button Turns the printer on top-of -form or tear-off . Load/Eject button • Loads a single sheet ...
... to the next cut -sheet feeder is selected. • n n when the printer is loaded. • Loads continuous paper from line. • Ejects a single sheet the tear-off position to the top-of this button is installed. • Enters the card mode to print on and off position. See Chapter ...2. Operate button Turns the printer on top-of -form or tear-off . Load/Eject button • Loads a single sheet ...

User Manual
Page 5
... 0-13 Use of options 0-13 Safety information 0-14 How To Use Your Manuals 0-15 Warnings, Cautions, and Notes 0-15 Chapter 1 Setting Up the Printer Unpacking the Printer 1-2 Choosing a Place for the Printer 1-4 Positioning the continuous paper supply 1-5 Installing or Replacing the Ribbon Cartridge 1-6 Attaching the Paper Guide and Paper Separator 1-11 Plugging In the...
... 0-13 Use of options 0-13 Safety information 0-14 How To Use Your Manuals 0-15 Warnings, Cautions, and Notes 0-15 Chapter 1 Setting Up the Printer Unpacking the Printer 1-2 Choosing a Place for the Printer 1-4 Positioning the continuous paper supply 1-5 Installing or Replacing the Ribbon Cartridge 1-6 Attaching the Paper Guide and Paper Separator 1-11 Plugging In the...

User Manual
Page 6
... 2-5 Turning on the double-strike mode 2-6 Loading Continuous Paper With Labels 2-7 Removing continuous paper with labels 2-8 Using the Front Push Tractor 2-9 Installing the tractor in the front push position 2-9 Loading paper onto the front push tractor 2-10 Removing the printed document from the front push tractor ... rear push tractor 2-17 Removing the printed document from the rear push tractor 2-21 Using the Tractor in the Pull Position 2-22 Installing the tractor in the pull position 2-23 Loading paper onto the pull tractor 2-24 Removing paper from the pull tractor 2-30 Using...
... 2-5 Turning on the double-strike mode 2-6 Loading Continuous Paper With Labels 2-7 Removing continuous paper with labels 2-8 Using the Front Push Tractor 2-9 Installing the tractor in the front push position 2-9 Loading paper onto the front push tractor 2-10 Removing the printed document from the front push tractor ... rear push tractor 2-17 Removing the printed document from the rear push tractor 2-21 Using the Tractor in the Pull Position 2-22 Installing the tractor in the pull position 2-23 Loading paper onto the pull tractor 2-24 Removing paper from the pull tractor 2-30 Using...

User Manual
Page 8
... Panel Selecting a Built-In Font and Pitch 5-2 About Your Printer's Default Settings 5-3 Changing default settings 5-8 Chapter 6 Using EPSON Status Monitor 2 About the EPSON Status Monitor 2 Utility 6-2 Installing EPSON Status Monitor 2 6-3 Accessing EPSON Status Monitor 2 6-4 Checking Printer Status Information 6-4 Using the EPSON Status Monitor 2 window 6-4 Using the Printer Status window 6-9 Making Monitoring Preference Settings 6-10 Turning on background monitoring 6-11...
... Panel Selecting a Built-In Font and Pitch 5-2 About Your Printer's Default Settings 5-3 Changing default settings 5-8 Chapter 6 Using EPSON Status Monitor 2 About the EPSON Status Monitor 2 Utility 6-2 Installing EPSON Status Monitor 2 6-3 Accessing EPSON Status Monitor 2 6-4 Checking Printer Status Information 6-4 Using the EPSON Status Monitor 2 window 6-4 Using the Printer Status window 6-9 Making Monitoring Preference Settings 6-10 Turning on background monitoring 6-11...

User Manual
Page 9
... cut -sheet feeder Using the Roll Paper Holder Assembling the roll paper holder Installing the roll paper holder Loading roll paper Removing roll paper Installing an Interface Card Using the C82305] or C82306] serial interface card . . . . Appendix A Enhancing Your Printer With Options Options Paper handling options Optional interface cards Using the Optional Cut...
... cut -sheet feeder Using the Roll Paper Holder Assembling the roll paper holder Installing the roll paper holder Loading roll paper Removing roll paper Installing an Interface Card Using the C82305] or C82306] serial interface card . . . . Appendix A Enhancing Your Printer With Options Options Paper handling options Optional interface cards Using the Optional Cut...

User Manual
Page 15
... continuous paper. Using a push tractor If you often need to tear off printed sheets of continuous paper (for example, if you are installed in the rear push position cannot be removed. 4 Getting to easily tear off sheets of continuous paper at the perforation. This allows you... best to use the printer's tear-off edge to Know Your Printer This section helps you determine which paper paths and tractor positions are two push tractor positions: front and rear. There are best for tractor installation and paper loading instructions. See the table below for details about ...
... continuous paper. Using a push tractor If you often need to tear off printed sheets of continuous paper (for example, if you are installed in the rear push position cannot be removed. 4 Getting to easily tear off sheets of continuous paper at the perforation. This allows you... best to use the printer's tear-off edge to Know Your Printer This section helps you determine which paper paths and tractor positions are two push tractor positions: front and rear. There are best for tractor installation and paper loading instructions. See the table below for details about ...

User Manual
Page 16
...require a straight paper path, load them in the front slot. This reduces the chance of paper jams. rear push To use this type of the printer. However, you load continuous paper with labels in the rear slot, the labels may come off feature with labels, use a tractor in the front ... continuous paper with labels, load the paper in the pull position. Using a pull tractor If you can purchase the optional pull tractor (C80032] ) and install it in the rear slot. the front push tractor cannot feed this tractor, load paper in the pull position. The pull tractor provides the best...
...require a straight paper path, load them in the front slot. This reduces the chance of paper jams. rear push To use this type of the printer. However, you load continuous paper with labels in the rear slot, the labels may come off feature with labels, use a tractor in the front ... continuous paper with labels, load the paper in the pull position. Using a pull tractor If you can purchase the optional pull tractor (C80032] ) and install it in the rear slot. the front push tractor cannot feed this tractor, load paper in the pull position. The pull tractor provides the best...

User Manual
Page 18
...pull combination, see page 2-30. Getting to purchase the optional pull tractor (C80032] ) and install it is especially helpful for printing high quality graphics. Caution: Do not load continuous paper with ... To use the front push tractor with the pull tractor, you need to Know Your Printer 7 This is used in combination with labels onto the rear push/pull tractor, the labels may ...come off their backing sheet inside the printer and cause a paper jam. Combination rear push and pull Description To use two tractors at...
...pull combination, see page 2-30. Getting to purchase the optional pull tractor (C80032] ) and install it is especially helpful for printing high quality graphics. Caution: Do not load continuous paper with ... To use the front push tractor with the pull tractor, you need to Know Your Printer 7 This is used in combination with labels onto the rear push/pull tractor, the labels may ...come off their backing sheet inside the printer and cause a paper jam. Combination rear push and pull Description To use two tractors at...

User Manual
Page 21
... Cartridges Your printer uses the following ribbon cartridge: EPSON black Ribbon cartridge S015086 When printing becomes faint, you can further expand your printer's versatility. To replace a used ribbon cartridge, follow the instructions under "Installing or Replacing the Ribbon Cartridge" on options for your printer, see Appendix A, "Enhancing Your Printer With Options." Options Your printer comes with your EPSON printer.
... Cartridges Your printer uses the following ribbon cartridge: EPSON black Ribbon cartridge S015086 When printing becomes faint, you can further expand your printer's versatility. To replace a used ribbon cartridge, follow the instructions under "Installing or Replacing the Ribbon Cartridge" on options for your printer, see Appendix A, "Enhancing Your Printer With Options." Options Your printer comes with your EPSON printer.

User Manual
Page 23
... that this symbol may be hot. K q Printer parts marked with this printer, the building installation must be hot. Note for this symbol. Let the print head cool for a few minutes before touching it cool for a few minutes before you plan to use the printer in performance. q Unplug the printer and refer servicing to Know Your...
... that this symbol may be hot. K q Printer parts marked with this printer, the building installation must be hot. Note for this symbol. Let the print head cool for a few minutes before touching it cool for a few minutes before you plan to use the printer in performance. q Unplug the printer and refer servicing to Know Your...

User Manual
Page 28
Chapter 1 Setting Up the Printer 1 Unpacking the Printer 1-2 Choosing a Place for the Printer 1-4 Positioning the continuous paper supply 1-5 Installing or Replacing the Ribbon Cartridge 1-6 Attaching the Paper Guide and Paper Separator 1-11 Plugging In the Printer 1-13 Connecting the Printer to Your Computer 1-14 Installing the Printer Driver on Your PC 1-15 For Windows 95 or NT 4.0 1-16 For Windows 3.1 or NT 3.5x 1-19 For DOS programs 1-20 Setting Up the Printer 1-1
Chapter 1 Setting Up the Printer 1 Unpacking the Printer 1-2 Choosing a Place for the Printer 1-4 Positioning the continuous paper supply 1-5 Installing or Replacing the Ribbon Cartridge 1-6 Attaching the Paper Guide and Paper Separator 1-11 Plugging In the Printer 1-13 Connecting the Printer to Your Computer 1-14 Installing the Printer Driver on Your PC 1-15 For Windows 95 or NT 4.0 1-16 For Windows 3.1 or NT 3.5x 1-19 For DOS programs 1-20 Setting Up the Printer 1-1


