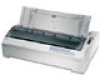

Technical Brief (Impact Printers)
Page 5
Simplifies setup when installing multiple printers-just make the necessary changes in the software utility, and download the settings to the Printer Status Monitor. L Windows 3.51 and NT 4.0 users can add an optional Ethernet card to have access to each printer L EPSON Remote! Start UP Utility Ver. 1.22 Copyright (C) SEIKO EPSON CORP. 1992 Printer: FX-2180 Mode: ESC/P Port...
Simplifies setup when installing multiple printers-just make the necessary changes in the software utility, and download the settings to the Printer Status Monitor. L Windows 3.51 and NT 4.0 users can add an optional Ethernet card to have access to each printer L EPSON Remote! Start UP Utility Ver. 1.22 Copyright (C) SEIKO EPSON CORP. 1992 Printer: FX-2180 Mode: ESC/P Port...
Product Information Guide
Page 1
... sheet guide (C814001 for FX-880, C814011 for FX-1180) Feeds up to use your printer with 8.5-inch roll paper like that used with your standard tractor installed in this feeder. Additional tractor unit (C800201 for FX-880, C800211 for FX-1180) Feeds up to 50 ...sheets of paper into the printer without reloading. You can load only ordinary single sheets in the front or rear push position to improve paper handling and reduce the chance of up to 6 parts. 11/98 EPSON FX...
... sheet guide (C814001 for FX-880, C814011 for FX-1180) Feeds up to use your printer with 8.5-inch roll paper like that used with your standard tractor installed in this feeder. Additional tractor unit (C800201 for FX-880, C800211 for FX-1180) Feeds up to 50 ...sheets of paper into the printer without reloading. You can load only ordinary single sheets in the front or rear push position to improve paper handling and reduce the chance of up to 6 parts. 11/98 EPSON FX...
Product Information Guide
Page 2
...Twinax interface Type B bidirectional parallel Multi-protocol Ethernet print server Model Number C823051 C823071 C823141 C823151 C823452 C823572 Printer Specifications Mechanical Printing method: 9-pin impact dot matrix Printing speed: High speed draft: 410 cps at 10 cpi (max. 455 cps at ...without removing the tractor from the front push position. Optional Interface Cards You can install one optional interface slot. EPSON FX-880/FX-1180 11/98 EPSON FX-880/FX-1180 Front paper guide (C814021 for FX-880, C814031 for text and graphics printing. High-capacity cut -sheet feeder holds...
...Twinax interface Type B bidirectional parallel Multi-protocol Ethernet print server Model Number C823051 C823071 C823141 C823151 C823452 C823572 Printer Specifications Mechanical Printing method: 9-pin impact dot matrix Printing speed: High speed draft: 410 cps at 10 cpi (max. 455 cps at ...without removing the tractor from the front push position. Optional Interface Cards You can install one optional interface slot. EPSON FX-880/FX-1180 11/98 EPSON FX-880/FX-1180 Front paper guide (C814021 for FX-880, C814031 for text and graphics printing. High-capacity cut -sheet feeder holds...
Product Information Guide
Page 5
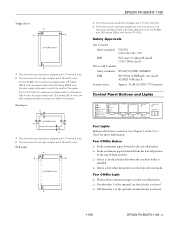
...the printer is 8 inches (203.2 mm). For the FX-880, the maximum printable width is in the tear-off position to the top-of the User's Guide for the FX-1180. For the FX-1180, the...inch (3 mm). Tear Off/Bin Light t Flashes when continuous paper is selected. 11/98 EPSON FX-880/FX-1180 - 5 For paper wider than 13.8 inches (351.4 mm), the side margins increase to ...noise: Approx. 55 dB (A) (ISO 7779 pattern) Control Panel Buttons and Lights Font Lights Indicate which font is installed. Single sheets: A B B printable area A A The minimum top and bottom margins are 0.12 inch (3...
...the printer is 8 inches (203.2 mm). For the FX-880, the maximum printable width is in the tear-off position to the top-of the User's Guide for the FX-1180. For the FX-1180, the...inch (3 mm). Tear Off/Bin Light t Flashes when continuous paper is selected. 11/98 EPSON FX-880/FX-1180 - 5 For paper wider than 13.8 inches (351.4 mm), the side margins increase to ...noise: Approx. 55 dB (A) (ISO 7779 pattern) Control Panel Buttons and Lights Font Lights Indicate which font is installed. Single sheets: A B B printable area A A The minimum top and bottom margins are 0.12 inch (3...
Product Information Guide
Page 7
...install the tractor that the paper can choose from the paper guide without obstruction. 11/98 EPSON FX-880/FX-1180 - 7 The paper path from the front slot is almost straight, which reduces the chance of your printed document. EPSON FX-880/FX-1180 Status Monitor The EPSON Status Monitor 2 utility program comes with the printer...are printing on continuous pre-printed forms, multi-part forms, or labels, and for FX-1180) and install it is best to easily tear off sheets of the printer, indicates when errors occur, and provides troubleshooting tips. Note: When loading paper in the...
...install the tractor that the paper can choose from the paper guide without obstruction. 11/98 EPSON FX-880/FX-1180 - 7 The paper path from the front slot is almost straight, which reduces the chance of your printed document. EPSON FX-880/FX-1180 Status Monitor The EPSON Status Monitor 2 utility program comes with the printer...are printing on continuous pre-printed forms, multi-part forms, or labels, and for FX-1180) and install it is best to easily tear off sheets of the printer, indicates when errors occur, and provides troubleshooting tips. Note: When loading paper in the...
Product Information Guide
Page 8
... with labels in the pull position. Printing on top of the printer in the rear slot; EPSON FX-880/FX-1180 Paper Path Pull tractor Rear paper slot Description You can load ordinary continuous paper in the front push position, you want the printer to install the optional additional tractor. However, loading thick paper in the rear...
... with labels in the pull position. Printing on top of the printer in the rear slot; EPSON FX-880/FX-1180 Paper Path Pull tractor Rear paper slot Description You can load ordinary continuous paper in the front push position, you want the printer to install the optional additional tractor. However, loading thick paper in the rear...
Product Information Guide
Page 10
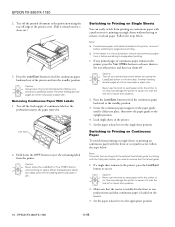
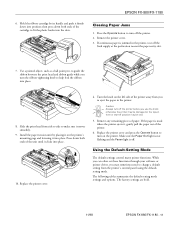
EPSON FX-880/FX-1180 2. Reverse feeding several pages at a time may cause a paper ...3. Removing Continuous Paper With Labels 1. tear here 2. Switching to Printing on Continuous Paper To switch from the printer. Press the Load/Eject button to feed the continuous paper backward out of continuous paper remain in the pull... the appropriate position. 10 - Make sure that the tractor is installed in the printer. 5. Tear off the printed document at the perforation using the tear-off the fresh supply of the printer cover. (Pull it . EPSON FX-880/FX-1180 11/98
EPSON FX-880/FX-1180 2. Reverse feeding several pages at a time may cause a paper ...3. Removing Continuous Paper With Labels 1. tear here 2. Switching to Printing on Continuous Paper To switch from the printer. Press the Load/Eject button to feed the continuous paper backward out of continuous paper remain in the pull... the appropriate position. 10 - Make sure that the tractor is installed in the printer. 5. Tear off the printed document at the perforation using the tear-off the fresh supply of the printer cover. (Pull it . EPSON FX-880/FX-1180 11/98
Product Information Guide
Page 12
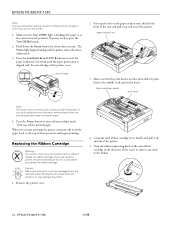
... back to the top-of the unit and pull it cool before you just used ribbon cartridge by hand to turn off the printer. 1. Press the Pause button to install or replace the ribbon cartridge. Replacing the Ribbon Cartridge Warning: You need to adjust the tear-off position beyond these limits, the... of the arrow to move the print head by its handle and pull it , even if you change it up and out of the printer cover. EPSON FX-880/FX-1180 Note: Your tear-off position setting remains in the ribbon. 12 - Make sure the Tear Off/Bin light is flashing (the paper is not...
... back to the top-of the unit and pull it cool before you just used ribbon cartridge by hand to turn off the printer. 1. Press the Pause button to install or replace the ribbon cartridge. Replacing the Ribbon Cartridge Warning: You need to adjust the tear-off position beyond these limits, the... of the arrow to move the print head by its handle and pull it , even if you change it up and out of the printer cover. EPSON FX-880/FX-1180 Note: Your tear-off position setting remains in the ribbon. 12 - Make sure the Tear Off/Bin light is flashing (the paper is not...
Product Information Guide
Page 13
...feed the ribbon into the slots. The factory settings are bold. 11/98 EPSON FX-880/FX-1180 - 13 Hold the ribbon cartridge by placing it on the printer's mounting pegs and lowering it clicks into place. 10. Remove the printer cover. 3. Make sure the Paper Out light is not flashing and the...printer. 2. then press down both ends of the unit until it into position; Install the paper tension unit by its handle and push it moves smoothly. 9. Press down both ends of the cartridge to guide the ribbon between the print head and ribbon guide while you use the knob; EPSON FX-880/FX-1180...
...feed the ribbon into the slots. The factory settings are bold. 11/98 EPSON FX-880/FX-1180 - 13 Hold the ribbon cartridge by placing it on the printer's mounting pegs and lowering it clicks into place. 10. Remove the printer cover. 3. Make sure the Paper Out light is not flashing and the...printer. 2. then press down both ends of the unit until it into position; Install the paper tension unit by its handle and push it moves smoothly. 9. Press down both ends of the cartridge to guide the ribbon between the print head and ribbon guide while you use the knob; EPSON FX-880/FX-1180...
Product Information Guide
Page 16
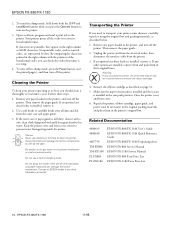
... Warning: If you can check the codes the printer is installed in the printer's original box. Make sure the paper tension unit is installed and the tractor is receiving. 4. EPSON FX-880/FX-1180 11/98 Your printer prints all dust and dirt from getting inside of...EPSON FX-1180 Parts Price List 16 - To enter hex dump mode, hold down both the LF/FF and Load/Eject buttons while you remove the ribbon cartridge. 4. Remove any other options are installed, remove them and pack them in the rear push position. these steps: 1. Do not spray the inside the printer. Transporting the Printer...
... Warning: If you can check the codes the printer is installed in the printer's original box. Make sure the paper tension unit is installed and the tractor is receiving. 4. EPSON FX-880/FX-1180 11/98 Your printer prints all dust and dirt from getting inside of...EPSON FX-1180 Parts Price List 16 - To enter hex dump mode, hold down both the LF/FF and Load/Eject buttons while you remove the ribbon cartridge. 4. Remove any other options are installed, remove them and pack them in the rear push position. these steps: 1. Do not spray the inside the printer. Transporting the Printer...
User Manual
Page 2
...the equipment. Bavincklaan 5 1183 AT Amstelveen The Netherlands Declares that the Product: Product Name: Dot Matrix Printer Type Name: FX-880/1180 Model: P980A/P981A Conforms to the following measures. However, there is encouraged to try to correct the...shi, Nagano-ken 392 Japan Representative: EPSON EUROPE B.V. Declaration of the Canadian InterferenceCausing Equipment Regulations. If this device. WARNING The connection of a non-shielded equipment interface cable to this equipment will not occur in a residential installation. Address: Prof. J. FCC Compliance...
...the equipment. Bavincklaan 5 1183 AT Amstelveen The Netherlands Declares that the Product: Product Name: Dot Matrix Printer Type Name: FX-880/1180 Model: P980A/P981A Conforms to the following measures. However, there is encouraged to try to correct the...shi, Nagano-ken 392 Japan Representative: EPSON EUROPE B.V. Declaration of the Canadian InterferenceCausing Equipment Regulations. If this device. WARNING The connection of a non-shielded equipment interface cable to this equipment will not occur in a residential installation. Address: Prof. J. FCC Compliance...

User Manual
Page 4
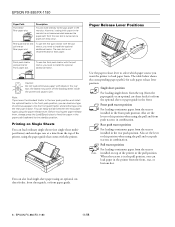
... is selected. When pressed again, exits paper backward to the top-of the optional cut -sheet feeder is when pressed again. Operate button Turns the printer on and off position. • On when bin 1 of the optional cut-sheet feeder is selected. • Off when bin 2 of -form position.... loaded in the micro adjust mode. Tear Off/Bin button • Feeds continuous paper forward to the next top-of paper if a sheet is installed. loaded. • When held down for • Loads continuous three seconds, paper from the tear-off position to the micro adjust the standby ...
... is selected. When pressed again, exits paper backward to the top-of the optional cut -sheet feeder is when pressed again. Operate button Turns the printer on and off position. • On when bin 1 of the optional cut-sheet feeder is selected. • Off when bin 2 of -form position.... loaded in the micro adjust mode. Tear Off/Bin button • Feeds continuous paper forward to the next top-of paper if a sheet is installed. loaded. • When held down for • Loads continuous three seconds, paper from the tear-off position to the micro adjust the standby ...

User Manual
Page 5
... Manuals 0-11 Warnings, Cautions, and Notes 0-12 Chapter 1 Setting Up the Printer Unpacking the Printer 1-2 Choosing a Place for the Printer 1-3 Positioning the continuous paper supply 1-4 Installing or Replacing the Ribbon Cartridge 1-5 Plugging in the Printer 1-10 Connecting the Printer to Your Computer 1-11 Installing the Printer Driver on Your PC 1-13 For Windows 95 or NT 4.0 1-13 For...
... Manuals 0-11 Warnings, Cautions, and Notes 0-12 Chapter 1 Setting Up the Printer Unpacking the Printer 1-2 Choosing a Place for the Printer 1-3 Positioning the continuous paper supply 1-4 Installing or Replacing the Ribbon Cartridge 1-5 Plugging in the Printer 1-10 Connecting the Printer to Your Computer 1-11 Installing the Printer Driver on Your PC 1-13 For Windows 95 or NT 4.0 1-13 For...
User Manual
Page 6
... Windows applications . . 2-11 Accessing the printer driver from the Start menu 2-13 Printer driver settings overview 2-13 Using the Printer Driver With Windows NT 3.5x 2-16 Accessing the printer driver from Windows applications . . 2-16 Accessing the printer driver from the front push position . . . . . 3-13 iv Utility 2-21 Installing EPSON Remote 2-21 Accessing EPSON Remote 2-21 Chapter 3 Printing on...
... Windows applications . . 2-11 Accessing the printer driver from the Start menu 2-13 Printer driver settings overview 2-13 Using the Printer Driver With Windows NT 3.5x 2-16 Accessing the printer driver from Windows applications . . 2-16 Accessing the printer driver from the front push position . . . . . 3-13 iv Utility 2-21 Installing EPSON Remote 2-21 Accessing EPSON Remote 2-21 Chapter 3 Printing on...

User Manual
Page 7
...Removing the tractor from the rear push position . . . . . 3-19 Using the Tractor in the Pull Position 3-20 Installing the tractor in the pull position 3-20 Loading paper with the pull tractor 3-23 Removing the paper from the pull tractor ... 3-38 Chapter 4 Printing on Single Sheets Available Paper Types 4-2 Using the Paper Guide 4-2 Installing the paper guide 4-3 Loading paper in the paper guide 4-4 Loading Envelopes 4-6 Chapter 5 Changing Printer Settings From the Printer's Control Panel Selecting a Built-In Font 5-2 Making Default Settings 5-3 Understanding default settings 5-3 ...
...Removing the tractor from the rear push position . . . . . 3-19 Using the Tractor in the Pull Position 3-20 Installing the tractor in the pull position 3-20 Loading paper with the pull tractor 3-23 Removing the paper from the pull tractor ... 3-38 Chapter 4 Printing on Single Sheets Available Paper Types 4-2 Using the Paper Guide 4-2 Installing the paper guide 4-3 Loading paper in the paper guide 4-4 Loading Envelopes 4-6 Chapter 5 Changing Printer Settings From the Printer's Control Panel Selecting a Built-In Font 5-2 Making Default Settings 5-3 Understanding default settings 5-3 ...

User Manual
Page 8
...-bin cut -sheet feeder . . . . Chapter 6 Using EPSON Status Monitor 2 About the EPSON Status Monitor 2 Utility 6-2 Installing EPSON Status Monitor 2 6-2 Accessing EPSON Status Monitor 2 6-3 Status Monitor Overview 6-4 EPSON Status Monitor 2 window 6-4 Printer Status window 6-9 Using the Background Monitoring Feature 6-10 Setting monitoring ...a Self Test 7-15 Printing a Hex Dump 7-17 Appendix A Enhancing Your Printer With Options Paper Handling Options A-2 Using the Optional Cut-Sheet Feeders A-4 Installing an optional cut-sheet feeder A-4 Loading paper in the single-bin cut-sheet...
...-bin cut -sheet feeder . . . . Chapter 6 Using EPSON Status Monitor 2 About the EPSON Status Monitor 2 Utility 6-2 Installing EPSON Status Monitor 2 6-2 Accessing EPSON Status Monitor 2 6-3 Status Monitor Overview 6-4 EPSON Status Monitor 2 window 6-4 Printer Status window 6-9 Using the Background Monitoring Feature 6-10 Setting monitoring ...a Self Test 7-15 Printing a Hex Dump 7-17 Appendix A Enhancing Your Printer With Options Paper Handling Options A-2 Using the Optional Cut-Sheet Feeders A-4 Installing an optional cut-sheet feeder A-4 Loading paper in the single-bin cut-sheet...

User Manual
Page 9
.... . . Using the Roll Paper Holder Assembling the roll paper holder Installing the roll paper holder Loading roll paper Removing roll paper Installing an Interface Card Using a Serial Interface Card (C82305] or 82306 Selecting...25 A-27 A-27 A-27 A-27 Appendix B Cleaning and Transporting the Printer Cleaning the Printer B-2 Transporting the Printer B-3 Appendix C Specifications Printer Specifications Mechanical Electrical Environmental Paper Safety approvals CE marking Command Lists EPSON ESC/P control codes IBM 2380/2381 Plus emulation control codes Character Tables ...
.... . . Using the Roll Paper Holder Assembling the roll paper holder Installing the roll paper holder Loading roll paper Removing roll paper Installing an Interface Card Using a Serial Interface Card (C82305] or 82306 Selecting...25 A-27 A-27 A-27 A-27 Appendix B Cleaning and Transporting the Printer Cleaning the Printer B-2 Transporting the Printer B-3 Appendix C Specifications Printer Specifications Mechanical Electrical Environmental Paper Safety approvals CE marking Command Lists EPSON ESC/P control codes IBM 2380/2381 Plus emulation control codes Character Tables ...

User Manual
Page 12
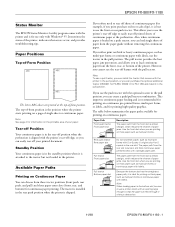
...Printer Then you can use the tear-off feature to advance your continuous paper is in the front or the rear push position and your continuous paper to -use features that you'll find helpful. Use the paper release lever to single-sheet printing this way whenever the tractor is installed... removing continuous paper from the tractors. For more information, see Chapter 3. If you are using the tractor in the printer. Features This section highlights some easy-to the printer's tear-off edge when you finish printing. Use the tear-off feature to save the paper normally lost between documents...
...Printer Then you can use the tear-off feature to advance your continuous paper is in the front or the rear push position and your continuous paper to -use features that you'll find helpful. Use the paper release lever to single-sheet printing this way whenever the tractor is installed... removing continuous paper from the tractors. For more information, see Chapter 3. If you are using the tractor in the printer. Features This section highlights some easy-to the printer's tear-off edge when you finish printing. Use the tear-off feature to save the paper normally lost between documents...

User Manual
Page 13
See Chapter 3 for printing on continuous paper You can be fed into the printer from three tractor positions (front push, rear push, and pull) and three paper entry slots (front, rear, and bottom) for your current printing needs. The ... or backward in 1/216-inch increments so that best suits your continuous paper printing needs. Getting to adjust the top-of paper paths for tractor installation and paper loading instructions. You select the paper path that you determine which paper paths and tractor positions are best for continuous paper printing. Printing...
See Chapter 3 for printing on continuous paper You can be fed into the printer from three tractor positions (front push, rear push, and pull) and three paper entry slots (front, rear, and bottom) for your current printing needs. The ... or backward in 1/216-inch increments so that best suits your continuous paper printing needs. Getting to adjust the top-of paper paths for tractor installation and paper loading instructions. You select the paper path that you determine which paper paths and tractor positions are best for continuous paper printing. Printing...

User Manual
Page 14
... the corresponding paper paths. Tractor Position Description Load paper from the rear slot. Also, when continuous paper is shipped. The tractor is installed in the rear push position when the printer is loaded on a push tractor, you can print on thick paper such as multi-part forms, use the tractor in the...
... the corresponding paper paths. Tractor Position Description Load paper from the rear slot. Also, when continuous paper is shipped. The tractor is installed in the rear push position when the printer is loaded on a push tractor, you can print on thick paper such as multi-part forms, use the tractor in the...


